Cocos2d-x引擎学习笔记(一)—— cpp-empty-test程序流程
cpp-empty-test程序流程
cocos2d-x版本:3.17.2
运行环境:Visual Studio 2017
解决方案配置:Debug Win32
1.程序入口 main.cpp
#include "main.h"
#include "../Classes/AppDelegate.h"

USING_NS_CC;

int WINAPI _tWinMain(HINSTANCE hInstance,
                       HINSTANCE hPrevInstance,
                       LPTSTR    lpCmdLine,
                       int       nCmdShow)
{
    UNREFERENCED_PARAMETER(hPrevInstance);
    UNREFERENCED_PARAMETER(lpCmdLine);

    // 创建一个应用程序的实例
    AppDelegate app;
    // 单例模式,运行
    return Application::getInstance()->run();
}
main函数只做了两个操作,一是创建应用程序实例,二是执行该实例。而其细节都被封装到了AppDelegate中,而这个类是基于cocos2d::Application类的派生类。
class  AppDelegate : private cocos2d::Application
{
	···
}
2. Application类
上面说到程序实例的运行都被封装到了AppDelegate类里面,故这里先来分析一下它的基类Application,由于我使用的是win32平台运行,故这里的Application头文件为CCApplication-win32.h.
class CC_DLL Application : public ApplicationProtocol
{
public:
    Application();
    virtual ~Application();

    // 运行消息循环
    int run();

    // 获取实例,单例模式
    static Application* getInstance();

    // 旧版本的用法,现在用getInstance代替
    CC_DEPRECATED_ATTRIBUTE static Application* sharedApplication();

    // 设置动画时间间隔,重载函数
    virtual void setAnimationInterval(float interval) override;

	// 获取当前的语言类型
    virtual LanguageType getCurrentLanguage();

	// 获取当前语言类型的代码
    virtual const char * getCurrentLanguageCode();

    // 获取目标的平台
    virtual Platform getTargetPlatform();

    // 获取应用的版本
    virtual std::string getVersion() override;

    // 在默认浏览器中打开网址
    virtual bool openURL(const std::string &url);

    // 旧api,设置资源的根目录。现使用FileUtils::getInstance()->setSearchPaths()代替
    CC_DEPRECATED_ATTRIBUTE void setResourceRootPath(const std::string& rootResDir);

    // 旧api,获取资源的根目录。现使用FileUtils::getInstance()->getSearchPaths()代替
    CC_DEPRECATED_ATTRIBUTE const std::string& getResourceRootPath(void);

    void setStartupScriptFilename(const std::string& startupScriptFile);

    const std::string& getStartupScriptFilename(void)
    {
        return _startupScriptFilename;
    }

protected:
    HINSTANCE           _instance;
    HACCEL              _accelTable;
    LARGE_INTEGER       _animationInterval;
    std::string         _resourceRootPath;
    std::string         _startupScriptFilename;
	// 用于单例模式
    static Application * sm_pSharedApplication;
};
sm_pSharedApplication它是一个静态变量,保存的是Application* ,用于单例,即每次只会存在一个应用,且保存在sm_pSharedApplication。以后可以使用Application的静态方法来获得sm_pSharedApplication。
这里最为关键的就是这个run()函数,其实现如下
// 程序运行
int Application::run()
{
    PVRFrameEnableControlWindow(false);

    UINT TARGET_RESOLUTION = 1; // 1 millisecond target resolution
    TIMECAPS tc;
    UINT wTimerRes = 0;
    if (TIMERR_NOERROR == timeGetDevCaps(&tc, sizeof(TIMECAPS)))
    {
        wTimerRes = std::min(std::max(tc.wPeriodMin, TARGET_RESOLUTION), tc.wPeriodMax);
        timeBeginPeriod(wTimerRes);
    }

    // Main message loop: 主消息循环
    LARGE_INTEGER nLast;
    LARGE_INTEGER nNow;

	// 获取当前的计数值,即频率x当前时间
    QueryPerformanceCounter(&nLast);

    initGLContextAttrs();

    // Initialize instance and cocos2d.
    if (!applicationDidFinishLaunching())
    {
        return 1;
    }

    auto director = Director::getInstance();
    auto glview = director->getOpenGLView();

    // retain glview 避免在主循环被释放掉
    glview->retain();

    LONGLONG interval = 0LL;
    LONG waitMS = 0L;
	// WINDOWS高精度定时器的用法,先获取频率
    LARGE_INTEGER freq;
    QueryPerformanceFrequency(&freq);

    while(!glview->windowShouldClose())
    {
		// 取得当前的计数值,即频率x当前时间
        QueryPerformanceCounter(&nNow);
        interval = nNow.QuadPart - nLast.QuadPart;
        if (interval >= _animationInterval.QuadPart)
        {
			// 如果时间流逝达到了设定的FPS时间差,则更新计数值。
            nLast.QuadPart = nNow.QuadPart;
			// 这里是设备渲染场景的函数
            director->mainLoop();
            glview->pollEvents();
        }
        else
        {
            waitMS = (_animationInterval.QuadPart - interval) * 1000LL / freq.QuadPart - 1L;
            if (waitMS > 1L)
                Sleep(waitMS);
        }
    }
	// 如果窗口是手动关闭,那么Director还需要执行清理
    if (glview->isOpenGLReady())
    {
        director->end();
        director->mainLoop();
        director = nullptr;
    }
    glview->release();
    if (wTimerRes != 0)
    {
        timeEndPeriod(wTimerRes);
    }
    return 0;
}
这部分可以看成三个主要的步骤,初始化,主循环,退出主循环。
这里主要看主循环部分。
while(!glview->windowShouldClose())
{
    // 取得当前的计数值,即频率x当前时间
    QueryPerformanceCounter(&nNow);
    interval = nNow.QuadPart - nLast.QuadPart;
    if (interval >= _animationInterval.QuadPart)
    {
        // 如果时间流逝达到了设定的FPS时间差,则更新计数值。
        nLast.QuadPart = nNow.QuadPart;
        // 这里是消息循环与设备渲染场景的函数
        director->mainLoop();
        glview->pollEvents();
    }
    else
    {
        waitMS = (_animationInterval.QuadPart - interval) * 1000LL / freq.QuadPart - 1L;
        if (waitMS > 1L)
            Sleep(waitMS);
    }
}
其中,执行消息循环的是director导演类中的mainLoop,而glview代表OpenGL显示窗口,它封装了使用OpengGL做为显示底层API的一个基本的WINDOWS窗体的创建与控制,控制包括对于键盘鼠标等操作的响应。
3. Director导演类
上面看到Application执行消息循环与绘制场景的实际上是调用director的mainLoop()来执行。
void Director::mainLoop()
{
    // 清除导演
    if (_purgeDirectorInNextLoop)
    {
        _purgeDirectorInNextLoop = false;
        purgeDirector();
    }
    // 重新开始导演
    else if (_restartDirectorInNextLoop)
    {
        _restartDirectorInNextLoop = false;
        restartDirector();
    }
    // 正常情况
    else if (! _invalid)
    {
        drawScene();

        // release the objects 释放其管理的内存
        PoolManager::getInstance()->getCurrentPool()->clear();
    }
}
mainLoop函数主要分清除、重新开始、正常三种情况,而正常情况中调用了drawScene()来进行绘制,然后再释放当前的内存。
// Draw the Scene
void Director::drawScene()
{
    // 计算帧之间的时间间隔,下面根据这个时间间隔来判断是否应该进行操作
    calculateDeltaTime();
    if (_openGLView)
    {
        _openGLView->pollEvents();
    }

    // Director没有暂停的情况下,更新定时器,分发update后的消息
    if (! _paused)
    {
        _eventDispatcher->dispatchEvent(_eventBeforeUpdate);
        _scheduler->update(_deltaTime);
        _eventDispatcher->dispatchEvent(_eventAfterUpdate);
    }
	// 清除缓存区
    _renderer->clear();
    experimental::FrameBuffer::clearAllFBOs();

    _eventDispatcher->dispatchEvent(_eventBeforeDraw);

    // 清除完缓存区后,设置下个场景
    if (_nextScene)
    {
        setNextScene();
    }

    pushMatrix(MATRIX_STACK_TYPE::MATRIX_STACK_MODELVIEW);

    // 如果需要切换场景,就设置下一个要渲染的场景
    if (_runningScene)
    {
#if (CC_USE_PHYSICS || (CC_USE_3D_PHYSICS && CC_ENABLE_BULLET_INTEGRATION) || CC_USE_NAVMESH)
        _runningScene->stepPhysicsAndNavigation(_deltaTime);
#endif
        // clear draw stats
        _renderer->clearDrawStats();

        // render the scene 渲染场景
        if(_openGLView)
            _openGLView->renderScene(_runningScene, _renderer);
        // 分发渲染后的消息
        _eventDispatcher->dispatchEvent(_eventAfterVisit);
    }

    // 渲染notifications结点
    if (_notificationNode)
    {
        _notificationNode->visit(_renderer, Mat4::IDENTITY, 0);
    }

    updateFrameRate();
    // 渲染FPS等帧频显示
    if (_displayStats)
    {
#if !CC_STRIP_FPS
        showStats();
#endif
    }

    // 渲染
    _renderer->render();
	// 事件分发
    _eventDispatcher->dispatchEvent(_eventAfterDraw);

    popMatrix(MATRIX_STACK_TYPE::MATRIX_STACK_MODELVIEW);

    _totalFrames++;

    // 调用opengl的api,交换buffers中的内容
    if (_openGLView)
    {
        _openGLView->swapBuffers();
    }

    if (_displayStats)
    {
#if !CC_STRIP_FPS
        calculateMPF();
#endif
    }
}
这是整个cocos引擎的渲染控制函数,管理了场景切换,事件分发,渲染等。而实际渲染的工作继续交给了reander来进行渲染,这也很符合Director的设计,导演不需要去真正干某件事,但是知道这件事情分发给谁来做。后面再进行渲染_renderer->render()与事件分发_eventDispatcher->dispatchEvent()的分析,下面回到我们的AppDelegate中。
4. AppDelegate类
上面已经知道主函数是通过new一个AppDelegate做为程序对象,它在启动的时候就调用了applicationDidFinishLaunching()函数,它负责的工作包括设置一些openGL的数据、资源路径,及加载demo主类。
class  AppDelegate : private cocos2d::Application
{
public:
    AppDelegate();
    virtual ~AppDelegate();

    virtual void initGLContextAttrs();

	// 重载应用程序启动后调用的处理函数
    virtual bool applicationDidFinishLaunching();

	// 重载应用程序转入后台时调用的函数
    virtual void applicationDidEnterBackground();

	// 重载应用程序恢复前台时调用的函数
    virtual void applicationWillEnterForeground();
};
bool AppDelegate::applicationDidFinishLaunching()
{
    // Initialize director
    auto director = Director::getInstance();
    auto glview = director->getOpenGLView();

    if(!glview) {
        // 调用glview创建标题为"Cpp Empty Test"的windows窗口
        glview = GLViewImpl::create("Cpp Empty Test");
        director->setOpenGLView(glview);
    }

    // 设置图标icon
    #if (CC_TARGET_PLATFORM == CC_PLATFORM_LINUX)
    std::vector<std::string> icons;
    FileUtils::getInstance()->listFilesRecursively("icons", &icons);
    #else
    std::string icons = "icons/[email protected]";
    #endif /* (CC_TARGET_PLATFORM == CC_PLATFORM_LINUX) */
    glview->setIcon(icons);

    director->setOpenGLView(glview);

    // 设置分辨率
    glview->setDesignResolutionSize(designResolutionSize.width, designResolutionSize.height, ResolutionPolicy::NO_BORDER);

    Size frameSize = glview->getFrameSize();

    vector<string> searchPath;

    if (frameSize.height > mediumResource.size.height)
    {
        searchPath.push_back(largeResource.directory);

        director->setContentScaleFactor(MIN(largeResource.size.height/designResolutionSize.height, largeResource.size.width/designResolutionSize.width));
    }
    // If the frame's height is larger than the height of small resource size, select medium resource.
    else if (frameSize.height > smallResource.size.height)
    {
        searchPath.push_back(mediumResource.directory);

        director->setContentScaleFactor(MIN(mediumResource.size.height/designResolutionSize.height, mediumResource.size.width/designResolutionSize.width));
    }
    // If the frame's height is smaller than the height of medium resource size, select small resource.
    else
    {
        searchPath.push_back(smallResource.directory);

        director->setContentScaleFactor(MIN(smallResource.size.height/designResolutionSize.height, smallResource.size.width/designResolutionSize.width));
    }

    // 设置搜索路径
    FileUtils::getInstance()->setSearchPaths(searchPath);

    // 打开显示FPS的开关
    director->setDisplayStats(true);

    // 设置FPS
    director->setAnimationInterval(1.0f / 60);

    // Create a scene. it's an autorelease object
	// 创建HelloWorld场景
    auto scene = HelloWorld::scene();

    // 运行
    director->runWithScene(scene);

    return true;
}
这里就真正到我们绘制场景与运行的函数,该场景HelloWorld::scene()就是我们显示界面的元素。然后将该场景交给director来运行。
5. HelloWorld场景类
class HelloWorld : public cocos2d::Scene
{
public:
    virtual bool init() override;

    static cocos2d::Scene* scene();

    // a selector callback
    void menuCloseCallback(Ref* sender);

    // implement the "static create()" method manually
    CREATE_FUNC(HelloWorld);
};
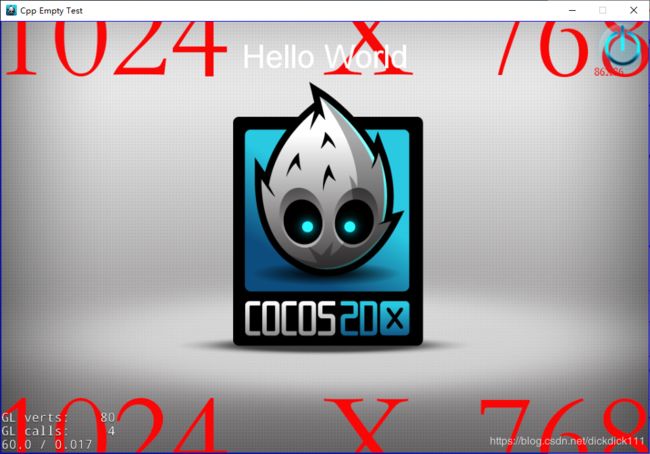
这里的场景很简单,无非就是几个简单的cocos组件元素,加上一个按键的回调函数,用于关闭窗口。
场景截图:
场景初始化函数,里面都是使用cocos引擎帮我们封装好的api即可,包括初始化元素,设置位置,设置回调函数等等。
bool HelloWorld::init()
{
    //////////////////////////////
    // 1. super init first
    if ( !Scene::init() )
    {
        return false;
    }
	float ratio = 0.5;
	//ratio = ispc::clampf_ispc(ratio, 0.0f, 1.0f);

    auto visibleSize = Director::getInstance()->getVisibleSize();
    auto origin = Director::getInstance()->getVisibleOrigin();

    // 创建右上方的关闭按钮
    auto closeItem = MenuItemImage::create(
                                        "CloseNormal.png",
                                        "CloseSelected.png",
                                     CC_CALLBACK_1(HelloWorld::menuCloseCallback,this));
									 closeItem->setPosition
    (origin + Vec2(visibleSize) - Vec2(closeItem->getContentSize() / 2));

    // 创建菜单
    auto menu = Menu::create(closeItem, nullptr);
    menu->setPosition(Vec2::ZERO);
    this->addChild(menu, 1);

    // 创建“Hello World”的label

    auto label = Label::createWithTTF("Hello World", "fonts/arial.ttf", TITLE_FONT_SIZE);

    // 设置label的位置为居中
    label->setPosition(origin.x + visibleSize.width/2,
                            origin.y + visibleSize.height
                       		- label->getContentSize().height);

    // add the label as a child to this layer
    this->addChild(label, 1);

    // 添加背景图
    auto sprite = Sprite::create("HelloWorld.png");

    // 设置位置
    sprite->setPosition(Vec2(visibleSize / 2) + origin);

    // add the sprite as a child to this layer
    this->addChild(sprite);

    auto drawNode = DrawNode::create();
    drawNode->setPosition(Vec2(0, 0));
    addChild(drawNode);

    Rect safeArea = Director::getInstance()->getSafeAreaRect();
    drawNode->drawRect(safeArea.origin, safeArea.origin + safeArea.size, Color4F::BLUE);

    return true;
}
到此,我们的第一个HelloWorld程序的分析就结束了,我们通过从Main函数出发,一步步找到cocos绘制运行的流程,大致理清楚了每个类的作用,后面再对cocos渲染与绘制流程进行深入的分析,如Render类;还要对cocos消息事件分发的流程进行分析,如eventDispatcher等。
