IOS开发-基础篇-One
UI基础-第一天
人生就像卫生纸,没事的时候尽量少扯;时间就像卫生纸,看着挺多,用着挺少…
学前需知
学习内容
- UI
基础控件:UIButton、UIImageView、UILabel、UIView等
高级控件:UITableView、UICollectionView
屏幕适配:Autoresizing、Autolayout、Sizeclass、Massonry
多控制器管理:UINavigationController、UITabBarContraller、滴定仪控制器管理
Quart2D、核心动画、事件处理、手势、UIDynamic
目标和发展规划
- 薪资待遇
– 1年以内大于10k
– 可以挑战20k
– 必须学业有成 - 技术目标
–强化变成思想(封装抽取、思考视角、框架设计)
–提高解决问题的能力、自学能力 - 未来发展
– 海阔凭鱼跃,天高任鸟飞
学习期间的要求
1.别玩手机,以防错过精彩、关键瞬间
2.注意休息,尤其是晚上
3.不要边听课程边敲代码
4.尽量不要看视频,尽量只参考课堂代码、笔记
5.整理一份属于自己的笔记
》新手:完全对着课堂代码(跟抄书一样)或者边看视频边敲
》熟手:浏览一边课堂代码,边回想边敲遇到不会的去看课堂代码
》高手:不用看课堂代码,回想上课的编程思路,直接开搞
(等级不断提高)
作息
尽量早点睡,第二天上课才有精神,最晚不要超过2点
珍爱时间,远离游戏
IOS开发须知
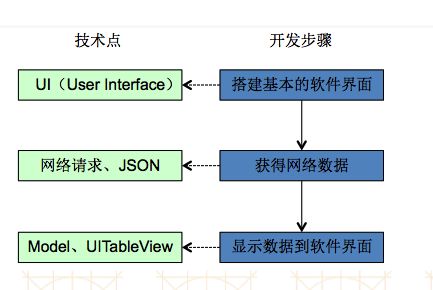
开发流程!
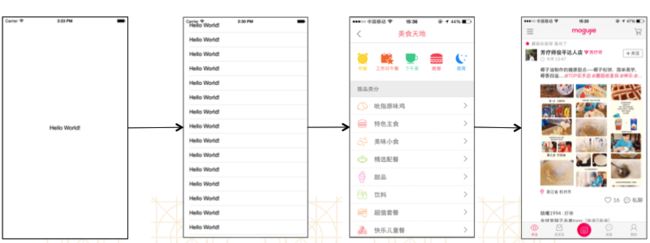
UI界面的组成-对象
- 总结
- UI界面上的每一个元素都是对象
- 万物皆对象
框架
使用框架的目的就是让开发更简单
开发水平
第一个IOS程序
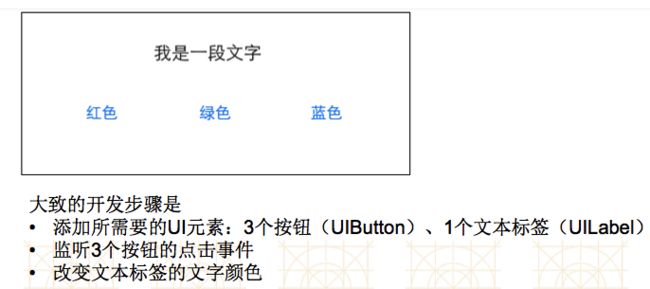
切换文字颜色
IBAction和IBOutlet
- IBAction
- 从返回值角度上看,作用相当于void
- 只有返回值生命为IBAction的方法,才能跟storyboard中的空间进行连线
- IBOutlet
- 只有声明为IBOutlet的属性,才能跟storyboard中的控件进行连线
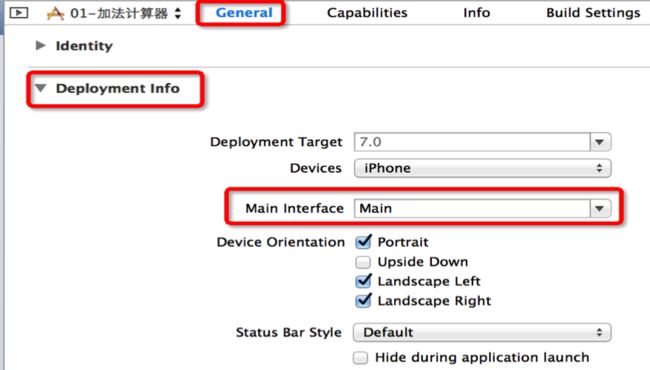
设置程序启动时加载的storyboard
经典错误
- 如果遇到这种错误,90%的可能都是因为连线有问题,比如一些线以及“过期”
- ‘NSUnknownKeyException’, reason: ‘[ setValue:forUndefinedKey:]: this class is not key value coding-compliant for the key
需要了解的知识点
- storyboard文件的认识
- UIViewController的认识
- IBOutlet、IBAction的作用
- 类扩展的作用
- 修改UI元素的属性(textColor、backgroundColor)
- 新建项目的常见属性
- 模拟器的各种功能
UIView
UIView简介
UIView
- 什么是控件?
- 屏幕上的所有UI元素叫做控件,也有人叫做视图、组件
- 按钮(UIButton)、文件(UILabel)都是控件
- 控件的共同属性有哪些?
- 尺寸
- 位置
- 背景色
- 。。。。。
- 苹果将控件的共同属性都抽取到父类UIView中
- 所有的控件最终都继承自UIView
- UIButton、UILabel都是继承自UIView(可以查看头文件)
父子控件
父控件、子控件
- 每一个控件其实都是一个容器- 可以将其他控件放到该空间的内部
- 比较常见的还是将UIView作为容器
- 可以将A控件放入B控件
- A控件是B控件的子控件
- B控件是A控件的父控件
- 每一个控制器都有一个UIView
- 控制器本身是不可见
- 能够看到的是控制器的View
- 每一个控制器中都有一个UIView的属性
- 控制器中管理的所有子控件都是该控件的子控件
UIView的常见属性
- @property (nonatomic,readonly)UIView *superview;
- 获得自己的父控件对象
- @property (nonatomic,readonly,copy)NSArray *subviews;
- 获得自己的所有子控件对象
- @property (nonatomic)NSInteger tag;
- 控件的ID[标识],父控件可以通过tag来找到对应的子控件
- @property (nonatomic) CGffineTransfom transform;
- 控件的形变属性(可以设置旋转角度、比例缩放、平移等属性)
UIView的常见方法
. - (void)addSubview:(UIView *)view;
- 添加一个子控件
. - (void)removeFromSuperview;
- 将自己从父控件移除
. - (UIView *)viewWithTag:(NSInteger)tag;
- 根据一个tag标识找出对应的控件(一般都是子控件)
位置尺寸
UIView的常见属性
. @property (nonatomic) CGRect frame;
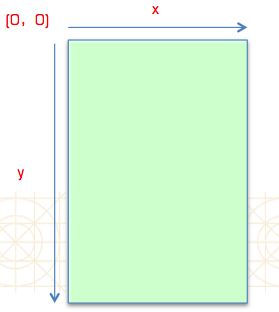
- 控件矩形框在父控件中的位置和尺寸(以父控件的左上角为坐标原点)
. @property (nonatomic) CGRect bounds;
- 控件矩形框的位置和尺寸(以自己左上角为坐标原点,所以bounds的x、y一般都为0)
. @property (nonatomic) CGPoint center;
- 空间中心点的位置(以父控件的左上角为坐标原点)
UIKit坐标系
代码练习部分
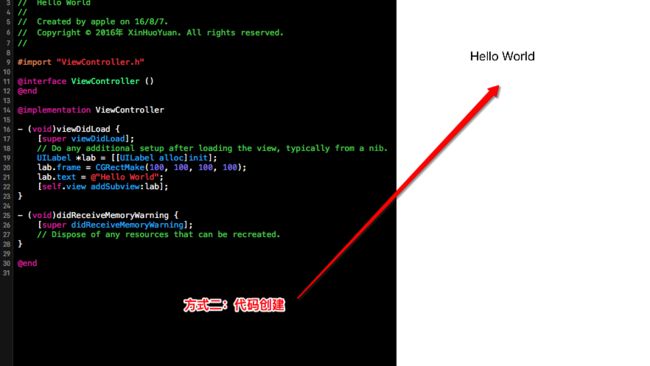
显示hello world
按钮点击改变label颜色
/*
 经典错误
 1.错误一
 描述:reason: '[ setValue:forUndefinedKey:]: this class is not key value coding-compliant for the key testLabel.'
 原因:有多余的连线
 解决:删除多余的连线
 2.错误二
 描述:reason: '-[MainViewController clickBtn:]: unrecognized selector sent to instance 0x7feb69418640'
 原因:找不到对应的方法
 解决:1.添加对应的方法 2.删除多余的连线
 */

#import "ViewController.h"

@interface ViewController ()

//已经有强指针指向
@property (weak, nonatomic) IBOutlet UILabel *showLabel;

@end

@implementation ViewController

- (void)viewDidLoad {
    [super viewDidLoad];
    // Do any additional setup after loading the view, typically from a nib.
}

#pragma mark - 点击红色按钮
- (IBAction)redBtn {
//    //改变文字颜色
//    self.showLabel.textColor = [UIColor redColor];
//    //修改文字内容
//    self.showLabel.text = @"现在我变成红色啦";
//    //改变背景颜色
//    self.showLabel.backgroundColor = [UIColor greenColor];
//    //文字居中
//    self.showLabel.textAlignment = NSTextAlignmentCenter;
//    //改变文字的大小
//    self.showLabel.font = [UIFont systemFontOfSize:13.0];
    [self changeLabelWithColor:[UIColor redColor] text:@"现在我变红啦" backColor:[UIColor greenColor] fontsize:13.0];
}

#pragma mark - 抽取方法
/**可供调用的改变文字颜色,内容,背景颜色,大小的方法*/
- (void)changeLabelWithColor:(UIColor *)color text:(NSString *)text backColor:(UIColor *)bcolor fontsize:(float)size{
    //改变文字颜色
    self.showLabel.textColor = color;
    //修改文字内容
    self.showLabel.text = text;
    //改变背景颜色
    self.showLabel.backgroundColor = bcolor;
    //文字居中
    self.showLabel.textAlignment = NSTextAlignmentCenter;
    //改变文字的大小
    self.showLabel.font = [UIFont systemFontOfSize:size];
}

#pragma mark - 点击黄色按钮
- (IBAction)yellowBtn {
    [self changeLabelWithColor:[UIColor yellowColor] text:@"我又变黄了,啦啦啦" backColor:[UIColor redColor] fontsize:14.0];
}

#pragma mark - 点击绿色按钮
- (IBAction)greenBtn {
    [self changeLabelWithColor:[UIColor greenColor] text:@"最终我还是变绿了" backColor:[UIColor purpleColor] fontsize:12.0];
}

@end
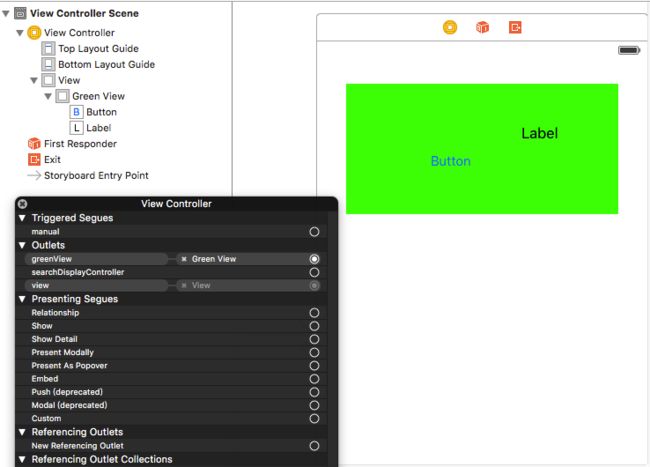
UIView的常见属性
#import "ViewController.h"

@interface ViewController ()
//绿色的view
@property (weak, nonatomic) IBOutlet UIView *greenView;
/**可变数组*/
@property (nonatomic,strong)NSMutableArray *arrayM;
@end

@implementation ViewController

//调用viewDidLoad之前会先调用loadView
- (void)loadView
{
    [super loadView];
//    NSLog(@"%s",__func__);
}

/**
     1.系统调用
     2.控制器的view加载完毕的时候调用
     3.控件的初始化,数据的初始化(懒加载)
 */
- (void)viewDidLoad {
    [super viewDidLoad];
    // Do any additional setup after loading the view, typically from a nib.
//    NSLog(@"%s",__func__);

    //1.查看绿色view的父控件,结论:就是控制器的view
//    NSLog(@"绿色的view的父控件:%@--控制器的view:%@",self.greenView.superview,self.view);
    //2.查看绿色view的子控件
//    NSLog(@"绿色view的子控件:%@",self.greenView.subviews);
    //3.控制器的view的子控件
//    NSLog(@"%@",self.view.subviews);
    //4.控制器的view的父控件 --> UIWindow,这边看不到,要到viewDidAppear中才可以
//    NSLog(@"viewDidLoad ---- %@",self.view.superview);

}

- (void)viewDidAppear:(BOOL)animated
{
    [super viewDidAppear:animated];
//    NSLog(@"viewDidLoad ---- %@",self.view.superview);
}

/**
 1.系统调用
 2.当控制器收到内存警告的时候调用
 3.这时要去掉一些不必要的内存,去除耗时的内存

 //此处可以使用模拟器模仿,内存警告会调用此方法
 */
- (void)didReceiveMemoryWarning {
    [super didReceiveMemoryWarning];
    // Dispose of any resources that can be recreated.
    NSLog(@"%s",__func__);
    //假设数组arrayM中不断添加控件引发的内存警告,清空内存则要如下即可
    self.arrayM = nil;
}


@end
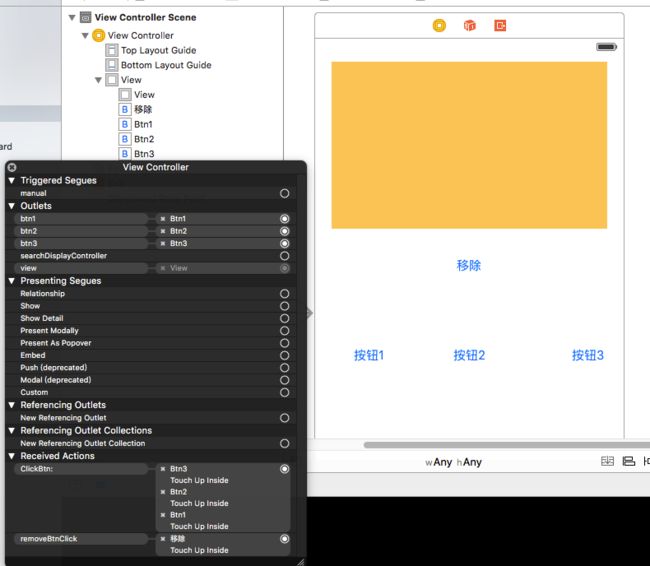
View的常用方法
#import "ViewController.h"

@interface ViewController ()
//黄色的view,这是脱线形成的属性
//@property (weak, nonatomic) IBOutlet UIView *orgView;
@property (weak, nonatomic) UIView *orgView;

@property (weak, nonatomic) IBOutlet UIButton *btn1;
@property (weak, nonatomic) IBOutlet UIButton *btn2;
@property (weak, nonatomic) IBOutlet UIButton *btn3;

@end

@implementation ViewController

/**尽量少使用tag:
     1>tag的效率非常差
     2>tag使用多了,非常容易乱
 */

- (void)viewDidLoad {
    [super viewDidLoad];
    // Do any additional setup after loading the view, typically from a nib.

    //根据tag拿到对应的view
    UIView *redView = [self.view viewWithTag:1];
    self.orgView = redView;

    //1.创建UISwitch对象
    UISwitch *sw = [[UISwitch alloc]init];
    //2.加到控制器的view中
    [self.view addSubview:sw];
    //3.创建UISwitch对象
    UISwitch *sw1 = [[UISwitch alloc]init];
    //4.加载到黄色的view
    [redView addSubview:sw1];
    //5.创建一个选项卡独享
    UISegmentedControl *sg = [[UISegmentedControl alloc]initWithItems:@[@"111",@"222",@"3333"]];
    //6.加载到黄色的view
    //后添加上去的控件,如果和前一个添加上去的控件在同一个层,而且位置一样,会盖在上一个添加的控件上面
    [redView addSubview:sg];
    //7.移除
//    [sg removeFromSuperview];
//    [self.orgView removeFromSuperview];
//    [sw removeFromSuperview];
//
    //这个在这里写没有效果,要写到viewDidAppear中,才可以
    [self.view removeFromSuperview];
}

//[self.view removeFromSuperview];在词才能有效果
//只要控件有父控件,就一定能够移除
- (void)viewDidAppear:(BOOL)animated
{
    [super viewDidAppear:animated];
//    [self.view removeFromSuperview];
}

- (IBAction)removeBtnClick {
    [self.orgView removeFromSuperview];
}
- (IBAction)ClickBtn:(UIButton *)button {

    //方法一:按钮点击
//    if (button == self.btn1) {
//        NSLog(@"我是按钮1,我被点了");
//    }else if (button == self.btn2)
//    {
//        NSLog(@"我是按钮2,我也被点了");
//    }else if (button == self.btn3)
//    {
//        NSLog(@"我是按钮3,点我干嘛");
//    }
    //方法二:查看按钮点击
    switch (button.tag) {
        case 3:
            NSLog(@"哈哈,我是按钮1,我最先备点");
            break;
        case 4:
            NSLog(@"我是按钮2,其实我才是先被点的");
            break;
        case 5:
            NSLog(@"我才是被先点击的按钮3好不好");
            break;
        default:
            break;
    }
    //做公共的事情
    NSLog(@"做公共的事情");
}

- (void)didReceiveMemoryWarning {
    [super didReceiveMemoryWarning];
    // Dispose of any resources that can be recreated.
}

@end
UIView的center frame bounds用法
#import "ViewController.h"

@interface ViewController ()
//MainStoryboard上显示的label
//这里我们不用连线的label
//@property (weak, nonatomic) IBOutlet UILabel *showLabel;
@property (weak, nonatomic) UILabel *showlabel;
@end

@implementation ViewController

- (void)viewDidLoad {
    [super viewDidLoad];
    // Do any additional setup after loading the view, typically from a nib.
    //创建UIlabel对象
    UILabel *label = [[UILabel alloc]init];
    //设置frame(位置和尺寸)
    label.frame = CGRectMake(100, 100, 100, 60);
    //设置背景颜色
    label.backgroundColor = [UIColor purpleColor];
    //将label添加到控制器的view中
    [self.view addSubview:label];
    self.showlabel = label;

}

- (void)didReceiveMemoryWarning {
    [super didReceiveMemoryWarning];
    // Dispose of any resources that can be recreated.
}
- (IBAction)centerBtnCilck {
    //center可以改变点的位置,中间点
    //改变位置
//    self.showlabel.center = CGPointMake(100, 400);
    //显示到界面中间
    self.showlabel.center = CGPointMake(self.view.bounds.size.width * 0.5, self.view.bounds.size.height * 0.5);

}
- (IBAction)boundsBtnClick {
    //bounds只能改变尺寸,不能改变wiezhi ios9之后,中心点不变,向四周延伸
    self.showlabel.bounds = CGRectMake(0, 0, 200, 120);
}
- (IBAction)frameBtnClick {
    //frame可以改变位置,也能改变大小,一般不轻易使用
    //方式1
//    self.showlabel.frame = CGRectMake(200, 100, 100, 60);
    //方式2
//    self.showlabel.frame = (CGRect){{200,100},{100,60}};
    //方式3
    //结构体是值传递,不是地址传递
//    self.showlabel.frame.size += 100;要想改变不能这么写,要向下面写
    CGRect frame = self.showlabel.frame;
//    frame.origin.x -= 100 ;// 改变x值
//    frame.origin.y += 100 ;//改变y值
//    frame.size.width += 50 ;//改变宽度
    frame.size.height += 100;//改变高度
    self.showlabel.frame = frame;

}

@end