人脸识别项目openface
原文出处: https://blog.xugaoxiang.com/ai/openface.html
软硬件环境
- openface
- ubuntu 16.04 64bit
- python2
openface项目
openface是一个在github上开源的基于深度神经网络(Deep Neural Networks)的人脸识别项目,目前star数已经接近9.5k,fork数也有2k,可见非常受欢迎,openface基于python2.
安装依赖
安装lua,不知从哪个版本开始,ubuntu安装软件的apt-get可以只写apt了,挺好
sudo apt install lua5.3
安装dlib, pandas
sudo pip2 install dlib
sudo pip2 install pandas
安装torch
git clone https://github.com/torch/distro.git ~/torch --recursive
cd ~/torch
bash install-deps
sudo ./install.sh
安装程序会在~/.bashrc中添加语句
. /home/xugaoxiang/torch/install/bin/torch-activate
执行使之生效
source ~/.bashrc
安装luarocks及相关模块
sudo apt-get install luarocks
sudo chown -R xugaoxiang:xugaoxiang ~/.cache
luarocks install csvigo
luarocks install dpnn
luarocks install image
luarocks install torchx
luarocks install graphicsmagick
luarocks install nn
运转openface
下载源码
git clone https://github.com/cmusatyalab/openface.git
cd openface
python setup.py install
准备自己的样本图片
在ubuntu系统下用cheese(sudo apt install cheese)摄像头工具录制一段15秒左右的视频,然后利用ffmpeg(同样利用apt安装)工具将视频转化成图片,将生成的图片集合存放在openface/training-images/xugaoxiang下,大概就有了400左右的样本数量了,据openface的官方说法是样本数量越大,准确度是越高的,经过简单的测试,发现的确是这样.
ffmpeg -i 2018-03-16-170319.webm -r 25 -f image2 xugaoxiang/%05d.png
预处理
对每张照片进行alignment操作,就是把跟人脸无关的元素去掉,以便解决一些如不一致和弱光线的问题,形成一张张96x96的图片
./util/align-dlib.py ./training-images/ align outerEyesAndNose ./aligned-images/ --size 96
生成Representations
cd models
./get-models.sh
cd ..
./batch-represent/main.lua -outDir ./generated-embeddings/ -data ./aligned-images/
创建分类模型
./demos/classifier.py train ./generated-embeddings/
到此, 各项准备工作都已经OK了,接下来看看效果吧.
照片中人脸的识别
./demos/classifier.py infer ./generated-embeddings/classifier.pkl your_test_image.jpg
我从training-images中找了张照片测试,结果非常好,相似度90%
2张照片的对比
./demos/compare.py training-images/xugaoxiang/00100.png training-images/xugaoxiang/00200.png
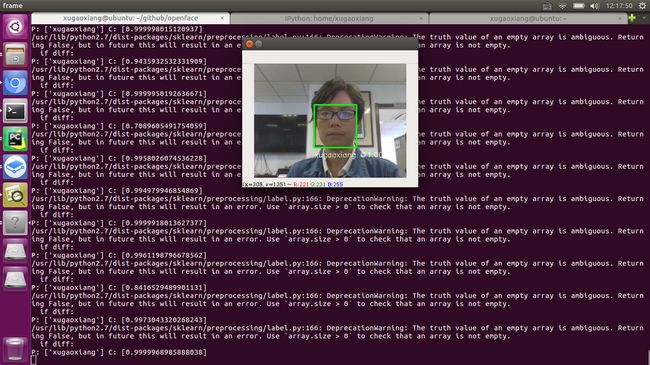
从webcam中识别
./demos/classifier_webcam.py ./generated-embeddings/classifier.pkl
在线交流gitter
https://gitter.im/cmusatyalab/openface, 这点非常的不错,比提issue要更快速有效,参与的人也多,但也不是你提问就有人来帮你,毕竟大家都很忙.
ubuntu 18.04适配
在18.04 LTS上做trainging时发现会报libreadline.so.6找不到的错误,按下面方法修正
sudo ln -s /lib/x86_64-linux-gnu/libreadline.so.7 /usr/lib/x86_64-linux-gnu/libreadline.so.6
参考资料
https://github.com/cmusatyalab/openface
http://cmusatyalab.github.io/openface/setup/
https://github.com/conda/conda/issues/4860
http://torch.ch/
https://www.cs.cmu.edu/~satya/docdir/CMU-CS-16-118.pdf
https://zhuanlan.zhihu.com/p/24567586
http://blog.csdn.net/dev_csdn/article/details/79176037

