Android组件化-UI统一&主题变色
客户端开发中UI设计极其重要,直接影响用户体验和App的品质;其次UI设计应做到样式、排版统一,简化布局文件,方便全局修改和维护。
系列文章
Android组件化-基础框架搭建
Android组件化-组件间通信BRouter
Android组件化-风格统一&主题变色
Android组件化-MVP设计模式
一、样式排版统一
1.1 共用style
基础颜色表
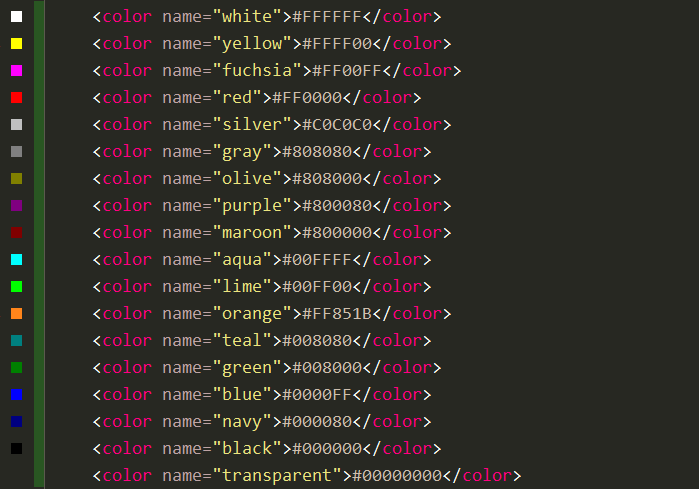
在values资源文件夹下添加文件colors.xml,加入常用的基础颜色值,使全局组件色调保持一致:
除基础颜色,还可添加App主题色调,使得ActionBar、Tab等组件颜色和主题色保持一致:
统一布局尺寸和文字大小
Android界面设计需要统一排版,如图标边距、文字大小、ListItem间隔等,在values资源文件夹下添加文件dimen.xml,添加统一的布局距离和文字大小:
<resources>

    <dimen name="font_larger">22spdimen>
    <dimen name="font_large">18spdimen>
    <dimen name="font_normal">16spdimen>
    <dimen name="font_small">14spdimen>
    <dimen name="font_smaller">12spdimen>
    <dimen name="font_smallest">10spdimen>

    <dimen name="spacing_huge">40dpdimen>
    <dimen name="spacing_larger">34dpdimen>
    <dimen name="spacing_large">24dpdimen>
    <dimen name="spacing_biger">20dpdimen>
    <dimen name="spacing_big">18dpdimen>
    <dimen name="spacing_normal">14dpdimen>
    <dimen name="spacing_small">12dpdimen>
    <dimen name="spacing_smaller">10dpdimen>
    <dimen name="spacing_smallest">8dpdimen>
    <dimen name="spacing_tiny">6dpdimen>
    <dimen name="spacing_tinyer">4dpdimen>
    <dimen name="spacing_tinyest">2dpdimen>
    <dimen name="spacing_border">12dpdimen>

resources>
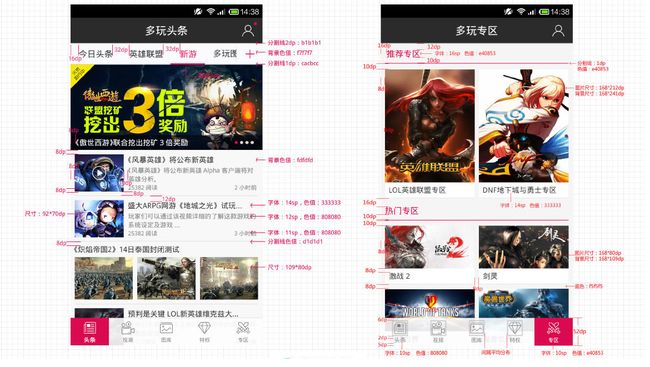
界面排版等的尺寸可以参考如下布局,
- 菜单选项内边距、字体颜色、选中颜色、背景色、上线分割线
- ListView中Item的外边距、图标尺寸、图标和内容的间距、内容区标题和内容的文字尺寸颜色、Item分割线
- Tab菜单选项图标尺寸、文字尺寸、Item间隔、Item选中样式
统一样式
应用内组件的样式应保持统一,比如按钮、弹窗、菜单列表等,在values资源文件夹下定义styles.xml(或新建文件把样式分离出来,如style-btn.xml),方便全局修改。
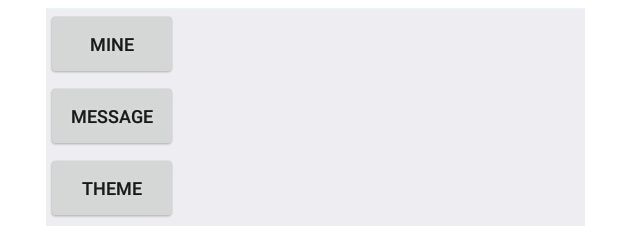
如下在布局文件中添加几个按钮,无任何样式:
<Button
    android:id="@+id/main_module_mine"
    android:layout_width="wrap_content"
    android:layout_height="wrap_content"
    android:text="Mine" />

<Button
    android:id="@+id/main_module_message"
    android:layout_width="wrap_content"
    android:layout_height="wrap_content"
    android:text="Message" />

<Button
    android:id="@+id/main_module_theme"
    style="@style/ButtonTheme"
    android:text="Theme" />
现加入按钮字体、内边距、背景等样式,
<Button
    android:id="@+id/main_module_mine"
    android:layout_width="match_parent"
    android:layout_height="wrap_content"
    android:background="@drawable/theme_button_selector"
    android:paddingBottom="@dimen/spacing_smallest"
    android:paddingTop="@dimen/spacing_smallest"
    android:text="Mine"
    android:textColor="@color/white"
    android:textSize="@dimen/font_normal" />

...

...
theme-button-selector.xml如下:
<selector xmlns:android="http://schemas.android.com/apk/res/android">
    <item android:state_pressed="true">
        <shape android:shape="rectangle">
            <corners android:radius="3dip" />
            <stroke android:width="1dip" android:color="@color/colorPrimary" />
            <gradient android:angle="-90" android:endColor="@color/colorPrimary" android:startColor="@color/colorPrimary" />
        shape>
    item>
    <item android:state_focused="true">
        <shape android:shape="rectangle">
            <corners android:radius="3dip" />
            <stroke android:width="1dip" android:color="@color/colorPrimary" />
            <solid android:color="@color/colorPrimaryDark" />
        shape>
    item>
    <item>
        <shape android:shape="rectangle">
            <corners android:radius="3dip" />
            <stroke android:width="1dip" android:color="@color/colorPrimary" />
            <gradient android:angle="-90" android:endColor="@color/colorPrimary" android:startColor="@color/colorPrimary" />
        shape>
    item>
selector>
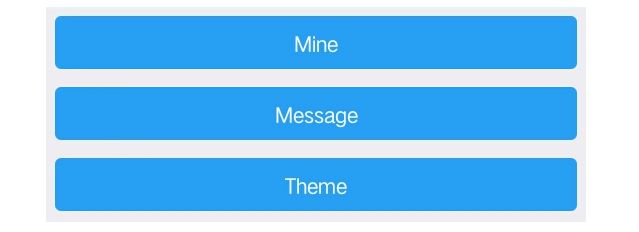
加入统一的样式后,三个按钮好看些了-:
但布局文件也变得格外冗长,为减少重复的布局代码,抽离通用样式,在styles.xml添加如下元素:
<style name="ButtonTheme" parent="@android:style/Widget.Button">
- "android:textSize"
>@dimen/font_normal
- "android:textColor">@color/white
- "android:layout_height">wrap_content
- "android:layout_width">match_parent
- "android:layout_margin">@dimen/spacing_tiny
- "android:paddingTop">@dimen/spacing_smallest
- "android:paddingBottom">@dimen/spacing_smallest
- "android:background">@drawable/theme_button_selector
style>
重新修改布局文件,三个按钮使用通用样式,代码简化了很多:
<Button
    android:id="@+id/main_module_mine"
    style="@style/ButtonTheme"
    android:text="Mine" />

<Button
    android:id="@+id/main_module_message"
    style="@style/ButtonTheme"
    android:text="Message" />

<Button
    android:id="@+id/main_module_theme"
    style="@style/ButtonTheme"
    android:text="Theme" />
布局重用
有些布局组件可在全局复用,例如自定义TitleBar、ActionBar,本项目Modulize使用第三方库CommonTitleBar作为标题栏布局,在layout资源文件夹中定义common_titlebar.xml:
<merge xmlns:android="http://schemas.android.com/apk/res/android">

    <com.wuhenzhizao.titlebar.widget.CommonTitleBar xmlns:titlebar="http://schemas.android.com/apk/res-auto"
        android:id="@+id/titlebar"
        android:layout_width="match_parent"
        android:layout_height="wrap_content"
        titlebar:centerTextColor="@color/white"
        titlebar:centerTextSize="@dimen/font_normal"
        titlebar:centerType="textView"
        titlebar:fillStatusBar="true"
        titlebar:leftImageResource="@drawable/common_transparent"
        titlebar:leftType="imageButton"
        titlebar:rightType="imageButton"
        titlebar:showBottomLine="false"
        titlebar:statusBarColor="?attr/colorPrimaryDark"
        titlebar:titleBarColor="?attr/colorPrimary" />
merge>
在activity布局文件中使用include引入此布局,merge标签为了减少视图层级(详细使用参考Android抽象布局):
<include layout="@layout/common_titlebar" />

<Button
    android:id="@+id/main_module_mine"
    style="?android:attr/buttonStyle"
    android:text="Mine" />
布局复用可以有效地统一标题栏风格,每个页面设置不同的标题和图标:
commonTitleBar = findViewById(R.id.common_titlebar);
commonTitleBar.getCenterTextView().setText("标题栏");
commonTitleBar.getRightImageButton().setImageResource(R.drawable.main_action_icon_user);
1.2 UI模块lib-ui
模块化开发应用模块之间不直接相互依赖,各模块之间内的样式不可直接被其他模块调用,因此有必要创建UI基础库,将公共样式放在UI库中。
按照Android组件化-基础框架搭建中基础库搭建方法,新建lib-ui存放公共样式和资源文件:
├─res
|  ├─values
|  |   ├─colors.xml
|  |   ├─dimens.xml
|  |   ├─strings.xml
|  |   ├─styles.xml
|  |   └theme.xml
|  ├─layout
|  |   └common_titlebar.xml
|  ├─drawable-xxxhdpi
|  |        ├─action_bar_add.png
|  ├─drawable-xxhdpi
|  |        ├─action_bar_add.png
|  ├─drawable-xhdpi
|  |       ├─action_bar_add.png
|  ├─drawable-mdpi
|  |       ├─action_bar_add.png
|  ├─drawable-hdpi
|  |       ├─action_bar_add.png
|  ├─drawable
|  |    ├─common_transparent.xml
|  |    └theme_button_selector.xml
使lib-common依赖lib-ui,因此各应用模块就可以使用lib-ui中的公共样式。
二、主题切换
主题切换功能开发思路如下:
- 根据上述布局风格统一原则配置两套主题
- 在Activity中为App设置主题
- 动态设置主题,主题设置立即生效
- 复杂的View组件随主题动态变化
2.1 主题配置
配置至少两个主题
在lib-ui\src\main\res下添加两个资源文件theme-default.xml、theme-dark.xml,
├─values
|   ├─theme-dark.xml
|   ├─theme-default.xml
|   └theme.xml
在theme.xml添加主题父类,theme-default和theme-dark中分别定义两个主题继承theme中的父主题:
theme.xml:
theme-default.xml:
#289ff4
#0b79b7
@color/white
theme-dark.xml:
#222222
#333333
#333333
配置的内容
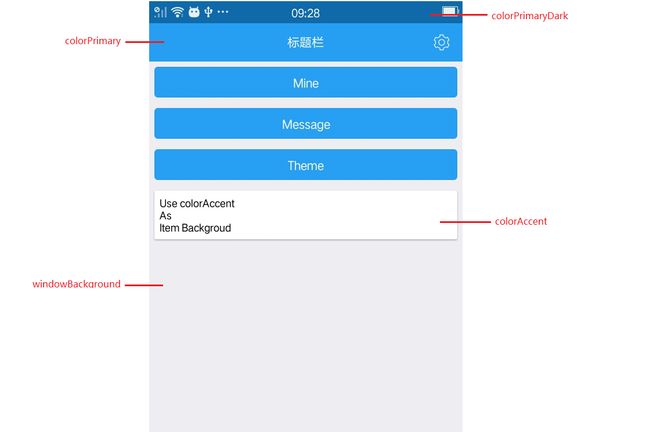
主题配置中重要的配置项,参见Material Design的The Color System:
- colorPrimary:基色,跨域整个App各个页面和组件最常用的颜色,常用于应用栏(Appbar)
- colorPrimaryDark:重基色,一般为状态栏(Sytembar)的颜色,与应用栏形成对比色
- colorAccent:着重色,各View被选中或突出显示时的颜色;Item或CardView的背景色
- android:windowBackground:界面背景色
- android:buttonStyle:按钮样式;其他组件样式也可全局定义
各样式和value在activity布局文件中使用如下:
<LinearLayout xmlns:android="http://schemas.android.com/apk/res/android"
    xmlns:app="http://schemas.android.com/apk/res-auto"
    xmlns:tools="http://schemas.android.com/tools"
    android:layout_width="match_parent"
    android:layout_height="match_parent"
    android:background="?android:windowBackground"
    android:orientation="vertical"
    tools:context="org.blackist.modulize.main.view.MainActivity">

    <include layout="@layout/common_titlebar" />

    <Button
        android:id="@+id/main_module_mine"
        style="?android:attr/buttonStyle"
        android:text="Mine" />

    <Button
        android:id="@+id/main_module_message"
        style="?android:attr/buttonStyle"
        android:text="Message" />

    <Button
        android:id="@+id/main_module_theme"
        style="?android:attr/buttonStyle"
        android:text="Theme" />

    <android.support.v7.widget.CardView
        android:layout_width="match_parent"
        android:layout_height="wrap_content"
        android:layout_margin="@dimen/spacing_tiny"
        android:background="?attr/colorAccent">

        <TextView
            android:layout_width="match_parent"
            android:layout_height="wrap_content"
            android:padding="@dimen/spacing_tiny"
            android:background="?attr/colorAccent"
            android:text="Use colorAccent \nAs \nItem Backgroud" />
    android.support.v7.widget.CardView>

LinearLayout>
为页面设置背景色,使用 background="?android:windowBackground" 属性;
colorAccent用作List Item布局 或 局部布局的背景,当主题切换时Item背景随之切换,使用方式 background="?attr/colorAccent";
Button等组件的样式使用 **style="?android:attr/buttonStyle"**设置;
本项目文字颜色自适应,即根据当前主题,安卓系统会自动设置字黑色或白色;
从 ?android:windowBackground 和 ?colorAccent 中可以看出,根据如下主题配置项配置方式,决定布局文件中使用这些属性的方式:
2.2 主题切换
使用SDK中的setTheme方法设置主题,设置主题需要在setContentView()之前调用:
@Override
public void onCreate(@Nullable Bundle savedInstanceState) {
    super.onCreate(savedInstanceState);
    // before set ContentView
    setTheme(mThemeDefault ? R.style.setTheme : R.style.AppTheme);
    setContentView(R.layout.main_activity);
}
mThemeDefault为boolean类型的值,存储在SharedPreference中,App启动时读取其值使得App记住用户偏好。
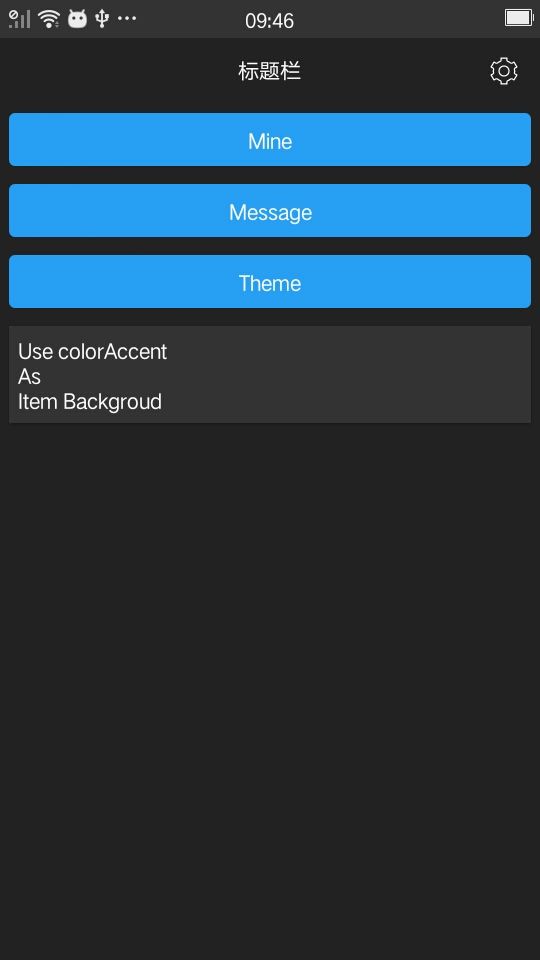
切换后的主题如下:
2.3 主题动态切换
当使用按钮或Switch触发主题设置后,视图已经创建,设置不能立即生效,需要重启App才能看到效果。想要立即生效则需要重建当前栈中所有activity,因此需要获取到所有已加载activity,使用lib-apptools下的AppManager工具类,在Activity的onCreate()中将自身加入Activity栈:
AppManager.getInstance().addActivity(this);
在onDestory()中使activity出栈:
AppManager.getInstance().removeActivity(this);
调用AppManager.getInstance().recreateAllActivity()方法重建栈中Activity,使得主题切换立即生效。
三、组件主题
配置某些组件跟随主题变换颜色等样式。
3.1 AlertDialog
配置Dialog的默认样式类似于Button的全局样式,但稍加复杂一些。
在theme-default.xml中:
<style name="AppTheme" parent="AppBaseTheme">
- "alertDialogTheme"
>@style/AlertDialog
style>
<style name="AlertDialog" parent="Theme.AppCompat.Light.Dialog.Alert">
- "android:windowTitleStyle"
>@style/AlertDialogTitle
- "colorAccent"
>@color/colorPrimary
- "android:background">@color/colorAccent
style>
<style name="AlertDialogTitle">
- "android:textAppearance"
>@style/AlertDialogTitleStyle
style>
<style name="AlertDialogTitleStyle" parent="@android:style/TextAppearance.Holo.DialogWindowTitle">
- "android:textSize"
>@dimen/font_normal
- "android:textColor"
>@color/colorPrimary
style>
theme-dark.xml
<style name="AppDarkTheme" parent="AppBaseTheme">
- "alertDialogTheme"
>@style/DarkAlertDialog
style>
<style name="DarkAlertDialog" parent="Theme.AppCompat.Light.Dialog.Alert">
- "android:windowTitleStyle"
>@style/DarkAlertDialogTitle
- "colorAccent"
>@color/text_hint
- "android:background">@color/colorDarkAccent
style>
<style name="DarkAlertDialogTitle">
- "android:textAppearance"
>@style/DarkAlertDialogTitleStyle
style>
<style name="DarkAlertDialogTitleStyle" parent="@android:style/TextAppearance.Holo.DialogWindowTitle">
- "android:textSize"
>@dimen/font_normal
- "android:textColor"
>@color/text_hint
style>
在Activity中new AlertDialog即可,无需多余的样式设置:
mTypeDialog = new AlertDialog.Builder(MainActivity.this)
    .setIcon(R.mipmap.ic_launcher_round)
    .setTitle("AlertDialog Theme")
    .setNegativeButton("Cancel", new DialogInterface.OnClickListener() {
        @Override
        public void onClick(DialogInterface dialog, int which) {
            dialog.dismiss();
        }
    })
    .setPositiveButton("Confirm", new DialogInterface.OnClickListener() {
        @Override
        public void onClick(DialogInterface dialog, int which) {
            dialog.dismiss();
        }
    }).create();
mTypeDialog.show();
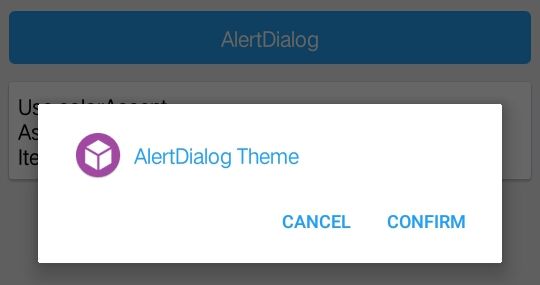
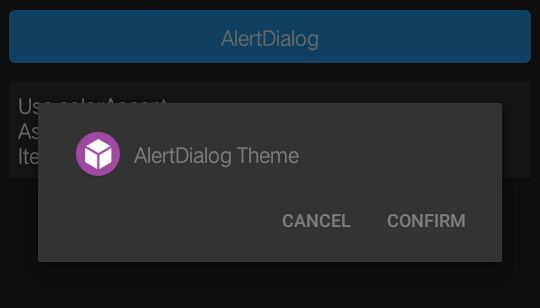
切换主题后,AlertDialog样式随之变化:
3.2 获取当前主题属性
在某些自定义组件中需要获取App主题色,比如在AlertDialog中添加一个轮滑选择器,自定义组件Whiew(在lib-ui\src\main\java\org\blackist\modulize\ui\widget\whiew下),当设置文本时需要获取当前主题的相关属性来设置样式。
获取Color
TypedValue typedValue = new TypedValue();
Theme theme = context.getTheme();
theme.resolveAttribute(R.attr.colorPrimary, typedValue, true);
@ColorInt int color = typedValue.data;
...
获取Dimen
tv.setTextSize(TypedValue.COMPLEX_UNIT_PX, context.getResources().getDimensionPixelSize(R.dimen.font_normal));
项目Github地址:https://github.com/blackist/modulize
参考
https://www.25xt.com/android
https://blog.csdn.net/xyz_lmn/article/details/14524567
https://material.io/design/color/#color-theme-creation
https://stackoverflow.com/questions/29797134/how-to-use-and-style-new-alertdialog-from-appcompat-22-1-and-above
https://stackoverflow.com/questions/17277618/get-color-value-programmatically-when-its-a-reference-theme
(完)
