1. jsplumb 中文基础教程
后续的更新会直接在github上,如需查看最新文档,请直接访问原始仓库。另外用了七牛的测试域名做图片托管,现在发现很多图片都无法显示了,建议直接参看git仓库里的, 仓库中的示例图片不是用的七牛云,都能正常显示。
仓库地址:https://github.com/wangduandu...
1.1. 什么是jsplumb?
你有没有想过在你的网站上展示图表或者甚至在浏览器应用程序中使用它?用jsPlumb你可以!它是完全免费的,并根据MIT许可证提供。您可以直接从jsPlumb github网站下载框架。
该项目主要由Simon Porritt开发,他在澳大利亚西德尼担任网络开发人员。 jsPlumb由他积极开发。作为许多优秀的开发人员,他似乎更喜欢开发代码而不是编写教程,这就是为什么我提供一个简单的入门教程。
1.2. jsplumb能干什么?
那么如果你应该使用它取决于你想用jsPlumb做什么。该框架适用于必须绘制图表的Web应用程序,例如类似于Visio的应用程序或工作流程设计器等。由于图表项目和连接的所有参数都是非常精细可控的,因此您可以绘制您可以想到的任何类型的图表的!
1.3. 基本概念
- Souce 源节点
- Target 目标节点
- Anchor 锚点
- Endpoint 端点
- Connector 连接
2. 基础demos
注意:点击标题即可查看demo的在线效果
2.1. 连接两个节点
demo: https://wdd.js.org/jsplumb-ch...
jsPlumb.ready方法和jquery的ready方法差不多的功能,jsPlumb.connect用于建立连线
参数说明:
jsPlumb.connect(config) return connection
| 参数 | 参数类型 | 是否必须 | 说明 |
|---|---|---|---|
| source | String,Object,Endpoint | 是 | 连线源的标识,可以是id, element, 或者Endpoint |
| target | String,Object,Endpoint | 是 | 连线目标的标识,可以是id, element, 或者Endpoint |
| endpoint | String | 可选 | 端点类型,形状 |
>>> connect方法详情
2.2. 可拖动节点
demo: https://wdd.js.org/jsplumb-ch...
使用draggable可以让节点被拖动,draggable方法参考
2.3. 连接的其他参数
demo: https://wdd.js.org/jsplumb-ch...
可以通过connector去设置链接线的形状,如直线或者曲线之类的。anchor可以去设置锚点的位置。
2.4. 设置连接的默认值
demo: https://wdd.js.org/jsplumb-ch...
很多连线都是相同设置的情况下,可以将配置抽离出来,作为一个单独的变量,作为connect的第二个参数传入。实际上connect的第二个参数会和第一个参数merge,作为一个整体。
2.5. 给连接加上样式
demo: https://wdd.js.org/jsplumb-ch...
例如给连线设置不同的颜色,设置不同的粗细之类的。
jsPlumb.connect({
  source: 'item_left',
  target: 'item_right',
  paintStyle: { stroke: 'lightgray', strokeWidth: 3 },
  endpointStyle: { fill: 'lightgray', outlineStroke: 'darkgray', outlineWidth: 2 }
}, common)
2.6. 给连接加上箭头
demo: https://wdd.js.org/jsplumb-ch...
箭头实际上是通过设置overlays去设置的,可以设置箭头的长宽以及箭头的位置,location 0.5表示箭头位于中间,location 1表示箭头设置在连线末端。 一根连线是可以添加多个箭头的。
jsPlumb.connect({
  source: 'item_left',
  target: 'item_right',
  paintStyle: { stroke: 'lightgray', strokeWidth: 3 },
  endpointStyle: { fill: 'lightgray', outlineStroke: 'darkgray', outlineWidth: 2 },
  overlays: [ ['Arrow', { width: 12, length: 12, location: 0.5 }] ]
}, common)
2.7. 增加一个端点
demo: https://wdd.js.org/jsplumb-ch...
addEndpoint方法可以用来增加端点,具体使用请看
    jsPlumb.ready(function () {
      jsPlumb.addEndpoint('item_left', {
        anchors: ['Right']
      })
    })
2.8. 拖动创建连接
demo: https://wdd.js.org/jsplumb-ch...
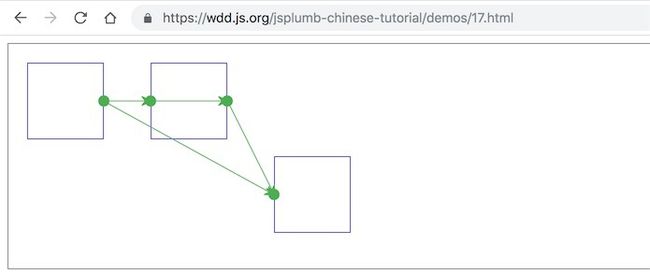
如果你将isSource和isTarget设置成true,那么久可以用户在拖动时,自动创建链接。
jsPlumb.ready(function () {
      jsPlumb.setContainer('diagramContainer')

      var common = {
        isSource: true,
        isTarget: true,
        connector: ['Straight']
      }

      jsPlumb.addEndpoint('item_left', {
        anchors: ['Right']
      }, common)

      jsPlumb.addEndpoint('item_right', {
        anchor: 'Left'
      }, common)

      jsPlumb.addEndpoint('item_right', {
        anchor: 'Right'
      }, common)
    })
一般来说拖动创建的链接,可以再次拖动,让链接断开。如果不想触发这种行为,可以设置。
  jsPlumb.importDefaults({
    ConnectionsDetachable: false
  })
2.9. 给端点增加样式
demo: https://wdd.js.org/jsplumb-ch...
通过设置各种 *Style来改变链接或者端点的样式。
jsPlumb.ready(function () {
      jsPlumb.setContainer('diagramContainer')

      var common = {
        isSource: true,
        isTarget: true,
        connector: 'Straight',
        endpoint: 'Dot',
        paintStyle: {
          fill: 'white',
          outlineStroke: 'blue',
          strokeWidth: 3
        },
        hoverPaintStyle: {
          outlineStroke: 'lightblue'
        },
        connectorStyle: {
          outlineStroke: 'green',
          strokeWidth: 1
        },
        connectorHoverStyle: {
          strokeWidth: 2
        }
      }

      jsPlumb.addEndpoint('item_left', {
        anchors: ['Right']
      }, common)

      jsPlumb.addEndpoint('item_right', {
        anchor: 'Left'
      }, common)

      jsPlumb.addEndpoint('item_right', {
        anchor: 'Right'
      }, common)
    })
2.10. 节点改变尺寸
demo: https://wdd.js.org/jsplumb-ch...
jsplumb实际上不支持改变节点大小,实际上只能通过jquery ui resizable 方法去改变。
2.11. 限制节点拖动区域
demo: https://wdd.js.org/jsplumb-ch...
默认情况下,节点可以被拖动到区域外边,如果想只能在区域内拖动,需要设置containment,这样节点只能在固定区域内移动。
jsPlumb.setContainer('area-id')2.12. 节点网格对齐
demo: https://wdd.js.org/jsplumb-ch...
网格对齐实际上是设置了grid属性,使移动只能按照固定的尺寸移动。然后用一张图作为背景铺开作为网格来实现的。
#diagramContainer {
  padding: 20px;
  width: 80%;
  height: 400px;
  border: 1px solid gray;
  background-image: url(http://p3alsaatj.bkt.clouddn.com/20180227163310_1bVYeW_grid.jpeg);
  background-repeat: repeat;
}

jsPlumb.draggable('item_left', {
  containment: 'parent',
  grid: [10, 10]
})
2.13. 点击删除连线
// 单点击了连接线,
jsPlumb.bind('click', function (conn, originalEvent) {
  if (confirm('确定删除所点击的链接吗?')) {
    jsPlumb.detach(conn)
  }
})
2.14. 删除节点,包括节点相关的连接
// nodeId为节点id, remove方法可以删除节点以及和节点相关的连线
jsPlumb.remove(nodeId)
注意remove方法有些情况下是无法删除干净连线的,详情
2.15. 通过编码连接endPoint
初始化数据后,给节点加上了endPoint, 如果想编码让endPoint链接上。需要在addEndpoint时,就给该断点加上一个uuid, 然后通过connect()方法,将两个断点链接上。建议使用node-uuid给每个断点都加上唯一的uuid, 这样以后链接就方便多了。
jsPlumb.addEndpoint(id, {
    anchors: 'Top',
    uuid: uuid() // 这里需要唯一的一个Id,
}, config)

jsPlumb.connect({ uuids: [fromId, toId] })
2.16 一个端点如何拖拽出多条连线?
默认情况下,maxConnections的值是1,也就是一个端点最多只能拉出一条连线。
你也可以设置成其他值,例如5,表示最多可以有5条连线。
如果你想不限制连线的数量,那么可以将该值设置为-1
参见 https://wdd.js.org/jsplumb-ch...
var common = {
  isSource: true,
  isTarget: true,
  connector: ['Straight'],
  maxConnections: -1
}

jsPlumb.addEndpoint('item_left', {
  anchors: ['Right']
}, common)
3. 有没有稍微复杂一点,带有拖放的栗子?
项目地址:https://github.com/wangduandu... ,将views目录下的drag-drop-demo.html拖放到浏览器中,就可以愉快的玩耍了。
从该demo中除了可以学到基本的jsplumb的api, 也可以学到其他的关于拖放的知识点。其中目前只做了语音节点的拖放,其他的还时间做。该demo没有使用webpack打包,代码写的有点乱,大家凑合着看,有问题可以提issue, 或者评论。
4. 实战项目 一个可视化IVR编辑器
项目地址:https://github.com/wangduandu... 该项目还在开发完善中,不过已经具备基本功能。
该项目是用webpack打包的项目,所有文件都在src目录下。
5. 参考资源
- jsPlumb Class
- freedevelopertutorials jsplumb-tutorial
扫码订阅我的微信公众号:洞香春天。每天一篇技术短文,让知识不再高冷。

