Window窗口机制(二)——Window,WindowManager理解
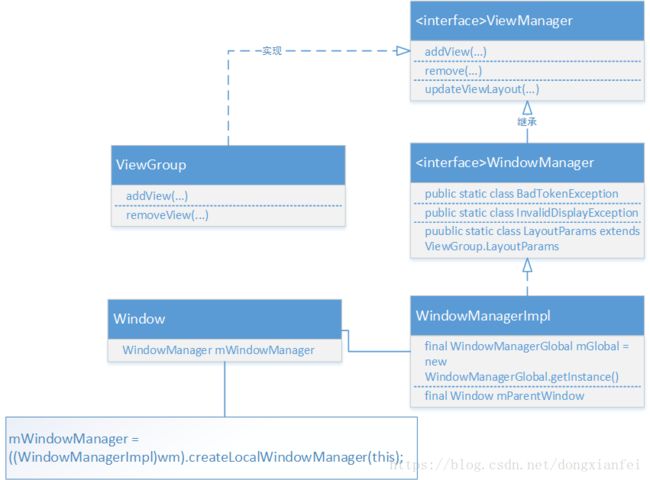
前一篇文章跟大家介绍了Window,PhoneWindow,DecorView之间的联系,接下来和大家讲解一下WindowManager相关,先来看一张图:

ViewManager
public interface ViewManager
{
    public void addView(View view, ViewGroup.LayoutParams params);
    public void updateViewLayout(View view, ViewGroup.LayoutParams params);
    public void removeView(View view);
}
ViewManager接口定义了一组规则,就是add、update、remove的操作View接口。也就是说ViewManager是用来添加和移除activity中View的接口,可以通过Context.getSystemService()获取实例。
public abstract class ViewGroup extends View implements ViewParent, ViewManager {
    private static final String TAG = "ViewGroup";

	public void addView(View child) {
        addView(child, -1);
    }

	public void addView(View child, int index, LayoutParams params) {
        if (DBG || ViewDebugManager.DBG) {
            System.out.println(this + " addView");
        }

        if (child == null) {
            throw new IllegalArgumentException("Cannot add a null child view to a ViewGroup");
        }

        // addViewInner() will call child.requestLayout() when setting the new LayoutParams
        // therefore, we call requestLayout() on ourselves before, so that the child's request
        // will be blocked at our level
        requestLayout();
        invalidate(true);
        addViewInner(child, index, params, false);
    }
}
可以看到ViewGroup里面实现了ViewManager接口,View通过ViewGroup的addView方法添加到ViewGroup中,而ViewGroup层层嵌套到最顶级都会显示在在一个窗口Window中。
WindowManager
public interface WindowManager extends ViewManager {
	/**
     * Exception that is thrown when trying to add view whose
     * {@link LayoutParams} {@link LayoutParams#token}
     * is invalid.
     * 则是addView时它的LayoutParams无效则会被抛出,
     * 或是添加第二个View的时候没有移除第一个View则会被抛出
     */
	public static class BadTokenException extends RuntimeException {...}

	/**
     * Exception that is thrown when calling {@link #addView} to a secondary display that cannot
     * be found. See {@link android.app.Presentation} for more information on secondary displays.
     * 如果一个窗口是在一个二级的显示上而指定的显示找不到则会被抛出
     */
    public static class InvalidDisplayException extends RuntimeException {...}

	//返回当前WindowManager管理的显示Display
	public Display getDefaultDisplay();

	//表示从窗口上移除View,一般是当View调用了onDetachedFromWindow也就是从Window上分开后,把它移除
	public void removeViewImmediate(View view);

	//静态内部类,是Window的布局参数,里面定义了一系列的窗口属性
	public static class LayoutParams extends ViewGroup.LayoutParams implements Parcelable{...}
}
可以看到WindowManager是一个接口,而且它继承与ViewManager。WindowManager字面理解就是窗口管理器,每一个窗口管理器都与一个的窗口显示绑定。获取实例可以通过
Context.getSystemService(Context.WINDOW_SERVICE)获取,既然继承了ViewManager,那么它也就可以进行添加删除View的操作了,不过它的操作放在它的实现类WindowManagerImpl里面。
WindowManagerImpl
public final class WindowManagerImpl implements WindowManager {
    private final WindowManagerGlobal mGlobal = WindowManagerGlobal.getInstance();
    private final Context mContext;
    private final Window mParentWindow;

	public WindowManagerImpl(Context context) {
        this(context, null);
    }

    private WindowManagerImpl(Context context, Window parentWindow) {
        mContext = context;
        mParentWindow = parentWindow;
    }

    public WindowManagerImpl createLocalWindowManager(Window parentWindow) {
        return new WindowManagerImpl(mContext, parentWindow);
    }

	@Override
    public void addView(@NonNull View view, @NonNull ViewGroup.LayoutParams params) {
        applyDefaultToken(params);
        mGlobal.addView(view, params, mContext.getDisplay(), mParentWindow);
    }

    @Override
    public void updateViewLayout(@NonNull View view, @NonNull ViewGroup.LayoutParams params) {
        applyDefaultToken(params);
        mGlobal.updateViewLayout(view, params);
    }

	@Override
    public void removeView(View view) {
        mGlobal.removeView(view, false);
    }

    @Override
    public void removeViewImmediate(View view) {
        mGlobal.removeView(view, true);
    }
}
可以看到WindowManagerImpl里面有一个成员变量WindowManagerGlobal,而真正的实现则是在WindowManagerGlobal了,其自己定义了套实现。
public final class WindowManagerGlobal {
	public void addView(View view, ViewGroup.LayoutParams params,
            Display display, Window parentWindow) {
   }

	public void updateViewLayout(View view, ViewGroup.LayoutParams params) {
	}

	public void removeView(View view, boolean immediate) {
	}
}
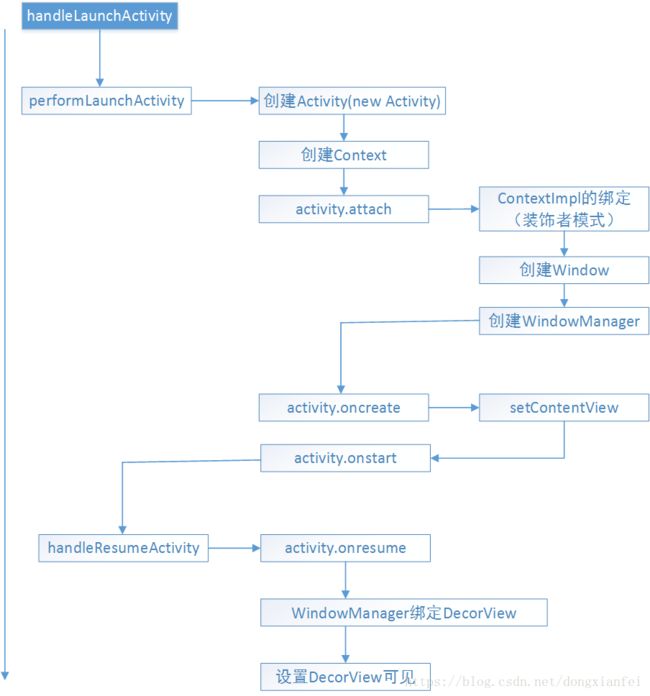
接下来我们将从Activity的启动过程来了解Window是如何被创建出来的,想要了解Activity是如何启动的,请参考另外一篇博文Activity启动流程源码分析之入门(一),我们直接从ActivityThread.handleLaunchActivity()方法来看Activity的创建。
public Activity handleLaunchActivity(ActivityClientRecord r,
            PendingTransactionActions pendingActions, Intent customIntent) {
	//创建WindowManagerService对象
	WindowManagerGlobal.initialize();

	final Activity a = performLaunchActivity(r, customIntent);
	...
}
可以看到 WindowManagerGlobal.initialize()则通过WindowManagerGlobal创建了WindowManagerService,接下来调用了performLaunchActivity。
private Activity performLaunchActivity(ActivityClientRecord r, Intent customIntent) {
	//创建Activity所需的Context
	ContextImpl appContext = createBaseContextForActivity(r);
    Activity activity = null;

	try {
            java.lang.ClassLoader cl = appContext.getClassLoader();
            //Activity通过ClassLoader创建出来
            activity = mInstrumentation.newActivity(
                    cl, component.getClassName(), r.intent);
			//创建Application
			Application app = r.packageInfo.makeApplication(false, mInstrumentation);
			appContext.setOuterContext(activity);
			//将Context与Activity进行绑定,并调用Activity的attach方法
            activity.attach(appContext, this, getInstrumentation(), r.token,
                        r.ident, app, r.intent, r.activityInfo, title, r.parent,
                        r.embeddedID, r.lastNonConfigurationInstances, config,
                        r.referrer, r.voiceInteractor, window, r.configCallback);
            //调用activity.oncreate
            mInstrumentation.callActivityOnCreate(activity, r.state, r.persistentState);
        }
}
我们这边着重分析Activity.attach()方法。
final void attach(Context context, ActivityThread aThread,
            Instrumentation instr, IBinder token, int ident,
            Application application, Intent intent, ActivityInfo info,
            CharSequence title, Activity parent, String id,
            NonConfigurationInstances lastNonConfigurationInstances,
            Configuration config, String referrer, IVoiceInteractor voiceInteractor,
            Window window, ActivityConfigCallback activityConfigCallback) {
	//ContextImpl的绑定
	attachBaseContext(context);
	//在当前Activity创建Window
	mWindow = new PhoneWindow(this, window, activityConfigCallback);
    mWindow.setWindowControllerCallback(this);
    mWindow.setCallback(this);
    mWindow.setOnWindowDismissedCallback(this);
    mWindow.getLayoutInflater().setPrivateFactory(this);
	//...
	//为Window设置WindowManager
	mWindow.setWindowManager(
                (WindowManager)context.getSystemService(Context.WINDOW_SERVICE),
                mToken, mComponent.flattenToString(),
                (info.flags & ActivityInfo.FLAG_HARDWARE_ACCELERATED) != 0);
    //创建完后通过getWindowManager就可以得到WindowManager实例
	mWindowManager = mWindow.getWindowManager();
}
可以看到在Activity创建到attach的时候,对应的Window窗口也被创建起来,而且Window也与WindowManager绑定。而mWindow,和mWindowManager则是Activity的成员变量,可以看到这里WindiwManager的创建是context.getSystemService(Context.WINDOW_SERVICE)。
public void setWindowManager(WindowManager wm, IBinder appToken, String appName,
            boolean hardwareAccelerated) {
        //...
        if (wm == null) {
            wm = (WindowManager)mContext.getSystemService(Context.WINDOW_SERVICE);
        }
        mWindowManager = ((WindowManagerImpl)wm).createLocalWindowManager(this);
    }
接着创建WindowManager的实现类,我们平时在Activity中使用getWindow()和getWindowManager,就是返回对应这两个成员变量。
调用了performLauncherActiviy来创建Activity以及Activity所需要的Context,Window,调用了Activity的onCreate,onStart方法,而接下来进入handleResumeActivity()。
final void handleResumeActivity(IBinder token,
            boolean clearHide, boolean isForward, boolean reallyResume) {

        //调用activity.onResume,把activity数据记录更新到ActivityClientRecord
        ActivityClientRecord r = performResumeActivity(token, clearHide);

        if (r != null) {
            final Activity a = r.activity;
            /*
            activity.mStartedActivity是用来标记启动Activity,有没有带返回值,
            一般我们startActivity(intent)是否默认是startActivityForResult(intent,-1),
            默认值是-1,所以这里mStartedActivity = false
            */
            boolean willBeVisible = !a.mStartedActivity;
            ...
            /*
            mFinished标记Activity有没有结束,
            而r.window一开始activity并未赋值给ActivityClientRecord,所以这里为null
            */
            if (r.window == null && !a.mFinished && willBeVisible) {
                r.window = r.activity.getWindow();
                //此处将DecorView进行隐藏
                View decor = r.window.getDecorView();
                decor.setVisibility(View.INVISIBLE);
                ViewManager wm = a.getWindowManager();
                WindowManager.LayoutParams l = r.window.getAttributes();
                a.mDecor = decor;
                l.type = WindowManager.LayoutParams.TYPE_BASE_APPLICATION;
                l.softInputMode |= forwardBit;
                if (a.mVisibleFromClient) {
                    a.mWindowAdded = true;
                    //把当前的DecorView与WindowManager绑定一起
                    wm.addView(decor, l);
                }

            ...
            if (!r.activity.mFinished && willBeVisible
                    && r.activity.mDecor != null && !r.hideForNow) {
             	/*
             	标记当前的Activity有没有设置新的配置参数,比如现在手机是横屏的,
             	之后你转成竖屏,那么这里的newCofig就会被赋值,表示参数改变
             	*/
                if (r.newConfig != null) {
                    r.tmpConfig.setTo(r.newConfig);
                    if (r.overrideConfig != null) {
                        r.tmpConfig.updateFrom(r.overrideConfig);
                    }
                    //然后调用这个方法回调,表示屏幕参数发生了改变(onConfigurationChanged)
                    performConfigurationChanged(r.activity, r.tmpConfig);
                ...
                WindowManager.LayoutParams l = r.window.getAttributes();
                	//改变之后update更新当前窗口的DecorView
                    if (r.activity.mVisibleFromClient) {
                        ViewManager wm = a.getWindowManager();
                        View decor = r.window.getDecorView();
                        wm.updateViewLayout(decor, l);
                    }
                }

                r.activity.mVisibleFromServer = true;
                mNumVisibleActivities++;
                if (r.activity.mVisibleFromClient) {
                	//由于前面设置了INVASIBLE,所以现在要把DecorView显示出来了
                    r.activity.makeVisible();
                }
            }

           //通知ActivityManagerService,Activity完成Resumed
           ActivityManagerNative.getDefault().activityResumed(token);

    }
先获取当前Activity的Window(getWindow())进而获取到DecorView(getDevorView()),再获取当前Activity的WindowManager(getWindowManager()),将DecorView与WindowManager进行绑定。
我们来到handleResumeActivity的最后,
if (r.activity.mVisibleFromClient) {
	//由于前面设置了INVASIBLE,所以现在要把DecorView显示出来了
	r.activity.makeVisible();
}

void makeVisible() {
	if (!mWindowAdded) {
		ViewManager wm = getWindowManager();
        wm.addView(mDecor, getWindow().getAttributes());
        mWindowAdded = true;
    }
	mDecor.setVisibility(View.VISIBLE);
}

public void setVisible(boolean visible) {
	if (mVisibleFromClient != visible) {
		mVisibleFromClient = visible;
        if (mVisibleFromServer) {
			if (visible) makeVisible();
            else mDecor.setVisibility(View.INVISIBLE);
        }
    }
}
可以看到如果当前DecorView还未添加到WindwManager的话,则重新添加,最后设置为VISIBLE,
而我们平常在activity中使用setVisibility,也就是在设置DecorView是VISIBLE还是INVASIBLE。
至此,Activity被启动起来,视图(DecorView)也被创建(Window)管理(WindowManager)起来了。
- ViewManager接口定义了一组规则,也就是add、update、remove来操作View接口,ViewGroup实现了该接口;
- WindowManager的实现类是WindowManagerImpl,而它则是通过WindowManagerGlobal代理来实现。WindowManager用来在应用与Window之间的接口、窗口顺序、消息等的管理;
