Android视图绘制流程解析(二)
紧接着上一篇的分析Android视图绘制流程解析(一),我们接下来看onLayout进行布局。
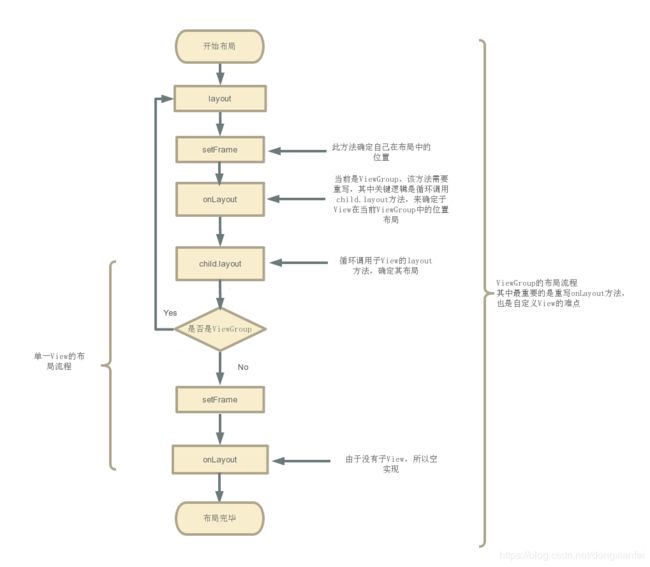
onLayout()
布局是自上而下进行的,不同的是ViewGroup先在layout()中确定自己的布局,然后在onLayout()方法中再调用子View的layout()方法,让子View布局。在Measure过程中,ViewGroup一般是先测量子View的大小,然后再确定自身的大小。
mView.layout(0, 0, mView.mMeasuredWidth, mView.mMeasuredHeight);
layout()方法接收四个参数,分别代表着左、上、右、下的坐标,当然这个坐标是相对于当前视图的父视图而言的。可以看到,这里还把刚才测量出的宽度和高度传到了layout()方法中。
public void layout(int l, int t, int r, int b) {

	//当前视图的四个顶点
	int oldL = mLeft;
	int oldT = mTop;
	int oldB = mBottom;
	int oldR = mRight;

	// setFrame() / setOpticalFrame():确定View自身的位置
    // 即初始化四个顶点的值,然后判断当前View大小和位置是否发生了变化并返回
	boolean changed = isLayoutModeOptical(mParent) ?
                setOpticalFrame(l, t, r, b) : setFrame(l, t, r, b);

	//如果视图的大小和位置发生变化,会调用onLayout()
    if (changed || (mPrivateFlags & PFLAG_LAYOUT_REQUIRED) == PFLAG_LAYOUT_REQUIRED) {
        //onLayout():确定该View所有的子View在父容器的位置
        onLayout(changed, l, t, r, b);
    }
}

protected void onLayout(boolean changed, int left, int top, int right, int bottom) {
}
在layout()方法中,首先会调用setFrame()方法来判断视图的大小是否发生过变化,以确定有没有必要对当前的视图进行重绘,同时还会在这里把传递过来的四个参数分别赋值给mLeft、mTop、mRight和mBottom这几个变量。
另外我们看到View中的onLayout()方法是一个空方法,因为onLayout()过程是为了确定视图在布局中所在的位置,而这个操作应该是由布局来完成的,即父视图决定子视图的显示位置,那我们来看一下ViewGroup的onLayout()方法。
protected abstract void onLayout(boolean changed,
            int l, int t, int r, int b);
可以看到,ViewGroup中的onLayout()方法竟然是一个抽象方法,这就意味着所有ViewGroup的子类都必须重写这个方法。没错,像LinearLayout、RelativeLayout等布局,都要重写了这个方法,然后在内部按照各自的规则对子视图进行布局的。
接下来我们看一个示例:
public class SimpleLayout extends ViewGroup {

	public SimpleLayout(Context context, AttributeSet attrs) {
		super(context, attrs);
	}

	@Override
	protected void onMeasure(int widthMeasureSpec, int heightMeasureSpec) {
		super.onMeasure(widthMeasureSpec, heightMeasureSpec);
		if (getChildCount() > 0) {
			View childView = getChildAt(0);
			measureChild(childView, widthMeasureSpec, heightMeasureSpec);
		}
	}

	@Override
	protected void onLayout(boolean changed, int l, int t, int r, int b) {
		if (getChildCount() > 0) {
			View childView = getChildAt(0);
			childView.layout(0, 0, childView.getMeasuredWidth(), childView.getMeasuredHeight());
		}
	}
}
onMeasure()方法会在onLayout()方法之前调用,因此这里在onMeasure()方法中判断SimpleLayout中是否有包含一个子视图,如果有的话就调用measureChild()方法来测量出子视图的大小。
接着在onLayout()方法中同样判断SimpleLayout是否有包含一个子视图,然后调用这个子视图的layout()方法来确定它在SimpleLayout布局中的位置,这里传入的四个参数依次是0、0、childView.getMeasuredWidth()和childView.getMeasuredHeight(),分别代表着子视图在SimpleLayout中左上右下四个点的坐标。其中,调用childView.getMeasuredWidth()和childView.getMeasuredHeight()方法得到的值就是在onMeasure()方法中测量出的宽和高。
<com.example.viewtest.SimpleLayout xmlns:android="http://schemas.android.com/apk/res/android"
    android:layout_width="match_parent"
    android:layout_height="match_parent" >

    <ImageView
        android:layout_width="wrap_content"
        android:layout_height="wrap_content"
        android:src="@drawable/ic_launcher"
        />
com.example.viewtest.SimpleLayout>
可以看到,我们能够像使用普通的布局文件一样使用SimpleLayout,只是注意它只能包含一个子视图,多余的子视图会被舍弃掉。这里SimpleLayout中包含了一个ImageView,并且ImageView的宽高都是wrap_content。
在onLayout()过程结束后,我们就可以调用getWidth()方法和getHeight()方法来获取视图的宽高了。但getWidth()方法和getMeasureWidth()方法到底有什么区别呢?
首先getMeasureWidth()方法在measure()过程结束后就可以获取到了,而getWidth()方法要在layout()过程结束后才能获取到。另外,getMeasureWidth()方法中的值是通过setMeasuredDimension()方法来进行设置的,而getWidth()方法中的值则是通过视图右边的坐标减去左边的坐标计算出来的。
观察SimpleLayout中onLayout()方法的代码,这里给子视图的layout()方法传入的四个参数分别是0、0、childView.getMeasuredWidth()和childView.getMeasuredHeight(),因此getWidth()方法得到的值就是childView.getMeasuredWidth() - 0 = childView.getMeasuredWidth() ,所以此时getWidth()方法和getMeasuredWidth() 得到的值就是相同的,但如果你将onLayout()方法中的代码进行如下修改:
@Override
protected void onLayout(boolean changed, int l, int t, int r, int b) {
	if (getChildCount() > 0) {
		View childView = getChildAt(0);
		childView.layout(0, 0, 200, 200);
	}
}
这样getWidth()方法得到的值就是200 - 0 = 200,不会再和getMeasuredWidth()的值相同了。当然这种做法充分不尊重measure()过程计算出的结果,通常情况下是不推荐这么写的。