一、zabbix部署架构
二、正文
2.1、部署环境
操作系统:RedHat 6.5 x86_64
Nginx:  1.15.7
PHP: 7.1.29
Mysql: 5.7.26
Zabbix: 4.2.1
openssl: 1.0.2r
测试系统配置: 1核1G20G
2.2、LNMP部署
2.2.1、Linux系统安装(略)
2.2.2、Nginx服务部署
[root@server1 nginx-1.15.7]# yum –y install pcre-devel
[root@server1 nginx-1.15.7]#  ./configure --prefix=/usr/local/nginx --with-http_ssl_module --with-http_v2_module --with-http_stub_status_module --with-pcre --with-openssl=/home/ipnet/Update_openssh_v8.0p1_rhel4567_20190425/openssl-1.0.2r --with-zlib=/home/ipnet/Update_openssh_v8.0p1_rhel4567_20190425/zlib-1.2.11
Configuration summary   + using system PCRE library   + using OpenSSL library: /home/ipnet/upload/Update_openssh_v7.9p1_rhel4567_20181228/openssl-1.0.2o   + using zlib library: /home/ipnet/upload/Update_openssh_v7.9p1_rhel4567_20181228/zlib-1.2.11
  nginx path prefix: "/usr/local/nginx"   nginx binary file: "/usr/local/nginx/sbin/nginx"   nginx modules path: "/usr/local/nginx/modules"   nginx configuration prefix: "/usr/local/nginx/conf"   nginx configuration file: "/usr/local/nginx/conf/nginx.conf"   nginx pid file: "/usr/local/nginx/logs/nginx.pid"   nginx error log file: "/usr/local/nginx/logs/error.log"   nginx http access log file: "/usr/local/nginx/logs/access.log"   nginx http client request body temporary files: "client_body_temp"   nginx http proxy temporary files: "proxy_temp"   nginx http fastcgi temporary files: "fastcgi_temp"   nginx http uwsgi temporary files: "uwsgi_temp"   nginx http scgi temporary files: "scgi_temp"
[root@server1 nginx-1.15.7]# make && make install
注:
--with-http_ssl_module 表示支持https方式
--with-http_v2_module 表示支持http2.0
--with-http_stub_module 表示支持nginx状态查询
--with-pcre 表示支持rewrite功能
--with-openssl 指向openssl安装目录
--with-zlib  指向 zlib安装目录
2.2.3、Mysql5.7服务部署
2.2.3.1、卸载系统自带的mysql服务
[root@server1 upload]# rpm -qa|grep mysql
mysql-devel-5.1.73-7.el6.x86_64
mysql-libs-5.1.73-7.el6.x86_64
mysql-server-5.1.73-7.el6.x86_64
mysql-5.1.73-7.el6.x86_64
[root@server1 upload]# rpm -e mysql-devel
[root@server1 upload]# rpm -e mysql-server
warning: /var/log/mysqld.log saved as /var/log/mysqld.log.rpmsave
[root@server1 upload]# rpm -e mysql
[root@server1 MariaDB]# rpm  -e --nodeps mysql-libs
[root@server1 upload]# rpm -qa|grep mysql
[root@server1 upload]#
2.2.3.2、安装最新版Mysql
删除旧版本mysql
[root@server1 upload]# rpm -qa|grep mysql
mysql-devel-5.1.73-7.el6.x86_64
mysql-libs-5.1.73-7.el6.x86_64
php-mysql-5.3.3-47.el6.x86_64
mysql-server-5.1.73-7.el6.x86_64
mysql-5.1.73-7.el6.x86_64
[root@server1 upload]#
[root@server1 upload]#
[root@server1 upload]# rpm -e mysql-devel
[root@server1 upload]# rpm -e mysql-libs
error: Failed dependencies:
     libmysqlclient.so.16()(64bit) is needed by (installed) postfix-2:2.6.6-2.2.el6_1.x86_64
     libmysqlclient.so.16()(64bit) is needed by (installed) perl-DBD-MySQL-4.013-3.el6.x86_64
     libmysqlclient.so.16()(64bit) is needed by (installed) mysql-5.1.73-7.el6.x86_64
     libmysqlclient.so.16()(64bit) is needed by (installed) mysql-server-5.1.73-7.el6.x86_64
     libmysqlclient.so.16()(64bit) is needed by (installed) php-mysql-5.3.3-47.el6.x86_64
     libmysqlclient.so.16(libmysqlclient_16)(64bit) is needed by (installed) postfix-2:2.6.6-2.2.el6_1.x86_64
     libmysqlclient.so.16(libmysqlclient_16)(64bit) is needed by (installed) perl-DBD-MySQL-4.013-3.el6.x86_64
     libmysqlclient.so.16(libmysqlclient_16)(64bit) is needed by (installed) mysql-5.1.73-7.el6.x86_64
     libmysqlclient.so.16(libmysqlclient_16)(64bit) is needed by (installed) mysql-server-5.1.73-7.el6.x86_64
     libmysqlclient.so.16(libmysqlclient_16)(64bit) is needed by (installed) php-mysql-5.3.3-47.el6.x86_64
     libmysqlclient_r.so.16()(64bit) is needed by (installed) MySQL-python-1.2.3-0.3.c1.1.el6.x86_64
     libmysqlclient_r.so.16()(64bit) is needed by (installed) mysql-5.1.73-7.el6.x86_64
     libmysqlclient_r.so.16()(64bit) is needed by (installed) mysql-server-5.1.73-7.el6.x86_64
     libmysqlclient_r.so.16(libmysqlclient_16)(64bit) is needed by (installed) MySQL-python-1.2.3-0.3.c1.1.el6.x86_64
     libmysqlclient_r.so.16(libmysqlclient_16)(64bit) is needed by (installed) mysql-5.1.73-7.el6.x86_64
     libmysqlclient_r.so.16(libmysqlclient_16)(64bit) is needed by (installed) mysql-server-5.1.73-7.el6.x86_64
     mysql-libs is needed by (installed) postfix-2:2.6.6-2.2.el6_1.x86_64
     mysql-libs = 5.1.73-7.el6 is needed by (installed) mysql-5.1.73-7.el6.x86_64
[root@server1 upload]# rpm -e php-mysql
[root@server1 upload]# rpm -e mysql-server
warning: /var/log/mysqld.log saved as /var/log/mysqld.log.rpmsave
[root@server1 upload]# rpm -e mysql-5.1.73
[root@server1 upload]# rpm -qa|grep mysql
mysql-libs-5.1.73-7.el6.x86_64
[root@server1 upload]#
安装mysql5.7
[root@server1 upload]# rpm -Uvh mysql-community-libs-compat-5.7.26-1.el6.x86_64.rpm mysql-community-libs-5.7.26-1.el6.x86_64.rpm mysql-community-server-5.7.26-1.el6.x86_64.rpm mysql-community-client-5.7.26-1.el6.x86_64.rpm mysql-community-common-5.7.26-1.el6.x86_64.rpm mysql-community-devel-5.7.26-1.el6.x86_64.rpmwarning: mysql-community-libs-compat-5.7.26-1.el6.x86_64.rpm: Header V3 DSA/SHA1 Signature, key ID 5072e1f5: NOKEYPreparing...                ########################################### [100%]    1:mysql-community-common ########################################### [ 20%]    2:mysql-community-libs   ########################################### [ 40%]    3:mysql-community-client ########################################### [ 60%]    4:mysql-community-server ########################################### [ 80%]    5:mysql-community-libs-co########################################### [100%]
    6:mysql-community-devel  ########################################### [100%]
修改my.cnf
[root@server1 upload]# cat /etc/my.cnf
[client]
default-character-set = utf8
socket=/var/lib/mysql/mysql.sock
[mysqld]
max_connections = 2000
open_files_limit = 30000
table_open_cache = 20000
explicit_defaults_for_timestamp = true
transaction-isolation = READ-COMMITTED
max_allowed_packet = 128M
innodb_buffer_pool_size = 20G  这个一般是主机内存的80%
innodb_log_file_size = 512M
innodb_file_per_table = 1
innodb_log_buffer_size=4M
innodb_thread_concurrency=64
innodb_flush_log_at_trx_commit=0
innodb_flush_method=O_DIRECT
lower_case_table_names = 1
#collation-server = gbk_bin
# character-set-server = gbk
default-storage-engine = INNODB
join_buffer_size = 512M
sort_buffer_size = 20M
read_rnd_buffer_size = 20M

log_timestamps = system
collation-server = utf8_bin
character-set-server = utf8
#validate_password_policy = 0
#validate_password_number_count = 0
#validate_password_length = 4
#validate_password_special_char_count = 0
default_password_lifetime = 0
innodb_read_io_threads = 16
innodb_write_io_threads = 16
datadir=/var/lib/mysql
socket=/var/lib/mysql/mysql.sock

skip-host-cache
skip-name-resolve

# Disabling symbolic-links is recommended to prevent assorted security risks
symbolic-links=0
# Recommended in standard MySQL setup
#sql_mode=NO_ENGINE_SUBSTITUTION,STRICT_TRANS_TABLES
#sql_mode='STRICT_TRANS_TABLES,NO_ZERO_IN_DATE,ERROR_FOR_DIVISION_BY_ZERO,NO_AUTO_CREATE_USER,NO_ENGINE_SUBSTITUTION'
sql_mode='STRICT_TRANS_TABLES,NO_AUTO_CREATE_USER,NO_ENGINE_SUBSTITUTION'

[mysqld_safe]
log-error=/var/log/mysqld.log
pid-file=/var/run/mysqld/mysqld.pid
[root@server1 upload]#
启动mysql服务
修改mysql初始密码,因为我是拿来测试的,不想密码设置太复杂,我这里将密码复杂度(默认需要有数字,大小写字母,特殊字符)和密码长度(默认是8位)都调低了。
mysql> set global validate_password_policy=0;Query OK, 0 rows affected (0.00 sec)
mysql> set global validate_password_length=1;Query OK, 0 rows affected (0.00 sec)
mysql> alter user 'root'@'localhost' identified by 'redhat';Query OK, 0 rows affected (0.00 sec)
mysql>
创建zabbix数据库并设置zabbix用户访问权限
mysql> create database zabbix character set utf8 collate utf8_bin;Query OK, 1 row affected (0.00 sec)
mysql> grant all on zabbix.* to zabbix@localhost identified by 'redhat';Query OK, 0 rows affected, 2 warnings (0.00 sec)
mysql> grant all on *.* to root@'127.0.0.1' identified by 'redhat';Query OK, 0 rows affected, 1 warning (0.44 sec)
mysql> flush privileges;Query OK, 0 rows affected (0.00 sec)
mysql>
导入zabbix基础数据到数据库中,注意按顺序导入
[root@server1 zabbix-4.2.1]# cd /home/ipnet/zabbix-4.2.1/zabbix-4.2.1
[root@server1 zabbix-4.2.1]# ls
aclocal.m4  build      conf          config.status  configure.ac  depcomp    INSTALL     Makefile     man      NEWS    src
AUTHORS     ChangeLog  config.guess  config.sub     COPYING       frontends  install-sh  Makefile.am  misc     README
bin         compile    config.log    configure      database      include    m4          Makefile.in  missing  sass
[root@server1 zabbix-4.2.1]# cd database/
[root@server1 database]# ls
elasticsearch  ibm_db2  Makefile  Makefile.am  Makefile.in  mysql  oracle  postgresql  sqlite3
[root@server1 database]# cd mysql/
[root@server1 mysql]# ls
data.sql  images.sql  Makefile  Makefile.am  Makefile.in  schema.sql
[root@server1 mysql]# mysql -uzabbix -predhat zabbix < schema.sql
mysql: [Warning] Using a password on the command line interface can be insecure.
[root@server1 mysql]# mysql -uzabbix -predhat zabbix < images.sql
mysql: [Warning] Using a password on the command line interface can be insecure.
[root@server1 mysql]# mysql -uzabbix -predhat zabbix < data.sql
mysql: [Warning] Using a password on the command line interface can be insecure.
[root@server1 mysql]#
2.2.4、PHP服务部署
依赖安装
[root@server1 upload]# yum -y install gcc gcc-c++ autoconf libjpeg libjpeg-devel libpng libpng-devel freetype freetype-devel libxml2 libxml2-devel zlib zlib-devel glibc glibc-devel glib2  glib2-devel bzip2 bzip2-devel ncurses ncurses-devel curl curl-devel e2fsprogs e2fsprogs-devel krb5 krb5-devel libidn libidn-devel openssl openssl-devel openldap  openldap-devel openldap.i686 openldap-devel.i686 nss_ldap openldap-clients openldap-servers net-snmp net-snmp-devel libxslt-devel
[root@server1 upload]# rpm -ivh libmcrypt-devel-2.5.8-9.el6.x86_64.rpm libmcrypt-2.5.8-9.el6.x86_64.rpm
Preparing...                ########################################### [100%]    1:libmcrypt              ########################################### [ 50%]    2:libmcrypt-devel        ########################################### [100%]
[root@server1 php-7.1.29]# './configure' '--prefix=/usr/local/php-7.1.29' '--with-config-file-path=/usr/local/php-7.1.29/etc' '--with-mysqli=mysqlnd' '--with-pdo-mysql=mysqlnd' '--enable-mbstring' '--with-freetype-dir' '--with-jpeg-dir' '--with-png-dir' '--with-iconv-dir' '--with-zlib' '--with-libxml-dir' '--enable-pdo' '--with-snmp' '--with-xsl' '--enable-xml' '--disable-rpath' '--enable-bcmath' '--enable-shmop' '--enable-sysvsem' '--enable-inline-optimization' '--with-curl' '--enable-mbregex' '--enable-fpm' '--with-mcrypt' '--with-gd' '--enable-gd-native-ttf' '--with-openssl' '--with-mhash' '--enable-sockets' '--with-bz2' '--enable-pcntl' '--with-xmlrpc' '--enable-zip' '--enable-soap' '--disable-debug' '--disable-ipv6' '--enable-opcache' '--without-pear'
[root@server1 upload]# make && make install
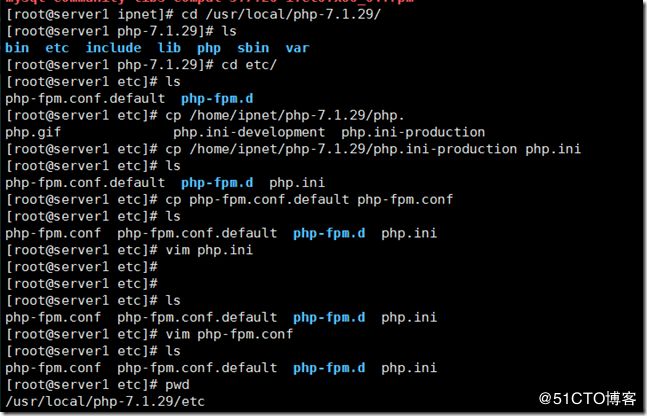
生成php-fpm.conf 和 php.ini文件
PHP配置文件修改
max_execution_time = 300
memory_limit = 128M
post_max_size = 16M
upload_max_filesize = 2M
max_input_time = 300
date.timezone = Asia/Shanghai
php-fpm引擎的配置文件
[root@server1 php-fpm.d]# egrep -v '^$|^;' www.conf
[www]
user = nobody
group = nobody
listen = 127.0.0.1:9000
listen.allowed_clients = 127.0.0.1
pm = dynamic
pm.max_children = 50
pm.start_servers = 20
pm.min_spare_servers = 20
pm.max_spare_servers = 30
pm.max_requests = 500
slowlog = /var/log/php-fpm/$pool.log.slow
request_slowlog_timeout = 10s
[root@server1 php-fpm.d]#
[root@server1 php-fpm.d]# mkdir –p /var/log/php-fpm
[root@server1 php-fpm.d]# /usr/local/php-7.1.29/sbin/php-fpm
[root@server1 php-fpm.d]# netstat -tnlp|grep 9000
tcp        0      0 127.0.0.1:9000              0.0.0.0:*                   LISTEN      91358/php-fpm
[root@server1 php-fpm.d]
2.2.5 PHP和Nginx关联
[root@server1 php-fpm.d]# vim /usr/local/nginx/conf/nginx.conf
[root@server1 php-fpm.d]# egrep -v '^\s+#.*|^$|^#' /usr/local/nginx/conf/nginx.conf
user  nobody;
worker_processes  1;
error_log  logs/error.log;
pid        logs/nginx.pid;
events {
     worker_connections  1024;
}
http {
     include       mime.types;
     default_type  application/octet-stream;
     sendfile        on;
     keepalive_timeout  65;
     server {
         listen       80;
         server_name  localhost;
         location / {
             root   html;
             index  index.html index.htm;
         }
         error_page   500 502 503 504  /50x.html;
         location = /50x.html {
             root   html;
         }
         location ~ \.php$ {
             root           html;
             fastcgi_pass   127.0.0.1:9000;
             fastcgi_index  index.php;
             fastcgi_param  SCRIPT_FILENAME  $document_root$fastcgi_script_name;
             include        fastcgi_params;
         }
     }
}
[root@server1 php-fpm.d]#
[root@server1 php-fpm.d]# /usr/local/nginx/sbin/nginx
[root@server1 php-fpm.d]# netstat -tnlp|grep 80
tcp        0      0 0.0.0.0:80                  0.0.0.0:*                   LISTEN      91399/nginx
[root@server1 php-fpm.d]#
重点
nginx配置文件 fastcgi_param SCRIPT_FILENAME /scripts$fastcgi_script_name; 这一行需要改成fastcgi_param SCRIPT_FILENAME $document_root$fastcgi_script_name;
否则界面访问php文件会报File not Found的错误,nginx后台日志也会报Primary script unknown" while reading response header from upstream的报错,$document_root 代表当前请求在root指令中指定的值,更改后重启Nginx服务即可恢复正常访问。
测试Nginx打开PHP页面是否正常
直接在/usr/local/nginx/html 目录中新建index.php和mysql_connect.php
[root@server1 html]# cat index.php

[root@server1 html]#
[root@server1 html]# cat test.php
close();
?>
[root@server1 html]#
2.3、zabbix部署
必要依赖环境安装
[root@server1 zabbix-4.2.1]# rpm -ivh /home/ipnet/zabbix-4.2.1/libevent-devel-1.4.13-4.el6.x86_64.rpm /home/ipnet/zabbix-4.2.1/libevent-headers-1.4.13-4.el6.noarch.rpm /home/ipnet/zabbix-4.2.1/libevent-doc-1.4.13-4.el6.noarch.rpm
warning: /home/ipnet/zabbix-4.2.1/libevent-devel-1.4.13-4.el6.x86_64.rpm: Header V3 RSA/SHA1 Signature, key ID c105b9de: NOKEY
Preparing...                ########################################### [100%]
    1:libevent-headers       ########################################### [ 33%]
    2:libevent-doc           ########################################### [ 67%]
    3:libevent-devel         ########################################### [100%]
[root@server1 zabbix-4.2.1]#
如果要zabbix服务器支持监控JAVA应用程序的性能需要事先在服务端安装java编译环境然后启用—enable-java 参数
[root@server1 zabbix-4.2.1]# rpm -ivh /home/ipnet/jdk-7u80-linux-x64.rpm
如果需要监控服务器硬件可以加上 –with-openipmi 参数,这个需要事先安装好OpenIPMI和OpenIPMI-devel RPM包,也可以用SNMP来监控服务器硬件,我因为是用的SNMP来获取服务器硬件信息,这里我没有将这个功能编译进去。
编译zabbix服务端应用
[root@server1 zabbix-4.2.1]# ./configure --prefix=/usr/local/zabbix-3.4.1 --enable-server --enable-agent --with-mysql --with-net-snmp --with-libcurl --with-libxml2 --with-openssl --enable-java --enable-ipv6
[root@server1 zabbix-4.2.1]# make && make install
[root@server1 conf]# egrep -v '^$|^#' /usr/local/zabbix-3.4.1/etc/zabbix_server.conf
ListenPort=10051
LogFile=/tmp/zabbix_server.log
Timeout=4
LogSlowQueries=3000
StatsAllowedIP=127.0.0.1
DBHost=localhost
DBName=zabbix
DBUser=zabbix
DBPassword=redhat
ListenIP=0.0.0.0
[root@server1 conf]
[root@server1 conf]# useradd -M zabbix -s /sbin/nologin
[root@server1 conf]# /usr/local/zabbix-3.4.1/sbin/zabbix_server
[root@server1 conf]# /usr/local/zabbix-3.4.1/sbin/zabbix_agentd
[root@server1 conf]# ps -ef|grep zabbix
zabbix     3973      1  0 16:27 ?        00:00:00 /usr/local/zabbix-3.4.1/sbin/zabbix_server
zabbix     3978      1  0 16:27 ?        00:00:00 /usr/local/zabbix-3.4.1/sbin/zabbix_agentd
zabbix     3979   3978  0 16:27 ?        00:00:00 /usr/local/zabbix-3.4.1/sbin/zabbix_agentd: collector [idle 1 sec]
zabbix     3980   3978  0 16:27 ?        00:00:00 /usr/local/zabbix-3.4.1/sbin/zabbix_agentd: listener #1 [waiting for connection]
zabbix     3981   3978  0 16:27 ?        00:00:00 /usr/local/zabbix-3.4.1/sbin/zabbix_agentd: listener #2 [waiting for connection]
zabbix     3982   3978  0 16:27 ?        00:00:00 /usr/local/zabbix-3.4.1/sbin/zabbix_agentd: listener #3 [waiting for connection]
zabbix     3983   3978  0 16:27 ?        00:00:00 /usr/local/zabbix-3.4.1/sbin/zabbix_agentd: active checks #1 [idle 1 sec]
root       3985   2470  0 16:27 pts/0    00:00:00 grep zabbix
[root@server1 conf]#
拷贝zabbix web 文件到html目录下并改名
[root@server1 zabbix-4.2.1]# cp -rf /home/ipnet/zabbix-4.2.1/zabbix-4.2.1/frontends/php /usr/local/nginx/html/
[root@server1 zabbix-4.2.1]# cd /usr/local/nginx/html/ && mv php zabbix
[root@server1 html]# ls -l /usr/local/nginx/html/
总用量 20
-rw-r--r--.  1 root root  494 5月  23 13:07 50x.html
-rw-r--r--.  1 root root  612 5月  23 13:07 index.html
-rw-r--r--.  1 root root   20 5月  23 14:01 index.php
-rw-r--r--.  1 root root  157 5月  23 14:48 test.php
drwxr-xr-x. 13 root root 4096 5月  23 16:07 zabbix
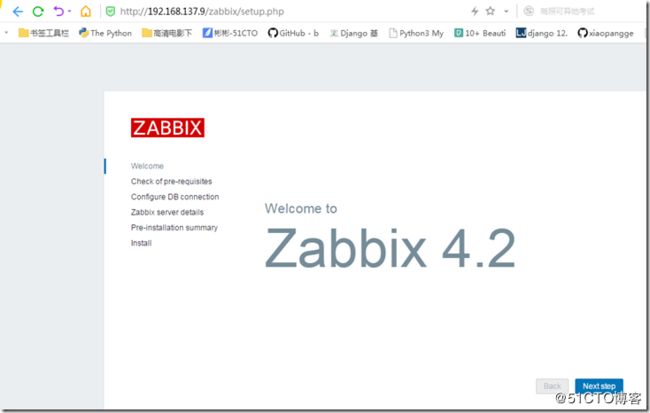
浏览器打开zabbix配置界面
下面的要求都需要是OK状态再继续。
配置数据库连接,当主机填写为localhost时MySQL会采用 unix domain socket连接,当主机填写为127.0.0.1时MySQL会采用TCP/IP的方式连接,如果页面报的错误是No such file or directory,也就是说PHP找不到这个socket文件,这个时候需要修改php.ini指定mysql的socket文件位置
具体可以看https://segmentfault.com/q/1010000000328531 这个博文
首先my.cnf看下socket文件的位置
[root@server1 no-debug-non-zts-20160303]# cat /etc/my.cnf|grep socket
socket=/var/lib/mysql/mysql.sock
[root@server1 no-debug-non-zts-20160303]# egrep 'mysqli.default_socket' /usr/local/php-7.1.29/etc/php.ini
mysqli.default_socket = /var/lib/mysql/mysql.sock
[root@server1 no-debug-non-zts-20160303]#
然后重启nginx和php-fpm即可
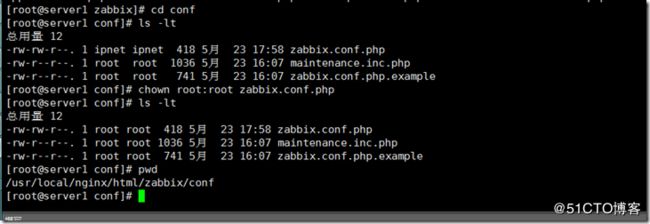
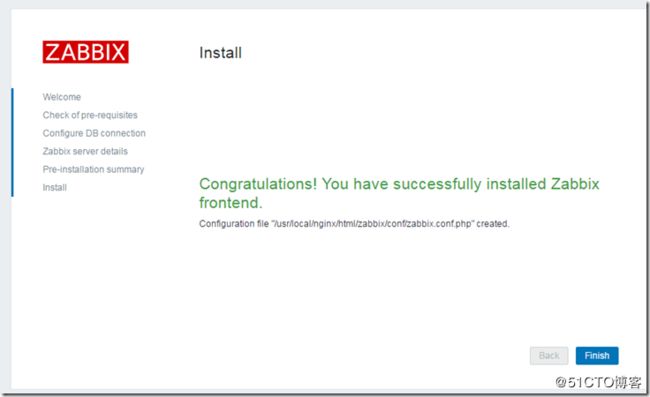
按照提示下载下来再传到对应服务器位置刷新界面即可
zabbix的默认账号和密码是 Admin/zabbix
最终打开的界面如下:


