一、前言
最近自己在学习Spring boot的过程中开发了一个组件 multithreadpool-spring-boot-starter,通过这个组件,我们可以动态根据配置文件进行多个线程池的初始化。既然有这个产出后,肯定是希望能够上传到maven中央仓库,给更多的人使用,于是就产生了这次项目发布经历。
整个过程可谓是一波三折,由于平时工作比较忙只能晚上花一个小时搞,所以在经历了近一周的时间后,终于成功发布上去了。
下面把我当时的上传过程记录下来,希望帮助更多的朋友。
二、环境准备
1> mac osx 10.14.6 : 本文主要以mac环境为准
2> Apache Maven 3.2.3 : 本文主要使用maven进行构建和发布例子的说明
三、步骤说明
1、工单创建
1> 访问sonatype并注册账号 https://issues.sonatype.org ,注意要记住账号密码,会用于我们后续的发布及相关操作
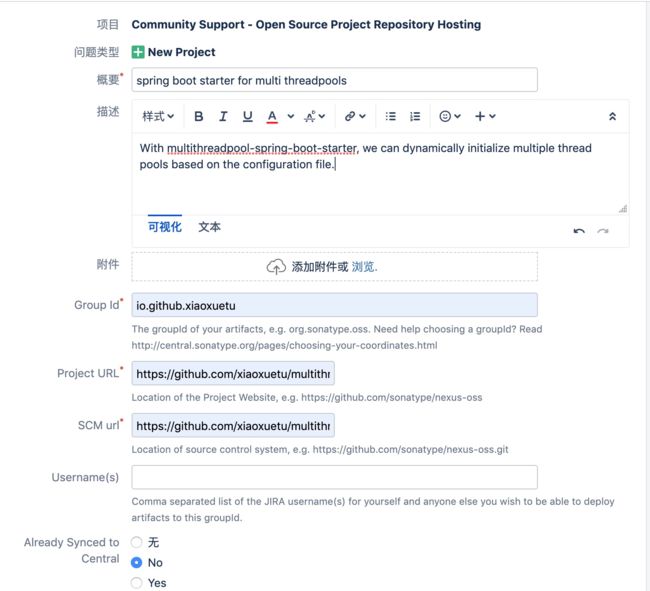
2> 如图新建一个issue,项目需要选择 Community Support - Open Source Project Repository Hosting
3> 参考下图填写概要、Group Id、项目地址、代码管理地址,填写后点击确认提交。网上很多都说需要几个小时或者隔天才有回复,我当时等了10分钟就收到回复了。此时,对方跟你说两件事情:
- 【提醒】确保 group id对应的域名是你的
- 【校验】比如我是的项目地址是github上的,他会要求我在github上创建一个和issue同名的项目确保我拥有该项目的管理权限,
完成确认并创建和issue同名的项目后,记得要在issue进行回复,具体参考: sonatype-issue 和 Github仓库
4> 在通过上述的确认和校验后,sonatype会回复你到时候maven发布会用到的snapshot地址和release地址,并提醒你首次发布后需要回复该issue,详情参考issue
2、gpg 环境安装
gpg的主要作用是生成密钥对,会用于后续我们组件发布的校验。
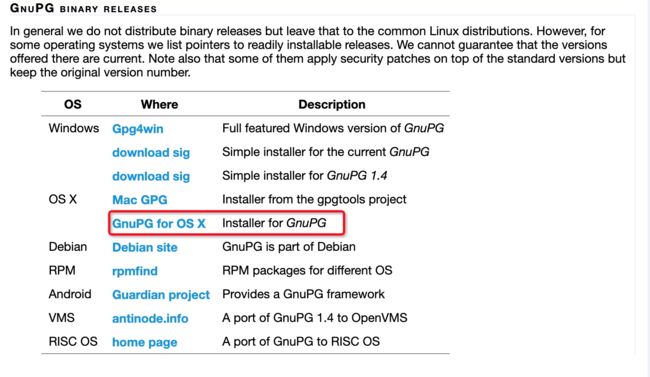
1> 下载地址:https://www.gnupg.org/download/
2> 如图红色框所示下载并安装
3> 在安装完成后,执行以下命令生成密钥对,按照提示输入账号、邮箱、密码 (PS: 此处的密码在后面发布会用到,请务必记住)
gpg2 --gen-key
4> 执行命令查看密钥, 此时控制台会输出类似下面的内容
$ gpg2 --list-keys
...
pub rsa2048 2019-04-12 [SC] [有效至:2021-04-11]
9A1640F7A2551131612D51B12D83594B7B29D86A
uid [ 绝对 ] xiaoxuetu
sub rsa2048 2019-04-12 [E] [有效至:2021-04-11]
5> 执行以下命令将公钥发布到服务器中
$ gpg --keyserver hkp://subkeys.pgp.net --send-keys 9A1640F7A2551131612D51B12D83594B7B29D86A
...
gpg: 正在发送密钥 2D83594B7B29D86A 到 hkp://subkeys.pgp.net
gpg: 发送至公钥服务器失败:Server indicated a failure
gpg: 发送至公钥服务器失败:Server indicated a failure
6> 如果控制台输出如上面类似的错误内容,则将命令中的密钥调整为 2D83594B7B29D86A
$ gpg --keyserver hkp://subkeys.pgp.net --send-keys 2D83594B7B29D86A
gpg: sending key 2D83594B7B29D86A to hkp://pool.sks-keyservers.net
3、Maven全局配置
一般情况下,maven全局配置存在于 ${HOME}/.m2/setting.xml ,如果这个目录下没有,则可以从 ${MAVEN_HOME}/conf/setting.xml 拷贝一份到 ${HOME}/.m2 目录下并进行以下修改
1> 添加服务器验证信息
    <server>
      <id>sonatype_releasesid>
      <username>your user nameusername>
      <password>your passwordpassword>
    server>
    <server>
      <id>sonatype_snapshotsid>
      <username>your user nameusername>
      <password>your passwordpassword>
    server>
2> 配置gpg验证命令
<settings>
  <profiles>
    <profile>
      <id>gpgid>
      <properties>

        <gpg.executable>gpg2gpg.executable>
        <gpg.passphrase>your passwordgpg.passphrase>
      properties>
    profile>
  profiles>
  <activeProfiles>
    <activeProfile>gpgactiveProfile>
  activeProfiles>
settings>
4、项目maven配置
1> 在项目的pom.xml中,配置相应的开源协议、仓库信息、开发人员信息和发布配置
    <licenses>
        <license>
            <name>The Apache Software License, Version 2.0name>
            <url>http://www.apache.org/licenses/LICENSE-2.0.txturl>
            <distribution>repodistribution>
        license>
    licenses>


    <scm>
        <connection>scm:git:[email protected]:xiaoxuetu/multithreadpool-spring-boot-starter.gitconnection>
        <developerConnection>scm:git:[email protected]:xiaoxuetu/multithreadpool-spring-boot-starter.git
        developerConnection>
        <url>http://github.com/xiaoxuetu/multithreadpool-spring-boot-starter/tree/masterurl>
    scm>


    <developers>
        <developer>
            <name>xiaoxuetuname>
            <email>[email protected]email>
            <organization>https://github.com/xiaoxuetuorganization>
            <timezone>+8timezone>
        developer>
    developers>


    <distributionManagement>
        <repository>

            <id>sonatype_releasesid>
            <name>Nexus Release Repositoryname>

            <url>https://oss.sonatype.org/service/local/staging/deploy/maven2url>
        repository>
        <snapshotRepository>

            <id>sonatype_snapshotsid>
            <name>Nexus Snapshot Repositoryname>

            <url>https://oss.sonatype.org/content/repositories/snapshotsurl>
        snapshotRepository>
    distributionManagement>
2> 由于发布到maven中央仓库会要求我们在上传jar到同时,必须同步发布对应到Javadoc、source、asc(利用gpg生成到校验),所以需要在maven中添加以下构建插件
    <build>
        <plugins>
            <plugin>
                <groupId>org.sonatype.pluginsgroupId>
                <artifactId>nexus-staging-maven-pluginartifactId>
                <version>1.6.7version>
                <extensions>trueextensions>
                <configuration>

                    <serverId>sonatype_releasesserverId>
                    <nexusUrl>https://oss.sonatype.org/nexusUrl>

                    <autoReleaseAfterClose>falseautoReleaseAfterClose>
                configuration>
            plugin>


            <plugin>
                <groupId>org.apache.maven.pluginsgroupId>
                <artifactId>maven-source-pluginartifactId>
                <version>2.2.1version>
                <executions>
                    <execution>
                        <id>attach-sourcesid>
                        <goals>
                            <goal>jar-no-forkgoal>
                        goals>
                    execution>
                executions>
            plugin>


            <plugin>
                <groupId>org.apache.maven.pluginsgroupId>
                <artifactId>maven-gpg-pluginartifactId>
                <version>1.5version>
                <executions>
                    <execution>

                        <id>gpgid>
                        <phase>verifyphase>
                        <goals>
                            <goal>signgoal>
                        goals>
                    execution>
                executions>
            plugin>
        plugins>
    build>
5、发布操作
1> 执行以下命令进行发布(如果 pom.xml 中 autoReleaseAfterClose 的值为true,则脚本会自动完成在平台上close、release的操作,至此你将成功发布了,否则我们继续查看第2步)
mvn clean javadoc:jar deploy -P release
2> 登录https://oss.sonatype.org,然后选择staging Repositories
3> 如下图搜索并选择需要发布的组件,依次执行Close、Release操作
4> 如果Release成功,并且你是首次发布组件,则需要到你创建到issue中回复 “我已经成功发布该组件”,经历大概2小时后,该组件将会同步到对应的maven仓库
5> 如果Close或者Release不成功,你可以如下图操作查看原因并谷歌定位,或者回复咨询
四、参考文档
1> 发布构件到 Maven 中央仓库遇到的坑: https://juejin.im/post/5cb03e1a5188251b0e4e3583
2> Working with PGP Signatures: https://central.sonatype.org/pages/working-with-pgp-signatures.html#distributing-your-public-key
3> Deploying to OSSRH with Apache Maven: https://central.sonatype.org/pages/apache-maven.html


