该篇主要为大家讲解两个用起来比较简单,但是效果却极好的strokeEnd和strokeStart。本文通过两个项目来对它们的使用进行演示。
strokeEnd以及strokeStart值的范围均为0-1,表示一段路径的结束点和起始点。对于这两个属性的解释就是这么多。苹果的开发文档也是寥寥数语。那它们能实现什么样的效果呢。请看效果图。
strokeEnd && strokeStart项目:
该gif展示的是一个类似于回形针似的动画。结合笔者前两篇文章的CAShapeLayer、UIBezierPath以及CABasicAnimation的相关知识应该会较为容易地分析出该动画的实现原理。
- 项目动画原理简要分析
在前文我们已经道出了实现该项目需要的大致知识点。通过UIBezierPath以及CAShapeLayer去绘制对应的线行图形,并结合CABasicAnimation去实现相关动画(如果对这些技术不是很熟悉可以详读笔者的前两篇文章Core Animation:CAKeyframeAnimation && mask]和iOS转场动画(Push))。
在这些技术的支撑下我们便可以很快地完成回形针的绘制了。
1.为了项目的美观,我们对控制器做一些小小的装饰,将背景颜色改为橙色。并在控制器中拖拽一个UIView,添加约束、切割圆角。在这里教大家一个在storyboard中切割圆角的一个小方法(已经清楚的可自行忽略)。-
storyboard设置圆角
打开storyboard选择刚添加上的UIView,将目光移到属性面板界面,具体位置如下图:
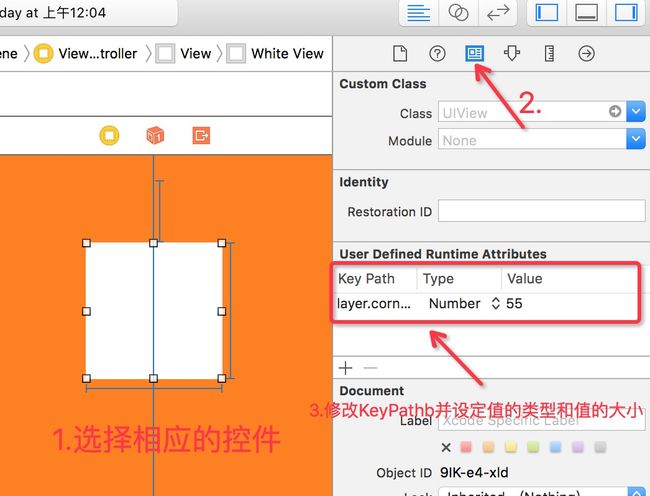
-
2.使用UIBezierPath和CAShapeLayer绘制回形针图形
UIBezierPath *path = [UIBezierPath bezierPath];
[path moveToPoint:CGPointMake(90, 90)];
[path addLineToPoint:CGPointMake(90, 40)];

[path addArcWithCenter:CGPointMake(65, 40) radius:25 startAngle:0 endAngle:M_PI clockwise:NO];
[path addLineToPoint:CGPointMake(40, 90)];
[path addArcWithCenter:CGPointMake(55, 90) radius:15 startAngle:M_PI endAngle:0 clockwise:NO];
[path addLineToPoint:CGPointMake(70, 50)];
[path addArcWithCenter:CGPointMake(62, 50) radius:8 startAngle:0 endAngle:M_PI clockwise:NO];
[path addLineToPoint:CGPointMake(54, 120)];

_layer = [CAShapeLayer layer];
_layer.path = path.CGPath;
_layer.lineWidth = 5.0f;
_layer.lineCap = kCALineCapRound;
_layer.lineJoin = kCALineJoinRound;
_layer.fillColor = [UIColor clearColor].CGColor;
_layer.strokeColor = [UIColor greenColor].CGColor;
[self.whiteView.layer addSublayer:_layer];
3.为图层添加动画并设置KeyPath为strokeEnd
CABasicAnimation *animation = [CABasicAnimation animationWithKeyPath:@"strokeEnd"];
animation.fromValue = @(0.0f);
animation.toValue = @(1.0f);
animation.duration = 1.5f;
[_layer addAnimation:animation forKey:@"animationStrokeEnd"];
此时运行应用,回形针图形缓慢的绘制的动画已经展现出来了。那么我们如何让回形针在绘制到一定时间的时候让已经绘制完的回形针慢慢消失呢?这个时候便用到了strokeStart。
4.遵循代理,实现代理方法
animation.delegate = self;
我们在以下的两个代理方法中去做一些操作来实现动画效果。
 - (void)animationDidStart:(CAAnimation *)anim;
 - (void)animationDidStop:(CAAnimation *)anim finished:(BOOL)flag;
凭借代理方法的字面意思我们也可以比较清楚第一个代理方法在动画开始时会被调用,第二个代理方法则是在动画结束时会被调用。那我们在start的代理方法中对layer做KeyPath为strokeStart的动画会有什么效果?
- (void)animationDidStart:(CAAnimation *)anim {
      // 判断动画的类型
      if ([anim isEqual:[_layer animationForKey:@"animationStrokeEnd"]]) {
            dispatch_after(dispatch_time(DISPATCH_TIME_NOW, (int64_t)(0.5 * NSEC_PER_SEC)), dispatch_get_main_queue(), ^{
                CABasicAnimation *animationStart = [CABasicAnimation animationWithKeyPath:@"strokeStart"];
                animationStart.fromValue = @(0.0f);
                animationStart.toValue = @(1.0f);
                animationStart.duration = 1.5f;
                animationStart.delegate = self;
                 // 设置动画结束时保持最终状态
                animationStart.fillMode = kCAFillModeForwards;
                animationStart.removedOnCompletion = NO;
                [_layer addAnimation:animationStart forKey:@"animationStrokeStart"];
          });
    }
}
运行应用,该项目就基本完成了。为了完美,我们在动画结束后移除了相关的动画和layer,并限制动画正在进行中时点击绘制按钮不进行相关动作。
详细代码见GitHub
https://github.com/RookieAngry/Demo_ClipAnimation
在这里再分享一个项目,同样还是先看效果图:

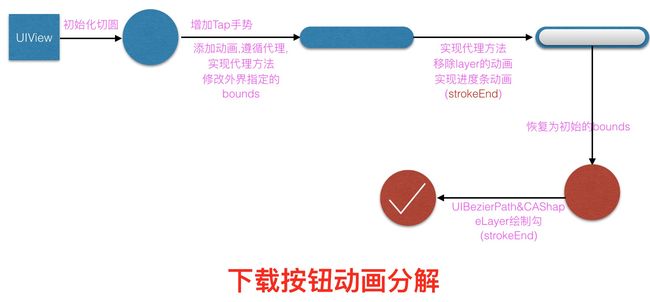
这是一个下载按钮带进度条的项目。这个项目算是笔者前面两篇文章以及strokeEnd的一个综合项目。该项目的实现并不是很复杂。我们还是对动画进行拆解,一步一步分析动画的实现过程。
由于该项目复杂程度不高,主要是一些技术的综合使用,这些技术在笔者的前面的一些文章中已经有所讲解,所以在此便不做过多的解释,用一张图去分析项目的整个过程,各个环节的实现需要用到哪些技术希望读者自行进行思考。
-
项目实现原理图解
项目GitHub
https://github.com/Samueler/Demo_ClipAnimation
项目来源于KITTEN大神的《A GUIDE TO IOS ANIMATION》