写在前面的话:
ADSL捆绑的功能有很多工具可以实现,RouteOS、vyatta、panabit等等。但平时我公司用Linux系统用的多。我从RouteOS上得到启发,遂验证一下看Linux能不能实现。经过在网上查找资料,发现可行。今天终于有时间把这个东西写一写。闲话少说,开整。
拓扑图如下:
一、RouteOS 内网口设置trunk,允许多个vlan,上网设置。
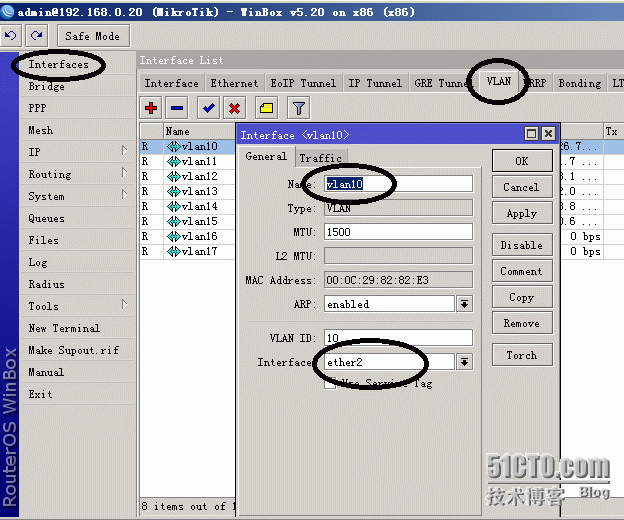
#设置RouteOS ether2 为trunk,模拟多个接口
实验中使用了vlan 10 - vlan 15
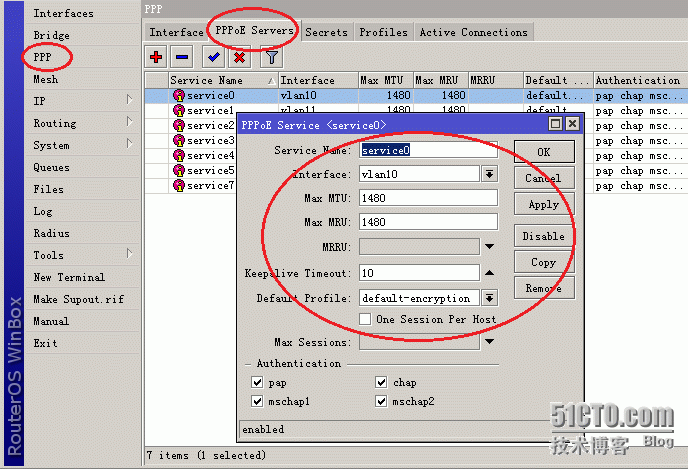
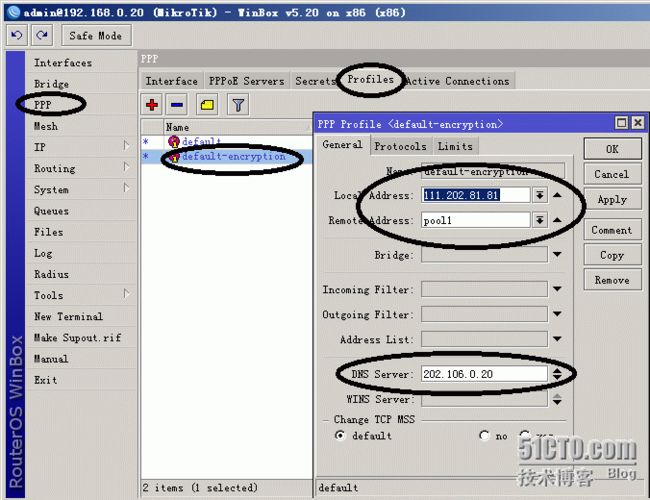
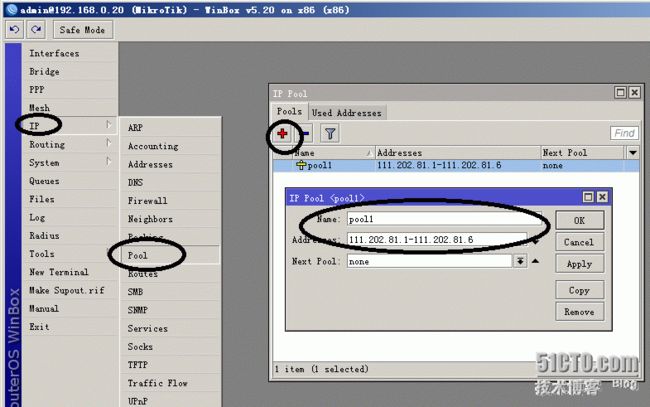
#配置PPPoE服务器模拟运营商
# 配置RouteOS 上网
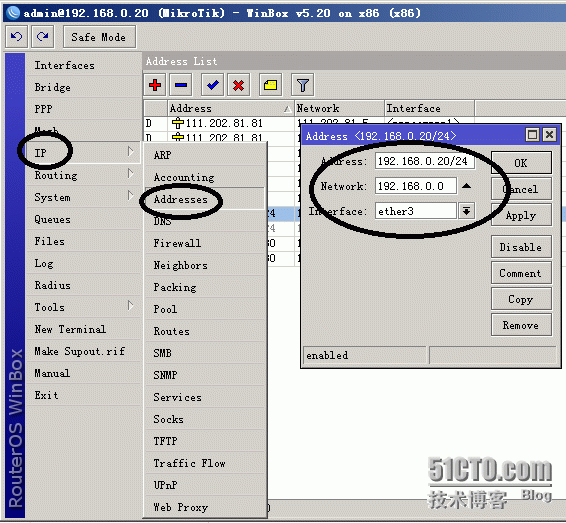
设置地址:
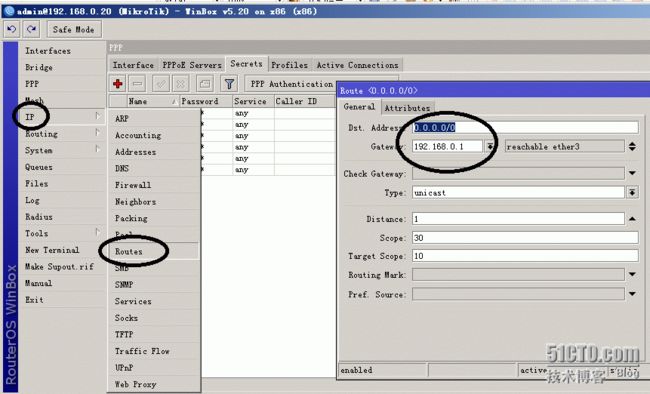
设置路由
设置NAT
IP -- Firewall -- NAT -- +
到此,RouteOS配置完毕。
二、Linux配置拨号
# 设置Linux 跟RouteOS互联的网卡为trunk,加载8021q模块支持vlan tag
[root@LB-2 ~]# modprobe 8021q
# 为接口添加vlan tag,
添加vlan10的命令:vconfig add eth1 10,为方便起见,下面用for循环;
[root@LB-2 ~]# for i in {10..15}; do vconfig add eth1 $i ; done
#安装pppoe客户端,需要软件包:rp-pppoe,插入光盘
[root@LB-2 ~]# mount -o loop /dev/cdrom /mnt
[root@LB-2 ~]# cd /etc/yum.repos.d/
[root@LB-2 yum.repos.d]# rm -f *
[root@LB-2 yum.repos.d]# vi local.repo
[localcd]
name=local cd
baseurl=file:///mnt/
enabled=1
[root@LB-2 yum.repos.d]# yum clean all
[root@LB-2 yum.repos.d]# yum install rp-pppoe -y --nogpgcheck
设置拨号:
[root@LB-2 ~]# adsl-setup
[root@LB-2 ~]# adsl-setup
Welcome to the ADSL client setup. First, I will run some checks on
your system to make sure the PPPoE client is installed properly...
The following DSL config was found on your system:
# 我已经配置过一遍了,这里有几个配置好的。
Device: Name:
ppp0 DSLppp0
ppp1 DSLppp1
ppp2 DSLppp2
ppp3 DSLppp3
ppp4 DSLppp4
ppp5 DSLppp5
Please enter the device if you want to configure the present DSL config
(default ppp0) or enter 'n' if you want to create a new one: n
LOGIN NAME
Enter your Login Name: ppp6 #Login Name就是联通/电信给的账号
INTERFACE
Enter the Ethernet interface connected to the ADSL modem
For Solaris, this is likely to be something like /dev/hme0.
For Linux, it will be ethX, where 'X' is a number.
(default eth0): eth1.16
Do you want the link to come up on demand, or stay up continuously?
If you want it to come up on demand, enter the idle time in seconds
after which the link should be dropped. If you want the link to
stay up permanently, enter 'no' (two letters, lower-case.)
NOTE: Demand-activated links do not interact well with dynamic IP
addresses. You may have some problems with demand-activated links.
Enter the demand value (default no): no #按需拨号,no
DNS
Please enter the IP address of your ISP's primary DNS server.
If your ISP claims that 'the server will provide dynamic DNS addresses',
enter 'server' (all lower-case) here.
If you just press enter, I will assume you know what you are
doing and not modify your DNS setup.
Enter the DNS information here: # DNS留空
PASSWORD
Please enter your Password: # 账号的密码
Please re-enter your Password:
USERCTRL
Please enter 'yes' (three letters, lower-case.) if you want to allow
normal user to start or stop DSL connection (default yes): no #是否允许普通用户启动或停止,no
FIREWALLING
Please choose the firewall rules to use. Note that these rules are
very basic. You are strongly encouraged to use a more sophisticated
firewall setup; however, these will provide basic security. If you
are running any servers on your machine, you must choose 'NONE' and
set up firewalling yourself. Otherwise, the firewall rules will deny
access to all standard servers like Web, e-mail, ftp, etc. If you
are using SSH, the rules will block outgoing SSH connections which
allocate a privileged source port.
The firewall choices are:
0 - NONE: This script will not set any firewall rules. You are responsible
for ensuring the security of your machine. You are STRONGLY
recommended to use some kind of firewall rules.
1 - STANDALONE: Appropriate for a basic stand-alone web-surfing workstation
2 - MASQUERADE: Appropriate for a machine acting as an Internet gateway
for a LAN
Choose a type of firewall (0-2): 0 # 防火墙设置,0
Start this connection at boot time
Do you want to start this connection at boot time?
Please enter no or yes (default no):yes # 是否开机拨号,yes
** Summary of what you entered **
Ethernet Interface: eth1.16
User name: ppp6
Activate-on-demand: No
DNS: Do not adjust
Firewalling: NONE
User Control: no
Accept these settings and adjust configuration files (y/n)? y
Adjusting /etc/sysconfig/network-scripts/ifcfg-ppp6
Adjusting /etc/ppp/chap-secrets and /etc/ppp/pap-secrets
(But first backing it up to /etc/ppp/chap-secrets.bak)
(But first backing it up to /etc/ppp/pap-secrets.bak)
Congratulations, it should be all set up!
Type '/sbin/ifup ppp6' to bring up your xDSL link and '/sbin/ifdown ppp6'
to bring it down.
Type '/sbin/adsl-status /etc/sysconfig/network-scripts/ifcfg-ppp6'
to see the link status.
[root@LB-2 ~]# cd /etc/sysconfig/network-scripts/
[root@LB-2 network-scripts]# vi ifcfg-ppp6
USERCTL=no
BOOTPROTO=dialup
NAME=DSLppp6
DEVICE=ppp6
TYPE=xDSL
ONBOOT=yes
PIDFILE=/var/run/pppoe-adsl.pid #注意,这个地方要改,否则多个ADSL的pid一样会启动不了
PIDFILE=/var/run/pppoe-adsl6.pid
FIREWALL=NONE
PING=.
PPPOE_TIMEOUT=80
LCP_FAILURE=3
LCP_INTERVAL=20
CLAMPMSS=1412
CONNECT_POLL=6
CONNECT_TIMEOUT=60
DEFROUTE=no #不用下发的默认路由,
SYNCHRONOUS=no
ETH=eth1.16
PROVIDER=DSLppp6
USER=ppp6
PEERDNS=no
DEMAND=no
~
下面就可以拨号了
[root@LB-2 network-scripts]# ifup ppp6
如果不出意外,就能拨上号了。
# ifdown ppp0 断开拨号
# ifup ppp0 拨号
以此类推,设置多个拨号连接。
根据NTH机制(PS:NTH是什么鬼,请自行脑补),直接上命令:
iptables -t mangle -A PREROUTING -i eth0 -m conntrack --ctstate NEW -m statistic --mode nth --every 6 --packet  5 -j CONNMARK --set-mark 1
iptables -t mangle -A PREROUTING -i eth0 -m conntrack --ctstate NEW -m statistic --mode nth --every 6 --packet  4 -j CONNMARK --set-mark 2
iptables -t mangle -A PREROUTING -i eth0 -m conntrack --ctstate NEW -m statistic --mode nth --every 6 --packet  3 -j CONNMARK --set-mark 3
iptables -t mangle -A PREROUTING -i eth0 -m conntrack --ctstate NEW -m statistic --mode nth --every 6 --packet  2 -j CONNMARK --set-mark 4
iptables -t mangle -A PREROUTING -i eth0 -m conntrack --ctstate NEW -m statistic --mode nth --every 6 --packet  1 -j CONNMARK --set-mark 5
iptables -t mangle -A PREROUTING -i eth0 -m conntrack --ctstate NEW -m statistic --mode nth --every 6 --packet  0 -j CONNMARK --set-mark 6
iptables -t mangle -A PREROUTING -i eth0 -m connmark --mark 1 -j MARK --set-mark 1
iptables -t mangle -A PREROUTING -i eth0 -m connmark --mark 2 -j MARK --set-mark 2
iptables -t mangle -A PREROUTING -i eth0 -m connmark --mark 3 -j MARK --set-mark 3
iptables -t mangle -A PREROUTING -i eth0 -m connmark --mark 4 -j MARK --set-mark 4
iptables -t mangle -A PREROUTING -i eth0 -m connmark --mark 5 -j MARK --set-mark 5
iptables -t mangle -A PREROUTING -i eth0 -m connmark --mark 6 -j MARK --set-mark 6
可以这么理解哈:这个机制给第1一个新建连接打上连接标记1,第二个新建连接打上2,有几条写几条;
然后再给连接标记打上防火墙标记。
本文曾参考过这篇文章:
http://blog.chinaunix.net/uid-13423994-id-3212414.html
然后用策略路由对防火墙标记进行策略路由,说到策略路由就有路由表
[root@LB-2 ~]# vi /etc/iproute2/rt_tables
#
# reserved values
#
255 local
254 main
253 default
0 unspec
#
# local
#
#1 inr.ruhep
10 v10
11 v11
12 v12
13 v13
14 v14
15 v15
定义完路由表,就得有路由条目
[root@LB-2 ~]# ip route add default dev ppp0 table v10
[root@LB-2 ~]# ip route add default dev ppp1 table v11
[root@LB-2 ~]# ip route add default dev ppp2 table v12
[root@LB-2 ~]# ip route add default dev ppp3 table v13
[root@LB-2 ~]# ip route add default dev ppp4 table v14
[root@LB-2 ~]# ip route add default dev ppp5 table v15
快速方法:for i in {0..5}; do ip route add default dev ppp$i table v1$i ; done
设置策略:
[root@LB-2 ~]# ip rule add fwmark 1 table v10 pref 10000
[root@LB-2 ~]# ip rule add fwmark 2 table v11 pref 10000
[root@LB-2 ~]# ip rule add fwmark 3 table v12 pref 10000
[root@LB-2 ~]# ip rule add fwmark 4 table v13 pref 10000
[root@LB-2 ~]# ip rule add fwmark 5 table v14 pref 10000
#快速方法: for i in {0..5}; do ip rule add fwmark $((i+1)) table v1$i pref 10000 ; done
顺便设置一个检测的地址,用来检测各个出口的通断情况;如果其中一条断了就发邮件神马的就比较easy了。
# for i in {0..5}; do ip addr add 1.1.1.$i/32 dev lo ; done
# ip addr show | grep lo
# for i in {0..5}; do ip rule add from 1.1.1.$i table v1$i pref 10000 ; done
设置NAT ,获取的地址为非固定IP,所以
iptables -t nat -A POSTROUTING -o ppp0 -j MASQUERADE
iptables -t nat -A POSTROUTING -o ppp1 -j MASQUERADE
iptables -t nat -A POSTROUTING -o ppp2 -j MASQUERADE
iptables -t nat -A POSTROUTING -o ppp3 -j MASQUERADE
iptables -t nat -A POSTROUTING -o ppp4 -j MASQUERADE
iptables -t nat -A POSTROUTING -o ppp5 -j MASQUERADE
刚开始我设置的-o是eth1.10 -- eth1.15结果nat策略不生效。
测试情况如下:
[root@LB-2 ~]# ping 202.97.0.1 -I 1.1.1.0
[root@LB-2 ~]# ping 202.97.0.1 -I 1.1.1.1
[root@LB-2 ~]# ping 202.97.0.1 -I 1.1.1.2
[root@LB-2 ~]# ping 202.97.0.1 -I 1.1.1.3
[root@LB-2 ~]# ping 202.97.0.1 -I 1.1.1.4
[root@LB-2 ~]# ping 202.97.0.1 -I 1.1.1.5
最后上两张效果图:
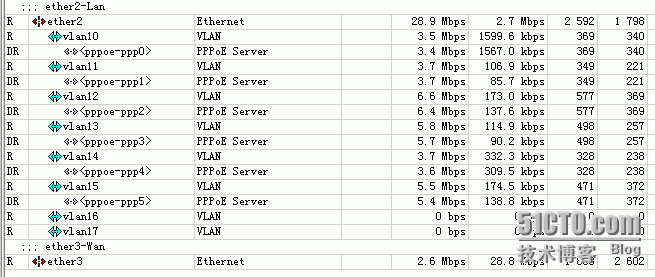
1、实验截图:这是我用自己的电脑开迅雷测试。不是很理想,因为有的连接快,有的就慢,但在实际生产环境中效果就很好啦
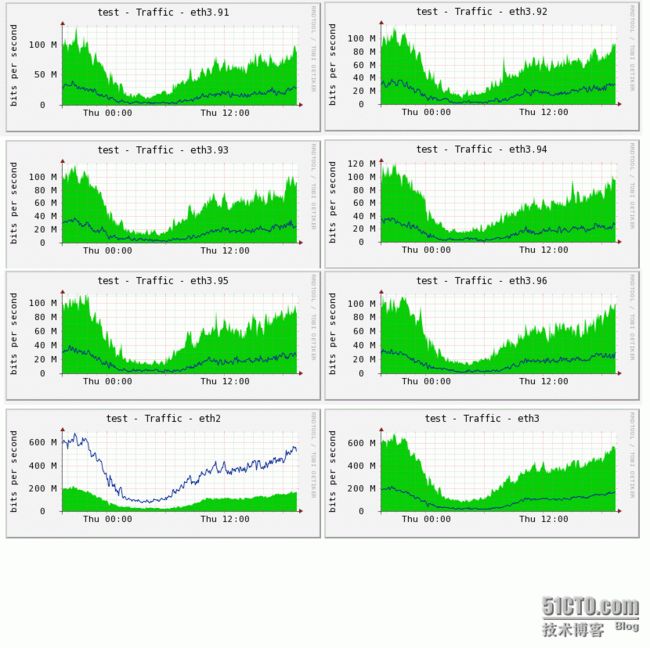
2、下面是生产环境下截图,效果还是蛮好的。这里的多个接口用的是固定IP,但用的跟上面同样的负载均衡机制,这种基于连接的负载均衡要比基于数据包的负载均衡要好的多,不会出现网银登不上的情况。(网银提示IP经常变化)
