上一篇主要说的是开启http basic认证,从安全角度来讲,基于base64编码,容易被抓包后破解,在公网中很不安全,本文详谈如何在eureka server和eureka client中开启https。
公共依赖pom文件
        org.springframework.boot
        spring-boot-starter-parent
        2.0.3.RELEASE


        UTF-8
        UTF-8
        1.8
        Finchley.RELEASE


                org.springframework.cloud
                spring-cloud-dependencies
                ${spring-cloud.version}
                pom
                import
1、eureka server工程
1.1、eureka server工程pom:
            org.springframework.cloud
            spring-cloud-starter-netflix-eureka-server


                org.springframework.boot
                spring-boot-maven-plugin
1.2、eureka server工程启动类:
import org.springframework.boot.SpringApplication;
import org.springframework.boot.autoconfigure.SpringBootApplication;
import org.springframework.cloud.netflix.eureka.server.EnableEurekaServer;

@SpringBootApplication
@EnableEurekaServer
public class EurekaServerApplication {

    public static void main(String[] args) {
        SpringApplication.run(EurekaServerApplication.class, args);
    }
}
1.3、生成证书
a、生成server工程的证书,使用命令行工具,执行下面的指令:
keytool -genkeypair -alias server -storetype PKCS12 -keyalg RSA -keysize 2048 -keystore server.p12 -validity 3650
输入密钥库口令:
再次输入新口令:
您的名字与姓氏是什么?
  [Unknown]:  spring
您的组织单位名称是什么?
  [Unknown]:  spring
您的组织名称是什么?
  [Unknown]:  spring
您所在的城市或区域名称是什么?
  [Unknown]:  spring
您所在的省/市/自治区名称是什么?
  [Unknown]:  spring
该单位的双字母国家/地区代码是什么?
  [Unknown]:  spring
CN=spring, OU=spring, O=spring, L=spring, ST=spring, C=spring是否正确?
  [否]:  y
b、同样的方式生成client工程证书,执行下面的指令:
keytool -genkeypair -alias client -storetype PKCS12 -keyalg RSA -keysize 2048 -keystore client.p12 -validity 3650
//。。。同样需要设置密码,回答上面的那些问题
c、分别导出2个p12证书,执行指令:
keytool -export -alias server -file server.crt --keystore server.p12 输入密钥库口令: 这里的密码是生成server证书时设置的密码 存储在文件中的证书
keytool -export -alias client -file client.crt --keystore client.p12 输入密钥库口令: 这里的密码是生成client证书时设置的密码 存储在文件中的证书
d、将server.crt文件导入client.p12证书中,使client端信任server的证书,执行如下指令
keytool -import -alias server -file server.crt -keystore client.p12
输入密钥库口令: 这里的密码是生成client证书密码,密码错误会提示如下信息:
【密码错误时提示的信息:keytool 错误: java.io.IOException: keystore password was incorrect】

所有者: CN=spring, OU=spring, O=spring, L=spring, ST=spring, C=spring
发布者: CN=spring, OU=spring, O=spring, L=spring, ST=spring, C=spring
序列号: 2b87a269
有效期为 Fri Oct 04 20:11:07 CST 2019 至 Mon Oct 01 20:11:07 CST 2029
证书指纹:
     MD5:  EF:A3:6B:32:DE:8F:E4:34:46:E6:0D:48:B9:8F:B8:7E
     SHA1: AE:42:78:14:D8:6B:B2:E9:46:F4:76:E8:D9:D0:51:E0:3A:E6:C9:2E
     SHA256: 54:6D:93:7E:B3:D3:C4:49:87:84:9D:46:66:B1:B8:1B:95:5B:DC:05:9A:8A:A4:DF:43:E4:A7:A7:4A:81:F7:B0
签名算法名称: SHA256withRSA
主体公共密钥算法: 2048 位 RSA 密钥
版本: 3

扩展:

#1: ObjectId: 2.5.29.14 Criticality=false
SubjectKeyIdentifier [
KeyIdentifier [
0000: 6C 1A E4 01 EB 84 0B C2   90 97 81 3D DB 0D C3 F1  l..........=....
0010: 4A FB 2A F4                                        J.*.
]
]

是否信任此证书? [否]:  y
证书已添加到密钥库中
e、将client.crt文件导入server.p12文件,使server服务信任client的证书,执行如下指令:
keytool -import -alias client -file client.crt -keystore server.p12
输入密钥库口令: 这里的密码是生成server证书密码
所有者: CN=cloud, OU=cloud, O=cloud, L=cloud, ST=cloud, C=cloud
发布者: CN=cloud, OU=cloud, O=cloud, L=cloud, ST=cloud, C=cloud
序列号: 6ea2a01
有效期为 Fri Oct 04 20:27:38 CST 2019 至 Mon Oct 01 20:27:38 CST 2029
证书指纹:
     MD5:  E9:22:2C:8D:C4:08:27:AD:02:75:93:31:C2:17:35:8E
     SHA1: BB:B0:9A:3A:98:43:5E:02:FC:8A:BC:85:33:DD:82:4A:4E:DF:3A:5C
     SHA256: 20:96:61:27:D1:CA:55:E5:B6:0E:41:CA:BC:84:F8:8F:1F:D8:25:87:10:50:90:E3:BC:12:39:35:74:16:4A:B3
签名算法名称: SHA256withRSA
主体公共密钥算法: 2048 位 RSA 密钥
版本: 3

扩展:

#1: ObjectId: 2.5.29.14 Criticality=false
SubjectKeyIdentifier [
KeyIdentifier [
0000: 91 E6 46 EF 4C 9E 88 B1   2F 63 12 4B 39 53 9D 32  ..F.L.../c.K9S.2
0010: EF 0F 42 F9                                        ..B.
]
]

是否信任此证书? [否]:  y
证书已添加到密钥库中
1.4、将生成的server.p12、server.crt、client.crt三个文件放在eureka server工程resources目录下。
1.5、添加eureka server工程相关resources配置文件
application-https.yml:
server:
  port: 8766
  ssl:
    enabled: true
    key-store: classpath:server.p12
    key-store-password: hello2019 #生成server证书时设置的密码
    key-store-type: PKCS12
    key-alias: server
eureka:
  instance:
    hostname: localhost
    securePort: ${server.port}
    securePortEnabled: true
    nonSecurePortEnabled: false
    homePageUrl: https://${eureka.instance.hostname}:${server.port}/
    statusPageUrl: https://${eureka.instance.hostname}:${server.port}/
  client:
    registerWithEureka: false
    fetchRegistry: false
    serviceUrl:
      defaultZone: https://${eureka.instance.hostname}:${server.port}/eureka/
  server:
      waitTimeInMsWhenSyncEmpty: 0
      enableSelfPreservation: false
application.yml:
spring:
  profiles:
    active: https
1.6、启动eureka server工程,执行指令:
mvn spring-boot:run -Dspring.profiles.active=https
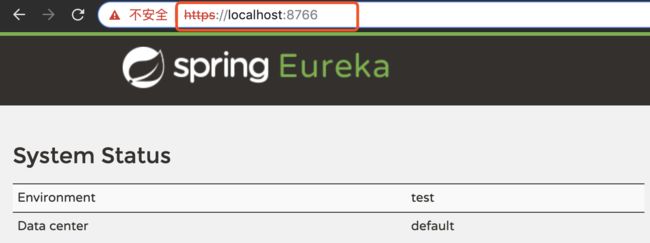
访问:https://localhost:8766
由此看出确实使用的是https,不妨在试一下访问:http://localhost:8766
2、eureka client工程
2.1、client工程pom文件:
            org.apache.httpcomponents
            httpclient
            4.5.5


            org.springframework.cloud
            spring-cloud-starter-netflix-eureka-client


                org.springframework.boot
                spring-boot-maven-plugin
2.2、client工程启动类:
import org.springframework.boot.SpringApplication;
import org.springframework.boot.autoconfigure.SpringBootApplication;
import org.springframework.cloud.netflix.eureka.EnableEurekaClient;

@SpringBootApplication
@EnableEurekaClient
public class EurekaClientApplication {

    public static void main(String[] args) {
        SpringApplication.run(EurekaClientApplication.class, args);
    }
}
2.2、client工程resources配置文件
先将client.crt、client.p12、server.crt三个文件放在client工程的resources目录下。
application.yml:
spring:
  profiles:
    active: https
application-https.yml:
server:
  port: 8081

spring:
  application:
    name: client1

eureka:
  client:
    securePortEnabled: true
    ssl:
      key-store: client.p12
      key-store-password: hello2020
    serviceUrl:
      defaultZone: https://localhost:8766/eureka/
这里没有指定整个应用实例启用https,仅仅是开启访问eureka server的https配置,自定义eureka.client.ssl.key-store和eureka.client.ssl.key-store-password两个属性,指定client访问server的sslContext配置,需要在代码里指定DiscoveryClient.DiscoveryClientOptionalArgs:
import com.netflix.discovery.DiscoveryClient;
import com.netflix.discovery.shared.transport.jersey.EurekaJerseyClientImpl;
import org.apache.http.ssl.SSLContextBuilder;
import org.springframework.beans.factory.annotation.Value;
import org.springframework.context.annotation.Bean;
import org.springframework.context.annotation.Configuration;
import org.springframework.context.annotation.Profile;

import javax.net.ssl.SSLContext;
import java.io.IOException;
import java.security.KeyManagementException;
import java.security.KeyStoreException;
import java.security.NoSuchAlgorithmException;
import java.security.cert.CertificateException;

/**
 * 指定client访问server的sslContext配置
 */
@Profile({"https"})
@Configuration
public class EurekaHttpsClientConfig {

    @Value("${eureka.client.ssl.key-store}")
    String keyStoreFileName;

    @Value("${eureka.client.ssl.key-store-password}")
    String keyStorePassword;

    @Bean
    public DiscoveryClient.DiscoveryClientOptionalArgs discoveryClientOptionalArgs() throws CertificateException, NoSuchAlgorithmException, KeyStoreException, IOException, KeyManagementException {
        EurekaJerseyClientImpl.EurekaJerseyClientBuilder builder = new EurekaJerseyClientImpl.EurekaJerseyClientBuilder();
        builder.withClientName("eureka-https-client");
        SSLContext sslContext = new SSLContextBuilder()
                .loadTrustMaterial(
                        this.getClass().getClassLoader().getResource(keyStoreFileName),keyStorePassword.toCharArray()
                )
                .build();
        builder.withCustomSSL(sslContext);

        builder.withMaxTotalConnections(10);
        builder.withMaxConnectionsPerHost(10);

        DiscoveryClient.DiscoveryClientOptionalArgs args = new DiscoveryClient.DiscoveryClientOptionalArgs();
        args.setEurekaJerseyClient(builder.build());
        return args;
    }
}
2.3、执行指令,启动client工程:
mvn spring-boot:run -Dspring.profiles.active=https
访问https://localhost:8766/
可以看到client工程已经成功注册到了server服务上。


