0.运行环境:Ubuntu 16.04 LTS
1.用 OpenLDAP 搭建 LDAP 服务器,尝试对学生信息进行增删改查,信息包括但不限于学生 id 、密码、邮箱、手机号、部门等。
1.1 搭建LDAP服务器
$ sudo apt update
$ sudo apt install slapd ldap-utils    #安装配置软件
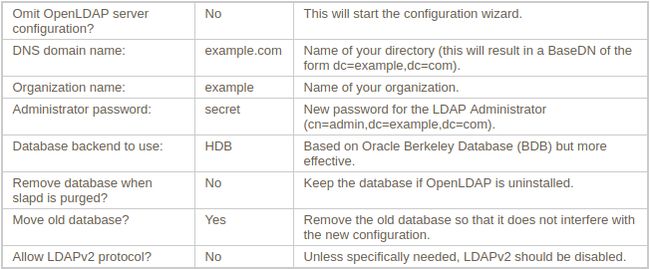
$ sudo dpkg-reconfigure slapd   #对slapd进行再配置
配置参数参考
$ sudo apt install phpldapadmin #安装phpldapadmin
修改相应的配置文件/etc/phpldapadmin/config.php,做如下修改:
$servers->setValue('server'. 'host', '127.0.0.1') #修改为某个内网可访问的IP地址
防火墙放行Apache2:
$ sudo ufw allow "Apache"
$ sudo ufw allow "Apache Full"
$ sudo ufw allow "Apache Secure"
$ sudo /etc/init.d/apache2 restart    #重启Apache服务
1.2 测试登录
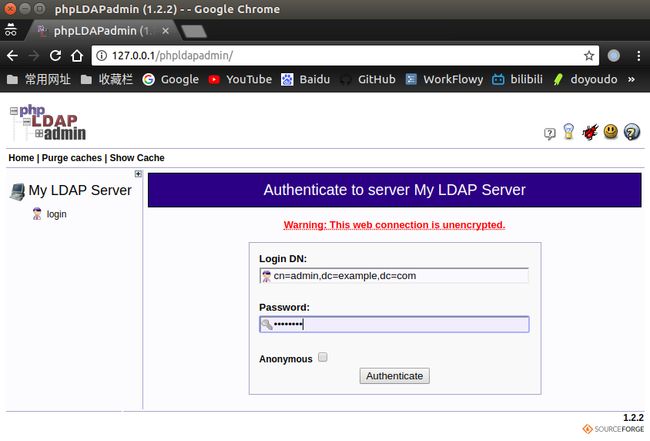
浏览器打开:http://127.0.0.1/phpldapadmin/index.php 进入后登录
登录后:
LDAP服务器配置完成
1.3 对学生数据增删改查
- 通过Create new entry here选择Generic: Organisational Unit新建Group组和People组
- 在Group组下通过Create a child entry选择Generic: Posix Group新建cn=student后才可以在People组下Create a child entry选择Generic: User Account创建用户资料
- 在cn=richard yan下可通过Add new attribute添加邮件、电话、部门等属性
phpldapadmin 的图形化界面可进行增删改查十分简单,不作赘述
2. 配置 Apache 服务器,配置 Basic 认证模块和需要认证的页面,使用用户名密码认证。
2.1 搭建 Apache 服务
$ sudo apt-get install apache2
防火墙放行Apache2:
$ sudo ufw allow "Apache"
$ sudo ufw allow "Apache Full"
$ sudo ufw allow "Apache Secure"
$ sudo service apache2 restart    #重启Apache服务
新建一个验证页面
$ sudo mkdir /var/www/html/auth-basic
$ sudo vim /var/www/html/auth-basic/index.html
Basic Authentication is Successful.
Richard Yan
2018.7.7
2.2 待验证页面
浏览器访问 http://127.0.0.1/auth-basic/ 访问成功
2.3 配置一个本地目录的Basic基本认证
创建用户
$ sudo htpasswd -c /etc/apache2/.user richard     #第一次创建.user文件添加 -c 参数
New password:
Re-type new password:
Adding password for user richard

$ sudo cat /etc/apache2/.user     #查看密码文件
richard:$apr1$JUaFTlkk$T1BwFfn.kU9OaxvxdqUQD1
修改本地Apache配置文件
$ sudo vim /etc/apache2/apache2.conf
# 找到这里
在授权目录下添创建.htaccess文件
$ sudo vim /var/www/html/auth-basic/.htaccess
AuthType Basic
AuthName "Basic Authentication"
AuthUserFile /etc/apache2/.user
Require valid-user
重启 Apache
$ sudo service apache2 restart
2.4 测试认证
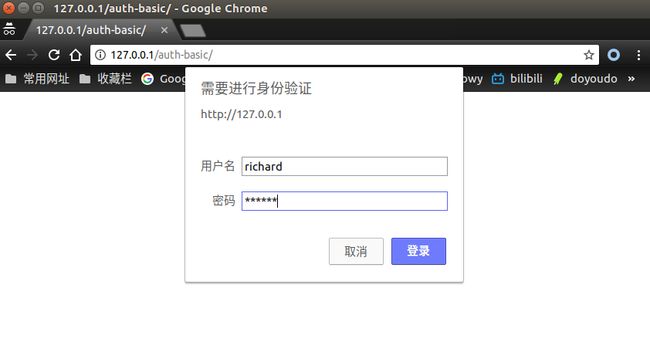
在浏览器访问 http://127.0.0.1/auth-basic/ 输入用户名密码登录即可正常访问
登录后
Basic 认证完成!
3.配置 Apache 服务器,配置 LDAP 认证模块和需要认证的页面,使用 LDAP 存放的学生的用户名密码认证。
3.1 环境配置
安装ldap模块
$ a2enmod ldap authnz_ldap
Module ldap already enabled
Considering dependency ldap for authnz_ldap:
Module ldap already enabled
Module authnz_ldap already enabled
配置需要认证信息
$ sudo vim /etc/apache2/sites-available/auth-ldap.conf
#配置文件

    AuthName "LDAP Authentication"
    AuthType Basic
    AuthBasicProvider ldap
    AuthLDAPUrl "ldap://127.0.0.1/dc=example,dc=com"
    Require valid-user

#这里说一下Directory后面的认证页面路径在不同系统环境里可能需要加"",有的可能不需要加,这个玄学折磨了我整整一天
创建配置页面
$ sudo mkdir /var/www/html/auth-ldap
$ a2ensite auth-ldap
$ sudo vim /var/www/html/auth-ldap/index.html
Programming is Metaphysics.
Richard Yan
2018.7.8
重启Apache服务
$ sudo service apache2 restart
3.2 测试认证
浏览器访问:http://127.0.0.1/auth-ldap/
* 这里
"cn=richard yan" 由于缩写实际 User Name=ryan
登录后:
LDAP 认证完成!
4.用 FreeRADIUS 搭建 Radius 服务器,尝试配置基于 Unix 账号的认证,并用 radtest 验证服务有效。
4.1 安装 FreeRADIUS
$ sudo apt-get install freeradius
4.2 验证版本
$ freeradius -v
freeradius: FreeRADIUS Version 2.2.8, for host x86_64-pc-linux-gnu, built on Jul 26 2017 at 15:27:21
Copyright (C) 1999-2015 The FreeRADIUS server project and contributors.
There is NO warranty; not even for MERCHANTABILITY or FITNESS FOR A
PARTICULAR PURPOSE.
You may redistribute copies of FreeRADIUS under the terms of the
GNU General Public License.
For more information about these matters, see the file named COPYRIGHT.
4.3 运行快速配置检查
$ sudo freeradius -CX
#结尾会回显
Configuration appears to be OK.
4.4 查看配置文件
$ sudo vim /etc/freeradius/radiusd.conf
4.5 配置 Clients
sudo vim /etc/freeradius/clients.conf
# 这个是默认配置,如果在本地实验,无需改动
client localhost {
 ipaddr = 127.0.0.1
 secret = testing123
 }
4.6 添加用户
$ sudo vim /etc/freeradius/users
# 在配置文件中添加
richard  Cleartext-Password := "password"
         Reply-Message := "Hello,%{User-Name}"
4.7 重启 RADIUS
$ sudo service freeradius restart
4.8 测试认证
$ radtest richard password 127.0.0.1 0 testing123
Sending Access-Request of id 145 to 127.0.0.1 port 1812
    User-Name = "richard"
    User-Password = "password"
    NAS-IP-Address = 127.0.1.1
    NAS-Port = 0
    Message-Authenticator = 0x00000000000000000000000000000000
rad_recv: Access-Accept packet from host 127.0.0.1 port 1812, id=145, length=35
    Reply-Message = "Hello,richard"
4.9 Start FreeRADIUS
# 查看服务状态
$ service freeradius status
● freeradius.service - LSB: Radius Daemon
   Loaded: loaded (/etc/init.d/freeradius; bad; vendor preset: enabled)
   Active: active (running) since 一 2018-07-09 00:22:02 CST; 54min ago
     Docs: man:systemd-sysv-generator(8)
    Tasks: 6
   Memory: 5.1M
      CPU: 73ms
   CGroup: /system.slice/freeradius.service
           └─13302 /usr/sbin/freeradius

7月 09 00:22:01 richard-lenovo systemd[1]: Starting LSB: Radius Daemon...
7月 09 00:22:01 richard-lenovo freeradius[13273]:  * Starting FreeRADIUS daemon f
7月 09 00:22:02 richard-lenovo freeradius[13273]:    ...done.
7月 09 00:22:02 richard-lenovo systemd[1]: Started LSB: Radius Daemon.
lines 1-14/14 (END)
Radius 服务器配置完成!
5. 配置 Apache 服务器,配置 Radius 认证模块和需要认证的页面,使用 Unix/Linux 本地用户名密码认证。
5.1 环境配置
在 Apache2 上安装 Radius 身份验证所需的模块
$ sudo apt-get install libapache2-mod-auth-radius
启动模块
$ a2enmod auth_radius
Module auth_radius already enabled
在Apache配置文件中添加认证
$ sudo vim /etc/apache2/apache2.conf
# 添加在配置文件 apache2.conf 中
AddRadiusAuth localhost:1812 testing123 5
AddRadiusCookieValid 60
# 下面这是模板
# AddRadiusAuth IP_OF_RADIUS_SERVER:PORT SECRET 5
# AddRadiusCookieValid 60
创建配置页面
$ sudo mkdir /var/www/html/auth-radius
$ sudo vim /var/www/html/auth-radius/index.html
Radius Authentication is Successful.
Richard Yan
2018.7.9
在待验证⻚页面面添加 .htaccess 文文件
$ sudo vim /var/www/html/auth-radius/.htaccess
# 配置文件 .htaccess
AuthType Basic
AuthName "Radius Authentication"
AuthBasicAuthoritative Off
AuthBasicProvider radius
AuthRadiusAuthoritative on
AuthRadiusActive On
Require valid-user
重启 Apache 服务
$ sudo service apache2 restart
5.2 认证测试
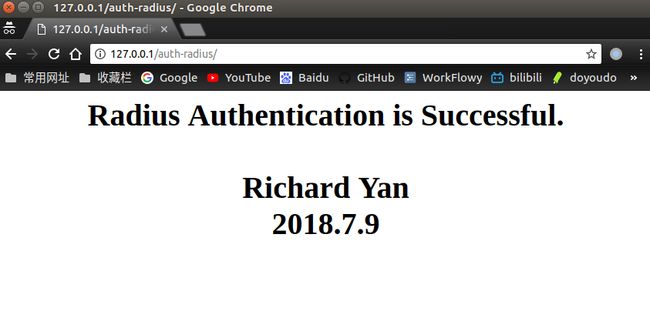
浏览器访问:http://127.0.0.1/auth-radius/
认证后:
Radius 认证完成!
6.在 FreeRADIUS 中配置 ldap 认证模块,和 LDAP 服务器互通,利用 ldap 账号密码认证用户身份,并用 radtest 测试通过。
6.1环境配置
安装 FreeRADIUS 和 OpenLDAP 模块
$ sudo apt install freeradius-ldap
配置 FreeRADIUS 的 ldap 模块参数
$ sudo vim /etc/freeradius/modules/ldap
ldap{
        server = "localhost"
        identity = "cn=admin,dc=example,dc=com"
        password = password
        basedn = "dc=example,dc=com"
        filter = "(uid=%{%{Stripped-User-Name}:-%{User-Name}})"
        ldap_connections_number = 5
        timeout = 4
        timelimit = 3
        net_timeout = 1
        dictionary_mapping = ${confdir}/ldap.attrmap
        edir_account_policy_check = no
        set_auth_type = yes
}
# 这些格式在配置文件中都有,只需修改对应的变量或删除对应参数前的#注释
配置以下参数以启动 ldap
$ sudo vim /etc/freeradius/sites-available/default
# 这里 . 是省略,只需删除对应 authorize 参数下 ldap 前的#注释即可
authorize {
.
.
ldap
.
.
}
$ sudo vim /etc/freeradius/sites-available/inner-tunnel
# 这里 . 是省略,只需删除对应 authorize 参数下 ldap 前的#注释即可
authorize {
.
.
ldap
.
.
}
6.2 通过 radtest 测试 LDAP 中的用户
以下是 LDAP 中以添加的用户
* 这里
"cn=richard yan" 由于缩写实际 User Name=ryan
$ radtest ryan 123456 127.0.0.1 0 testing123
Sending Access-Request of id 190 to 127.0.0.1 port 1812
    User-Name = "ryan"
    User-Password = "123456"
    NAS-IP-Address = 127.0.1.1
    NAS-Port = 0
    Message-Authenticator = 0x00000000000000000000000000000000
rad_recv: Access-Accept packet from host 127.0.0.1 port 1812, id=190, length=20
出现 Access-Accept 即证明用户可在 Radius 下登录认证。
LDAP用户认证完成!
7. 在之前 Apache 的 Radius 认证模块的配置下,不改变配置,切换到使用 LDAP 存放的学生用户名密码认证,体会这种配置和 3 的不同。
7.1 认证测试
浏览器访问 http://127.0.0.1/auth-radius/
这里使用的就是 LDAP 中存放的学生用户进行的认证:
登录后:
7.2 对比
- LDAP提供目录服务,类似于企业、人员黄页的东西,用户和组织的信息都被存放在上面,查找起来十分快捷,也可以理解成一种特殊的数据库,而认证只是一方面,它的目标是按目录结点的方式来存取信息。
- Radius是一种专门的认证协议,支持多样的认证方式。出了最常见的pap,chap等,还支持EAP(扩展认证协议),这是LDAP协议中没有的。
- LDAP + Radius 有效的结合二者的特性,使认证更加系统化,方便目录管理而又兼顾了认证的安全性,可用于实现商业企业局域网统一认证系统。
8. 在 ROS 的 AP 下,通过配置与 Radius 服务器连接,使学生可以通过存放在 LDAP 中的用户名密码来通过认证接入 WiFi 。(选做)
大概就是这个样子吧。
期末这段时间很忙,以后有空再做吧!
总结
- 以前只是在各种场合使用过各种认证而不知其中原理,如今亲手操作一遍俺感觉还是很奇妙的,对认证又有了更深层次的了解,也学会了更多关于认证及目录管理的知识,Get 到很多新技能,受益匪浅。
这个实验II投入了整整三天时间全身心来做。从一开始的一脸茫然,去查找各种文档及配置教程,有些教程时间太久已经不再适用,失败了好多次却找不到原因,各种搜索解决问题的方法以及求助于身边的大佬,最后经过各种尝试,被各种配置环境、修改参数折磨后终于完成了这部分的实验内容。
虽然被折磨的很难受,但通过这三天也学习了很多,不仅仅是知识,也学会了很多解决问题的方法,收获很多,在以后的工作和学习中肯定会有很大的帮助。2018.7.10凌晨——By Richard Yan


