本文将分为三大部分来讲es相关的基础知识点
一、ElasticSearch 基础概念和组成部分
1)ElasticSearch概念一句话总结:
ES是一个基于Lucene并采用Restful API 标准的高可扩展性和高可用性的实时数据分析的全文检索工具
2)ElasticSearch涉及到的一些概念:
NRT(准实时): Elasticsearch是一个接近实时的搜索平台。这意味着,从索引一个文档直到这 个文档能够被搜索到有一个轻微的延迟(通常是1秒)
Node(节点):单个的装有ElasticSearch服务并且提供故障转移和扩展的服务器
Cluster(集群):一个集群就是由一个或多个Node组织在一起共同工作,共同分享整个数据具有负载均衡功能的集群,集群名称是唯一标识,因为一个节点只能通过指定某个集群的名字,来加入这个集群
Document(文档):一个文档是一个可以被索引的基础信息单元
Index(索引):索引就是一个拥有几分相似特征的文档的集合
Type(类型):一个索引中,你可以定义一种或者多种类型
Field(列):Field是ElasticSearch中最小单位,相当于数据的某一列
Shards(分片):一个索引可以存储超出单个结点硬件限制的大量数据。比如,一个具有10亿文档的索引占据1TB的磁盘空间,而任一节点都没有这样大的磁盘空间;或者单个节点处理搜索请求,响应太慢。因此ElasticSearch将索引分成若干份,每个部分就是一个shard ,当你创建一个索引的时候,你可以指定你想要的分片的数量。每个分片本身也是一个功能完善并且独立的“索引”,这个“索引”可以被放置到集群中的任何节点上。 分片好处就是可以对数据进行水平分割,扩展内容容量,提高查询性能和吞吐量
Replicas(复制):Replicas是索引的一份或者多份拷贝 提供高可用
分片和复制的数量可以在索引创建的时候指定。在索引创建之后,你可以在任何时候动态地改变复制数量,但是不能改变分片的数量。
3)Es跟关系型数据库对照如下图:
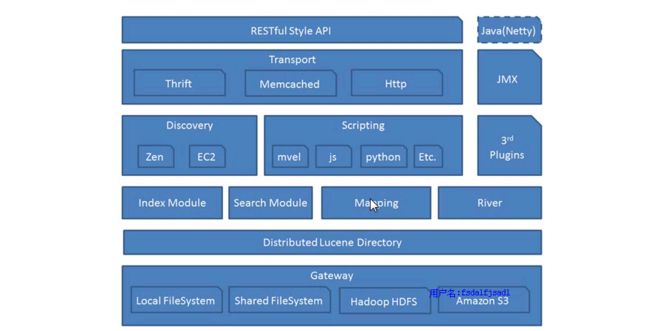
4) ElasticSearch架构图如下:
二、ElastSearch 简单安装
1)ElasticSearch安装:
ES最佳实践安装方法就是下载压缩包直接解压 官网地址:https://www.elastic.co/
1)安装ES首先需要安装jdk,必须是1.7以上的版本。
[root@localhost ~]# yum -y install java-1.8.0-openjdk*
2)下载压缩包到下载目录下
[root@localhost ~] # cd /opt/elasticsearch && wget https://download.elastic.co/elasticsearch/release/org/elasticsearch/distribution/tar/elasticsearch/2.3.5/elasticsearch-2.3.5.tar.gz
[root@localhost elasticsearch]# tar zxvf elasticsearch-2.3.5.tar.gz
3)创建ES安装目录 将解压后的东西移动到安装目录
[root@localhost elasticsearch]# cd elasticsearch-2.3.5
[root@localhost elasticsearch-2.3.5]# mkdir /usr/local/elasticsearch
[root@localhost elasticsearch-2.3.5]# mv * /usr/local/elasticsearch
[root@localhost elasticsearch-2.3.5]# cd /usr/local/elasticsearch/bin/
[root@localhost bin]# ./elasticsearch
Exceptioninthread"main"java.lang.RuntimeException:don'trunelasticsearchasroot.
atorg.elasticsearch.bootstrap.Bootstrap.initializeNatives(Bootstrap.java:93)
atorg.elasticsearch.bootstrap.Bootstrap.setup(Bootstrap.java:144)
atorg.elasticsearch.bootstrap.Bootstrap.init(Bootstrap.java:270)
atorg.elasticsearch.bootstrap.Elasticsearch.main(Elasticsearch.java:35)
Refertothelogforcompleteerrordetails.
报错,提示不能用root用户运行。
vim编辑elasticsearch,添加ES_JAVA_OPTS="-Des.insecure.allow.root=true"
我添加在了注释说明下面,一定在变量ES_JAVA_OPTS使用前添加。
再次运行./elasticsearch
[root@localhost bin]# ./elasticsearch
[2016-08-2016:11:52,021][WARN][bootstrap]runningasROOTuser.thisisabadidea!
[2016-08-2016:11:52,034][WARN] [bootstrap]unabletoinstallsyscallfilter:seccompunavailable:requireskernel3.5+withCONFIG_SECCOMPandCONFIG_SECCOMP_FILTERcompiledin
[2016-08-2016:11:52,431][INFO][node] [JohnnyStorm]version[2.3.5],pid[28122],build[90f439f/2016-07-27T10:36:52Z]
[2016-08-2016:11:52,431][INFO][node][JohnnyStorm]initializing...
[2016-08-2016:11:53,390][INFO][plugins][JohnnyStorm]modules[lang-groovy,reindex,lang-expression],plugins[],sites[]
[2016-08-2016:11:53,474][INFO][env] [JohnnyStorm]using[1]datapaths,mounts/(/dev/mapper/VolGroup-lv_root),netusable_space[22.3gb],nettotal_space[30.5gb],spins?[possibly],types[ext4]
[2016-08-2016:11:53,475][INFO][env][JohnnyStorm]heapsize[1007.3mb],compressedordinaryobjectpointers[true]
[2016-08-2016:11:53,475][WARN][env][JohnnyStorm]maxfiledescriptors[65535]forelasticsearchprocesslikelytoolow,considerincreasingtoatleast[65536]
[2016-08-2016:11:55,811][INFO][node][JohnnyStorm]initialized
[2016-08-2016:11:55,811][INFO][node][JohnnyStorm]starting...
[2016-08-2016:11:56,031][INFO][transport][JohnnyStorm]publish_address{127.0.0.1:9300},bound_addresses{127.0.0.1:9300},{[::1]:9300}
[2016-08-2016:11:56,038][INFO][discovery][JohnnyStorm]elasticsearch/VDX23-BvQX-2saLUKUSLww
[2016-08-2016:11:59,138][INFO][cluster.service][JohnnyStorm]new_master{JohnnyStorm}{VDX23-BvQX-2saLUKUSLww}{127.0.0.1}{127.0.0.1:9300},reason:zen-disco-join(elected_as_master,[0]joinsreceived)
[2016-08-2016:11:59,166][INFO][http][JohnnyStorm]publish_address{127.0.0.1:9200},bound_addresses{127.0.0.1:9200},{[::1]:9200}
[2016-08-2016:11:59,166][INFO][node][JohnnyStorm]started
[2016-08-2016:11:59,201][INFO][gateway][JohnnyStorm]recovered[0]indicesintocluster_state
出现上面信息表示已经运行成功,到此正式完成安装。
外网访问
上面的提示中有一句:publish_address{127.0.0.1:9200},bound_addresses{127.0.0.1:9200},{[::1]:9200},通过浏览器访问发现无法访问。
修改配置文件,
vim /usr/local/elasticsearch/config/elasticsearch.yml
添加或修改:network.host:0.0.0.0,表示不限制IP访问
重启服务后浏览器就能访问。
三、ElasticSearch 插件部分简介
ES安装插件是非常简单的 都是一句命令搞定 插件一般都是存放在github上面 命令会自动去找相应目录下的源码 下载并安装到本地的plugin目录下 也可以使用下载并解压
1)安装分词[编辑]
wget https://github.com/medcl/elasticsearch-analysis-ik/releases/download/v1.9.5/elasticsearch-analysis-ik-1.9.5.zip
mkdir /usr/local/elasticsearch/plugin/ik
cp elasticsearch-analysis-ik-1.9.5.zip /usr/local/elasticsearch/plugin/ik
unzip elasticsearch-analysis-ik-1.9.5.zip
4) 验证 创建索引 创建mapping 添加数据
创建索引:curl -X PUT http://localhost:9200/index
创建mapping:
curl -X POST http: //localhost: 9200/index/fulltext/_mapping-d' {
"fulltext": {
"_all": {
"analyzer": "ik_max_word",
"search_analyzer": "ik_max_word",
"term_vector": "no",
"store": "false"
},
"properties": {
"content": {
"type": "string",
"store": "no",
"term_vector": "with_positions_offsets",
"analyzer": "ik_max_word",
"search_analyzer": "ik_max_word",
"include_in_all": "true",
"boost": 8
}
}
}
}'
插入数据:
curl -X POST http://localhost:9200/index/fulltext/1 -d '{"content":"美国留给伊拉克的是个烂摊子吗"}'
curl -X POST http://localhost:9200/index/fulltext/2 -d '{"content":"公安部:各地校车将享最高路权"}'
curl -X POST http://localhost:9200/index/fulltext/3 -d '{"content":"中韩渔警冲突调查:韩警平均每天扣1艘中国渔船"}'
curl -X POST http://localhost:9200/index/fulltext/4 -d '{"content":"中国驻洛杉矶领事馆遭亚裔男子枪击嫌犯已自首"}'
查询数据并高亮显示:
curl -X POST http://localhost:9200/index/fulltext/_search-d'
{
"query":{"term":{"content":"中国"}},
"highlight":{
"pre_tags":["",""], //默认高亮是em标签
"post_tags":["",""],
"fields":{ "content":{} }
}
}'
结果:
{ "took":14, "timed_out":false, "_shards":{ "total":5, "successful":5, "failed":0 }, "hits":{ "total":2, "max_score":2, "hits":[ { "_index":"index", "_type":"fulltext", "_id":"4", "_score":2, "_source":{ "content":"中国驻洛杉矶领事馆遭亚裔男子枪击嫌犯已自首" }, "highlight":{ "content":[ "中国驻洛杉矶领事馆遭亚裔男子枪击嫌犯已自首" ] } }, { "_index":"index", "_type":"fulltext", "_id":"3", "_score":2, "_source":{ "content":"中韩渔警冲突调查:韩警平均每天扣1艘中国渔船" }, "highlight":{ "content":[ "均每天扣1艘中国渔船" ] } } ] } }
2)JDBC插件安装 该插件主要是同步数据用的 后面会有篇幅去详细介绍此部分
[root@localhost bin]# cd /opt/elasticsearch
[root@localhost elasticsearch]# wget http://xbib.org/repository/org/xbib/elasticsearch/importer/elasticsearch-jdbc/2.3.4.0/elasticsearch-jdbc-2.3.4.0-dist.zip
[root@localhostelasticsearch]# cp elasticsearch-jdbc-2.3.4.0-dist /usr/local/elasticsearch/elasticsearch-jdbc-2.3.4.0
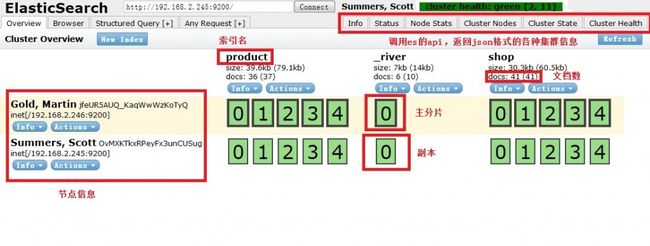
3) head插件安装 下图摘自网上
[root@localhost bin]# ./plugin -install mobz/elasticsearch-head
会根据配置文件配置的插件存放位置进行安装 打开http://localhost:9200/_plugin/head即可查看
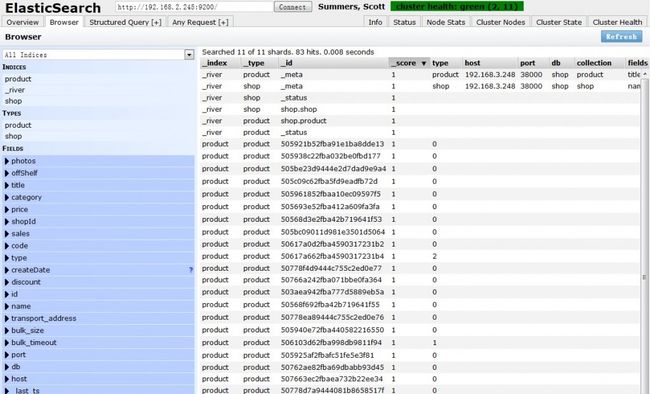
在地址栏输入es服务器的ip地址和端口点connect就可以连接到集群。下面是连接后的视图。这是主界面,在这里可以看到es集群的基本信息(如:节点情况,索引情况)。
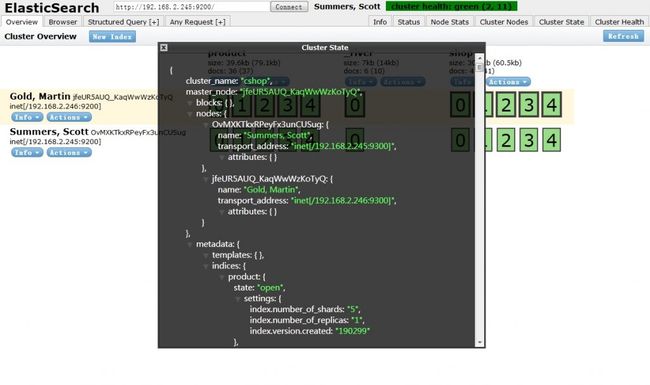
界面的右边有些按钮,如:node stats, cluster nodes,这些是直接请求es的相关状态的api,返回结果为json,如下图:
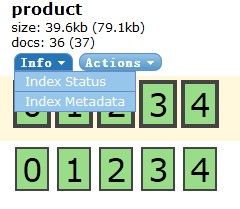
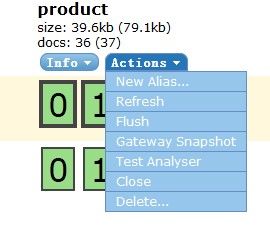
在索引下面有info和action两个按钮。info是可以查看索引的状态和mapping的定义。action是对索引进行操作,如:添加别名、刷新、关闭索引,删除索引等。
browser浏览界面,这个界面可以同时查看多个索引的数据,也可以查询指定字段的数据。
Structured Query查询界面,这个界面可以对某个索引进行一些复杂查询,如下面这个例子是查询product索引,构造boolquery,title字段里查询“产品”关键词,price范围为10到100的记录。
Any Request任意请求界面,这个界面可以说是个rest的客户端,可以通过它来对es进行一些请求操作或测试api接口,下面这个例子是把product索引的副本数设置为1,更多的api可以到es官网查询。
至此 简单介绍到此完毕 后续会更加详细的介绍其他知识,尽情期待。。。。

