PrintWriter
缓冲
Java默认的缓冲区大小是8kb的字节缓冲。也就是8192个字节。
缓冲的作用
应用程序每一次进行I/O操作都需要和设备进行通信,而且通信效率非常低。因此缓冲区的存在,大大提高了I/O效率。
例如写入设备时,每一次通信时,尽可能多的将字节流写入缓冲区,然后等到缓冲区满了(使用flush()或者close()),将数据一次性写入设备。这样一来,避免每写入一个字节都需要与设备进行一次通信的操作。大大提高了效率。
flush()&close()
代码示例1
package flush;
import java.io.PrintWriter;
public class TestFlush{
    public static void main(String[] args) {
        String s = "Hello World!\n";
        PrintWriter p = null;
        try {
            p = new PrintWriter(System.out);
            p.write(s);
            //p.flush();    //1
        }catch(Exception e) {
            e.printStackTrace();
        }finally{
            //p.close();    //2
        }
    }
}
flush()
当缓冲区没有满时,无法将字节流输出到目的地。flush()的主要作用就是强制将缓冲区存储的剩余字节清出,输出到目的地。
如果目的地是另一个字节流或者字符流,它也会被flush,输出给下一个目的地。所以一旦flush()调用,整个输出链都会被flush,输出给最后的目的地。
如果最终目的地是底层系统提供的抽象的目的地(例如file),flush()只能够保证之前写入缓冲的字节可以作为底层系统去写入的数据源,但是不能保证写入硬盘。
以PrintWriter为例,它的flush()实际上调用的是成员变量out的方法,类型是Writer。
不使用flush()
在代码示例1中,注释了代码行1和2,Console并不会输出Hello World!。这是因为缓冲区没有满,不会自动输出。
使用flush()
将代码中示例1中注释1去掉,执行,最终Console会输出:Hello World!。这是因为flush()强制清空缓冲区,输出到目的地。
close()
由于这里以PrintWriter为例,带有缓冲区,所以调用close()后首先回去flush缓冲区。而如果是OutputStream,则只会关闭流。
关闭流同时会释放所有与该流关联的系统资源。一个被关闭的流无法在进行相应的I/O操作,而且无法被重新打开。
一旦流最外层包装类调用了close(),整个链中的流对象都会被close。
将代码示例1中注释2去掉,执行,最终Console一样输出了:Hello World!。
参考
那些你一直没有搞明白的Java缓冲流细节!
PrintWriter中的缓冲区
构造器
- PrintWriter(File file)
- PrintWriter(File file, String csn)
- PrintWriter(OutputStream out)
- PrintWriter(OutputStream out, boolean autoFlush)
- PrintWriter(String fileName)
- PrintWriter(String fileName, String csn)
- PrintWriter(Writer out)
- PrintWriter(Writer out, boolean autoFlush)
有无缓冲区
前六种构造器都是通过BufferedWriter包装后作为参数使用最后一种构造器创建PrintWriter对象。所以使用前六种构造器创建的PrintWriter对象一定有缓冲区。
而使用后两种构造器创建的PrintWriter对象有无缓冲区取决于传递的Writer参数自身有无缓冲区。PrintWriter类并不会自动提供缓冲区。
实际上在使用BufferedWriter包装之前,还会使用OutputStreamWriter进行包装。其作用是用指定或者默认的字符集对字节进行编码,转换成字符。而OutputStreamWriter内部通过StreamEncoder实现。在StreamEncoder中内置了8kb的字节缓冲区。而前六种构造器都是这样包装,生成流。
BufferedWriter作用
既然有无BufferedWriter的存在,PrintWriter的前六种创建的对象必定有缓冲区,那么BufferedWriter对于PrintWriter存在的必要性是什么?BufferedWriter主要作用是减少方法调用的次数。这种优化在大量数据输出时尤为明显。
    /**
     * Flushes the stream.
     * @see #checkError()
     */
    public void flush() {
        try {
            synchronized (lock) {
                ensureOpen();
                out.flush();
            }
        }
        catch (IOException x) {
            trouble = true;
        }
    }
举个例子,在源代码中可以PrintWriter.flush()实现是去调用成员变量out的flush()。而out是通过构造器初始化的,对于前六种构造器out变量的实际类型就是BufferedWriter。所以会直接去调用BufferedWriter.flush()。
而如果使用PrintWriter(OutputStreamWriter(new FileOutputStream(fileName)))来创建对象,保证了对象拥有缓冲区,但是out实际类型就是OutputStreamWriter。一旦调用PrintWriter.flush()后回去调用OutputStreamWriter.flush(),而它内部回去调用StreamEncoder.flush()。
构造器参数csn和autoFlush
参数csn用于指定字符集(Charset),然后通过toCharset()转换为Charset对象。
    /**
     * Returns a charset object for the given charset name.
     * @throws NullPointerException          is csn is null
     * @throws UnsupportedEncodingException  if the charset is not supported
     */
    private static Charset toCharset(String csn)
        throws UnsupportedEncodingException
    {
        Objects.requireNonNull(csn, "charsetName");
        try {
            return Charset.forName(csn);
        } catch (IllegalCharsetNameException|UnsupportedCharsetException unused) {
            // UnsupportedEncodingException should be thrown
            throw new UnsupportedEncodingException(csn);
        }
    }
最后使用私有构造器
private PrintWriter(Charset charset, File file)
        throws FileNotFoundException
    {
        this(new BufferedWriter(new OutputStreamWriter(new FileOutputStream(file), charset)),
             false);
    }
创建对象。可以看到最后还是用了最后一种构造器。
参数autoFlush如果为true,println, printf, or format方法会触发缓冲区flush操作。
参考
java.io.PrintWriter
作用
PrintWriter是字符型打印输出流,继承于Writer。可以对字符或者字符序列进行格式化。属于处理流。
PrintWriter优势
除了构造器,PrintWriter其他方法都不会抛出I/O异常。
如果要检查I/O操作过程中是否有错误,可以调用checkError()进行查询。如果流还没有关闭,会进行flush,同时检查有无错误。如果有错误,就会返回true。出错可能在底层流输出时或者格式化时。
常用方法
write()
    public void write(int c) {
        try {
            synchronized (lock) {
                ensureOpen();
                out.write(c);
            }
        }
        catch (InterruptedIOException x) {
            Thread.currentThread().interrupt();
        }
        catch (IOException x) {
            trouble = true;
        }
    }
write()的实现主要是利用成员变量out.write(),而且文档中说明:write()并不会直接从Writer基类中继承,因为PrintWriter需要压制异常。一旦发生IOException就会将trouble至为true,通过checkError()可以检测有无错误。
append()
该系列重载方法,将指定的字符或者字符序列追加到PrintWriter流中。其内部实现主要是利用了write()方法。
    public PrintWriter append(CharSequence csq) {
        if (csq == null)
            write("null");
        else
            write(csq.toString());
        return this;
    }
print()
该系列重载方法,将指定类型的数值转换为String、字符、字符数组、字符序列等参数通过内部write()方法添加到PrintWriter流中。
    public void print(boolean b) {
        write(b ? "true" : "false");
    }
println()
该系列重载方法和print()类似,但是其内部是用newLine()和print()方法实现的。
    public void println(boolean x) {
        synchronized (lock) {
            print(x);
            println();
        }
    }

    private void newLine() {
        try {
            synchronized (lock) {
                ensureOpen();
                out.write(lineSeparator);
                if (autoFlush)
                    out.flush();
            }
        }
        catch (InterruptedIOException x) {
            Thread.currentThread().interrupt();
        }
        catch (IOException x) {
            trouble = true;
        }
    }
可以看到当autoFlush为true时,自动清理缓冲区。
format()
根据Locale来格式化数据,将其添加到PrintWriter流中。
    public PrintWriter format(String format, Object ... args) {
        try {
            synchronized (lock) {
                ensureOpen();
                if ((formatter == null)
                    || (formatter.locale() != Locale.getDefault()))
                    formatter = new Formatter(this);
                formatter.format(Locale.getDefault(), format, args);
                if (autoFlush)
                    out.flush();
            }
        } catch (InterruptedIOException x) {
            Thread.currentThread().interrupt();
        } catch (IOException x) {
            trouble = true;
        }
        return this;
    }
和println()一样根据autoFlush成员变量决定是否清理缓冲区。代码中涉及到了Formatter类,之后学习。
Println()
其内部是通过format()来实现的。
public PrintWriter printf(String format, Object ... args) {
        return format(format, args);
    }
由于通过format()实现,一样会根据autoFlush清理缓冲区。
checkError()
由于PrintWriter压制了异常,调用者不会catch任何异常,可以通过checkError()来判断I/O操作是否有异常。这种异常主要有两种一种是I/O操作,另一种是格式化错误。
    public boolean checkError() {
        if (out != null) {
            flush();
        }
        if (out instanceof java.io.PrintWriter) {
            PrintWriter pw = (PrintWriter) out;
            return pw.checkError();
        } else if (psOut != null) {
            return psOut.checkError();
        }
        return trouble;
    }
- 首先判断流对象是否被回收,不为null就flush缓冲区。
- 根据成员变量out来决定调用哪一种checkError()的实现。
- 不满足判断,直接返回trouble。
close()
close()对于PrintWriter的作用上面已经分析了。还有一点需要注意,close()并不会造成引用变量的值为null。
Charset折腾
I/O流从处理数据类型可以分为字节流和字符流。一般字节流处理二进制文件而字符流处理文本,那么字节流可以处理文本吗?
Charset作用
查看文档介绍类的第一句话,Charset是用来实现UTF-16的code unit序列和其他编码方式字节序列之间的映射关系。
例如指定Charset是UTF-8,也就是采用了UTF-8编码与UTF-16编码之间的映射,实现转换。
为什么要一定转换成UTF-16,而不采用原始字符集?一旦在内存中统一字符集,向外界输出时,再不受限于编码集,可以完全按照输出对象的编码集来输出。例如输出目的地采用UTF-8,那么使用PrintWriter的构造函数时就可以指定字符集(参数csn)。
字节流处理文本
public class TestCharset {
    public static void main(String[] args) {
        Charset charset = Charset.forName("UTF-8");
        Charset charset2 = Charset.forName("GBK");
        InputStream input = null;
        File file = new File("..", "/file/TestFile.txt");
        try {
            input = new FileInputStream(file);
            int count = input.available();
            byte[] b = null;
            if(count > 0) {
                b = new byte[count];
                input.read(b);
            }
            // for(byte i : b) {
            //     System.out.print(i + " ");
            // }
            // System.out.println();
            String s = new String(b, charset);
            int[] codePoints = s.codePoints().toArray();
            System.out.println("Charset is UTF-8: ");
            for(int i : codePoints) {
                System.out.print(i + " ");
            }
            System.out.println();

            s = new String(b, charset2);
            codePoints = s.codePoints().toArray();
            System.out.println("Charset is GBK: ");
            for(int i : codePoints) {
                System.out.print(i + " ");
            }
            System.out.println();


            String h = new String("h");
            codePoints = h.codePoints().toArray();
            System.out.println("The correct \"h\"'s encode: ");
            for(int i : codePoints) {
                System.out.print(i + " ");
            }
            System.out.println();

            System.out.println("The correct character: ");
            System.out.println(s);
        }catch (FileNotFoundException e) {
            e.printStackTrace();
        }catch(IOException e) {
            e.printStackTrace();
        }
    }
}
在执行之前,先创建一个采用GBK字符集编码的文件TestFile.txt。里面输入了一个中文“一”。由于采用Mac系统保存后默认使用UTF-8字符集编码,变成“h”。这里看似是一个正确显示的字符,其实不然。对于ASCII表中的所有字符,在每一个字符集编码都是相同的,这种现象称为类ASCII字符集。但是在创建TestFile.txt时输入的是“一”,所以编码绝对不会是104,这绝笔是一个乱码。
文本切换编码方式,其本质是对于同一个编码在不同的字符集中去解码。所以可以这么认为一个文本文件存储的并非是字符序列,而是创建文本时根据输入的字符和设定好的字符集来encoding得到的编码序列。
设定Charset为GBK的流程:
- 使用字节流,从文本文件中获取所有字节,构成一个字节数组。文本默认采用的是UTF-8字符集去解码字符,而字节流获得了文本中原始编码(即,输入文本字符时采用了GBK编码的字节)。
- 根据字节数组,并且指定Charset为GBK,转换成Java内存中的Unicode字符串。采用GBK是因为文件在创建时采用的是GBK字符集显示正确的字符“一”,所以在原始编码不变的情况下只有采用正确的字符集才能获取到正确的字符,以转换为正确的Unicode(UTF-16)编码。
- 最后通过采用默认的字符集(UTF-8)向控制台输出。注意控制台默认字符集是UTF-8。
在代码中看到,还打印了获取到的字符串的code point。其作用是,一是看采用不同Charset映射UTF-16后获取到字符串后code point;二是证实文件采用UTF-8字符集显示时,确实是一个乱码(如果是正确的,必定是104)。
执行结果:
Charset is UTF-8:
1211 10
Charset is GBK:
19968 10
The correct "h"'s encode:
104
The correct character:
一
参考
Java 使用Charset类解决读入字符乱码问题和控制输出字符编码
Java nio 学习笔记(二) Charset(字符集)与Selector(异步IO)的知识
Java字符串
JVM内存中,字符串存储形式是UTF-16编码。有一个概念必须理解,Java字符串就是char值序列。char只是表示UTF-16的一个code unit,就是UTF-16字符集的一个子集。而字符串为了表示所有字符,可以使用两个char来表示补充字符。
最直接证明,String对象实际上维护了一个char数组类型变量value。
UTF-16
为了用好Java中的字符串,那么有必要了解一下UTF-16字符集。UTF-16实际上是对Unicode编码的一种转换,在存储空间和效率上进行了一定的权衡。
Unicode的code point可以分为17个代码级别,第一个代码级别称为基本的多语言级别,code point范围U+0000~U+FFFF;其余的16个级别code point从U+10000~U+10FFFF,包括补充字符。
UTF-16编码采用不同长度的编码表示所有Unicode code point。在第一个级别,基本的多语言级别中,每个字符使用16位表示(也就是char),通常称为code unit;针对其余级别的补充字符,采用一对连续的code unit进行编码(两个char)。采用一组char来编码补充字符,就构成了所谓的surrogate pair(底层是用一个int来表示):第一个char称为high-surrogate,高代理部分,范围是从"uD800到"uDBFF,共1024个码位;第二个char称为low-surrogate,低代理部分,范围是从"uDC00到"uDFFF,共1024个码位。
这样的构成难道不会造成第一级别和其余级别编码重复吗?实际上并不会,在第一级别中有2048字节空闲,而它们的编码范围正好是surrogate pair组合中的高低代理部分的编码。这样一来可以很方便的去判断一个code unit到底是一个字符,还是一个补充字符的高或者低代理部分。
code unit是指每一种编码中最小的编码单元。
实战
正确使用Unicode转义字符
public class TestCharacterSequence {
public static void main(String[] args) {
// 1D546 是Unicode编码,而且超过了16位,所以无法赋值给char类型变量。
//char c = '\u1D546';
String s = null;
// \u1D546在字符串字面量中出现时分为两部分:\u1D54作为一个UTF-16第一级字符;‘6’作为一个字符
s = "\u1D546" + " ";
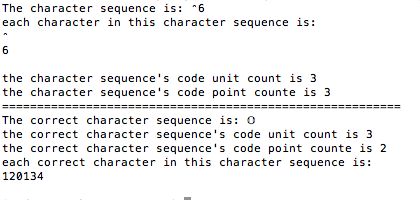
System.out.println("The character sequence is: " + s);
System.out.println("each character in this character sequence is:");
for(int i = 0; i < s.length(); i++) {
char c = s.charAt(i);
System.out.println(c);
}
int cuCount = s.length();
System.out.println("the character sequence's code unit count is " + cuCount); //Console 3
int cpCount = s.codePointCount(0, cuCount);
System.out.println("the character sequence's code point counte is " + cpCount); //Console 3
//从打印日志可以看到,确实将\u1D546分成两部分,如果没有,code unit的数量应该比code point数量多一个。
System.out.println("===================");
String correctStr = "\uD835\uDD46" + " ";
System.out.println("The correct character sequence is: " + correctStr);
cuCount = correctStr.length();
System.out.println("the correct character sequence's code unit count is " + cuCount);
cpCount = correctStr.codePointCount(0, cuCount);
System.out.println("the correct character sequence's code point counte is " + cpCount);
System.out.println("each correct character in this character sequence is:");
for(int i = 0; i < cuCount;) {
int index = correctStr.offsetByCodePoints(i, 0);
int cp = correctStr.codePointAt(index);
if(Character.isSupplementaryCodePoint(cp)) {
i += 2;
System.out.println(cp);
}
else {
i++;
System.out.println((char)cp);
}
}
}
}
代码分析:
String实际上是char序列,那么对于补充字符如何正确的编写。由于Java在内存中使用UTF-16编码形式存储字符串,所以使用补充字符是应该按照UTF-16中规定的surrogate pair依次分别编写high-surrogate和low-surrogate两部分。
Console输出:
正确遍历含有补充字符的字符串
public class TestUnicode{
public static void main(String[] args) {
//char c = '\u1D546';
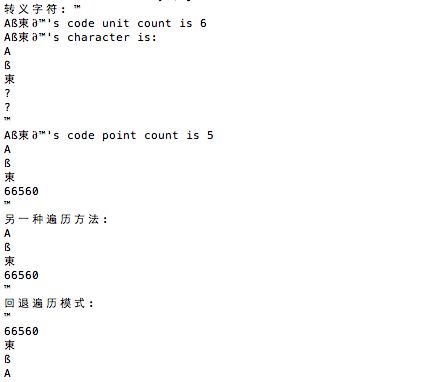
char c = '\u2122';
System.out.println("转义字符: " + c);
String s3 = "\u0041\u00DF\u6771\ud801\uDC00\u2122";
System.out.println(s3 + "\'s code unit count is " + s3.length());
System.out.println(s3 + "\'s character is: ");
for(int i = 0; i < s3.length(); i++) {
System.out.println(s3.charAt(i));
}
int cpCount3 = s3.codePointCount(0, s3.length());
System.out.println(s3 + "\'s code point count is " + cpCount3);
//第一种遍历方式
for (int i = 0; i < cpCount3; i++) {
int index = s3.offsetByCodePoints(0, i);
//System.out.println("i = " + i + ", index = " + index);
int cp = s3.codePointAt(index);
//System.out.println("code point is ");
if (!Character.isSupplementaryCodePoint(cp)) {
System.out.println((char) cp);
} else {
System.out.println(cp);
}
}
System.out.println("另一种遍历方法: ");
for(int i = 0; i < s3.length();) {
int index = s3.offsetByCodePoints(i, 0);
int cp = s3.codePointAt(index);
if(Character.isSupplementaryCodePoint(cp)) {
i += 2;
System.out.println(cp);
}else {
i++;
System.out.println((char)cp);
}
}
System.out.println("回退遍历模式: ");
for(int i = s3.length() - 1; i >= 0;) {
char cu = s3.charAt(i);
int cp = 0;
if(Character.isSurrogate(cu)) {
i--; //因为是回退操作,如果是代理字符,那么一定是low-surrogate,所以先减一。
int index = s3.offsetByCodePoints(i, 0);
cp = s3.codePointAt(index);
i--;//获取到high-surrogate后,再减一,可以遍历下一个code unit。
System.out.println(cp);
}else {
cp = s3.charAt(i);
System.out.println((char) cp);
i--;
}
}
}
}
代码分析:
首先看关键方法int offsetByCodePoints(int index, int codePointOffset)。文档解释说返回根据给定索引配合给定偏移量计算得到的code point索引,如果未匹配在surrogate范围内,算作为一个code point。感觉完全没说一样,那么来看看源码怎么实现的。
    public int offsetByCodePoints(int index, int codePointOffset) {
        if (index < 0 || index > value.length) {
            throw new IndexOutOfBoundsException();
        }
        return Character.offsetByCodePointsImpl(value, 0, value.length,
                index, codePointOffset);
    }
个人理解,源码提供的唯一信息就是参数index范围是String对象的code unit个数(也就是char[] value的长度)。由此有一种思路,通过指定当前遍历到的code unit来获取code point索引。于是,有了第二种遍历思路。
第一种方法借鉴于Java 正确遍历字符串,既然是按照字符串code point个数来遍历为何还要通过offsetByCodePoint()来获取索引,多此一举。
第三种回退遍历模式。
从代码中可以看到
codePointAt()方法返回的事int类型,这应该是为了适配surrogate pair模式。其值为Unicode字符集编码。
Console输出:
String.getBytes()使用
官方文档解释,该方法主要根据平台的默认字符集,对String对象中的char sequence进行编码然后以字节序列的形式存储在一个字节数组中。
MacOs默认字符集是UTF-8。
当然可以使用它的重载方法进行指定Charset来实现编码。
public class NewString {
public static void main(String[] args) throws UnsupportedEncodingException{
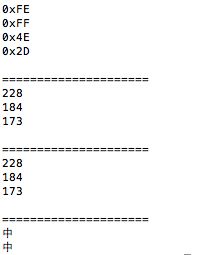
String str = "中";
//获取指定字符集UTF-16的字节数组。
byte[] b1 = str.getBytes("UTF-16"); //getByte()方法采用指定的字符集来保存编码
for(byte b : b1) {
System.out.println(Hex2Decimal.toHexString(b));
}
System.out.println();
System.out.println("=====================");
//获取默认字符集(UTF-8)的字节数组。
byte[] b2 = str.getBytes();
for(byte b : b2) {
int i = b;
//System.out.println(i);//输出是负数
System.out.println(b & 0xff);//高24位置0,输出正确值
}
System.out.println();
System.out.println("=====================");
Charset c = Charset.forName("UTF-16");
System.out.println(new String(b1, c));//在是用String(byte[])构造String对象时,需要使用字符集去解码,默认是UTF-8
System.out.println(new String(b2));//其实就是先使用UTF-8Charset解码成Unicode编码,然后在内存中使用char[]来保存
}
}
public class Hex2Decimal {
public static String toHexString(byte b) {
String tmp = Integer.toHexString(b & 0xff);
if(tmp.length() == 1) {
tmp = '0' + tmp;
}
return "0x" + tmp.toUpperCase();
}
}
Console输出:
误区
这里遇到两个坑:
一、打印getBytes()返回的字节数组出现负数
首先需要说明UTF-16字符集有两种,大尾序和小尾序,即 UTF-16BE 和 UTF-16LE,在编码前会放置一个U+FEFF或U+FFFE(UTF-16BE 以 FEFF 代表,UTF-16LE 以 FFFE 代表)。所以打印指定UTF-16字符集获取的byte array前两个元素是FE和FF。
但是直接打印分别是-2,-1,78,45。
调用System.out.println()实际上会先对byte进行一个转型,变成int后再去打印。问题的关键就出在转型。由于FE最高位为1,而byte类型范围是-128~127,所以JVM认为它是负数。例如:
“中”在UTF-8字符集中的编码由三个字节组成,第一个是228(二进制:1110 0100),如果直接转换为int为-28(前三个1作为符号位,表示负数)。
值为FE的byte类型直接转换为int是-2,其实质就是把前6位作为符号位,最后两位作为-2的二进制码。
byte转换成int类型是符号位扩展,所以直接转换就出现了误差。
为了避免这种方法,在代码中应该进行高位置0操作,能够这样做是因为字符集编码绝对不会有负数。
二、使用字节数组构造String对象乱码
在代码中看到最后由前两个获取到的字节数组重新创建String对象时,第一个构造器中制定了字符集为UTF-16。这是因为默认使用UTF-8,如果使用默认的Charset映射UTF-16编码,存储在内存的是乱码。
在内存实际上是通过编码的形式存储字符,如文本、String对象。而在流中实际上是以字节形式处理。
参考
Java 7之基础 - 编码与解码
参考
java.io.PrintWriter
java io系列25之 PrintWriter详解
工具
Unicode-UTF