1. OkHttp官网介绍:
OkHttp: An HTTP+HTTP/2 client for Android and Java applications.
该库支持 HTTP1.0、HTTP1.1、HTTP2.0 以及 SPDY ,都在类Protocol 中声明。
public enum Protocol {
  /**
   * An obsolete plaintext framing that does not use persistent sockets by default.
   */
  HTTP_1_0("http/1.0"),

  /**
   * A plaintext framing that includes persistent connections.
   *
   * This version of OkHttp implements RFC
   * 7230, and tracks revisions to that spec.
   */
  HTTP_1_1("http/1.1"),

  /**
   * Chromium's binary-framed protocol that includes header compression, multiplexing multiple
   * requests on the same socket, and server-push. HTTP/1.1 semantics are layered on SPDY/3.
   *
   * Current versions of OkHttp do not support this protocol.
   *
   * @deprecated OkHttp has dropped support for SPDY. Prefer {@link #HTTP_2}.
   */
  SPDY_3("spdy/3.1"),

  /**
   * The IETF's binary-framed protocol that includes header compression, multiplexing multiple
   * requests on the same socket, and server-push. HTTP/1.1 semantics are layered on HTTP/2.
   *
   * HTTP/2 requires deployments of HTTP/2 that use TLS 1.2 support {@linkplain
   * CipherSuite#TLS_ECDHE_RSA_WITH_AES_128_GCM_SHA256} , present in Java 8+ and Android 5+. Servers
   * that enforce this may send an exception message including the string {@code
   * INADEQUATE_SECURITY}.
   */
  HTTP_2("h2");
}
2. OkHttp的基本使用:
(1) Step One: 构建OkHttpClient对象
OkHttpClient okHttpClient = new OkHttpClient.Builder().build();
(2) Step Two: 构建Request对象
Request request = new Request.Builder().url("xxxxx").build();
(3) Step Three: 通过上两步创建的对象生成Call
Call newCall = okHttpClient.newCall(request);
(4) Step Four: 使用Call发送异步或同步请求,获取Response对象。
 //  同步请求:
Response response = newCall.execute();

//  异步请求:
 newCall.enqueue(new Callback() {
           @Override
           public void onFailure(Call call, IOException e) {
           }

           @Override
           public void onResponse(Call call, Response response) throws IOException {

           }
       });
(5) 取消网络请求:
newCall.cancel();
(6) 注意事项:
- OkHttp发送异步请求,CallBack回调依旧执行在子线程,所以不能直接进行UI更新操作。
- 同一个Call只能执行一次同步或者异步网络请求。
3. OkHttp流程图
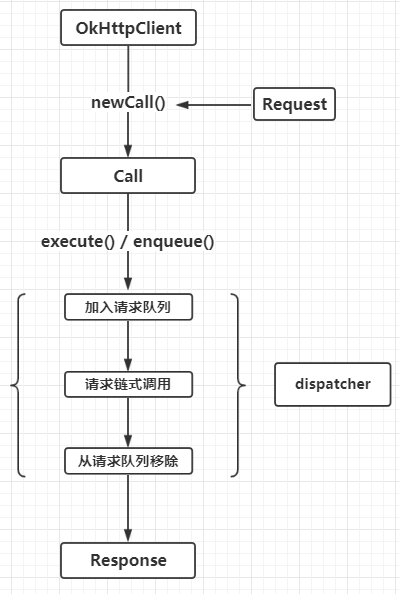
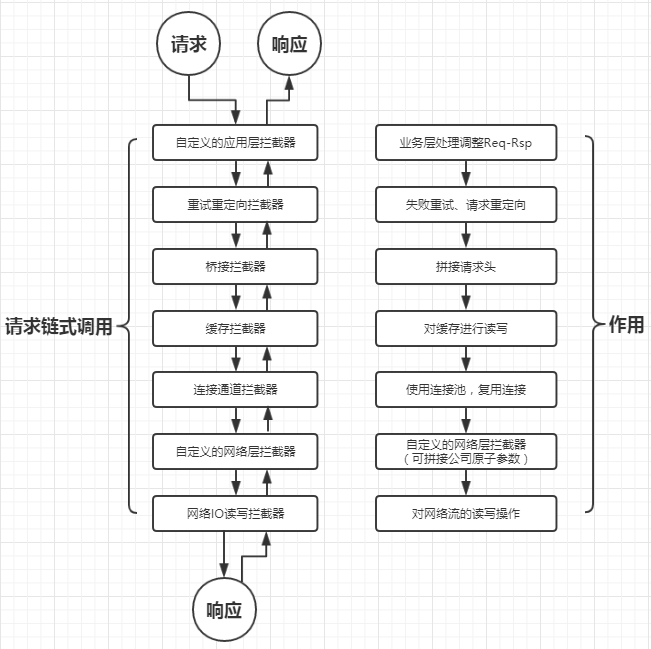
从整体来看,我们通过构建OkHttpClient对象,并调用其newCall (Request) 方法生成一个真正用于执行网络请求的Call实例。call.execute()进行同步网络请求,call.enqueue()进行异步网络请求。但不管是同步还是异步,在网络请求前,先将这个请求放入到dispatcher的请求队列中,然后getResponseWithInterceptorChain()来链式调用各拦截器(如下图所示)获取Response对象,最后将这次请求从队列中移除。
4. 核心代码分析
4.1 OkHttpClient创建(Builder模式):
OkHttpClient okHttpClient = new OkHttpClient.Builder().build();
    public Builder() {
      dispatcher = new Dispatcher();
       ...
      followRedirects = true;
      retryOnConnectionFailure = true;
      connectTimeout = 10_000;
      readTimeout = 10_000;
      writeTimeout = 10_000;
      pingInterval = 0;
    }
    public OkHttpClient build() {
      return new OkHttpClient(this);
    }
OkHttpClient(Builder builder) {
    this.dispatcher = builder.dispatcher;
    this.proxy = builder.proxy;
   ...
}
其中在Builder构造器内创建了Dispatcher对象,最终通过Builder.build()将Dispatcher传递给OkHttpClient,所以我们一定要记住OkHttpClient中存在Dispatcher对象。当然,既然OkHttpClient采用Builder模式创建实例,就允许我们以链式调用的方式对OkHttpClient进行配置,正如下面所示,但这不是本文关注的重点。
- connectTimeout() 设置连接超时时间
- cache() 设置缓存文件并配置缓存大小
- addInterceptor() 添加应用层拦截器(请求链式调用流程图.PNG 图中 “自定义应用层拦截器”)
- addNetworkInterceptor() 添加网络层拦截器(请求链式调用流程图.PNG 图中 “自定义网络层拦截器”)
- ...
4.2 Request创建(Builder模式):
Request request = new Request.Builder().url("xxxxx").build();
和上面创建OkHttpClient一样,依旧Builder模式允许使用者灵活配置请求。
- url() 添加网络请求地址
- addHeader() 添加网络请求头信息
- cacheControl() 设置本次请求的缓存方式
- get() post() put() delete() ... 设置请求的方式,支持restful风格
4.3 Call对象生成:
Call newCall = okHttpClient.newCall(request);
OkHttpClient.class 中的newCall() 方法:
 @Override public Call newCall(Request request) {
    return RealCall.newRealCall(this, request, false /* for web socket */);
  }
RealCall.class 中的newRealCall() 方法:
  static RealCall newRealCall(OkHttpClient client, Request originalRequest, boolean forWebSocket) {
    RealCall call = new RealCall(client, originalRequest, forWebSocket);
    ...
    return call;
  }
到此处为止,我们通过OkHttpClient.newCall(Request)生成一个newRealCall对象,这个对象包含了OkHttpClient和Request引用,所以我们完全可以在RealCall类中做剩余工作了,而事实也正是如此。
4.4 开始同步(异步)网络请求:
RealCall 的同步方法:
  @Override public Response execute() throws IOException {
    synchronized (this) {
      if (executed) throw new IllegalStateException("Already Executed");  // 这里可以解释为什么每个call只能执行一次。
      executed = true;
    }
    try {
      client.dispatcher().executed(this);           // 将RealCall存到之前强调的OkHttpClient的dispatcher中
      Response result = getResponseWithInterceptorChain(); // 真正向服务器发送网络请求的代码,后面会具体说明。
      if (result == null) throw new IOException("Canceled");
      return result;
    } catch (IOException e) { }
      finally {
      client.dispatcher().finished(this);     // 执行请求后将RealCall从dispatcher中移除
    }
  }
同步请求,通过dispatcher对RealCall储存和移除逻的辑相当简单,只是维护了一个集合用于管理。
Dispatcher.class中的同步请求的添加和移除方法:
public final class Dispatcher {
  ...
   // 同步请求集合
   private final Deque runningSyncCalls = new ArrayDeque<>();

   // 添加同步请求
   synchronized void executed(RealCall call) {
    runningSyncCalls.add(call);
   }

   // 移除同步请求
   void finished(RealCall call) {
    finished(runningSyncCalls, call, false);
   }

   private  void finished(Deque calls, T call, boolean promoteCalls) {
    ...
    synchronized (this) {
      if (!calls.remove(call)) throw new AssertionError("Call wasn't in-flight!");
      if (promoteCalls) promoteCalls();  // 同步请求,此处不会被调用。
    }
    ...
   }
  ...
 }
RealCall的异步方法:
 @Override public void enqueue(Callback responseCallback) {
    synchronized (this) {
      if (executed) throw new IllegalStateException("Already Executed");  // 这里可以解释为什么每个call只能执行一次。
      executed = true;
    }
    client.dispatcher().enqueue(new AsyncCall(responseCallback));  // AsyncCall为RealCall的内部类,实现Runnable接口,用于线程池的调度。
  }
先不讲client.dispatcher().enqueue(xx)具体代码实现,我们先看一下AsyncCall的结构。
final class RealCall implements Call {
    ...
    final class AsyncCall extends NamedRunnable {
        AsyncCall(Callback responseCallback) {
           super("OkHttp %s", redactedUrl());
           this.responseCallback = responseCallback;
        }

       @Override protected void execute() { ... }
    }
}
 public abstract class NamedRunnable implements Runnable {
  protected final String name;

  public NamedRunnable(String format, Object... args) {
    this.name = Util.format(format, args);
  }

  @Override public final void run() {
    String oldName = Thread.currentThread().getName();
    Thread.currentThread().setName(name);
    try {
      execute();
    } finally {
      Thread.currentThread().setName(oldName);
    }
  }

  protected abstract void execute();
}
AsyncCall作为RealCall的内部类,AsyncCall引用RealCall的实例对象,同时AsyncCall实现了Runnable接口,一旦开始执行就会调用AsyncCall 的execute()方法。知道了AsyncCall 的基本结构,就可以看client.dispatcher().enqueue(new AsyncCall(responseCallback)) 内部具体实现了。
public final class Dispatcher {

 private int maxRequests = 64;  // 同时进行的异步网络请求最大数

  private int maxRequestsPerHost = 5;  // 同一个网络请求主机地址允许最大请求个数

  private final Deque readyAsyncCalls = new ArrayDeque<>();  // 异步请求缓存队列

  private final Deque runningAsyncCalls = new ArrayDeque<>();  // 异步请求执行队列

  public synchronized ExecutorService executorService() {   // 获取线程池执行器
    if (executorService == null) {
      executorService = new ThreadPoolExecutor(0, Integer.MAX_VALUE, 60, TimeUnit.SECONDS,
          new SynchronousQueue(), Util.threadFactory("OkHttp Dispatcher", false));
    }
    return executorService;
  }

  synchronized void enqueue(AsyncCall call) {   // 添加异步请求。
    if (runningAsyncCalls.size() < maxRequests && runningCallsForHost(call) < maxRequestsPerHost) {  // 判断能否放入异步网络请求执行队列
      runningAsyncCalls.add(call);  // 将异步请求添加到执行队列
      executorService().execute(call);  // 执行异步网络请求
    } else {
      readyAsyncCalls.add(call); // 将异步请求添加到等待队列
    }
  }

 ...
}
执行异步网络请求交由ThreadPoolExecutor处理,执行runnable的run方法,之前先看过了AsyncCall的结构,runable的具体实现是通过AsyncCall的execute()方法处理的,具体代码如下:
@Override protected void execute() {
      boolean signalledCallback = false;
      try {
        Response response = getResponseWithInterceptorChain();            // 真正向服务器发送网络请求的代码,后面会具体说明。
        if (retryAndFollowUpInterceptor.isCanceled()) {                     // 调用了call.cancel()方法取消网络请求
          signalledCallback = true;
          responseCallback.onFailure(RealCall.this, new IOException("Canceled")); // 通过CallBack进行失败的回调
        } else {
          signalledCallback = true;
          responseCallback.onResponse(RealCall.this, response);    // 通过CallBack进行成功的回调
        }
      } catch (IOException e) {
        ...
      } finally {
        client.dispatcher().finished(this);    // 异步请求结束后,从执行队列中移除请求
      }
    }
异步请求的移除操作
  void finished(AsyncCall call) {
    finished(runningAsyncCalls, call, true);
  }


  private  void finished(Deque calls, T call, boolean promoteCalls) {
    ...
    synchronized (this) {
      if (!calls.remove(call)) throw new AssertionError("Call wasn't in-flight!");    //对执行队列中移除请求
      if (promoteCalls) promoteCalls();    // 将异步请求准备队列中的将请求放入执行队列中,做补位操作
      ...
    }
   ...
  }

  private void promoteCalls() {
    if (runningAsyncCalls.size() >= maxRequests) return;
    if (readyAsyncCalls.isEmpty()) return;

    for (Iterator i = readyAsyncCalls.iterator(); i.hasNext(); ) {
      AsyncCall call = i.next();

      if (runningCallsForHost(call) < maxRequestsPerHost) {
        i.remove();
        runningAsyncCalls.add(call);
        executorService().execute(call);
      }

      if (runningAsyncCalls.size() >= maxRequests) return;
    }
  }
5. 链式调用发送网络请求
之前只是知道通过getResponseWithInterceptorChain() 真正向服务器发送网络请求,但是没有做具体的分析,因为这块相对来说比较独立,可以单独提出来讲,废话不多说,先具体看看该方法内部实现。
  Response getResponseWithInterceptorChain() throws IOException {
    // Build a full stack of interceptors.
    List interceptors = new ArrayList<>();
    interceptors.addAll(client.interceptors());
    interceptors.add(retryAndFollowUpInterceptor);
    interceptors.add(new BridgeInterceptor(client.cookieJar()));
    interceptors.add(new CacheInterceptor(client.internalCache()));
    interceptors.add(new ConnectInterceptor(client));
    if (!forWebSocket) {
      interceptors.addAll(client.networkInterceptors());
    }
    interceptors.add(new CallServerInterceptor(forWebSocket));

    Interceptor.Chain chain = new RealInterceptorChain(interceptors, null, null, null, 0,
        originalRequest, this, eventListener, client.connectTimeoutMillis(),
        client.readTimeoutMillis(), client.writeTimeoutMillis());

    return chain.proceed(originalRequest);
  }
RealInterceptorChain中的proceed()方法:
 public Response proceed(Request request, StreamAllocation streamAllocation, HttpCodec httpCodec,
      RealConnection connection) throws IOException {

     ...
   //  1.  获取获截器链中的第一个拦截器
   //  2.  通过index + 1,去掉拦截器链中的第一个拦截器获得新的拦截器链
   //  3.  调用原拦截器链中第一个拦截器的intercept()方法,并传入新的拦截器链

     RealInterceptorChain next = new RealInterceptorChain(interceptors, streamAllocation, httpCodec,
        connection, index + 1, request, call, eventListener, connectTimeout, readTimeout,
        writeTimeout);
    Interceptor interceptor = interceptors.get(index);
    Response response = interceptor.intercept(next);
    ...
    return response;
  }
这里面的具体代码实现简单粗暴,无非是按顺序添加不同的拦截器,用于分级处理Request和Response,最后创建了一个RealInterceptorChain对象,用于顺序执行每个拦截器中的intercept()方法。
接着看其中一个拦截器RetryAndFollowUpInterceptor中intercept()方法
@Override public Response intercept(Chain chain) throws IOException {

      Request request = chain.request();

      ...   //  加工处理网络请求体

      response = realChain.proceed(request, streamAllocation, null, null);  // 将请求传递给下一个拦截器

      ...  //   加工处理响应体

     return response;
 }
可以看到每个拦截器做的事无非是加工请求对象,将请求交由下一个拦截器处理,当然最后一个拦截器就不需要下交请求,而是直接向服务器发送网络请求,最后对响应加工处理并返回。

