何为UIPopoverPresentationController?
An object that manages the display of content in a popover.--一个用来管理在一个弹出窗口中展示内容的对象
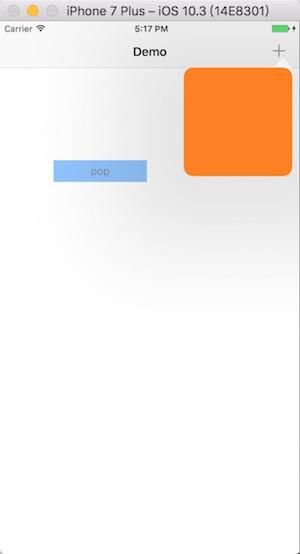
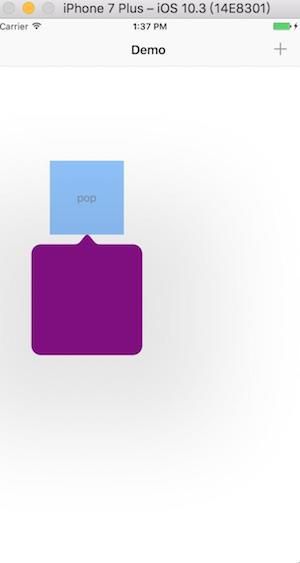
先来看一下效果
iOS9.0废弃的UIPopoverController
可以通过这篇文章了解一下以前的UIPopoverController使用方法UIPopoverController的使用
转到iOS8.0之后的UIPopoverPresentationController
官方文档对UIPopoverPresentationController的介绍原文为:
From the time a popover is presented until the time it is dismissed, UIKit uses an instance of this class to manage the presentation behavior. You use instances of this class as-is to configure aspects of the popover appearance and behavior for view controllers whose presentation style is set to popover
.
意思是说:从一个popover(也就是弹出的窗口)被presented(呈现)到被dismissed(退出)的期间,UIkit使用UIPopoverPresentationController的实例来管理呈现的行为。我们可以使用这个实例来为那些呈现的样式为popover的控制器设置popover的各个方面的外观和行为
另外官方文档还提到:
In nearly all cases, you use this class as-is and do not create instances of it directly. UIKit creates an instance of this class automatically when you present a view controller using the popover
style. You can retrieve that instance from the presented view controller’s popoverPresentationController
property and use it to configure the popover behavior.
意思是说:在几乎所有的情况下,我们都应该使用这个类并且不要直接创建它的实例。因为当我们present(呈现/弹出)一个控制器使用popover样式的时候,UIKit会自动为我们创建一个这个类的实例。我们可以通过控制器的popoverpresentationcontroller属性来重新获取UIPopoverPresentationController的实例,并且使用它来设置我们的popover的行为
如果当我们presenting一个控制器的时候,我们不想立即配置popover的话,我们可以使用它的代理去设置它。在present控制器的过程当中,UIPopoverPresentationController实例会调用遵守UIPopoverPresentationControllerDelegate的对象的很多方法,来询问一些信息和告诉它关于它应该呈现的状态
官方提供了如下的使用Swift代码的例子(我从Swfit切换到Objective-C,但还是显示的Swfit的例子,感觉苹果要默默干掉OC)
@IBAction func displayOptionsForSelectedItem () {
   let storyboard = UIStoryboard(name: "Main", bundle: nil)
   let optionsVC = storyboard.instantiateViewController(withIdentifier: "itemOptionsViewController")
   optionsVC.modalPresentationStyle = .popover
   optionsVC.popoverPresentationController?.barButtonItem = optionsControl
   self.present(optionsVC, animated: true) {}
}
官方提供的示例代码就是简单的把设置了一下将要弹出的控制器的modalPresentationStyle和popoverPresentationController用来显示在什么位置。但是使用上述代码运行的话,我们会发现它竟然把要弹出的控制器全屏展示了(这可能不是我们想要的效果)
定制我们想要的popopver效果(介绍)
Customizing the Popover Behavior(定制popover的行为)
-
delegate : UIPopoverPresentationControllerDelegate?
使用控制器的popoverPresentationController的delegate属性定制我们想要的效果
Configuring the Popover Appearance(设置popover的外观)
-
popoverLayoutMargins : UIEdgeInsets
定义popover允许展示的区域的各部分间隙。
客户端可能想要改变展示的popover的可用范围。默认的是返回距离展示的popover的各边的10个点,并且弹出的popover总是占据状态栏(我试了一下点击状态栏,popover不会消失),矩形的inset总是以当前设备的朝向来表示,(0,0)一直在设备的左上角。这可能需要在设备的旋转上进行改变。我设置了一下这个属性,即使在选择的情况下,好像没看到什么改变。 -
backgroundColor: UIColor?
popover的背景视图颜色 -
passthroughViews : [UIView]?
这个属性里可以放置那些当popover显示的时候的可和用户交互的视图 -
popoverBackgroundViewClass : UIPopoverBackgroundViewMethods.Type?
这个属性可以是UIPopoverBackgroundView的子类,也可以自定义一个UIView但是必须遵守UIPopoverBackgroundViewMethods协议并实现这个协议的响应方法。这个协议可以设置箭头的位置、高度以及它的contentView的inset -
canOverlapSourceViewRect : Bool
表示popover是否可以和它的源视图矩形重叠,默认是false。如果为true的话,表示popover的内容比可用空间更大时被允许重叠源视图以容纳内容
Specifying the Popover’s Anchor Point(指定popover的锚点)
锚点也就是popover的箭头所指向的位置
-
barButtonItem: UIBarButtonItem?
指定popover指向UIBarButtonItem -
sourceView : UIView?
指定popover指向的View -
sourceRect : CGRect
指定popover指向的矩形
Configuring the Popover Arrows(设置popover的箭头)
-
permittedArrowDirections: UIPopoverArrowDirection
表示允许的方向 -
arrowDirection: UIPopoverArrowDirection
获取箭头的指向。在弹出之前,这个值是UIPopoverArrowDirectionUnknown
UIPresentationController
UIPopoverPresentationController继承自UIPresentationController,这个对象的作用官方文档说是:一个为弹出的视图控制器提供高级视图和转场管理的对象。对于UIPresentationController更相近的内容限于篇幅,不再介绍,可以查看文档UIPresentationController
定制我们想要的popopver效果(实现)
先来说一下,如果我们像上文官方提供的例子的话,运行的结果将是全屏,这可能是系统会帮我们自适应弹出的样式,原因如下:
-
UIPopoverPresentationController继承自UIPresentationController,在源代码里,可以看到这个类包含一个属性
// By default this implementation defers to the delegate, if one exists, or returns the current presentation style. UIFormSheetPresentationController, and
// UIPopoverPresentationController override this implementation to return UIModalPresentationStyleFullscreen if the delegate does not provide an
// implementation for adaptivePresentationStyleForPresentationController:

open var adaptivePresentationStyle: UIModalPresentationStyle { get }
通过类型可以看出这个属性就是设置弹出popover的样式,再看一下注释,发现默认是根据UIAdaptivePresentationControllerDelegate实现的,如果实现了自适应样式的方法,那么这个属性的值就是设为响应的值。如果它的协议没有在adaptivePresentationStyleForPresentationController方法中实现的话,在UIFormSheetPresentationController和UIPopoverPresentationController重写了这个实现,并且返回UIModalPresentationStyleFullscreen。这就说明了,为什么官方的例子弹出的效果是全屏的了
-
UIPopoverPresentationController的delegate遵守的协议为UIPopoverPresentationControllerDelegate,这个协议又继承自UIAdaptivePresentationControllerDelegate。在Xcode中查看这个协议的内容,会发现这个协议可以控制自适应弹出的样式。并且从下图的第一个方法的注释中可以看出,自适应的样式只支持UIModalPresentationFullScreen和UIModalPresentationOverFullScreen,并没有我们想要的popover
另外,我们注意到第二个方法的注释:返回UIModalPresentationNone指示不会发生自适应的样式,经过测试,果真如此。如果在这个代理方法返回UIModalPresentationNone,我们将可以定制我们自己的弹出样式,这也是本文所展示的效果的解决方法。同样,如果在第一个代理返回返回UIModalPresentationNone的话,也可以禁止弹出的自适应效果
了解了思路以后,用代码来写出我们想要的效果
-
Swift实现
- 基于UIBarButtonItem
let vc: UIViewController = UIViewController()
@IBAction func itemPop(_ sender: UIBarButtonItem) {
  vc.view.backgroundColor = UIColor.orange
  // 设置弹出的尺寸
  vc.preferredContentSize = CGSize(width: 150, height: 150)
  // 设置弹出的样式
  vc.modalPresentationStyle = UIModalPresentationStyle.popover

  // 这个属性为true时表明除了popover内部,其它地方不响应事件,也就是说点击其他地方popover不会消失
  // 这个属性默认为false,也就是点击popover周围的地方会消失(状态栏除外)
  // modalInPopover is set on the view controller when you wish to force the popover hosting the view controller into modal behavior.
  // When this is active, the popover will ignore events outside of its bounds until this is set to NO.
  vc.isModalInPopover = true

  // 获取UIPopoverPresentationController对象
  let popoverPresentationController = vc.popoverPresentationController
  // 设置popoverPresentationController显示的锚点
  popoverPresentationController?.barButtonItem = self.navigationItem.rightBarButtonItem
  // 设置代理
  popoverPresentationController?.delegate = self
  // 设置方向
  popoverPresentationController?.permittedArrowDirections = UIPopoverArrowDirection.any

  self.present(vc, animated: true, completion: nil)
}

// 方法一:
func adaptivePresentationStyle(for controller: UIPresentationController) -> UIModalPresentationStyle {
  return .none
}

// 方法二:
//    func adaptivePresentationStyle(for controller: UIPresentationController, traitCollection: UITraitCollection) -> UIModalPresentationStyle {
//        return .none
//    }
效果图如本文开篇图片效果
- 基于父类是UIView的控件
let vc: UIViewController = UIViewController()
@IBAction func buttonPop(_ btn : UIButton) {
  vc.preferredContentSize = CGSize(width: 150, height: 150)
  vc.modalPresentationStyle = UIModalPresentationStyle.popover

  let popoverPresentationController = vc.popoverPresentationController
  popoverPresentationController?.sourceView = btn
  popoverPresentationController?.permittedArrowDirections = UIPopoverArrowDirection.up
  popoverPresentationController?.delegate = self
  popoverPresentationController?.backgroundColor = UIColor.purple

  self.present(vc, animated: true, completion: nil)
}
// 方法一:
func adaptivePresentationStyle(for controller: UIPresentationController) -> UIModalPresentationStyle {
  return .none
}
// 方法二:
//    func adaptivePresentationStyle(for controller: UIPresentationController, traitCollection: UITraitCollection) -> UIModalPresentationStyle {
//        return .none
//    }
效果图如下
我们发现并不是我们想要的效果,popover的位置好像不对。调整它的位置,这时候就要用到sourceRect属性了。没有设置的情况下默认都是0,所以显示在了按钮的左上角(0,0,0,0)的位置,下面设置一下sourceRect属性
popoverPresentationController?.sourceRect = CGRect(x: btn.frame.size.width / 2, y: btn.frame.size.height, width: 0, height: 0)
效果图如下
-
OC实现
- 基于UIBarButtonItem
- (IBAction)itemPop:(id)item {
  _vc.view.backgroundColor = [UIColor orangeColor];
  _vc.preferredContentSize = CGSizeMake(150, 150);

  _vc.modalPresentationStyle = UIModalPresentationPopover;

  UIPopoverPresentationController *popoverPresentationController = _vc.popoverPresentationController;
  popoverPresentationController.barButtonItem = item;
  popoverPresentationController.permittedArrowDirections = UIPopoverArrowDirectionAny;
  popoverPresentationController.delegate = self;
  [self presentViewController:_vc animated:YES completion:nil];
}

#pragma mark - UIPopoverPresentationControllerDelegate
- (UIModalPresentationStyle)adaptivePresentationStyleForPresentationController:(UIPresentationController *)controller {
  return UIModalPresentationNone;
}

//- (UIModalPresentationStyle)adaptivePresentationStyleForPresentationController:(UIPresentationController *)controller traitCollection:(UITraitCollection *)traitCollection {
//    return UIModalPresentationNone;
//}
效果和前文一样
- 基于父类是UIView的控件
- (IBAction)popBtnClick:(UIButton *)btn {
  _vc.preferredContentSize = CGSizeMake(150, 150);
  _vc.modalPresentationStyle = UIModalPresentationPopover;

  UIPopoverPresentationController *popoverPresentationController = _vc.popoverPresentationController;
  popoverPresentationController.sourceView = btn;
  popoverPresentationController.sourceRect = CGRectMake(btn.frame.size.width / 2, btn.frame.size.height, 0, 0);
  popoverPresentationController.permittedArrowDirections = UIPopoverArrowDirectionUp;
  popoverPresentationController.delegate = self;
  popoverPresentationController.backgroundColor = [UIColor purpleColor];

  [self presentViewController:_vc animated:YES completion:nil];
 }

#pragma mark - UIPopoverPresentationControllerDelegate
- (UIModalPresentationStyle)adaptivePresentationStyleForPresentationController:(UIPresentationController *)controller {
  return UIModalPresentationNone;
}

//- (UIModalPresentationStyle)adaptivePresentationStyleForPresentationController:(UIPresentationController *)controller traitCollection:(UITraitCollection *)traitCollection {
//    return UIModalPresentationNone;
//}
遗留问题:当第一次点击阴影使popover消失的时候,会报一个警告,可以点击这里进行了解
[Warning] <_UIPopoverBackgroundVisualEffectView 0x7f99f4607860> is being asked to animate its opacity. This will cause the effect to appear broken until opacity returns to 1.
参考文献:
UIPopoverPresentationController
UIPopoverController的使用
如果不想用系统的样式,也可以自定义,通过使用popoverBackgroundViewClass这个属性来自定义背景,具体可以参考这篇文章Customizing UIPopover with UIPopoverBackgroundView


