After learning Django Rest Framework a few month, I think it is time to make a summary. my project is host in github:
https://github.com/cagegong/erplite/tree/master/Server
There are three good packages we may use:
django-cors-headers Django app for handling the server headers required for Cross-Origin Resource Sharing (CORS)
rest_framework_extensions DRF-extensions is a collection of custom extensions for Django REST Framework
drf-nested-routers This package provides routers and relations to create nested resources in the Django Rest Framework
1. model:
//models.py
class Contacts(models.Model):
    name = models.CharField(max_length=255)
    avator = models.CharField(max_length=100, blank=True)
    description = models.TextField(blank=True)
    createdDate = models.DateTimeField(auto_now_add=True)
    createdBy = models.CharField(max_length=100)
    modifiedDate = models.DateTimeField(auto_now=True)
    modifiedBy = models.CharField(max_length=100)

    def __unicode__(self):
        return '%s' % (self.name)

class ContactTag(models.Model):
    contact = models.ForeignKey('Contacts', related_name='tags')
    tag = models.CharField(max_length=100)
    createdDate = models.DateTimeField(auto_now_add=True)
    createdBy = models.CharField(max_length=100)
    modifiedDate = models.DateTimeField(auto_now=True)
    modifiedBy = models.CharField(max_length=100)

    def __unicode__(self):
        return '%s' % (self.tag)
now we have contact and contacttag with 1:n relationship.
in contact = models.ForeignKey('Contacts', related_name='tags'), Contacts is model name, related_name='tags' is a name used in serializer.
2. serializer
//serializers.py
from rest_framework import serializers
from Contacts.models import Contacts, ContactTag

class ContactsListSerializer(serializers.HyperlinkedModelSerializer):
    tags = serializers.RelatedField(many=True)
    class Meta:
        model = Contacts
        fields = ('id','url', 'name', 'avator', 'tags', 'description', 'createdDate', 'createdBy', 'modifiedDate', 'modifiedBy')

class ContactsDetailSerializer(serializers.HyperlinkedModelSerializer):
    tags = serializers.HyperlinkedRelatedField(many=True,view_name='contacttag-detail')
    class Meta:
        model = Contacts
        fields = ('id', 'name', 'avator', 'tags', 'data', 'links', 'description', 'createdDate', 'createdBy', 'modifiedDate', 'modifiedBy')

class ContactTagSerializer(serializers.ModelSerializer):
    contactname = serializers.Field(source='contact.name')
    class Meta:
        model = ContactTag
        fields = ('contact','contactname','tag', 'createdDate', 'createdBy', 'modifiedDate', 'modifiedBy')
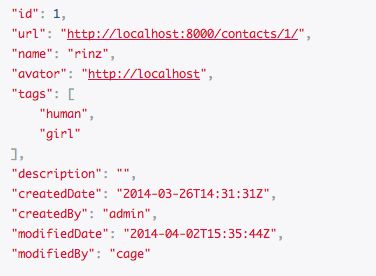
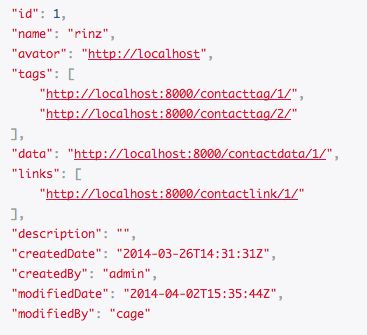
For contacts we need to display list and detail with different content
List:
Detail:
In list, we just need tag name but in detail, we will give the API for tag source.
In order to make this, in ContactsListSerializer we set
tags = serializers.RelatedField(many=True), so it displays the tag model return:
def __unicode__(self):
        return '%s' % (self.tag)
In ContactsDetailSerializer we set tags = serializers.HyperlinkedRelatedField(many=True,view_name='contacttag-detail')
3. view
we have two serializers for Contacts, but in DRF default viewset, we can only set one serializer_class, in order to support custom serializer, we need rewrite viewset. rest_framework_extensions package make it easy, we just import DetailSerializerMixin and use serializer_detail_class = ContactsDetailSerializer.
//views.py
class ContactViewSet(DetailSerializerMixin, viewsets.ModelViewSet):
    authentication_classes = (SessionAuthentication, TokenAuthentication, BasicAuthentication)
    permission_classes = (IsAuthenticated,)

    queryset = Contacts.objects.all()
    serializer_class = ContactsListSerializer
    serializer_detail_class = ContactsDetailSerializer

class ContactTagViewSet(viewsets.ModelViewSet):
    authentication_classes = (SessionAuthentication, TokenAuthentication, BasicAuthentication)
    permission_classes = (IsAuthenticated,)

    queryset = ContactTag.objects.all()
    serializer_class = ContactTagSerializer

  def get_queryset(self):
        contact_id = self.kwargs.get('contact_pk', None)
        print contact_id
        if contact_id:
            return ContactTag.objects.filter(contact=contact_id)
        return super(ContactTagViewSet, self).get_queryset()
4. URL
now we can use DRF default router.
//urls.py
from rest_framework.routers import DefaultRouter

router = DefaultRouter()
router.register(r'contacts', views.ContactViewSet)
router.register(r'contacttag', views.ContactTagViewSet)
5. Nested router
Now we have API like this:
[
    {
        "contacts": "http://localhost:8000/contacts/",
        "contacttag": "http://localhost:8000/contacttag/",
    }
]
and we get json result like this:
[
    {
        "id": 1,
        "url": "http://localhost:8000/contacts/1/",
        "name": "rinz",
        "avator": "http://localhost",
        "tags": [
            "human",
            "girl"
        ],
        "description": "",
        "createdDate": "2014-03-26T14:31:31Z",
        "createdBy": "admin",
        "modifiedDate": "2014-04-02T15:35:44Z",
        "modifiedBy": "cage"
    }
]
[
    {
        "contact": 1,
        "contactname": "rinz",
        "tag": "human",
        "createdDate": "2014-03-26T14:32:38Z",
        "createdBy": "admin",
        "modifiedDate": "2014-04-02T15:35:44Z",
        "modifiedBy": "admin"
    }
]
We can get all contacts from ./contacts and get detail contact from ./contact/x/, we can also get API point to contact's tags in contact detail. It takes two steps to get a contact's tag information, if we want to get tag's information in one step like ./contact/x/tag/ and ./contact/x/tag/y/. So we need nested router, drf-nested-routers is a package can make this simple.
//urls.py
from rest_framework.routers import DefaultRouter
from rest_framework_nested import routers

admin.autodiscover()

router = DefaultRouter()
router.register(r'contacts', views.ContactViewSet)
router.register(r'contacttag', views.ContactTagViewSet)

contacts_router = routers.NestedSimpleRouter(router, r'contacts', lookup='contact')
contacts_router.register(r'contacttag', views.ContactTagViewSet)
Use nested router we will get a url like:
^contacts/(?P
^contacts/(?P
so, we we should handle this url in view:
//views.py
class ContactTagViewSet(viewsets.ModelViewSet):
    authentication_classes = (SessionAuthentication, TokenAuthentication, BasicAuthentication)
    permission_classes = (IsAuthenticated,)

    queryset = ContactTag.objects.all()
    serializer_class = ContactTagSerializer

    def get_queryset(self):
        contact_id = self.kwargs.get('contact_pk', None)
        if contact_id:
            return ContactTag.objects.filter(contact=contact_id)
        return super(ContactTagViewSet, self).get_queryset()
Add custom get_queryset function to return ContactTag result.
6. Deploy
It's time to deploy our server to apache server.
My environment is AWS EC2 + Amazon Linux AMI + httpd + mod_wsgi.
step 1: update whole environment
install httpd first, yum install httpd
step 2: install python2.7
Download python resource package
tar zxvf Python-2.7.2.tgz
./configure –enable-shared
make sure you add –enable-shared or you will face unknow error in future.
make && make install
start python:
python: error while loading shared libraries: libpython2.7.so.1.0: cannot open shared object file: No such file or directory
python2.7 cannot find the lib, we have to configure using ldconfig
ldconfig /usr/local/lib
now, python2.7 has been installed but yum cannot work because it is relay on python2.6, it is easy to resolve.
step 3: install mod_wsgi
Download mod_wsgi resource,
./configure –with-apxs=/usr/local/apache2/bin/apxs –with-python=/usr/local/bin/python2.7
make && make install
step 4: configure
add LoadModule wsgi_module modules/mod_wsgi.so in /etc/httpd/conf/httpd.conf
add new file /etc/httpd/conf.d/wsgi.conf
//wsgi.conf
WSGIScriptAlias / /your_project_path/wsgi.py
AddType text/html .py
WSGIPassAuthorization On
//wsgi.py
import os
import sys

path='/var/www/server/'
sys.path.append(path)

os.environ.setdefault("DJANGO_SETTINGS_MODULE", "Server.settings")

from django.core.wsgi import get_wsgi_application
application = get_wsgi_application()
7. authentication
# Note: Apache mod_wsgi specific configuration
# this can go in either server config, virtual host, directory or .htaccess
WSGIPassAuthorization On
django-oauth2-provideris a Django application that provides customizable OAuth2-authentication and we use it to provide authentication for our server.
First install django-oauth2-provider and add it to setting.
//setting.py
INSTALLED_APPS = (
    ...
    'provider',
    'provider.oauth2',
)
REST_FRAMEWORK = {
    'DEFAULT_AUTHENTICATION_CLASSES': (
        'rest_framework.authentication.OAuth2Authentication',
    ),
}

READ = 1 << 1
WRITE = 1 << 2
READ_WRITE = READ | WRITE

OAUTH_SCOPES = (
        ...
    (READ_WRITE, 'read+write'),
)

OAUTH_DELETE_EXPIRED = True
OAUTH_EXPIRE_DELTA = datetime.timedelta(seconds=60*60)
fellow django-oauth2-provider document add urls and views:
//urls.py
url(r'^login/', include('provider.oauth2.urls', namespace = 'oauth2')),
add OAuth2Authentication to authentication_classes like this:
//views.py
class ContactViewSet(DetailSerializerMixin, viewsets.ModelViewSet):
    authentication_classes = (OAuth2Authentication,)
    permission_classes = (IsAuthenticated,)

    queryset = Contacts.objects.all()
    serializer_class = ContactsListSerializer
    serializer_detail_class = ContactsDetailSerializer
now we finished most work.
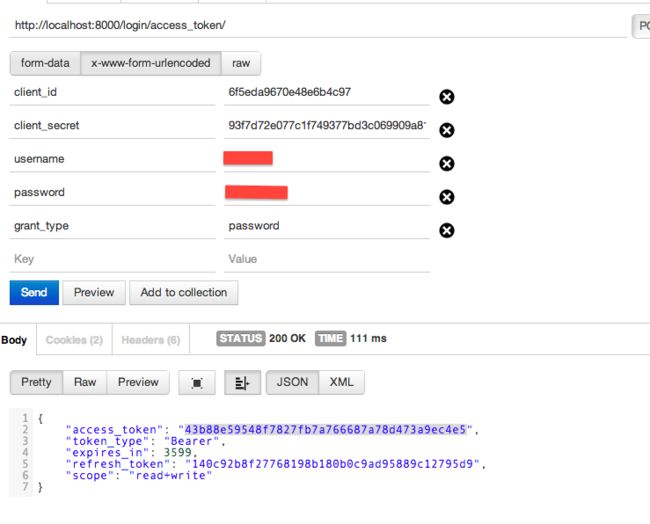
create clinet in django admin page, get clientID and client sercet.
get access token from http://localhost:8000/login/access_token/
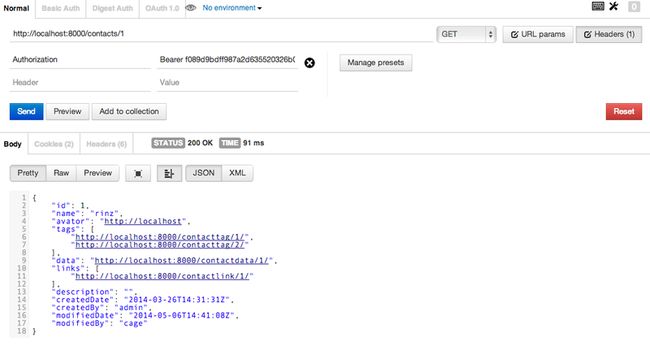
request API with token:
Now, it seems everything OK.
But we have a trouble: one user changed his password but the token he get before can still work, it shouldn't not allow, he should post his password again to get a new token. How?
It is very easy, we just delete or expire all tokens for the user when he change his password.
Create Account app to handle user register and management.
It is easy to create login, logout, register and change password page, and we just need add some control in change password view.
//Accounts/views.py
from provider.oauth2 import models as oauth2

def changepwd(request):
    if request.method == 'GET':
        form = ChangepwdForm()
        return render_to_response('accounts/changepwd.html', RequestContext(request, {'form': form,}))
    else:
        form = ChangepwdForm(request.POST)
        if form.is_valid():
            username = request.user.username
            oldpassword = request.POST.get('oldpassword', '')
            user = authenticate(username=username, password=oldpassword)
            if user is not None and user.is_active:
                newpassword = request.POST.get('newpassword1', '')
                user.set_password(newpassword)
                user.save()
                access_token = oauth2.AccessToken.objects.filter(user=user)
                access_token.delete()
                _login(request,username,newpassword)
                return HttpResponseRedirect(reverse("index"))
            else:
                return render_to_response('accounts/changepwd.html', RequestContext(request, {'form': form,'oldpassword_is_wrong':True}))
        else:
            return render_to_response('accounts/changepwd.html', RequestContext(request, {'form': form,}))
access_token = oauth2.AccessToken.objects.filter(user=user)
access_token.delete()
So easy, done!


