VS2010使用STLPort
STLport的下载地址
http://sourceforge.net/projects/stlport/
下载后,解压出文件。我的目录是 D:\STLport-5.2.1 。
右键计算机,属性,高级系统设置,环境,系统变量,编辑Path变量,添加;C:\Program Files\Microsoft Visual Studio 10.0\VC\bin。(我的路径是这样,分号是分隔符),确定。。
然后在 C:\Program Files\Microsoft Visual Studio 10.0\VC\bin 目录,编辑 vcvars32.bat 。
找到下面的一段,主要是添加STLport的include和lib路径,我的分别是 D:\STLport-5.2.1\stlport和D:\STLport-5.2.1\build\lib,注意分号,它是分隔符。
@rem INCLUDE
@rem -------
@if exist "%VCINSTALLDIR%ATLMFC\INCLUDE" set INCLUDE=%VCINSTALLDIR%ATLMFC\INCLUDE;%INCLUDE%;D:\STLport-5.2.1\stlport
@if exist "%VCINSTALLDIR%INCLUDE" set INCLUDE=%VCINSTALLDIR%INCLUDE;%INCLUDE%
@rem LIB
@rem ---
@if exist "%VCINSTALLDIR%ATLMFC\LIB" set LIB=%VCINSTALLDIR%ATLMFC\LIB;%LIB%;D:\STLport-5.2.1\build\lib
@if exist "%VCINSTALLDIR%LIB" set LIB=%VCINSTALLDIR%LIB;%LIB%
保存之后,双击 vcvars32.bat ,使我们的设置生效。
在 C:\Program Files\Microsoft Visual Studio 10.0\VC 目录下,运行 vcvarsall.bat 。
在 D:\STLport-5.2.1\stlport\stl 目录,编辑 _cstdlib.h。
将第158行的
inline _STLP_LONG_LONG abs(_STLP_LONG_LONG __x) { return __x < 0 ? -__x : __x; }
这一行改为如下三行。(就是多了个if判断。)
#if !defined(_STLP_MSVC) || (_STLP_MSVC < 1600)
inline _STLP_LONG_LONG abs(_STLP_LONG_LONG __x) { return __x < 0 ? -__x : __x; }
#endif
保存。
打开开始菜单的Microsoft Visual Studio 2010下的Visual Studio Tools中Visual Studio Command Prompt(2010)。
切换到STLport的目录下
cd D:\STLport-5.2.1
d:
进行配置,可以通过 configure --help查看支持哪些配置。
configure msvc9
切换到lib目录
cd build/lib
然后是
nmake /f msvc.mak clean install
我测试的效果如下:
Setting environment for using Microsoft Visual Studio 2010 x86 tools
C:\Program Files\Microsoft Visual Studio 10.0\VC>cd D:\STLport-5.2.1
C:\Program Files\Microsoft Visual Studio 10.0\VC>d:
D:\STLport-5.2.1>configure msvc9
STLport Configuration Tool for Windows
Setting compiler: Microsoft Visual C++ 2008
Setting platform: Windows XP
Done configuring STLport.
Go to build/lib folder and type "nmake clean install" to build and
install STLport to the "lib" and "bin" folders.
Go to build/test/unit folder and type nmake clean install to
build unit tests and install them in bin folder.
D:\STLport-5.2.1>cd build/lib
D:\STLport-5.2.1\build\lib>nmake /f msvc.mak clean install
————
等了几分钟就安装好了。
在D:\STLport-5.2.1目录多了几个文件夹,如bin和lib等。
把 D:\STLport-5.2.1\bin下 stlport.5.2.dll,stlportd.5.2.dll,stlportstld.5.2.dll,复制到 C:\Program Files\Microsoft Visual Studio 10.0\VC\bin 目录下,这样vc就能找到它了。
设置vc工程的include和lib目录了。
VS2010菜单,View,Property Manager,Debug|Win32,双击Microsoft.Cpp.Win32.user,Common Properties,VC++ directories。
在 Include Directories 下添加 D:\STLport-5.2.1\stlport 。
在 Library Directories 下添加 D:\STLport-5.2.1\lib 。
确定,通过这样的设置,以后建立的工程的VC++ Directories都有这些东西,就不用那么麻烦每个工程都进行设置了。
测试程序。
/*功能,Win7下vs2010使用STLport。
日期,2012年8月24日 星期五
环境,win7-32-vs2010
*/
#include
#include
usingnamespacestd;
intmain()
{
// crope是用来存储char字符的容器
crope crope1("Hello,");
crope crope2("STLport!");
cout << crope1 + crope2 << endl;
system("pause");
return0;
}
/*
输出效果:
Hello,STLport!
请按任意键继续. . .
*/
VS2010编辑boost库
(1)首先下载源代码:http://softlayer-dal.dl.sourceforge.NET/project/boost/boost/1.56.0/boost_1_56_0.zip
解压到某个目录,我解压到了D盘根目录:D:\boost_1_56_0
(2)生成bjam.exe可执行文件
用VS2010命令行
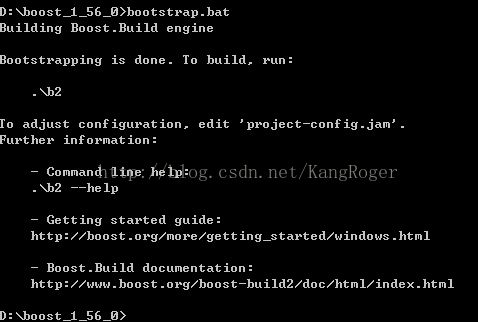
进入到到目录D:\boost_1_56_0,运行booststrap.bat得到:
这时在目录D:\boost_1_56_0生成了b2.exe、bjam.exe、project-config.jam文件。
(3)用bjam.exe编译
运行命令bjam stage --without-Python--toolset=msvc-10.0 --build-type=complete --stagedir="D:\boost_1_56_0\bin\vc10" link=static runtime-link=shared threading=multi debug release
bjam可以参考http://blog.chinaunix.net/uid-22301538-id-3158997.html
stage表示只生成库(dll和lib),用install的话还会生成包含头文件的include目录。
toolset指定编译器,VS2010用msvc-10.0。
without/with表示不编译/编译哪些库。
stagedir,当使用stage时用stagedir,使用install用prefix,表示编译生成文件的路径。路径的命名最好和编译器相关,编译管理。
link指定生成动态链接库或静态链接库。生成动态链接库需使用shared方式,生成静态链接库需使用static方式。
runtime-link,动态/静态链接C/C++运行时库。有shared和static两种方式,这样runtime-link和link一共可以产生4种组合方式。
threading,单/多线程编译。
debug/release,编译debug/release版本。一般都是程序的debug版本对应库的debug版本,所以两个都编译。
差不多需要一小时,编译完成(中间会有警告)。
编译好后,在根目录会有个bin.v2文件夹,是编译过程中的临时文件夹,很大,可以手动删除。
(4)在VS中使用Boost库
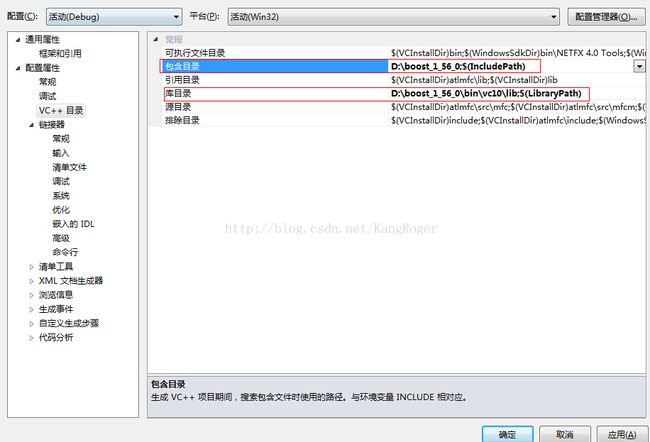
新建工程后需要把Boost库包含到工程中,右键选择属性,在VC++目录的“包含目录”中添加Boost的根目录,在“库目录”添加刚刚编译生成的位置再加上路径lib。
之后包好头文件即可使用,例如一个多线程的测试:
[cpp]view plaincopy
#include "boost/thread.hpp"
#include "iostream"
usingnamespacestd;
voidthreadFunc()
{
cout <<"This is a thread function"<< endl;
}
intmain()
{
boost::function func(threadFunc);
boost::threadt(func);
t.join();
return0;
}


