介绍
SonarQube是个开源的代码质量管理平台,可以通过多种工具和维度对代码质量进行分析,部分功能还支持可视化,对于代码缺陷一目了然。SonarQube比较开放,支持通过插件扩展功能,市面上常用的语言基本可以支持。同时,我们也可以尝试将sonar跟常用的jekins或者gocd集成在一起,在持续构建的同时对代码质量进行监测。该工具功能强大,使用简便,实乃程序员保证代码健康的必备良药。
环境搭建部署
环境搭建包含两部分,数据库后台和sonarqube本身,sonarqube本身内嵌了H2用来存储分析数据,但是应用到生产环境并不合适,针对我们的情况还是单独部署数据库为好。
数据库配置
官方支持对接四种数据库,Microsoft SQL Server、Oracle、PostgreSQL、MySQL(不推荐),我使用的是postgresql数据库。其他几种数据库具体安装注意事项大家可以看官方文档:Installing the Database
为了与其他应用隔离开,针对SonarQube单独建立相应的数据库、用户和schema,在Mac OS以及Linux上,还需要建立相应的系统用户sonarqube。数据库建用户、建库等操作请自行google,另外,别忘记赋予数据库用户相应的建表等权限。
schema名称为sonar,用户名称为sonarqube:
sonar=# \dn
  List of schemas
  Name  |   Owner
--------+-----------
 public | postgres
 sonar  | sonarqube
数据库名称也命名为sonar:
sonar=# \l
                              List of databases
   Name    |   Owner   | Encoding | Collate | Ctype |    Access privileges
-----------+-----------+----------+---------+-------+-------------------------
 open_lmis | postgres  | UTF8     | C       | C     |
 postgres  | postgres  | UTF8     | C       | C     |
 sonar     | sonarqube | UTF8     | C       | C     | =Tc/sonarqube          +
           |           |          |         |       | sonarqube=CTc/sonarqube
 template0 | postgres  | UTF8     | C       | C     | =c/postgres            +
           |           |          |         |       | postgres=CTc/postgres
 template1 | postgres  | UTF8     | C       | C     | =c/postgres            +
           |           |          |         |       | postgres=CTc/postgres
这块需要注意的是,在postgresql中,新建用户sonarqube默认的schema还是指向public,而我们要使用新建的sonar,需要在数据库中执行以下命令将sonarqube的默认schema改为sonar:
ALTER USER sonarqube SET search_path to sonar
SonarQube部署
sonarqube的部署非常简单,我下载的版本是7.3。下载后解压,然后执行bin目录中相应操作系统的启动即可,不过在这之前需要对数据库信息进行配置。配置方法是进入到解压后的文件夹的conf目录中,修改sonar.properties文件,文件中有很多配置项,不过都是被注释掉的。这个配置文件里面的说明非常详细,包括需要适配数据库的哪些版本等等。里面提示Postgresql需要在9.3版本及以上,我机器装的是9.4,刚好可以用,大家在安装相应版本的时也请仔细阅读这个配置里面的说明信息,防止因为版本问题出错。同时,也包含其他配置信息,暂时没有时间研究,我们先尽快把sonarqube跑起来再说。
(2.0-moz)⚡ % j sonar                                                                                                                                                              ~/IdeaProjects/open-lmis
/Users/zbao/Tool/sonarqube-7.3
% ll                                                                                                                                                                                   ~/Tool/sonarqube-7.3
total 16
-rw-r--r--@  1 zbao  staff   7.5K Aug 10 17:31 COPYING
drwxr-xr-x@  8 zbao  staff   256B Aug 10 17:31 bin
drwxr-xr-x@  4 zbao  staff   128B Sep  3 22:45 conf
drwxr-xr-x@  6 zbao  staff   192B Sep  3 22:46 data
drwxr-xr-x@ 11 zbao  staff   352B Aug 10 17:31 elasticsearch
drwxr-xr-x@  5 zbao  staff   160B Sep  3 17:52 extensions
drwxr-xr-x@  7 zbao  staff   224B Aug 10 17:40 lib
drwxr-xr-x@ 16 zbao  staff   512B Sep  5 09:27 logs
drwxr-xr-x@  8 zbao  staff   256B Sep  5 21:19 temp
drwxr-xr-x@ 24 zbao  staff   768B Aug 10 17:40 web
% cd conf                                                                                                                                                                              ~/Tool/sonarqube-7.3
% ll                                                                                                                                                                              ~/Tool/sonarqube-7.3/conf
total 48
-rw-r--r--@ 1 zbao  staff    20K Sep  3 22:45 sonar.properties
-rw-r--r--@ 1 zbao  staff   3.1K Aug 10 17:31 wrapper.conf
这个配置现在只需要修改三个配置即可,数据库用户、数据库密码和jdbc的url:
# User credentials.
# Permissions to create tables, indices and triggers must be granted to JDBC user.
# The schema must be created first.
sonar.jdbc.username=sonarqube
sonar.jdbc.password=password
#----- PostgreSQL 9.3 or greater
# If you don't use the schema named "public", please refer to http://jira.sonarsource.com/browse/SONAR-5000
sonar.jdbc.url=jdbc:postgresql://localhost/sonar
sonarqube的web服务默认是全零监听在9000端口上,如果想修改,可以修改这两个配置,我用的是默认:
# Binding IP address. For servers with more than one IP address, this property specifies which
# address will be used for listening on the specified ports.
# By default, ports will be used on all IP addresses associated with the server.
sonar.web.host=0.0.0.0

# Web context. When set, it must start with forward slash (for example /sonarqube).
# The default value is root context (empty value).
#sonar.web.context=
# TCP port for incoming HTTP connections. Default value is 9000.
sonar.web.port=9000
修改完成后,进入bin目录,根据操作系统选择,我用的是Mac OS,直接使用下面命令启动:
% cd macosx-universal-64                                                                                                                                                           ~/Tool/sonarqube-7.3/bin
% ll                                                                                                                                                           ~/Tool/sonarqube-7.3/bin/macosx-universal-64
total 288
-rw-r--r--  1 zbao  staff     5B Sep  5 21:19 SonarQube.pid
drwxr-xr-x@ 3 zbao  staff    96B Aug 10 17:31 lib
-rwxr-xr-x@ 1 zbao  staff    15K Aug 10 17:31 sonar.sh
-rwxr-xr-x@ 1 zbao  staff   123K Aug 10 17:31 wrapper
% sh sonar.sh start                                                                                                                                            ~/Tool/sonarqube-7.3/bin/macosx-universal-64
Starting SonarQube...
Started SonarQube.
启动后,查询sonar数据库里面新建了不少表,说明sonarqube已经在启动时将必须的数据刷进去了,下面是其中的部分表:
sonar=> \d
                        List of relations
 Schema |              Name               |   Type   |   Owner
--------+---------------------------------+----------+-----------
 sonar  | active_rule_parameters          | table    | sonarqube
 sonar  | active_rule_parameters_id_seq   | sequence | sonarqube
 sonar  | active_rules                    | table    | sonarqube
 sonar  | active_rules_id_seq             | sequence | sonarqube
 sonar  | alm_app_installs                | table    | sonarqube
 sonar  | analysis_properties             | table    | sonarqube
 sonar  | ce_activity                     | table    | sonarqube
 sonar  | ce_activity_id_seq              | sequence | sonarqube
 sonar  | ce_queue                        | table    | sonarqube
 sonar  | ce_queue_id_seq                 | sequence | sonarqube
 sonar  | ce_scanner_context              | table    | sonarqube
 sonar  | ce_task_characteristics         | table    | sonarqube
 sonar  | ce_task_input                   | table    | sonarqube
 sonar  | default_qprofiles               | table    | sonarqube
 sonar  | deprecated_rule_keys            | table    | sonarqube
 sonar  | duplications_index              | table    | sonarqube
 sonar  | duplications_index_id_seq       | sequence | sonarqube
 sonar  | es_queue                        | table    | sonarqube
数据库表中有张user表,是用来存储用户信息的,默认用户名和密码均为admin和admin,第一次登陆系统需要输入这个密码:
sonar=> select * from users;
 id | login |     name      | email |                       crypted_password                       | salt | active |  created_at   |  updated_at   | scm_accounts | external_login | external_identity_provider | user_local | is_root | onboarded | homepage_type | homepage_parameter | hash_method | uuid  | external_id | organization_uuid
----+-------+---------------+-------+--------------------------------------------------------------+------+--------+---------------+---------------+--------------+----------------+----------------------------+------------+---------+-----------+---------------+--------------------+-------------+-------+-------------+-------------------
  1 | admin | Administrator |       | $2a$12$LJLoKEDVZgBCO6OahphMYeYS6lqE7p0J/Fm6EdKdsqxMgpXGNpmhq |      | t      | 1535987042646 | 1536023846785 |              | admin          | sonarqube                  | t          | f       | t         |               |                    | BCRYPT      | admin | admin       |
(1 row)
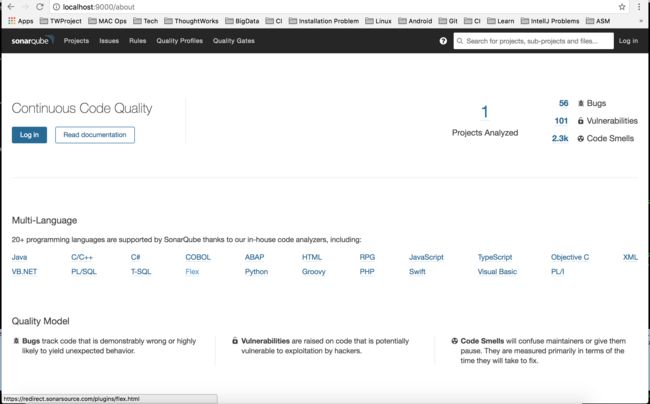
启动后稍等片刻,打开浏览器输入http://localhost:9000/,点击Log in,用户名admin,密码admin,便可以登陆进去了。至此,sonarqube环境搭建完成。
SonarJava插件
SonarQube支持了市面上大部分语言的分析,具体方式是通过Sonar插件来实现的,这样很方便插件开发人员。

根据官方介绍,使用了最先进的技术(模式匹配、数据流分析)对代码质量进行管理,包括代码坏味道检查(不了解的可以参考重构一书)、findbugs以及代码安全检查。自称检查的深度、精度、速度都很不错。
SonarSource delivers what is probably the best static code analyzer you can find on the market for Java. Based on our own Java compiler front-end, it uses the most advanced techniques (pattern matching, dataflow analysis) to analyze code and find code smells, bugs and security vulnerabilities. As for any product we develop at SonarSource, it was built on the following principles: depth, accuracy and speed.
优点:
支持400+的规则,规则数还比较多
支持规则自定义,用户实现相关接口便可以注入自己的检查规则
支持与Maven、Ant、Gradle的集成,快速简便
支持Jacoco和Cobertura覆盖率报告导入
支持导入用户的findbugs/pmd/checkstyle报告
Gradle集成
由于项目是Gradle构建,仅介绍与Gradle构建相关的集成,具体其他方式可以参考Analyzing Source Code。
集成过程在Gradle中很简单,引入sonar-runner和org.sonarqube插件,插件默认会导入sonarqube的task。
apply plugin: 'java'
apply plugin: 'sonar-runner'
apply plugin: 'org.sonarqube'
buildscript {
   classpath "org.sonarsource.scanner.gradle:sonarqube-gradle-plugin:2.6.2"
}
sonarqube {
    properties {
        property "sonar.sourceEncoding", "UTF-8"
     }
 }
关于Gradle更详细的配置,可以参考:SonarQube与Gradle集成
在工程目录中执行如下命令,便开始静态检查过程,检查完成后会将结果存入数据库,并在前台界面显示。
./gradlew clean sonarqube --stacktrace
分析结果:
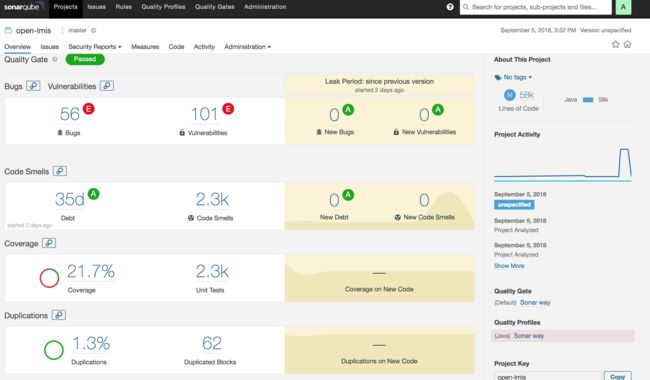
代码覆盖率根据不同的包进行图形化展示:

单元测试覆盖率报告集成
Jacoco和Cobertura都是用来统计java单元测试覆盖率的工具,SonarQube本身不具有统计覆盖率的功能,它支持导入Jacoco和Cobertura的覆盖率结果,然后进行界面呈现。
该两种覆盖率分析工具都可以通过在Gradle中集成相关插件实现。
JaCoCo插件
Cobertura插件
这块需要注意的地方,是需要在gradle脚本中的sonarqube任务中设置报告的路径或者在sonar的界面配置中配置相关报告路径,因为实际上sonar只负责展示报告结果,分析报告还是由插件生成的。
sonar支持导入分析结果报告
sonar也支持导入自己工程跑出的checkstyle,findbugs等的结果报告,同样,需要在gradle脚本中设置相关结果的报告路径或者在界面配置中设置,具体配置大家自行google就可以找到,不再赘述。
使用方法
Gradle的使用方法很简单,执行执行以下命令,执行完成后,分析结果会自动导入到数据库中,并展示在web界面上。
./gradlew clean sonarqube --stacktrace
Q&A
问题1
Caused by: The folder 'src/test' does not exist for ':modules:migration' (base directory = /Users/zbao/IdeaProjects/open-lmis/modules/migration)
解决办法:在migration的src目录下面创建test目录
参考:(http://sonarqube-archive.15.x6.nabble.com/Build-fails-if-src-main-does-not-exists-td5027877.html)
问题2
Caused by: File [...] can't be indexed twice.
解决办法:在root project的build.gradle中添加如下配置
    sonarqube {
        properties {
            property "sonar.sources", "src/main"
            property "sonar.tests", "src/test"
        }
    }
参考:(https://github.com/SonarOpenCommunity/sonar-cxx/wiki/FAQ)
问题3
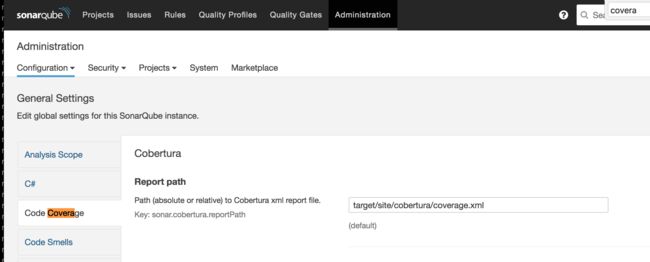
Cobertura report not found at /Users/zbao/IdeaProjects/open-lmis/modules/reporting/target/site/cobertura/coverage.xml
将sonar.cobertura.reportPath设置成报告路径,如下:
property "sonar.cobertura.reportPath", "build/report/cobertura/coverage.xml"
也可以通过SonarQube界面进行修改:
参考:(https://github.com/galexandre/sonar-cobertura)(https://stackoverflow.com/questions/24134595/sonar-cobertura-plugin-not-finding-coverage-xml-file)
问题4
如何扫描js代码
参考问题2配置sonar.sources属性,其中包含js代码即可,同时保证SonarJS插件已添加(默认已经安装)。
问题5
JS公共库被扫描导致结果不准
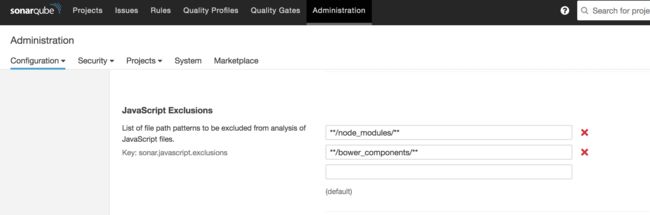
添加sonar.javascript.exclusions,从参数可以看出js是需要单独指定参数才能exclude掉不需要分析公共库。
property "sonar.javascript.exclusions", "src/main/webapp/public/lib/*,src/main/webapp/public/api-docs/*,src/main/webapp/public/device/*"
也可以通过界面配置sonar.javascript.exclusions:
处理这个问题遇到了比较大的坑,因为除了js代码外,其他的代码都使用sonar.exclusions这个属性还进行剔除,之前并不知道存在sonar.javascript.exclusions这个属性,导致在这里搞了好一会才解决。sonar.exclusions也支持从界面配置:

( https://docs.sonarqube.org/display/PLUG/SonarJS)
问题6
Gradle 2.4集成checkstyle插件报找不到checkstyle()方法
Gradle低版本bug,将gradle或者gradlew升级到2.7解决
参考:(https://docs.sonarqube.org/display/SONAR/Narrowing+the+Focus)(https://stackoverflow.com/questions/21323276/sonarqube-exclude-a-directory)
问题7
Jacoco单元测试覆盖率报告不准确
需要合并Jacoco单元测试结果,此处问题暂未解决,解决后进行更新
问题8
Exception in thread "main" java.lang.ClassNotFoundException: org.jacoco.agent.rt.internal_932a715.PreMain
    at java.net.URLClassLoader.findClass(URLClassLoader.java:381)
FATAL ERROR in native method: processing of -javaagent failed
    at java.lang.ClassLoader.loadClass(ClassLoader.java:424)
    at sun.misc.Launcher$AppClassLoader.loadClass(Launcher.java:349)
    at java.lang.ClassLoader.loadClass(ClassLoader.java:357)
    at sun.instrument.InstrumentationImpl.loadClassAndStartAgent(InstrumentationImpl.java:304)
    at sun.instrument.InstrumentationImpl.loadClassAndCallPremain(InstrumentationImpl.java:401)
解决办法,加入 tasks.withType(Test) {
systemProperties['user.dir'] = workingDir
}:
    tasks.withType(Test) {
        systemProperties['user.dir'] = workingDir
    }
参考:(https://discuss.gradle.org/t/jacoco-multiproject-build-cant-load-jacocoagent/11540)
相关资料
gradle-cobertura-plugin
SonarJava插件