搭建Git服务器需要准备一台运行Linux的机器,本文以Centos6.8纯净版系统为例搭建自己的Git服务。
准备工作:以root用户登陆自己的Linux服务器。
一 安装git
1、 安装依赖包
[root@iZwz945po7bqabsr6de22fZ]# yum install curl-devel expat-devel gettext-devel openssl-devel zlib-devel
2、 卸载旧版git(如没有安装过则跳过此步骤)
假如原先有用yum安装过git,则需要先卸载一下
[root@iZwz945po7bqabsr6de22fZ]# git --version (查看是否安装)
[root@iZwz945po7bqabsr6de22fZ]# yum remove git (卸载)
3、 下载源码
下载git-2.10.0.tar.gz 到 /usr/local/soft
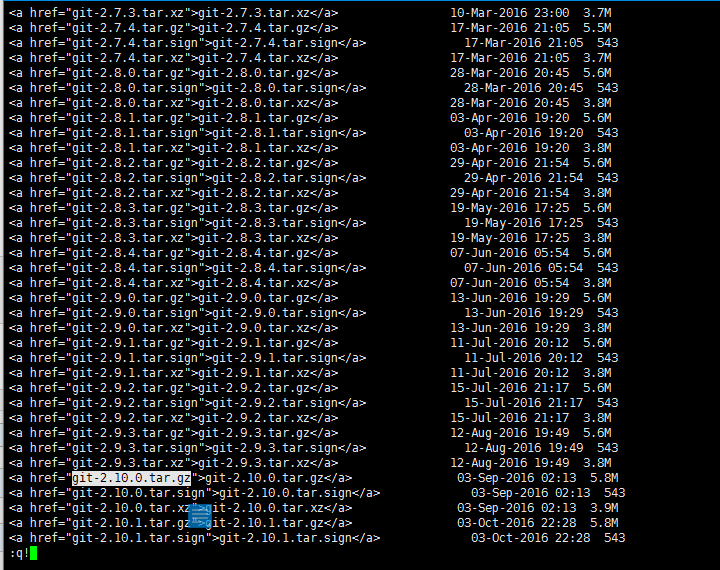
(查找git版本可以到https://www.kernel.org/pub/software/scm/git/下查看git的版本号自行选择下载)
查看版本方法:
[root@iZwz945po7bqabsr6de22fZ]# wget -v https://www.kernel.org/pub/software/scm/git/
[root@iZwz945po7bqabsr6de22fZ]# vi index.html
复制想下载的版本 --> Esc -->:q! --> 回车!
这里我选择下载git-2.10.0.tar.gz
[root@iZwz945po7bqabsr6de22fZ ]# cd /usr/local/soft
[root@iZwz945po7bqabsr6de22fZ ]# wget https://www.kernel.org/pub/software/scm/git/git-2.10.0.tar.gz
4、 解压、编译和安装
解压到当前目录:
[root@iZwz945po7bqabsr6de22fZ soft]# tar -zvxf git-2.10.0.tar.gz
移动文件:
[root@iZwz945po7bqabsr6de22fZ soft]# mv git-2.10.0 /usr/local/git-2.10.0
进入git解压后的包
[root@iZwz945po7bqabsr6de22fZ ]# cd /usr/local/git-2.10.0
编译安装
[root@iZwz945po7bqabsr6de22fZ~]# make prefix=/usr/local/git all
[root@iZwz945po7bqabsr6de22fZ~]# make prefix=/usr/local/git install
5、 将git目录加入PATH
[root@iZwz945po7bqabsr6de22fZ ~]# vi /etc/bashrc
在文件最后一行输入:
export PATH=/usr/local/git/bin:$PATH
保存退出后,使环境变量生效
[root@iZwz945po7bqabsr6de22fZ ~]# source /etc/bashrc
安装成功后就可以查看到git版本了
[root@iZwz945po7bqabsr6de22fZ ~]# git --version
git version 2.10.0
二 配置git
1、配置用户和邮箱:
[root@iZwz945po7bqabsr6de22fZ ~]# git config --global user.name "yangjing"
[root@iZwz945po7bqabsr6de22fZ ~]# git config --global user.email "[email protected]"(设置为自己的邮箱即可)
配置完查看是否配置成功:
[root@iZwz945po7bqabsr6de22fZ ~]# git config --global user.name yangjing
[root@iZwz945po7bqabsr6de22fZ ~]# git config --global user.email [email protected]
2、配置默认的文本编辑器 vim(因为git默认使用emacs作为编辑器):
[root@iZwz945po7bqabsr6de22fZ ~]# git config --global core.editor vim
3、查看git的所有配置:
[root@iZwz945po7bqabsr6de22fZ ~]# git config --list
user.name=yangjing
core.editor=vim
备注:上述操作中的global命令,代表“全局设置”,即整个系统中的git管理的所有项目都会默认使用此种配置信息。
三 、git实例操作
1、新建git仓库并初始化
[root@iZwz945po7bqabsr6de22fZ ~]mkdir -p /home/git/repositories/test.git
[root@iZwz945po7bqabsr6de22fZ ~]# cd /home/git/repositories/test.git
[root@iZwz945po7bqabsr6de22fZ test.git]# git --bare init(初始化一个裸版本库 )
Initialized empty Git repository in /home/git/repositories/test.git/
2、提交文件
1)创建文件夹
[root@iZwz945po7bqabsr6de22fZ test.git]# mkdir A
[root@iZwz945po7bqabsr6de22fZ test.git]# mkdir B
[root@iZwz945po7bqabsr6de22fZ test.git]# mkdir C
2)创建.xml的文件
[root@iZwz945po7bqabsr6de22fZ test.git]# vi config.xml
3)查看创建的内容
[root@iZwz945po7bqabsr6de22fZ test.git]# ls
4)编辑config.xml文件
[root@iZwz945po7bqabsr6de22fZ test.git]# vim config.xml
查看编辑后的内容:
[root@iZwz945po7bqabsr6de22fZ test.git]# cat config.xml
hello world
~
update finish!
5) 添加文件
[root@iZwz945po7bqabsr6de22fZ test.git]# git add A
添加文件时报错了,如下:
fatal: This operation must be run in a work tree
由于我使用的git init –bare方法创建一个裸仓库,在该仓库无法进行任何git操作,所以抛出错误。
解决方法如下:
[root@iZwz945po7bqabsr6de22fZ test.git]# touch readme
[root@iZwz945po7bqabsr6de22fZ test.git]# git init
[root@iZwz945po7bqabsr6de22fZ test.git]# git add readme
[root@iZwz945po7bqabsr6de22fZ test.git]# git commit -m 'initial commit' readme
执行以上操作后,可以重新添加了。
[root@iZwz945po7bqabsr6de22fZ test.git]# git add A
[root@iZwz945po7bqabsr6de22fZ test.git]# git add B
[root@iZwz945po7bqabsr6de22fZ test.git]# git add C
[root@iZwz945po7bqabsr6de22fZ test.git]# git add config.xml
提交文件(参数-m 'add ABC files.' 是对提交文件输入的备注):
[root@iZwz945po7bqabsr6de22fZ test.git]# git commit -m 'add ABC files.'
6)在/usr/APP下创建bak www目录
[root@iZwz945po7bqabsr6de22fZ app]# mkdir bak www
7)打包A、B、C、config文件为.tar.gz包在/usr/APP/bak目录下
[root@iZwz945po7bqabsr6de22fZ test.git]# tar -zcvf /usr/APP/bak/test.tar.gz A B C config.xml
打包后查看:
[root@iZwz945po7bqabsr6de22fZ ~]# cd /usr/APP/bak
[root@iZwz945po7bqabsr6de22fZ bak]# ls
8) 移动压缩包到/usr/APP/www目录下
[root@iZwz945po7bqabsr6de22fZ bak]# mv test.tar.gz /usr/APP/www
9) 解压压缩包
[root@iZwz945po7bqabsr6de22fZ www]# tar -xzvf test.tar.gz
10) 查看解压后的包
[root@iZwz945po7bqabsr6de22fZ www ]# ls
A B C config.xml test.tar.gz


