今天要讲的布局就是线性布局、相对布局和约束布局
1.LinearLayout:
-线性布局,两种排法:
水平
android:orientation=”horizontal”
垂直
android:orientation=”vertical
左边距
layout_marginLeft
layout_marginStart
右边距
layout_marginRight
layout_marginEnd
上边距
layout_marginTop
下边距
layout_marginBottom
权重按⽐例分配
layout_weight
例子如下:
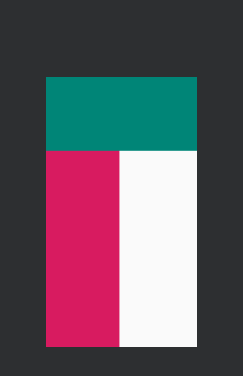

我们设置的是垂直布局,高度有和父容器相同,所以我们一个看到一个,有一个由于越界了,所以我们当然就看不到了,orientation设置的是它的子控件的布局方法:
一句话就是,水平布局时一行,垂直布局时一列:不管当前的容器能不能装下,
分析:我们设置的是垂直布局,高度有和父容器相同,所以我们一个看到一个,有一个由于越界了,所以我们当然就看不到了,orientation设置的是它的子控件的布局方法,一句话就是,水平布局时一行,垂直布局时一列:不管当前的容器能不能装下
LinearLayout是线性布局控件,它包含的子控件将以横向或竖向的方式排列,按照相对位置来排列所有的widgets或者其他的containers,超过边界时,某些控件将缺失或消失。因此一个垂直列表的每一行只会有一个widget或者是container,而不管他们有多宽,而一个水平列表将会只有一个行高(高度为最高子控件的高度加上边框高度)。LinearLayout保持其所包含的widget或者是container之间的间隔以及互相对齐(相对一个控件的右对齐、中间对齐或者左对齐)。
当 android:orientation="vertical" 时, 只有水平方向的设置才起作用,垂直方向的设置不起作用。 即:left,right,center_horizontal 是生效的。 当 android:orientation="horizontal" 时, 只有垂直方向的设置才起作用,水平方向的设置不起作用。 即:top,bottom,center_vertical 是生效的
设置权重的问题
容器为水平方向的布局只能设置水平方向的权重,设置步骤为:
1.分别将子控件2的水平方向的宽度设置为0dp,
2.设置权重的值 即比例数值例如:
如果这里我试图设置垂直方向上的权重,把高设置为0,将会报错。同理,如果父容器时垂直方向上的布局方式,那就只能设置垂直方向上的权重,试图设置 水平方向上的也会报错
2.RelativeLayout
RelativeLayout是一种相对布局,控件的位置是按照相对位置来计算的,后一个控件在什么位置依赖于前一个控件的基本位置,是布局最常用,也是最灵活的一种布局。
这里将这些属性分成组,便于理解和记忆。
a)、第一类:属性值为true或false
android:layout_centerHrizontal 水平居中
android:layout_centerVertical 垂直居中
android:layout_centerInparent 相对于父元素完全居中
android:layout_alignParentBottom 贴紧父元素的下边缘
android:layout_alignParentLeft 贴紧父元素的左边缘
android:layout_alignParentRight 贴紧父元素的右边缘
android:layout_alignParentTop 贴紧父元素的上边缘
b)、第二类:属性值必须为id的引用名“@id/id-name”
android:layout_below 在某元素的下方
android:layout_above 在某元素的的上方
android:layout_toLeftOf 在某元素的左边
android:layout_toRightOf 在某元素的右边
android:layout_alignTop 本元素的上边缘和某元素的的上边缘对齐
android:layout_alignLeft 本元素的左边缘和某元素的的左边缘对齐
android:layout_alignBottom 本元素的下边缘和某元素的的下边缘对齐
android:layout_alignRight 本元素的右边缘和某元素的的右边缘对齐
c)、第三类:属性值为具体的像素值,如30dip,40px
android:layout_marginBottom 离某元素底边缘的距离
android:layout_marginLeft 离某元素左边缘的距离
android:layout_marginRight 离某元素右边缘的距离
android:layout_marginTop 离某元素上边缘的距离
可以通过组合这些属性来实现各种各样的布局。
3.ConstraintLayout
约束布局的意思其实很简单,就是通过一系列的限制,让某个控件的位置实现唯一确定,这就是约束布局的核心思想。这样做的一个好处就是,避免了控件的无限制嵌套,减少过度绘制问题。看下面一个形象的例子:
#####3.1当 android:orientation="vertical" 时, 只有水平方向的
layout_constraintLeft_toLeftOf
layout_constraintLeft_toRightOf
layout_constraintRight_toLeftOf
layout_constraintRight_toRightOf
layout_constraintTop_toTopOf
layout_constraintTop_toBottomOf
layout_constraintBottom_toTopOf
layout_constraintBottom_toBottomOf
layout_constraintBaseline_toBaselineOf
layout_constraintStart_toEndOf
layout_constraintStart_toStartOf
layout_constraintEnd_toStartOf
layout_constraintEnd_toEndOf
这些属性会引用另一个控件的id或者parent(这会引用父容器,即ConstraintLayout)
3.2ConstraintLayout中有3中方式来设置子View的宽高尺寸:
Xdp,X为具体数值
WARP_CONTENT
0dp,0dp代表MATCH_CONSTRAINT,ConstraintLayout不推荐使用MATCH_PARENT
设置才起作用,垂直方向的设置不起作用。 即:left,right,center_horizontal 是生效的。 当 android:orientation="horizontal" 时, 只有垂直方向的设ConstrainLayout提供了ratio属性,用来限制View的宽高比例。
使用Ratio属性,宽高两个尺寸中至少要一个是MATCH_CONSTRAINT(0dp)
默认情况下,1:2,表示宽:高,宽为1,高为2
宽高都为MATCH_CONSTRAINT时,可以在比例前加W或者H:
W,1:2:表示宽=2,高=1,即H:W = 1:2
H,1:2:表示高=2,宽=1,即W:H = 1:2
3.3 相关属性:
一:相对位置属性如下:
• layout_constraintLeft_toLeftOf : 当前View的右侧和另一个View的右侧位置对齐,与RelativeLayout的alignLeft属性相似
•***layout_constraintLeft_toRightOf ***: 当前view的左侧会在另一个View的右侧位置 与RelativeLayout的toRightOf属性相似
• layout_constraintRight_toLeftOf : 当前view的右侧会在另一个View的左侧位置 与RelativeLayout的toLeftOf属性相似
• layout_constraintRight_toRightOf : 当前View的右侧和另一个View的右侧位置对其,与RelativeLayout的alignRight属性相似
• layout_constraintTop_toTopOf : 头部对齐,与alignTop相似
• layout_constraintTop_toBottomOf :当前View在另一个View的下侧 与below相似
• layout_constraintBottom_toTopOf :当前View在另一个View的上方 与above相似
• layout_constraintBottom_toBottomOf :底部对齐,与alignBottom属性相似
• layout_constraintBaseline_toBaselineOf :文字底部对齐,与alignBaseLine属性相似
• layout_constraintStart_toEndOf :同left_toRightOf
• layout_constraintStart_toStartOf :同left_toLeftOf
• layout_constraintEnd_toStartOf :同right_toLeftOf
• layout_constraintEnd_toEndOf :同right_toRightOf
二、Margins属性:同RelativeLayout属性
•android:layout_marginStart
•android:layout_marginEnd
•android:layout_marginLeft
•android:layout_marginTop
•android:layout_marginRight
•android:layout_marginBottom
三、Margins when connected to a Gone widget
当前View与另一个View绑定后,另一个View的属性设置为了Gone,则以下属性会生效
•layout_goneMarginStart
•layout_goneMarginEnd
•layout_goneMarginLeft
•layout_goneMarginTop
•layout_goneMarginRight
•layout_goneMarginBottom
四:Ratio比例大小属性
当你的父控件为ConstraintLayout,可以利用这个属性来控制当前View的宽高比。在利用这个属性时,你必须指明一个方向上的大小为0dp,另一个方向可指定为明确的dp值也可以使用wrap_content这样才能够按照比例来为你摆放
通过指定 app:layout_constraintDimensionRatio="1:1" 属性来指定控件宽高的比,默认为宽:高
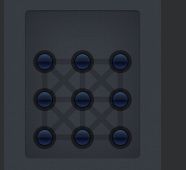
指纹解锁:
xml 文件源代码:
Activity源代码如下:
public class MainActivity extends AppCompatActivity {
@Override
public void onWindowFocusChanged(boolean hasFocus) {
    super.onWindowFocusChanged(hasFocus);
    if (hasFocus) {
        float scale = getResources().getDisplayMetrics().scaledDensity; //获取分辨率,方便统一
        ImageView iv = findViewById(R.id.opView);
        int x = (int) iv.getX();
        int y = (int) iv.getY();
        RelativeLayout rl = findViewById(R.id.root_layout);

        //创建横线
        for(int k = 0;k <2;k++){
            for (int n = 0; n < 3; n++) {
              //创建一个试图用于显示线
                ImageView LineView = new ImageView(this);
                //设置图片
                LineView.setBackgroundResource(R.drawable.normal_highlight1);
                //创建尺寸
                RelativeLayout.LayoutParams params = new RelativeLayout.LayoutParams(ViewGroup.LayoutParams.WRAP_CONTENT, ViewGroup.LayoutParams.WRAP_CONTENT);
                //设置坐标
                params.leftMargin =(int)(scale * 52 +x) +(int)(99*scale*k);
                params.topMargin = (int)(scale * 225 +x)+(int)(99*scale*n);
                rl.addView(LineView, params);
            }
        }
        //创建竖线
        for(int k = 0;k <3;k++){
            for (int n = 0; n <2; n++) {
                //创建一个试图用于显示线
                ImageView LineView = new ImageView(this);
                //设置图片
                LineView.setBackgroundResource(R.drawable.normal_highlight2);
                //创建尺寸
                RelativeLayout.LayoutParams params = new RelativeLayout.LayoutParams(ViewGroup.LayoutParams.WRAP_CONTENT, ViewGroup.LayoutParams.WRAP_CONTENT);
                //设置坐标
                params.leftMargin =(int)(scale * 52+x) +(int)(99*scale*k);
                params.topMargin = (int)(scale * 225 +x)+(int)(99*scale*n);
                rl.addView(LineView, params);
            }
        }
        //创建斜线
        for(int k = 0;k <2;k++){
            for (int n = 0; n < 2; n++) {
                //创建一个试图用于显示线
                ImageView rLineView = new ImageView(this);
                //设置图片
               rLineView.setBackgroundResource(R.drawable.normal_highlight3);
                //创建尺寸
                RelativeLayout.LayoutParams params = new RelativeLayout.LayoutParams(ViewGroup.LayoutParams.WRAP_CONTENT, ViewGroup.LayoutParams.WRAP_CONTENT);
                //设置坐标
                params.leftMargin =(int)(scale * 50 +x) +(int)(99*scale*k);
                params.topMargin = (int)(scale * 210+x)+(int)(99*scale*n);
                rl.addView(rLineView, params);
            }
        }
        //左斜
        for(int k = 0;k <2;k++){
            for (int n = 0; n < 2; n++) {
                //创建一个试图用于显示线
                ImageView lLineView = new ImageView(this);
                //设置图片
               lLineView.setBackgroundResource(R.drawable.normal_highlight4);
                //创建尺寸
                RelativeLayout.LayoutParams params = new RelativeLayout.LayoutParams(ViewGroup.LayoutParams.WRAP_CONTENT, ViewGroup.LayoutParams.WRAP_CONTENT);
                //设置坐标
                params.leftMargin =(int)(scale * 50 +x) +(int)(99*scale*k);
                params.topMargin = (int)(scale * 210 +x)+(int)(99*scale*n);
                rl.addView(lLineView, params);
            }
        }
        for(int i = 0;i<3;i++){
            for(int j = 0;j<3;j++) {

                //获取容器,因为在xml中定义了容器

                //背景视图的获取

                //创建用于显示点的视图
                ImageView dotView = new ImageView(this);
                //隐藏视图
               // dotView.setVisibility(View.INVISIBLE);
                //显示对应的图片
                dotView.setBackgroundResource(R.drawable.selected_dot);
                //创建控件的尺寸
                RelativeLayout.LayoutParams params = new RelativeLayout.LayoutParams(ViewGroup.LayoutParams.WRAP_CONTENT, ViewGroup.LayoutParams.WRAP_CONTENT);
                //不同分辨率的手机的xy之不同
                //params.leftMargin = x + 70 + 200 * i;
                //params.topMargin = y + 330 + 200*j;
                //将子控件添加到容器中、

                params.leftMargin = (int)(scale * 35 +x) + (int)(99 * scale * i);
                params.topMargin = (int )(scale *163 +y) +(int)(99 * scale * j);

                rl.addView(dotView, params);

            }
        }
    }
}
@Override
protected void onCreate(Bundle savedInstanceState) {
    super.onCreate(savedInstanceState);
    setContentView(R.layout.activity_main);

  }
 }
效果图:
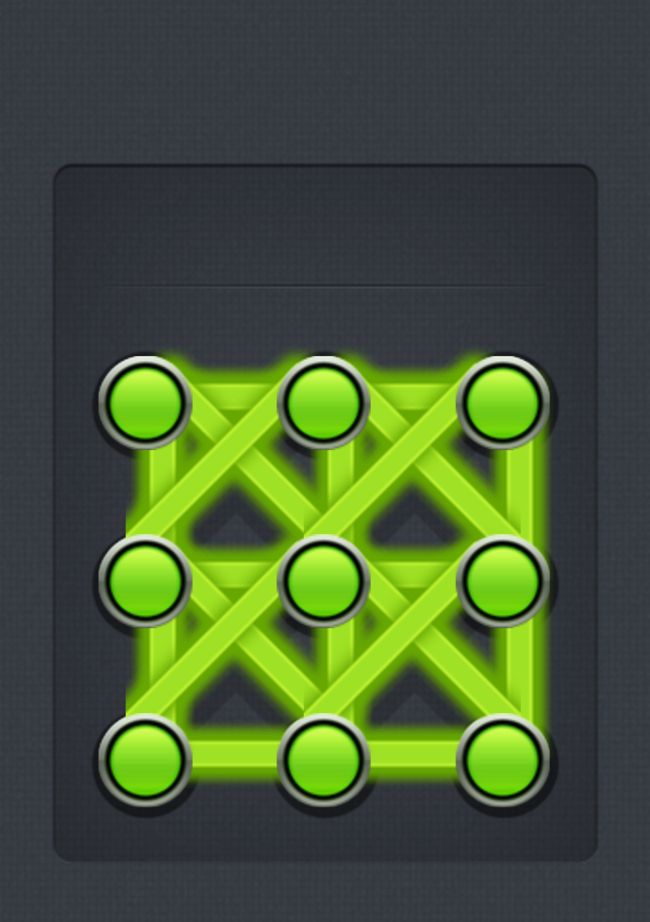
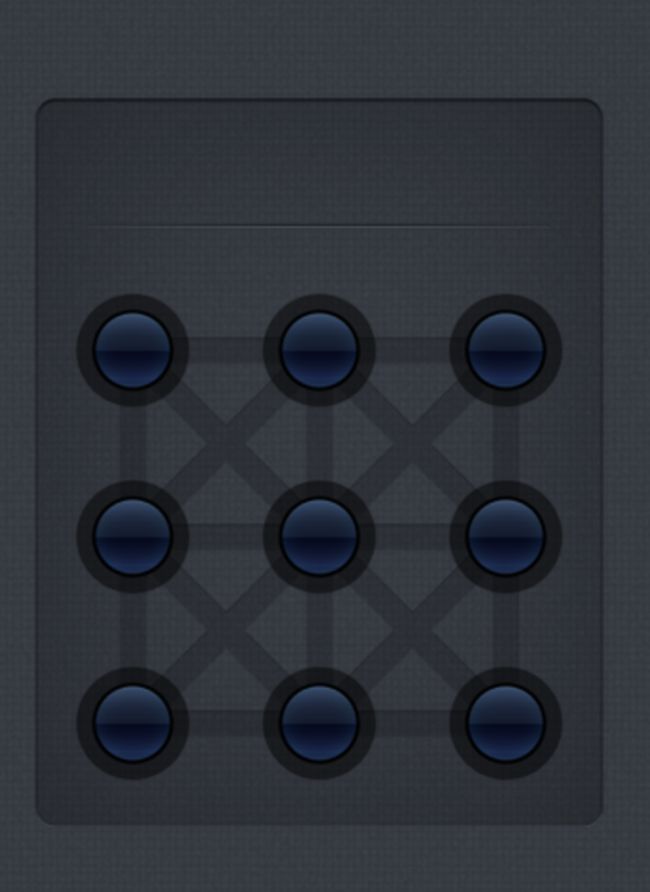
这里为了看到效果,所以都没有隐藏控件,如果隐藏只需要在每个添加的线里面也就是一个的for 循环里面分别增加:
dotView.setVisibility(View.INVISIBLE)
LineView.setVisibility(View.INVISIBLE)
rLineView.setVisibility(View.INVISIBLE);
lLineView.setVisibility(View.INVISIBLE);
就可以了,
效果图就如下:
今天就讲到这里,明天在为大家解答解锁功能的具体实现。