Python + TensorFlow + MNIST识别手写数字的实践
参考文章:https://blog.csdn.net/sparta_117/article/details/66965760
https://blog.csdn.net/hustqb/article/details/80222055
一、准备工作
1、安装Python3.5
2、安装TensorFlow
3、下载安装OpenCV Python库。
4、下载安装Mnist图像数据库。
二、训练模型。
import tensorflow as tf
from tensorflow.examples.tutorials.mnist import input_data
from tensorflow.examples.tutorials.mnist import mnist


#load data
mnist = input_data.read_data_sets("MNIST_data/", one_hot=True)

#define model
learning_rate = 0.5
epochs = 10
batch_size = 100

# placeholder
# 输入图片为28 x 28 像素 = 784
x = tf.placeholder(tf.float32, [None, 784])
# 输出为0-9的one-hot编码
y = tf.placeholder(tf.float32, [None, 10])

# hidden layer => w, b
W1 = tf.Variable(tf.random_normal([784, 300], stddev=0.03), name='W1')
b1 = tf.Variable(tf.random_normal([300]), name='b1')
# output layer => w, b
W2 = tf.Variable(tf.random_normal([300, 10], stddev=0.03), name='W2')
b2 = tf.Variable(tf.random_normal([10]), name='b2')

# hidden layer
hidden_out = tf.add(tf.matmul(x, W1), b1)
hidden_out = tf.nn.relu(hidden_out)

# 计算输出
y_ = tf.nn.softmax(tf.add(tf.matmul(hidden_out, W2), b2))
y_clipped = tf.clip_by_value(y_, 1e-10, 0.9999999)
cross_entropy = -tf.reduce_mean(tf.reduce_sum(y * tf.log(y_clipped) + (1 - y) * tf.log(1 - y_clipped), axis=1))

# 创建优化器,确定优化目标
optimizer = tf.train.GradientDescentOptimizer(learning_rate=learning_rate).minimize(cross_entropy)
# init operator
init_op = tf.global_variables_initializer()

# 创建准确率节点
correct_prediction = tf.equal(tf.argmax(y, 1), tf.argmax(y_, 1))
accuracy = tf.reduce_mean(tf.cast(correct_prediction, tf.float32))

#training
# 创建session
with tf.Session() as sess:
    # 变量初始化
    sess.run(init_op)
    total_batch = int(len(mnist.train.labels) / batch_size)
    for epoch in range(epochs):
        avg_cost = 0
        for i in range(total_batch):
            batch_x, batch_y = mnist.train.next_batch(batch_size=batch_size)
            _, c = sess.run([optimizer, cross_entropy], feed_dict={x: batch_x, y: batch_y})
            avg_cost += c / total_batch
        print("Epoch:", (epoch + 1), "cost = ", "{:.3f}".format(avg_cost))
    print(sess.run(accuracy, feed_dict={x: mnist.test.images, y: mnist.test.labels}))
    #save
    tf.train.Saver().save(sess, 'D:/python/mnist/test.ckpt')
三、准备一张待识别的图片。
四、识别代码文件mnist_test.py。
from PIL import Image, ImageFilter
import tensorflow as tf
import matplotlib.pyplot as plt
import cv2
import sys

def imageprepare(file_name):
    """
    This function returns the pixel values.
    The imput is a png file location.
    file_name='D:/python/mnist/test.png'#导入自己的图片地址
    """

    #打开原图
    image=cv2.imread(file_name)
    #修改大小为28*28
    res=cv2.resize(image,(28,28),interpolation=cv2.INTER_CUBIC)
    #转化为灰度图
    res = cv2.cvtColor(res, cv2.COLOR_BGR2GRAY)
    #二值化
    ret, res = cv2.threshold(res, 170, 255, cv2.THRESH_BINARY)
    #cv2.imshow("Image", res)
    #另存
    nFilename = file_name + "new.png"
    cv2.imwrite(nFilename, res)
    #转化为mnist输入-->tva
    #in terminal 'mogrify -format png *.jpg' convert jpg to png
    im = Image.open(nFilename).convert('L')    tv = list(im.getdata()) #get pixel values
    #normalize pixels to 0 and 1. 0 is pure white, 1 is pure black.
    tva = [ (255-x)*1.0/255.0 for x in tv]
    return tva


if __name__ == '__main__':
    #检查参数
    if len(sys.argv) < 3:
        print("Usage: %s test.png model.ckpt" % sys.argv[0])
    else:
        #define model
        # 输入图片为28 x 28 像素 = 784
        x = tf.placeholder(tf.float32, [None, 784])
        # 输出为0-9的one-hot编码
        y = tf.placeholder(tf.float32, [None, 10])

        # hidden layer => w, b
        W1 = tf.Variable(tf.random_normal([784, 300], stddev=0.03), name='W1')
        b1 = tf.Variable(tf.random_normal([300]), name='b1')
        # output layer => w, b
        W2 = tf.Variable(tf.random_normal([300, 10], stddev=0.03), name='W2')
        b2 = tf.Variable(tf.random_normal([10]), name='b2')

        # hidden layer
        hidden_out = tf.add(tf.matmul(x, W1), b1)
        hidden_out = tf.nn.relu(hidden_out)

        # 计算输出
        y_ = tf.nn.softmax(tf.add(tf.matmul(hidden_out, W2), b2))

        # init operator
        init_op = tf.global_variables_initializer()

        #参数1为要识别的图片
        result=imageprepare(sys.argv[1])


        saver = tf.train.Saver()
        with tf.Session() as sess:
            sess.run(init_op)
            #从参数2中恢复模型参数
            saver.restore(sess, sys.argv[2])
            #预测结果-->predint
            prediction=tf.argmax(y_, 1)
            predint=prediction.eval(feed_dict={x: [result]}, session=sess)
            #输出预测结果
            print('recognize result:')
            print(predint[0])
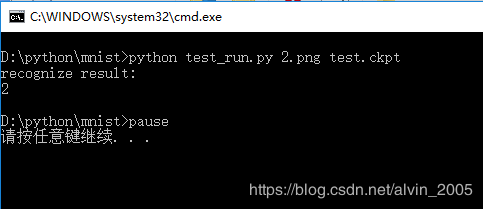
在命令行运行python mnist_test.py 2.png test.cpkt,运行结果如下:
全文完。

