mongodb副本集
Mongodb 副本集
mongodb支持副本集,通过异步复制 来达到故障转移和冗余,以保证一台服务器挂了以后数据依旧有备份。
mongodb的高可用采用两种策略:
1、主从复制
某一个服务启动加上-master参数,另一个服务加上-slave及-source选项
2、副本集
为mongodb推荐使用方式,能够实现故障自动切换。
通过oplog实现数据复制,oplog是个固定集合,在默认情况下,oplog占用磁盘空闲空间的5%,这个值可修改
主从节点
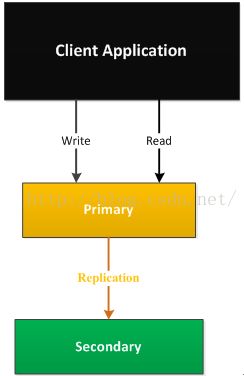
一般副本集会采用主节点、副节点及仲裁节点,不过仲裁节点不是必须的,本文先不适用仲裁节点,其架构方式为:
副本集1 :28010
副本集2: 28011
其配置文件1为:
replSet=rs1
#keyFile=/root/data/shard/key/r0
fork=true
port=28010
dbpath=/root/data/shard/s0
logpath=/root/data/shard/log/r0.log
logappend=true
directoryperdb=true
配置文件2为:
replSet=rs1
#keyFile=/root/data/shard/key/r1
fork=true
port=28011
dbpath=/root/data/shard/s1
logpath=/root/data/shard/log/r1.log
logappend=true
directoryperdb=true
步骤:
1. 启动mongod进程
# mongod -f s0.conf
about to fork child process, waiting until server is ready for connections.
forked process: 30513
child process started successfully, parent exiting
#mongod -f s1.conf
about to fork child process, waiting until server is ready for connections.
forked process: 30536
child process started successfully, parent exiting2、进入某一个实例# mongo -port28010
3、初始化副本集表
config_rs1={_id:"rs1",members:[]}
{ "_id" : "rs1", "members" : [ ] }
> config_rs1.members.push({_id:0,host:"localhost:28010"})
1
> config_rs1.members.push({_id:1,host:"localhost:28011"})
2
> rs.initiate(config_rs1)
{ "ok" : 1 }
查看数据信息
1、rs1:OTHER> rs.isMaster()
{
       "hosts" : [
              "localhost:28010",
              "localhost:28011"
       ],
       "setName" : "rs1",
       "setVersion" : 1,
       "ismaster" : true,
       "secondary" : false,
       "primary" : "localhost:28010",
       "me" : "localhost:28010",
    …
}
其中主要的几个属性:
isMaster,是否为主节点
secondary:是否为从节点
primary:指出当前副本集中的主节点位于哪个进程
2.查看详细的配置信息
rs1:PRIMARY> rs.config()
{
      "_id" : "rs1",
      "version" : 1,
      "protocolVersion" : NumberLong(1),
      "members" : [
             {
                    "_id" : 0,
                    "host" : "localhost:28010",
                    "arbiterOnly" : false,
                    "buildIndexes" : true,
                    "hidden" : false,
                    "priority" : 1,
                    "tags" : {

                    },
                    "slaveDelay" : NumberLong(0),
                    "votes" : 1
             },
             {
                    "_id" : 1,
                    "host" : "localhost:28011",
                    "arbiterOnly" : false,
                    "buildIndexes" : true,
                    "hidden" : false,
                    "priority" : 1,
                    "tags" : {

                    },
                    "slaveDelay" : NumberLong(0),
                    "votes" : 1
             }
      ],
      "settings" : {
             …
      }
}
3.查看副本集的当前状态:
rs1:SECONDARY>rs.status()
{
       "set" : "rs1",
       "date" : ISODate("2016-09-16T06:55:46.351Z"),
       "myState" : 2,
       "term" : NumberLong(1),
       "syncingTo" : "localhost:28010",
       "heartbeatIntervalMillis" : NumberLong(2000),
       "members" : [
              {
                     "_id" : 0,
                     "name" : "localhost:28010",
                     "health" : 1,
                     "state" : 1,
                     "stateStr" : "PRIMARY",
                     …
              },
              {
                     "_id" : 1,
                     "name" : "localhost:28011",
                     "health" : 1,
                     "state" : 2,
                     "stateStr" : "SECONDARY",
                      …
                     "syncingTo" : "localhost:28010",
                     "self" : true
              }
       ],
       "ok" : 1
}
该命令是在从节点完成,myState为2,代表为从节点,1为主节点。从节点以心跳包的方式与主节点查看服务器是否正常。
4.查看同步情况:
rs1:PRIMARY> use local
switched to db local
rs1:PRIMARY> db.oplog.rs.find()
{ "ts" : Timestamp(1474008594, 1), "h" : NumberLong("6036013166154382110"), "v" : 2, "op" : "n", "ns" : "", "o" : { "msg" : "initiating set" } }
{ "ts" : Timestamp(1474008606, 1), "t" : NumberLong(1), "h" : NumberLong("1907052058849733960"), "v" : 2, "op" : "n", "ns" : "", "o" : { "msg" : "new primary" } }
在初始化副本集集合完成之后,日志的记录为initiating set.
查看同步状态:
rs1:PRIMARY> db.printSlaveReplicationInfo()
source: localhost:28011
       syncedTo: Fri Sep 16 2016 15:00:14 GMT+0800 (CST)
       0 secs (0 hrs) behind the primary
rs1:PRIMARY> db.printReplicationInfo()
configured oplog size:   13185.910937309265MB
log length start to end: 620secs (0.17hrs)
oplog first event time:  Fri Sep 16 2016 14:49:54 GMT+0800 (CST)
oplog last event time:  Fri Sep 16 2016 15:00:14 GMT+0800 (CST)
now:                Fri Sep 16 2016 15:59:01 GMT+0800 (CST)
插入数据,实现读写分离
rs1:PRIMARY> use test
switched to db test
rs1:PRIMARY> db.dev.insert({"name":"camel"})
在从节点查看数据,首先设置从节点可读
rs1:SECONDARY> db.getMongo().setSlaveOk()
rs1:SECONDARY> use test
switched to db test
rs1:SECONDARY> db.dev.insert("name":"camel")
故障恢复
无论哪一个发生了故障,如使用kill命令或者使用shutdownServer命令。另外一个将变成从节点。状态为:SECONDARY。
rs1:SECONDARY> use admin
switched to db admin
rs1:SECONDARY> db.shutdownServer()
此时希望直接读取这个节点的内容:
rs1:SECONDARY> use test
switched to db test
rs1:SECONDARY> show collections
2016-09-16T16:19:54.879+0800 E QUERY    [thread1] Error: listCollections failed: { "ok" : 0, "errmsg" : "not master and slaveOk=false", "code" : 13435 } :
…
于是我们设置可读
rs1:SECONDARY> rs.slaveOk()
rs1:SECONDARY> show collections
dev
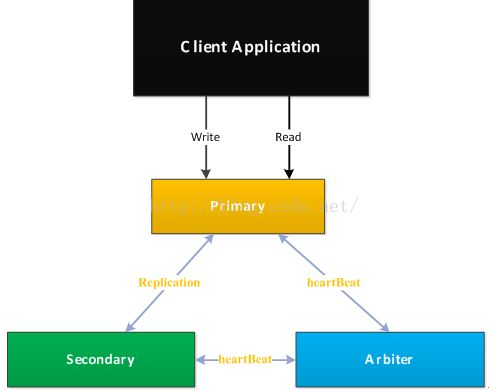
主、副、仲裁节点
如果是直接使用rs.remove(“localhost:28011”),移除节点。那么28010将成为唯一可用的节点,即没有备份。
这种方式显然有些不够合理,需要手动去设置节点可以读写,那么三个节点:主、副、仲裁节点,其架构方式将为:
插入新节点:
rs1:PRIMARY> rs.add({_id:3,host:"localhost:28012",arbiterOnly:true})
{ "ok" : 1 }
查看当前的信息
rs1:PRIMARY> rs.isMaster()
{
       "hosts" : [
              "localhost:28011",
              "localhost:28010"
       ],
       "arbiters" : [
              "localhost:28012"
       ],
       "setName" : "rs1",
       "setVersion" : 6,
       "ismaster" : true,
       "secondary" : false,
       "primary" : "localhost:28011",
       "me" : "localhost:28011",
       "ok" : 1
   …
}
在主节点上直接shutdownServer,查看从节点,此时
rs1:PRIMARY> rs.isMaster()
{
       "hosts" : [
              "localhost:28011",
              "localhost:28010"
       ],
       "arbiters" : [
              "localhost:28012"
       ],
       "setName" : "rs1",
       "setVersion" : 6,
       "ismaster" : true,
       "secondary" : false,
       "primary" : "localhost:28010",
       "me" : "localhost:28010",
        …}
s1:PRIMARY> rs.status()
{
"set" : "rs1",
"date" : ISODate("2016-09-16T08:36:27.466Z"),
"myState" : 1,
"term" : NumberLong(7),
"heartbeatIntervalMillis" : NumberLong(2000),
"members" : [
{
"_id" : 1,
"name" : "localhost:28011",
"health" : 0,
"state" : 8,
"stateStr" : "(not reachable/healthy)",
…28010已经处于不健康的状态。
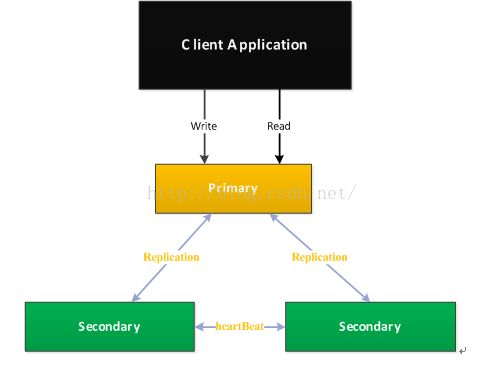
主、从、从
rs1:SECONDARY> rs.status()
{
	"set" : "rs1",
	"date" : ISODate("2016-09-16T09:18:29.102Z"),
	"myState" : 2,
	"term" : NumberLong(8),
	"heartbeatIntervalMillis" : NumberLong(2000),
	"members" : [
		{
			"_id" : 1,
			"name" : "localhost:28011",
			"health" : 0,
			"state" : 8,
			"stateStr" : "(not reachable/healthy)",
			"uptime" : 0,
			"optime" : {
				"ts" : Timestamp(0, 0),
				"t" : NumberLong(-1)
			},
			"optimeDate" : ISODate("1970-01-01T00:00:00Z"),
			"lastHeartbeat" : ISODate("2016-09-16T09:18:27.031Z"),
			"lastHeartbeatRecv" : ISODate("2016-09-16T09:18:04.818Z"),
			"pingMs" : NumberLong(0),
			"lastHeartbeatMessage" : "Connection refused",
			"configVersion" : -1
		},
		{
			"_id" : 2,
			"name" : "localhost:28010",
			"health" : 0,
			"state" : 8,
			"stateStr" : (not reachable/healthy)"
			"uptime" : 0,
			"optime" : {
				"ts" : Timestamp(0, 0),
				"t" : NumberLong(-1)
			},
			"optimeDate" : ISODate("1970-01-01T00:00:00Z"),
			"lastHeartbeat" : ISODate("2016-09-16T09:18:25.863Z"),
			"lastHeartbeatRecv" : ISODate("2016-09-16T09:15:48.264Z"),
			"pingMs" : NumberLong(0),
			"lastHeartbeatMessage" : "Connection refused",
			"configVersion" : -1
		},
		{
			"_id" : 3,
			"name" : "localhost:28012",
			"health" : 1,
			"state" : 2,
			"stateStr" : "SECONDARY",
			"uptime" : 376,
			"optime" : {
				"ts" : Timestamp(1474017358, 2),
				"t" : NumberLong(8)
			},
			"optimeDate" : ISODate("2016-09-16T09:15:58Z"),
			"infoMessage" : "could not find member to sync from",
			"configVersion" : 10,
			"self" : true
		}
	],
	"ok" : 1
}

