caffe学习笔记4-- 手写数字mnist训练过程
通过mnist数据集的训练,来看一下caffe的运行过程
这是caffe官网:examples里的第二个例子,链接地址:http://caffe.berkeleyvision.org/gathered/examples/mnist.html
1. 准备数据
首先,我们需要从网上下载数据,在caffe根目录下运行一下命令
./data/mnist/get_mnist.sh
./examples/mnist/create_mnist.sh
运行完后,会出现如下两个文件:
mnist_train_lmdb, and mnist_test_lmdb
具体看一下这里面写了写啥:
get_mnist.sh 用于获取数据
#!/usr/bin/env sh
# This scripts downloads the mnist data and unzips it.

DIR="$( cd "$(dirname "$0")" ; pwd -P )"
cd $DIR

echo "Downloading..." #下载手写数据集,http后面是手写数据集的网址

wget --no-check-certificate http://yann.lecun.com/exdb/mnist/train-images-idx3-ubyte.gz
wget --no-check-certificate http://yann.lecun.com/exdb/mnist/train-labels-idx1-ubyte.gz
wget --no-check-certificate http://yann.lecun.com/exdb/mnist/t10k-images-idx3-ubyte.gz
wget --no-check-certificate http://yann.lecun.com/exdb/mnist/t10k-labels-idx1-ubyte.gz

echo "Unzipping..." # 下载完成后解压

gunzip train-images-idx3-ubyte.gz
gunzip train-labels-idx1-ubyte.gz
gunzip t10k-images-idx3-ubyte.gz
gunzip t10k-labels-idx1-ubyte.gz

# Creation is split out because leveldb sometimes causes segfault
# and needs to be re-created.

echo "Done."
/examples/mnist/create_mnist.sh #生成数据,这个脚本的作用是将数据转换成lmdb格式或leveldb格式
具体如下:
#!/usr/bin/env sh
# This script converts the mnist data into lmdb/leveldb format,
# depending on the value assigned to $BACKEND.

EXAMPLE=examples/mnist
DATA=data/mnist
BUILD=build/examples/mnist

BACKEND="lmdb"

echo "Creating ${BACKEND}..."

rm -rf $EXAMPLE/mnist_train_${BACKEND}
rm -rf $EXAMPLE/mnist_test_${BACKEND}

$BUILD/convert_mnist_data.bin $DATA/train-images-idx3-ubyte \
  $DATA/train-labels-idx1-ubyte $EXAMPLE/mnist_train_${BACKEND} --backend=${BACKEND} #训练数据
$BUILD/convert_mnist_data.bin $DATA/t10k-images-idx3-ubyte \
  $DATA/t10k-labels-idx1-ubyte $EXAMPLE/mnist_test_${BACKEND} --backend=${BACKEND} #测试数据

echo "Done."
convert_mnist_data.bin是由convert_minst_data.cpp编译生成的可执行文件,这个编译过程就是在caffe安装的时候完成的,这个函数接受四个参数:
- $DATA/train-images-idx3-ubyte: 手写数字源文件
- $DATA/train-labels-idx1-ubyte: 手写数字标签文件
- $EXAMPLE/mnist_train_${BACKEND} : 转换后数据的存储位置
- --backend=${BACKEND} : 宏定义,转换数据的格式lmdb或leveldb
注:convert_mnist_data.cpp及用到的其他文件在下一篇中介绍
2. 网络模型
这个实验中使用的模型是LeNet,其模型结构如下:
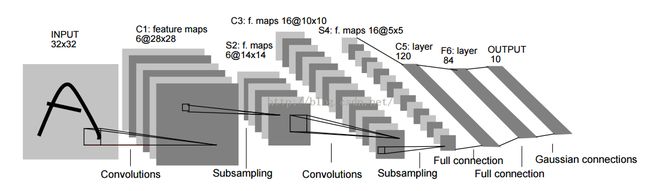
这个网络包含两个卷积层,两个池化层,两个全连接层,最后一层用于分类
其结构定义在:$CAFFE_ROOT/examples/mnist/lenet_train_test.prototxt中,图示如下

对于这个文档的了解,需要查看caffe.proto相关的内容
首先,给出网络名称
name: "LeNet"2.1. 数据层
接着,是数据层的写入
这里,我们从之前创建的lmdb文件夹中读入数据
layer {
  name: "mnist"    //层名称
  type: "Data"     // 层类型:数据层
  top: "data"       //该层产生两个blobs,: data blobs
  top: "label"      //label blobs
  include {
    phase: TRAIN // 仅用于训练阶段
  }
  transform_param {
    scale: 0.00390625 //将图像的像素值归一化,=1/256
  }
  data_param {
    source: "examples/mnist/mnist_train_lmdb"   //数据所在的文件路径
    batch_size: 64 //批尺寸,是每次迭代时输入样本的数量
    backend: LMDB //输入数据的类型为lmdb
  }
}
文档中还有另一个数据层,用于测试阶段
2.2. 卷积层
layer {
  name: "conv1"
  type: "Convolution"      //层类型: 卷积层
  bottom: "data"     //该层的输入为data blobs, 由数据层产生
  top: "conv1"     //输出为卷积特征conv1
  param {
    lr_mult: 1  //权重w的学习率倍数
  }
  param {
    lr_mult: 2       //权重b的学习率倍数,
  }
  convolution_param {  //卷积参数
    num_output: 20  //输出为20个特征图,其规模为(data_size-kernel_size + stride)*(data_size -kernel_size + stride)
    kernel_size: 5    //卷积核为5x5
    stride: 1    //卷积核的移动间隔为1
    weight_filler {
      type: "xavier"  //权值初始化方法,这里用xavier......
    }
    bias_filler {
      type: "constant"  //偏置初始化为常量,默认为0
    }
  }
}
2.3 池化层
layer {
  name: "pool1"
  type: "Pooling" //层类型:池化层
  bottom: "conv1" // 该层的输入为conv1的输出结果
  top: "pool1" //输出为pooling后的特征
  pooling_param {
    pool: MAX //pooling方式:最大值
    kernel_size: 2  //pooling核为2x2
    stride: 2 //间隔为2
  }
}
2.4 全连接层
layer {
  name: "ip1"
  type: "InnerProduct"
  bottom: "pool2" //该层输入为上个池化层的输出
  top: "ip1"    //输出
  param {
    lr_mult: 1
  }
  param {
    lr_mult: 2
  }
  inner_product_param {
    num_output: 500 //500个输出
    weight_filler {
      type: "xavier"
    }
    bias_filler {
      type: "constant"
    }
  }
}
2.5 非线性层
layer {
  name: "relu1"
  type: "ReLU" //ReLU,限制线性单元,是一种激活函数,与sigmoid作用类似
  bottom: "ip1"
  top: "ip1"
}
2.6 准确率层
layer {
  name: "accuracy"
  type: "Accuracy"
  bottom: "ip2"
  bottom: "label"
  top: "accuracy"
  include {
    phase: TEST  //仅用于测试数据,计算算法准确度
  }
}
2.7 损失估计层
layer {
  name: "loss"
  type: "SoftmaxWithLoss" //多分类使用softMax回归计算损失
  bottom: "ip2"
  bottom: "label" //需要用到数据层产生的lable;
  top: "loss"
}
3.模型优化文件
这个文件在$CAFFE_ROOT/examples/mnist/lenet_solver.prototxt,配置一些参数信息等
文件内容如下:
# The train/test net protocol buffer definition
net: "examples/mnist/lenet_train_test.prototxt" #网络模型文件路径
# test_iter specifies how many forward passes the test should carry out.
# In the case of MNIST, we have test batch size 100 and 100 test iterations,
# covering the full 10,000 testing images.
test_iter: 100            #test的迭代次数,批处理大小为100, 100*100为测试集个数
# Carry out testing every 500 training iterations.
test_interval: 500         #训练时每迭代500次测试一次
# The base learning rate, momentum and the weight decay of the network.
base_lr: 0.01        #学习率
momentum: 0.9      #动量
weight_decay: 0.0005       #权重衰减
# The learning rate policy#学习率策略
lr_policy: "inv"
gamma: 0.0001
power: 0.75
# Display every 100 iterations     #每迭代100次显示
display: 100
# The maximum number of iterations
max_iter: 10000 #最大迭代次数
# snapshot intermediate results#我感觉可能是每迭代5000次存储一次参数什么的。
snapshot: 5000
snapshot_prefix: "examples/mnist/lenet"
# solver mode: CPU or GPU
solver_mode: GPU     #使用GPU 训练
4. 训练数据
在caffe根目录下输入:
./examples/mnist/train_lenet.shsindyz@sindyz-desktop:~/caffe-master$ ./examples/mnist/train_lenet.sh
I0112 13:53:13.997781 3792 caffe.cpp:184] Using GPUs 0
I0112 13:53:14.093080 3792 solver.cpp:48] Initializing solver from parameters:
test_iter: 100
test_interval: 500
base_lr: 0.01
display: 100
max_iter: 10000
lr_policy: "inv"
gamma: 0.0001
power: 0.75
momentum: 0.9
weight_decay: 0.0005
snapshot: 5000
snapshot_prefix: "examples/mnist/lenet"
solver_mode: GPU
device_id: 0
net: "examples/mnist/lenet_train_test.prototxt"
I0112 13:53:14.093252 3792 solver.cpp:91] Creating training net from net file: examples/mnist/lenet_train_test.prototxt
I0112 13:53:14.093545 3792 net.cpp:322] The NetState phase (0) differed from the phase (1) specified by a rule in layer mnist
I0112 13:53:14.093574 3792 net.cpp:322] The NetState phase (0) differed from the phase (1) specified by a rule in layer accuracy
I0112 13:53:14.093646 3792 net.cpp:49] Initializing net from parameters:
name: "LeNet"
..........
4.1 数据层
I0112 13:53:14.093978  3792 layer_factory.hpp:77] Creating layer mnist //创建数据层,文件中这层命名为mnist
I0112 13:53:14.094444  3792 net.cpp:106] Creating Layer mnist
I0112 13:53:14.094468  3792 net.cpp:411] mnist -> data
I0112 13:53:14.094490  3792 net.cpp:411] mnist -> label
I0112 13:53:14.095192  3797 db_lmdb.cpp:38] Opened lmdb examples/mnist/mnist_train_lmdb
I0112 13:53:14.100249  3792 data_layer.cpp:41] output data size: 64,1,28,28   //输出data blobs(number, channel, width, height)
I0112 13:53:14.101164  3792 net.cpp:150] Setting up mnist
I0112 13:53:14.101198  3792 net.cpp:157] Top shape: 64 1 28 28 (50176)
I0112 13:53:14.101207  3792 net.cpp:157] Top shape: 64 (64)
I0112 13:53:14.101213  3792 net.cpp:165] Memory required for data: 200960
4.2 卷积层(conv1)
I0112 13:53:14.101223  3792 layer_factory.hpp:77] Creating layer conv1
I0112 13:53:14.101245  3792 net.cpp:106] Creating Layer conv1
I0112 13:53:14.101253  3792 net.cpp:454] conv1 <- data
I0112 13:53:14.101269  3792 net.cpp:411] conv1 -> conv1
I0112 13:53:14.101812  3792 net.cpp:150] Setting up conv1
I0112 13:53:14.101837  3792 net.cpp:157] Top shape: 64 20 24 24 (737280)
I0112 13:53:14.101845  3792 net.cpp:165] Memory required for data: 3150080
4.3 池化层(pooling1)
I0112 13:53:14.101857  3792 layer_factory.hpp:77] Creating layer pool1
I0112 13:53:14.101872  3792 net.cpp:106] Creating Layer pool1
I0112 13:53:14.101878  3792 net.cpp:454] pool1 <- conv1
I0112 13:53:14.101886  3792 net.cpp:411] pool1 -> pool1
I0112 13:53:14.101948  3792 net.cpp:150] Setting up pool1
I0112 13:53:14.101958  3792 net.cpp:157] Top shape: 64 20 12 12 (184320)
I0112 13:53:14.101963  3792 net.cpp:165] Memory required for data: 3887360
4.4 全连接层(ip1)
I0112 13:53:14.102401  3792 layer_factory.hpp:77] Creating layer ip1
I0112 13:53:14.102416  3792 net.cpp:106] Creating Layer ip1
I0112 13:53:14.102421  3792 net.cpp:454] ip1 <- pool2
I0112 13:53:14.102428  3792 net.cpp:411] ip1 -> ip1
I0112 13:53:14.105073  3792 net.cpp:150] Setting up ip1
I0112 13:53:14.105095  3792 net.cpp:157] Top shape: 64 500 (32000)
I0112 13:53:14.105101  3792 net.cpp:165] Memory required for data: 5039360
4.5 非线性层
I0112 13:53:14.105113  3792 layer_factory.hpp:77] Creating layer relu1
I0112 13:53:14.105124  3792 net.cpp:106] Creating Layer relu1
I0112 13:53:14.105130  3792 net.cpp:454] relu1 <- ip1
I0112 13:53:14.105139  3792 net.cpp:397] relu1 -> ip1 (in-place)
I0112 13:53:14.105152  3792 net.cpp:150] Setting up relu1
I0112 13:53:14.105161  3792 net.cpp:157] Top shape: 64 500 (32000)
I0112 13:53:14.105166  3792 net.cpp:165] Memory required for data: 5167360
4.6 损失层
I0112 13:53:14.105664  3792 layer_factory.hpp:77] Creating layer loss
I0112 13:53:14.105677  3792 net.cpp:106] Creating Layer loss
I0112 13:53:14.105685  3792 net.cpp:454] loss <- ip2
I0112 13:53:14.105692  3792 net.cpp:454] loss <- label
I0112 13:53:14.105700  3792 net.cpp:411] loss -> loss
接下来,开始计算反馈网络,(内容不在一一贴出,运行是会看到)
之后,输出测试网络和创建过程
这一步完成后,开始优化参数
I0112 13:53:14.112908  3792 net.cpp:283] Network initialization done.
I0112 13:53:14.112957  3792 solver.cpp:60] Solver scaffolding done.
I0112 13:53:14.113140  3792 caffe.cpp:212] Starting Optimization
I0112 13:53:14.113149  3792 solver.cpp:288] Solving LeNet
I0112 13:53:14.113154  3792 solver.cpp:289] Learning Rate Policy: inv
I0112 13:53:14.113476  3792 solver.cpp:341] Iteration 0, Testing net (#0)
I0112 13:53:15.875176  3792 solver.cpp:409]     Test net output #0: accuracy = 0.0861
I0112 13:53:15.875221  3792 solver.cpp:409]     Test net output #1: loss = 2.34769 (* 1 = 2.34769 loss)
I0112 13:53:15.889724  3792 solver.cpp:237] Iteration 0, loss = 2.33398
待运行结束,输出结果:
I0112 13:59:25.476456  3792 solver.cpp:409]     Test net output #0: accuracy = 0.9908
I0112 13:59:25.476516  3792 solver.cpp:409]     Test net output #1: loss = 0.02798 (* 1 = 0.02798 loss)
I0112 13:59:25.476526  3792 solver.cpp:326] Optimization Done.
I0112 13:59:25.476531  3792 caffe.cpp:215] Optimization Done.
其中,#0:为准确度, #1:为损失
下一篇,将介绍一下mnist中的cpp代码部分
参考资料:
http://caffe.berkeleyvision.org/gathered/examples/mnist.html
caffe初学,把边学的东西记下来,希望大家多多指导。