【tensorflow】mnist手写数字识别--tensorflow实现
【tensorflow】mnist手写数字识别--tensorflow实现
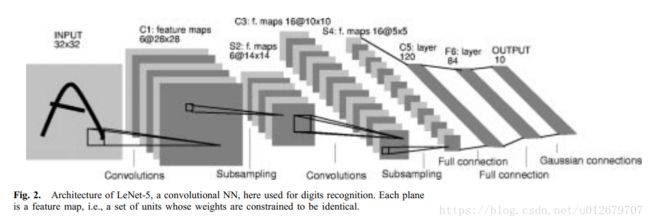
LeCun首次将反向传播算法应用于手写邮政编码识别,而后又将卷积神经网络应用于手写数字体识别,这便是CNN最初的模型--LeNet5。
LeNet5包含Input、卷积层1、池化层1、卷积层2、池化层2、全连接层、输出层。
INPUT: [28x28x1]           weights: 0
CONV5-32: [28x28x32]       weights: (5*5*1+1)*32
POOL2: [14x14x32]          weights: 2*2*1
CONV5-64: [14x14x64]       weights: (5*5*32+1)*64
POOL2: [7x7x64]            weights: 2*2*1
FC: [1x1x1024]              weights: (7*7*64+1)*1024
FC: [1x1x10] weights: (1*1*512+1)*10闪光点:定义了CNN的基本组件,是CNN的鼻祖。
LeNet是卷积神经网络的祖师爷LeCun在1998年提出,用于解决手写数字识别的视觉任务。自那时起,CNN的最基本的架构就定下来了:卷积层、池化层、全连接层。如今各大深度学习框架中所使用的LeNet都是简化改进过的LeNet-5(-5表示具有5个层),和原始的LeNet有些许不同,比如把激活函数改为了现在很常用的ReLu。
LeNet-5跟现有的conv->pool->ReLU的套路不同,它使用的方式是conv1->pool->conv2->pool2再接全连接层,但是不变的是,卷积层后紧接池化层的模式依旧不变。
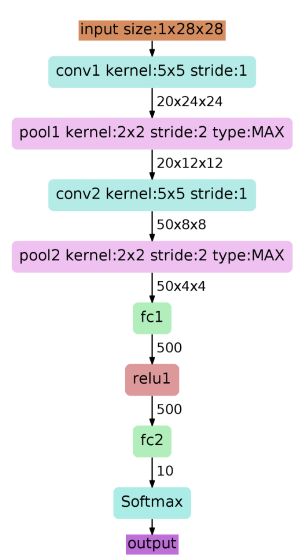
以上图为例,对经典的LeNet-5做深入分析:
- 首先输入图像是单通道的28*28大小的图像,用矩阵表示就是[1,28,28]
- 第一个卷积层conv1所用的卷积核尺寸为5*5,滑动步长为1,卷积核数目为20,那么经过该层后图像尺寸变为24,28-5+1=24,输出矩阵为[20,24,24]。
- 第一个池化层pool核尺寸为2*2,步长2,这是没有重叠的max pooling,池化操作后,图像尺寸减半,变为12×12,输出矩阵为[20,12,12]。
- 第二个卷积层conv2的卷积核尺寸为5*5,步长1,卷积核数目为50,卷积后图像尺寸变为8,这是因为12-5+1=8,输出矩阵为[50,8,8].
- 第二个池化层pool2核尺寸为2*2,步长2,这是没有重叠的max pooling,池化操作后,图像尺寸减半,变为4×4,输出矩阵为[50,4,4]。
- pool2后面接全连接层fc1,神经元数目为500,再接relu激活函数。
- 再接fc2,神经元个数为10,得到10维的特征向量,用于10个数字的分类训练,送入softmaxt分类,得到分类结果的概率output。
代码:
#!/usr/bin/env python
# _*_ coding: utf-8 _*_

import tensorflow as tf
from tensorflow.examples.tutorials.mnist import input_data

# 定义神经网络模型的评估部分
def compute_accuracy(test_xs, test_ys):
    # 使用全局变量prediction
    global prediction
    # 获得预测值y_pre
    y_pre = sess.run(prediction, feed_dict = { xs: test_xs, keep_prob: 1})
    # 判断预测值y和真实值y_中最大数的索引是否一致,y_pre的值为1-10概率, 返回值为bool序列
    correct_prediction = tf.equal(tf.argmax(y_pre, 1), tf.argmax(test_ys, 1))
    # 定义准确率的计算
    accuracy = tf.reduce_mean(tf.cast(correct_prediction, tf.float32)) #tf.cast将bool转换为float32
    # 计算准确率
    result = sess.run(accuracy)
    return result

# 下载mnist数据
mnist = input_data.read_data_sets('MNIST_data', one_hot=True)

# 权重参数初始化
def weight_variable(shape):
    initial = tf.truncated_normal(shape, stddev = 0.1)  #截断的正态分布,标准差stddev
    return tf.Variable(initial)

# 偏置参数初始化
def bias_variable(shape):
    initial = tf.constant(0.1, shape = shape)
    return tf.Variable(initial)

# 定义卷积层
def conv2d(x, W):
    # stride的四个参数:[batch, height, width, channels], [batch_size, image_rows, image_cols, number_of_colors]
    # height, width就是图像的高度和宽度,batch和channels在卷积层中通常设为1
    return tf.nn.conv2d(x, W, strides = [1, 1, 1, 1], padding = 'SAME')

def max_pool_2x2(x):
    return tf.nn.max_pool(x, ksize = [1, 2, 2, 1], strides = [1, 2, 2, 1], padding = 'SAME')
    """
    max_pool(x,ksize,strides,padding)参数含义
        x:input
        ksize:filter,滤波器大小2*2
        strides:步长,2*2,表示filter窗口每次水平移动2格,每次垂直移动2格
        padding:填充方式,补零

    conv2d(x,W,strides=[1,1,1,1],padding='SAME')参数含义与上述类似
        x:input
        W:filter,滤波器大小
        strides:步长,1*1,表示filter窗口每次水平移动1格,每次垂直移动1格
        padding:填充方式,补零('SAME')
    """


# 输入输出数据的placeholder
xs = tf.placeholder(tf.float32, [None, 784])
ys = tf.placeholder(tf.float32, [None, 10])
# dropout的比例
keep_prob = tf.placeholder(tf.float32)

# 对数据进行重新排列,形成图像
x_image = tf.reshape(xs, [-1, 28, 28, 1])#  -1, 28, 28, 1

print(x_image.shape)

# 卷积层一
# patch为5*5,in_size为1,即图像的厚度,如果是彩色,则为3,32是out_size,输出的大小-》32个卷积和(滤波器)
W_conv1 = weight_variable([5, 5, 1, 32])
b_conv1 = bias_variable([32])
# ReLU操作,输出大小为28*28*32
h_conv1 = tf.nn.relu(conv2d(x_image, W_conv1) + b_conv1)
# Pooling操作,输出大小为14*14*32
h_pool1 = max_pool_2x2(h_conv1)

# 卷积层二
# patch为5*5,in_size为32,即图像的厚度,64是out_size,输出的大小
W_conv2 = weight_variable([5, 5, 32, 64])
b_conv2 = bias_variable([64])
# ReLU操作,输出大小为14*14*64
h_conv2 = tf.nn.relu(conv2d(h_pool1, W_conv2) + b_conv2)
# Pooling操作,输出大小为7*7*64
h_pool2 = max_pool_2x2(h_conv2)

# 全连接层一
W_fc1 = weight_variable([7 * 7 * 64, 1024])
b_fc1 = bias_variable([1024])
# 输入数据变换
h_pool2_flat = tf.reshape(h_pool2, [-1, 7 * 7 * 64])  #整形成m*n,列n为7*7*64
# 进行全连接操作
h_fc1 = tf.nn.relu(tf.matmul(h_pool2_flat, W_fc1) + b_fc1)  # tf.matmul
# 防止过拟合,dropout
h_fc1_drop = tf.nn.dropout(h_fc1, keep_prob)


# 全连接层二
W_fc2 = weight_variable([1024, 10])
b_fc2 = bias_variable([10])
# 预测
prediction = tf.nn.softmax(tf.matmul(h_fc1_drop, W_fc2) + b_fc2)

# 计算loss
cross_entropy = tf.reduce_mean(-tf.reduce_sum(ys * tf.log(prediction), reduction_indices=[1]))
# 神经网络训练
train_step = tf.train.AdamOptimizer(0.001).minimize(cross_entropy) #0.0001

# 定义Session
sess = tf.Session()
init = tf.global_variables_initializer()
# 执行初始化
sess.run(init)

# 进行训练迭代
for i in range(1000):
    # 取出mnist数据集中的100个数据
    batch_xs, batch_ys = mnist.train.next_batch(50) #100
    # 执行训练过程并传入真实数据
    sess.run(train_step, feed_dict={xs: batch_xs, ys: batch_ys, keep_prob: 0.5})
    if i % 100 == 0:
        print( compute_accuracy(mnist.test.images, mnist.test.labels) )
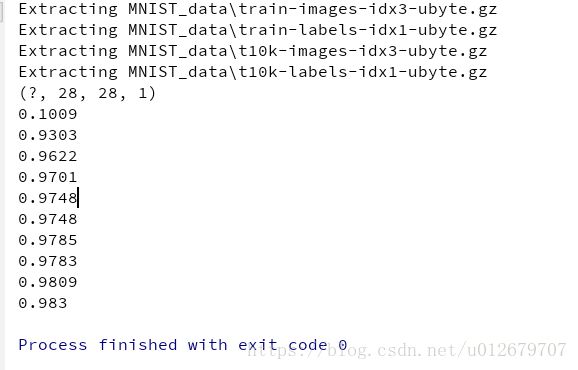
运行结果:


