神经风格迁移——基于VGG算法
本文是基于吴恩达《深度学习》卷积神经网络第四周习题而做。神经风格迁移的效果是将A图片的某些特征迁移到B图中,使B图具有与之相同的风格,具体的讲解可以观看达叔《深度学习》教程。
所需的第三方库如下,其中所用的数据集和辅助程序可点击此处下载。
import os
import sys
import scipy.io
import scipy.misc
import matplotlib.pyplot as plt
from matplotlib.pyplot import imshow
from PIL import Image
from nst_utils import *
import numpy as np
import tensorflow as tf
1.问题描述
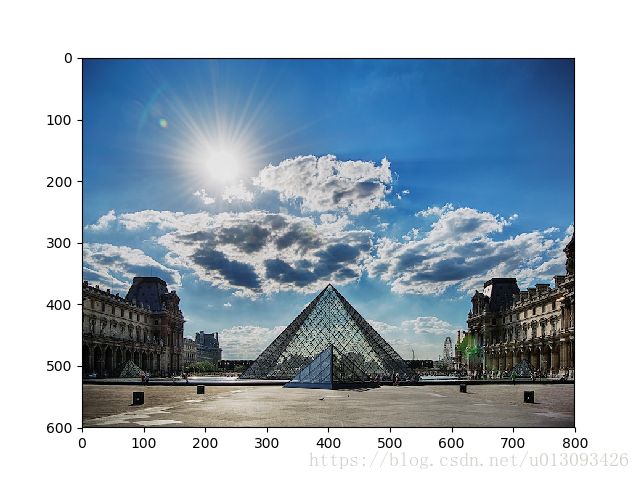
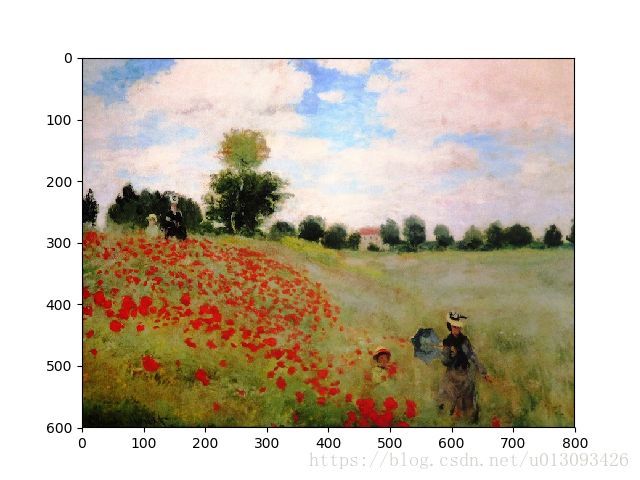
神经风格迁移是一项比较有趣的深度学习技术,如下图所示,我们将两张图片进行融合,第一张图片是罗浮宫博物馆,我们称之为content 图像(用C表示),第二张是莫奈的风景画,我们称之为style图像(用S表示),二者融合后的图像具有莫奈画作的风格,我们称之为generated图像(用G表示)。
下面让我们一起来实现这个算法。
2.迁移学习
在达叔的之前课程中已经详细讲述过迁移学习的作用,即将其他任务中已经训练好的网络应用当前的新任务中。神经风格迁移也是应用这样的思路来实现的。
在本文中,我们将使用VGG-19网络,由名字可知该网络是一个19层的VGG网络。这个模型已经在一个非常大的图像数据集上进行了训练,因此这个网络已经可以识别很多低层级和高层级的图像特性。
运行下列代码可以下载VGG-19模型的参数,直接生成一个model
model = load_vgg_model("pretrained-model/imagenet-vgg-verydeep-19.mat")
print(model)
可以打印出模型各层的参数设置如下
{'input': , 'conv1_1': , 'conv1_2': , 'avgpool1': , 'conv2_1': , 'conv2_2': , 'avgpool2': , 'conv3_1': , 'conv3_2': , 'conv3_3': , 'conv3_4': , 'avgpool3': , 'conv4_1': , 'conv4_2': , 'conv4_3': , 'conv4_4': , 'avgpool4': , 'conv5_1': , 'conv5_2': , 'conv5_3': , 'conv5_4': , 'avgpool5': } 该model是以字典的形式保存的,变量名为字典的Key值,相应的变量值以tensor的形式存储在value值中。如果通过这个网络跑某张图片的话,我们需要将image喂给网络即可,在TensorFlow中使用tf.assign()函数进行传递。
model["input"].assign(image)上行代码中assign()函数将image作为input传给model。
在model输入image的前提下,如果我们想执行某一层(比如4_2)的激活值,需要在正确的conv4_2tensor中运行TensorFlow的session即可。
sess.run(model["conv4_2"])3.神经风格迁移
构建NST算法可分三个步骤:
(1)构建content图像的损失函数:![]()
(2)构建style图像的 损失函数:![]()
(3)将二者合并得到:![]()
3.1计算 J_content (C, G)
本文示例的content图像C为巴黎卢浮宫,运行下列代码可见卢浮宫图像。
content_image = scipy.misc.imread("images/louvre.jpg")
imshow(content_image)
plt.show()
3.1.1如何保证Generated图像G和Content图像C匹配?
在卷积网络中浅层倾向于探测低层级的、简单的特征,深层倾向于探测高层级的、复杂的特征。想要G和C拥有相似的内容,需要选择某层的激活值来表示图像的内容,假定我们选择了一个深浅适中的层。现在设C为VGG-19网络的输入,执行前向传播的到选定层的激活值a_C,这是一个nH×nW×nC的tensor;同理在将G作为输入时可以得到选定层的激活值a_G。由于我们定义
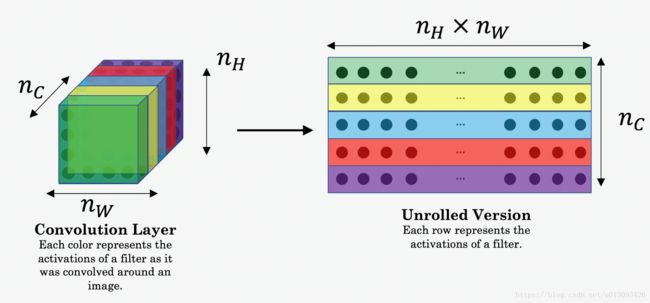
因此,a_C和a_G是比较匹配的。在上式中nH×nW×nC分别是图像的高、宽和通道数。在计算J_content的过程中3维的tensor将转化为2维的向量,如下图所示。
3.1.2计算J_content的步骤
(1)恢复a_G的维度:使用X.get_shape().as_list()函数
(2)展开a_C和a_G,正如上节所述
(3)计算content损失值
def compute_content_cost(a_C, a_G):
    m, n_H, n_W, n_C = a_G.get_shape().as_list()

    a_C_unrolled = tf.reshape(a_C, [n_H*n_W, n_C])
    a_G_unrolled = tf.reshape(a_G, [n_H*n_W, n_C])

    J_content = 1. / (4 * n_H * n_W * n_C) * tf.reduce_sum(tf.square(tf.subtract(a_C_unrolled, a_G_unrolled)))
    return J_content
tf.reset_default_graph()
with tf.Session() as test:
tf.set_random_seed(1)
a_C = tf.random_normal([1, 4, 4, 3], mean = 1, stddev = 4)
a_G = tf.random_normal([1, 4, 4, 3], mean = 1, stddev = 4)
J_content = compute_content_cost(a_C, a_G)
print("J_content = " + str(test.run(J_content)))J_content = 6.76559263.2计算 J_style(S, G)
获取style图像
style_image = scipy.misc.imread("images/monet_800600.jpg")
imshow(style_image)
plt.show()
3.2.1 style矩阵
style矩阵本质上是拉格姆矩阵,![]()
在NST中,style矩阵通过计算展开后的矩阵和其转置矩阵的向量积
def gram_matrix(A):

    GA = tf.matmul(A, tf.transpose(A))

    return GA
tf.reset_default_graph()
with tf.Session() as test:
tf.set_random_seed(1)
A = tf.random_normal([3, 2*1], mean=1, stddev=4)
GA = gram_matrix(A)
print("GA = " + str(GA.eval()))GA = [[ 6.422305 -4.429122 -2.096682]
[-4.429122 19.465837 19.563871]
[-2.096682 19.563871 20.686462]]3.2.2 计算style损失值
计算出style矩阵后,我们的目标是最小化S和G之间的距离,J_style(S, G)的计算公式为:
def compute_layer_style_cost(a_S, a_G):
    m, n_H, n_W, n_C = a_G.get_shape().as_list()

    a_S = tf.transpose(tf.reshape(a_S, [n_H*n_W, n_C]))
    a_G = tf.transpose(tf.reshape(a_G, [n_H*n_W, n_C]))

    GS = gram_matrix(a_S)
    GG = gram_matrix(a_G)

    J_style_layer = 1. / (4 * n_C * n_C * n_H * n_H * n_W * n_W) * \
                    tf.reduce_sum(tf.square(tf.subtract(GS, GG)))

    return J_style_layer
tf.reset_default_graph()
with tf.Session() as test:
tf.set_random_seed(1)
a_S = tf.random_normal([1, 4, 4, 3], mean=1, stddev=4)
a_G = tf.random_normal([1, 4, 4, 3], mean=1, stddev=4)
J_style_layer = compute_layer_style_cost(a_S, a_G)
print("J_style_layer = " + str(J_style_layer.eval()))J_style_layer = 9.1902783.2.3 style 权重
上述我们已经捕捉到了某一层的风格,为了得到更好的效果,我们可以多选择几层并将这些style合并,在合并时需要给选择的各层设置权重,如下:
STYLE_LAYERS = [('conv1_1', 0.2),
                ('conv2_1', 0.2),
                ('conv3_1', 0.2),
                ('conv4_1', 0.2),
                ('conv5_1', 0.2)]
合并各层“风格”的公式如下:
其中:lambda为权重中的系数。
def compute_style_cost(model, STYLE_LAYERS):

    J_style = 0
    for layer_name, coeff in STYLE_LAYERS:

        out = model[layer_name]
        a_S = sess.run(out)
        a_G = out

        J_style_layer = compute_layer_style_cost(a_S, a_G)

        J_style += coeff * J_style_layer

    return J_style
3.3定义总的优化损失函数
定义公式如下:
def total_cost(J_content, J_style, alpha = 10, beta = 40):

    J = alpha * J_content + beta * J_style

    return J
tf.reset_default_graph()
with tf.Session() as test:
np.random.seed(3)
J_content = np.random.randn()
J_style = np.random.randn()
J = total_cost(J_content, J_style)
print("J = " + str(J))J = 35.346678754782764. 解决优化问题
现在,我们可以将上述步骤整合起来构成一个完成的程序,实现起来会经过如下步骤:
1.创建interactive session
tf.reset_default_graph()
sess = tf.InteractiveSession()
2.下载content图像
content_image = scipy.misc.imread("images/louvre_small.jpg")
content_image = reshape_and_normalize_image(content_image)
下载style图像
style_image = scipy.misc.imread("images/monet.jpg")
style_image = reshape_and_normalize_image(style_image)
随机初始化Generated图像
generated_image = generate_noise_image(content_image)
imshow(generated_image[0])
下载VGG16模型
model = load_vgg_model("pretrained-model/imagenet-vgg-verydeep-19.mat")创建tensorflow流图:
- 通过VGG16模型计算content图像的cost值;
- 通过VGG16模型计算style图像的cost值;
- 计算总的cost;
- 设定优化器和学习率
sess.run(model['input'].assign(content_image))
out = model['conv4_2']
a_C = sess.run(out)
a_G = out
J_content = compute_content_cost(a_C, a_G)

sess.run(model['input'].assign(style_image))
J_style = compute_style_cost(model, STYLE_LAYERS)

J = total_cost(J_content, J_style, 10, 40)

optimizer = tf.train.AdamOptimizer(2.0)
train_step = optimizer.minimize(J)
初始化TensorFlow流图,经过大量迭代并在期间更新generated图像
def model_nn(sess, input_image, num_iterations = 200):

    sess.run(tf.global_variables_initializer())
    sess.run(model['input'].assign(input_image))

    for i in range(num_iterations):
        sess.run(train_step)
        generated_image = sess.run(model['input'])

        if i % 20 == 0:
            Jt, Jc, Js = sess.run([J, J_content, J_style])
            print("Iteration " + str(i) + " :")
            print("total cost = " + str(Jt))
            print("content cost = " + str(Jc))
            print("style cost = " + str(Js))
            save_image("output/" + str(i) + ".png", generated_image)
    save_image('output/generated_image.jpg', generated_image)

    return generated_image
model_nn(sess, generated_image)Iteration 0 :
total cost = 5062679000.0
content cost = 7885.699
style cost = 126565010.0
Iteration 20 :
total cost = 943903800.0
content cost = 15405.018
style cost = 23593744.0
Iteration 40 :
total cost = 489435650.0
content cost = 16829.322
style cost = 12231684.0
Iteration 60 :
total cost = 317281100.0
content cost = 17442.703
style cost = 7927666.5
Iteration 80 :
total cost = 232884240.0
content cost = 17812.037
style cost = 5817653.0
Iteration 100 :
total cost = 184140290.0
content cost = 18073.498
style cost = 4598989.0运行结束后,我们最终会得到这样的结果
参考文献:
- Leon A. Gatys, Alexander S. Ecker, Matthias Bethge, (2015). A Neural Algorithm of Artistic Style (https://arxiv.org/abs/1508.06576)
- Harish Narayanan, Convolutional neural networks for artistic style transfer. https://harishnarayanan.org/writing/artistic-style-transfer/
- Log0, TensorFlow Implementation of “A Neural Algorithm of Artistic Style”. http://www.chioka.in/tensorflow-implementation-neural-algorithm-of-artistic-style
- Karen Simonyan and Andrew Zisserman (2015). Very deep convolutional networks for large-scale image recognition (https://arxiv.org/pdf/1409.1556.pdf)
- MatConvNet. http://www.vlfeat.org/matconvnet/pretrained/


