正文之前
前两天写了SSM 重构注册登陆界面,然后添加了一点功能:保持登录状态,修改当前登录用户信息,查看登录状态
正文
Version 0.2.1
新增的功能都是在原有的基础上添加代码,基本没有删去版本 0.1 的代码
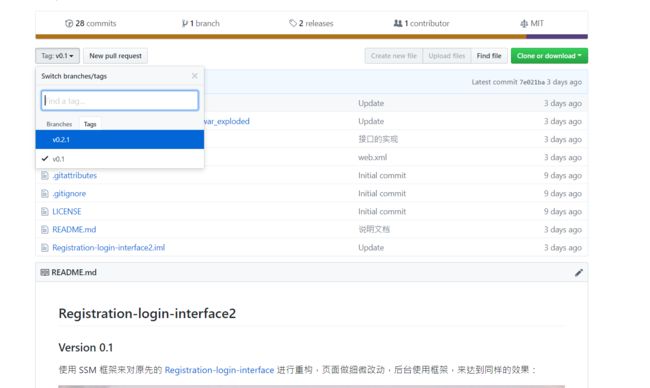
可通过点击 tag 来查看 v0.1:
1. 新增功能截图
登录成功后主页面:
修改用户信息(用户名无法修改):
电话号码和邮箱不能为空:
修改成功:
检测登录状态:
若未登录就检测登录状态:
2. 实体类
用户的信息添加了电话号码和描述,所以要在实体类和数据库中都做一点改动:
    private String gender;
    private String description;
    public void setGender(String gender) {
        this.gender = gender;
    }
    public String getGender() {
        return gender;
    }

    public void setDescription(String description) {
        this.description = description;
    }
    public String getDescription() {
        return description;
    }
MySQL 中对表做一点改动:
alter table user add gender varchar(10), add description varchar(200);
3. Mybatis
为了添加新功能,需要在 MyBatis 映射器中添加两步:
- 查找用户信息:
- 修改用户信息:
        UPDATE user SET phone = #{phone}, email = #{email},
        gender = #{gender}, description = #{description}
然后在接口中添加对应方法:
    User showInfo(String username);
    void setUserInfo(User user);
3. Service
先写异常的接口 ExceptionService 吧:
    void setInfoException(User user) throws UserException;

    void statusException(String username) throws UserException;
然后写实现类:
    //重置信息检测,关键信息不能为空
    @Override
    public void setInfoException(User user) throws UserException {
        if (user.getPhone() == null || user.getPhone().trim().isEmpty()){
            throw new UserException("电话号码不能为空");
        } else if (user.getEmail() == null || user.getEmail().trim().isEmpty()){
            throw new UserException("邮箱不能为空");
        }
    }

    //用户状态检测,如果在 Session 中未找到有用户登陆,就抛出异常
    @Override
    public void statusException(String username) throws UserException {
        if (username == null){
            throw new UserException("请先登录");
        }
    }
在 UserService 中新增三个功能,其中有两个有异常检测:
    User showInfo(String username);
    String getStatus(String username) throws UserException;
    void setUserInfo(User user) throws UserException;
然后是实现类:
    //显示用户信息
    @Override
    public User showInfo(String username) {
        return userMapper.showInfo(username);
    }

    //显示当前登录状态
    @Override
    public String getStatus(String username) throws UserException {
        exceptionService.statusException(username);
        return username;
    }

    //修改用户信息
    @Override
    public void setUserInfo(User user) throws UserException{
        exceptionService.setInfoException(user);
        userMapper.setUserInfo(user);
    }
4. Controller
在登录时,需要添加一点代码,将用户名写入 Session,以保持登录状态:
    public ModelAndView login(User user, HttpServletRequest request) {
        ModelAndView modelAndView = new ModelAndView("main");
        try {
            userService.login(user);
            userService.verifyCode(request.getParameter("verifyCode"), verifyCode.getText());
            //创建 Session,保持登录状态
            request.getSession().setAttribute("username", user.getUsername());
            //在模型中添加对象,用于 JSP 读取
            modelAndView.addObject("username", request.getSession().getAttribute("username"));
        } catch (UserException e){
            //如果未登录成功,就重新登录
            modelAndView.setViewName("login");
            modelAndView.addObject("message", e.getMessage());
        }
        return modelAndView;
然后是登出的操作:
    //登出账户,不需要具体用户名称,直接废除 session 就行
    @RequestMapping("/logout")
    public ModelAndView logout(HttpServletRequest request){
        request.getSession().invalidate();
        return new ModelAndView("login").addObject("message", "已登出");
    }
新增查看用户状态的功能:
    //查看用户状态,显示是哪个用户在登录,如果没有登录的用户,就会提示你先登录
    @RequestMapping("/userStatus")
    public ModelAndView userState(HttpServletRequest request){
        ModelAndView modelAndView = new ModelAndView("userStatus");
        try {
            modelAndView.addObject("username",
                    userService.getStatus((String)request.getSession().getAttribute("username")));
        } catch (UserException e){
            modelAndView.addObject("message", e.getMessage());
        }
        return modelAndView;
    }
然后是用户信息相关的操作,如果在修改信息时抛出异常,就带着错误信息回到信息修改页面:
    //显示用户信息
    @RequestMapping("showInfo")
    public ModelAndView showInfo(HttpServletRequest request){
        return new ModelAndView("userInfo")
                .addObject("user", userService.showInfo(
                        ((String)request.getSession().getAttribute("username"))));
    }

    //对用户信息进行修改
    @RequestMapping("setUserInfo")
    public ModelAndView setUserInfo(User user){
        ModelAndView modelAndView = new ModelAndView("userInfo");
        try {
            userService.setUserInfo(user);
            //设置提示信息
            modelAndView.addObject("message", "修改成功");
            //跳转
            modelAndView.setViewName("main");
        } catch (UserException e){
            modelAndView.addObject("message", e.getMessage());
        }
        return modelAndView;
    }
5. JSP
新增两个前端页面:userInfo.jsp 和 userStatus.jsp,都是差不多的页面,这里就不演示了
接下来的 v0.2.2 是采用过滤器来实现相同功能

