Java 集合框架(6)---- Map 相关类解析(下)
本文标题大纲:
文章目录
- 前言
- LinkedHashMap
- 操作元素
- 遍历元素
- 缓存控制
- WeakHashMap
- Hashtable
- IdentityHashMap
前言
在上上篇文章中,我们看了一下 Java 集合框架中一些 Map 接口下的具体类,主要是对 HashMap 和 TreeMap 实现原理和相关元素操作流程的源码解析。接下来这篇文章中我们继续来解析 Java 集合框架中 Map 接口下的另一些具体类。Ok,话不多说,进入正题,还是先看图:

在这里列举的 Map 接口我们还剩下三个类没看,但是除了这张图里列举的 Map 具体类,还有一个比较常用的 Map 接口下的具体类:LinkedHashMap。我们就先从这个类开始:
LinkedHashMap
回想我们使用 HashMap 时,元素的遍历顺序和插入顺序是不一定相同的,通过前篇的源码解读我们也知道了原因:HashMap 内部使用键值对数组来储存元素,对于每一个键值对,其在数组中的下标完全取决于其键的哈希值(hashCode),而我们在通过迭代器遍历 HashMap 的时候实际上相当于顺序遍历其内部的元素储存数组。那么如果我们需要使得元素的遍历顺序和插入顺序相同时 HashMap 就不能很好的实现这个功能了。这个时候就可以通过 LinkedHashMap 来完成这个功能。下面我们一起来看看这个类:
public class LinkedHashMap<K,V> extends HashMap<K,V> implements Map<K,V> {
    /**
     * LinkedHashMap 中表示键值对元素节点的类,继承于 HashMap.Node
     */
    static class Entry<K,V> extends HashMap.Node<K,V> {
        Entry<K,V> before, after; // 当前键值对元素节点的前继和后继节点
        Entry(int hash, K key, V value, Node<K,V> next) {
            super(hash, key, value, next);
        }
    }

    // 和序列化和反序列化有关,暂时不管
    private static final long serialVersionUID = 3801124242820219131L;

    /**
     *  LinkedHashMap 中双向链表的头结点(首元结点)
     */
    transient LinkedHashMap.Entry<K,V> head;

    /**
     * LinkedHashMap 中双向链表的尾节点
     */
    transient LinkedHashMap.Entry<K,V> tail;

    /**
     * 链表元素的排序依据:按访问顺序排序(true),按插入顺序排序(false)
     */
    final boolean accessOrder;
	// ...
}
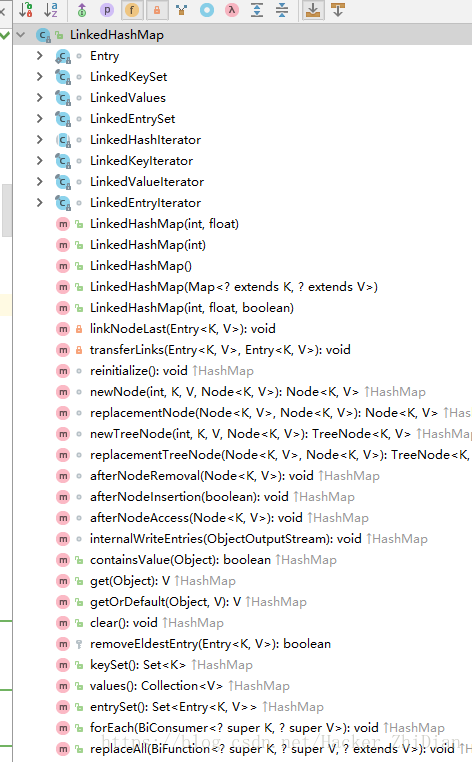
从这里我们大概可以知道了,LinkedHashMap 内部通过双向链表来维持元素的顺序,同时其继承于 HashMap ,因此可以猜测 LinkedHashMap 的一些操作时复用父类的。而查看 LinkedHashMap 的结构,发现很多对元素的操作方法都没有直接提供:
可以看到,类似于 put 和 remove 方法都没有在 LinkedHashMap 中提供,但是我们在使用 LinkedHashMap 的时候都是直接使用这些方法来操作元素,那么很显然其是复用了父类(HashMap) 的相关方法。如此一来,新的问题又产生了:HashMap 本身在操作元素(插入、删除)时候是并没有考虑元素的插入顺序的,其是通过要插入的键值对元素的键的 hashCode (哈希值)来决定元素的插入位置,那么 LinkedHashMap 是怎么实现元素访问顺序和插入顺序相同的功能呢?
操作元素
对于上面的问题,我们还是看看 HashMap 的源码:
// Callbacks to allow LinkedHashMap post-actions
void afterNodeAccess(Node<K,V> p) { }
void afterNodeInsertion(boolean evict) { }
void afterNodeRemoval(Node<K,V> p) { }
可以发现,HashMap 中提供了 3 个方法供 LinkedHashMap 重写,在 HashMap 的 putVal(HashMap 的 put 方法中会调用)方法中还会调用 newNode 和 newTreeNode 方法,我们来看看:
final V putVal(int hash, K key, V value, boolean onlyIfAbsent,
               boolean evict) {
    Node<K,V>[] tab; Node<K,V> p; int n, i;
    if ((tab = table) == null || (n = tab.length) == 0)
        n = (tab = resize()).length;
    if ((p = tab[i = (n - 1) & hash]) == null)
        // !!这里
        tab[i] = newNode(hash, key, value, null);
    else {
        Node<K,V> e; K k;
        if (p.hash == hash &&
            ((k = p.key) == key || (key != null && key.equals(k))))
            e = p;
        else if (p instanceof TreeNode)
            // 如果是树节点,那么创建 TreeNode
            e = ((TreeNode<K,V>)p).putTreeVal(this, tab, hash, key, value);
        else {
            for (int binCount = 0; ; ++binCount) {
                if ((e = p.next) == null) {
                    // !!这里
                    p.next = newNode(hash, key, value, null);
                    if (binCount >= TREEIFY_THRESHOLD - 1) // -1 for 1st
                        treeifyBin(tab, hash);
                    break;
                }
                if (e.hash == hash &&
                    ((k = e.key) == key || (key != null && key.equals(k))))
                    break;
                p = e;
            }
        }
        if (e != null) { // existing mapping for key
            V oldValue = e.value;
            if (!onlyIfAbsent || oldValue == null)
                e.value = value;
            afterNodeAccess(e);
            return oldValue;
        }
    }
    // ...
在上述源码中:
// 如果是树节点,那么创建 TreeNode
e = ((TreeNode<K,V>)p).putTreeVal(this, tab, hash, key, value);
putTreeVal 方法中会调用 newTreeNode 方法,显然,这两个方法(newNode、newTreeNode)都是用来新建键值对元素的,关于上述流程如果小伙伴们还不清楚,可以参考我的上上篇文章:Java 集合框架(5)---- Map 相关类解析(中) 中对 HashMap 的介绍。而对于这 5 个方法,LinkedHashMap 中也对他们进行了重写:
顺便提一下,这 5 个方法在 HashMap 中都是默认修饰符的,我们知道,默认修饰符的属性只能被同一个类文件或者同一个包中的其他类访问,子类是没办法访问的(没有可见性),这里 LinkedHashMap 是 HashMap 的子类,从这个角度上来说,其是没有对这 5 个方法的访问权的(可以理解为它根本看不到父类的这 5 个方法),但是它还有另外一重身份:和 HashMap 同包(HashMap 和 LinkedHashMap 都是在 java.utl 包中),因此从这方面来说,其可以对这 5 个方法进行重写。那么我们看一下这 5 个在 LinkedHashMap 中的源码,先是 newNode:
Node<K,V> newNode(int hash, K key, V value, Node<K,V> e) {
    LinkedHashMap.Entry<K,V> p =
        new LinkedHashMap.Entry<K,V>(hash, key, value, e);
    linkNodeLast(p);
    return p;
}
这个方法新建的是 LinkedHashMap 提供的表示双向链表节点的类对象,之后调用了 linkNodeLast 方法来连接这个新建的链表元素,不用看我们也知道这个方法将新建的节点连接到链表尾部:
// link at the end of list
private void linkNodeLast(LinkedHashMap.Entry<K,V> p) {
    LinkedHashMap.Entry<K,V> last = tail;
    tail = p;
    // 如果当前链表的尾节点为 null,证明当前链表还没有元素,
    // 因此将 head 赋值为 p,这里换成 head == null 判断也可以,写法不同而已。
    if (last == null)
        head = p;
    else {
        p.before = last;
        last.after = p;
    }
}
这样一来在调用 LinkedHashMap 的 puut 方法(实际上调用的是 HashMap 的 put 方法)时 LinkedHashMap 就可以初步保证元素的顺序和插入顺序是相同的(put -> putVal -> newNode -> linkNodeLast),为什么是初步保证?因为能改变链表的还有删除元素的操作呀。那么我们来看看 HashMap 的 remove 方法:
public V remove(Object key) {
    Node<K,V> e;
    return (e = removeNode(hash(key), key, null, false, true)) == null ?
        null : e.value;
}
可以看到,直接调用了 removeNode 方法:
final Node<K,V> removeNode(int hash, Object key, Object value,
                           boolean matchValue, boolean movable) {
    Node<K,V>[] tab; Node<K,V> p; int n, index;
    if ((tab = table) != null && (n = tab.length) > 0 &&
        (p = tab[index = (n - 1) & hash]) != null) {
        Node<K,V> node = null, e; K k; V v;
        if (p.hash == hash &&
            ((k = p.key) == key || (key != null && key.equals(k))))
            node = p;
        else if ((e = p.next) != null) {
            if (p instanceof TreeNode)
                node = ((TreeNode<K,V>)p).getTreeNode(hash, key);
            else {
                do {
                    if (e.hash == hash &&
                        ((k = e.key) == key ||
                         (key != null && key.equals(k)))) {
                        node = e;
                        break;
                    }
                    p = e;
                } while ((e = e.next) != null);
            }
        }
        if (node != null && (!matchValue || (v = node.value) == value ||
                             (value != null && value.equals(v)))) {
            if (node instanceof TreeNode)
                ((TreeNode<K,V>)node).removeTreeNode(this, tab, movable);
            else if (node == p)
                tab[index] = node.next;
            else
                p.next = node.next;
            ++modCount;
            --size;
            // !! 这里
            afterNodeRemoval(node);
            return node;
        }
    }
    return null;
}
在移除元素之后,HashMap 调用了 afterNodeRemoval 方法,这不就是在 LinkedHashMap 中重写方法吗:
// LinkedHashMap 类的方法:
void afterNodeRemoval(Node<K,V> e) { // unlink
        LinkedHashMap.Entry<K,V> p =
            (LinkedHashMap.Entry<K,V>)e, b = p.before, a = p.after;
        p.before = p.after = null;
        if (b == null)
            head = a;
        else
            b.after = a;
        if (a == null)
            tail = b;
        else
            a.before = b;
    }
不用看我们也能猜到:既然移除了一个元素,自然要把这个元素从链表中移除,这样才能维护链表顺序的正确性。
好了,通过这里的几个方法,LinkedHashMap 就可以保证链表中元素的顺序是按照插入元素的顺序来排序的。到这里可能又有小伙伴会问了:那么还有两个方法(afterNodeInsertion、afterNodeAccess)呢?还记得在开头给大家介绍 LinkedHashMap 的源码构成中有一个 accessOrder 属性吗?这两个方法就是和这个属性有关,这里允许我小小的买个官子,我们先来看 LinkedHashMap 是怎么遍历元素的,之后在来看这两个方法:
遍历元素
和其他 Map 一样,LinkedHashMap 也是通过迭代器(Iterator)来遍历元素的,当然,在以迭代器作为基础的情况下,其为我们提供了两种方式来遍历元素:
// 得到键的集合,之后通过 get 方法取到对应值
public Set<K> keySet() {
    Set<K> ks;
    return (ks = keySet) == null ? (keySet = new LinkedKeySet()) : ks;
}

// 得到键值对的集合,之后通过 getKey() 和 getValue() 方法得到键值
public Set<Map.Entry<K,V>> entrySet() {
    Set<Map.Entry<K,V>> es;
    return (es = entrySet) == null ? (entrySet = new LinkedEntrySet()) : es;
}
可以看到:两个方法分别返回了一个 LinkedKeySet 对象和 LinkedEntrySet 对象,我们来看看这两个类:
LinkedKeySet:
final class LinkedKeySet extends AbstractSet<K> {
    public final int size()                 { return size; }
    public final void clear()               { LinkedHashMap.this.clear(); }
    // 返回了一个 LinkedKeyIterator 迭代器对象
    public final Iterator<K> iterator() {
        return new LinkedKeyIterator();
    }
    public final boolean contains(Object o) { return containsKey(o); }
    public final boolean remove(Object key) {
        return removeNode(hash(key), key, null, false, true) != null;
    }
    public final Spliterator<K> spliterator()  {
        return Spliterators.spliterator(this, Spliterator.SIZED |
                                        Spliterator.ORDERED |
                                        Spliterator.DISTINCT);
    }
    public final void forEach(Consumer<? super K> action) {
        if (action == null)
            throw new NullPointerException();
        int mc = modCount;
        for (LinkedHashMap.Entry<K,V> e = head; e != null; e = e.after)
            action.accept(e.key);
        if (modCount != mc)
            throw new ConcurrentModificationException();
    }
}
LinkedEntrySet:
final class LinkedEntrySet extends AbstractSet<Map.Entry<K,V>> {
    public final int size()                 { return size; }
    public final void clear()               { LinkedHashMap.this.clear(); }
    // 返回了一个 LinkedEntryIterator 对象
    public final Iterator<Map.Entry<K,V>> iterator() {
        return new LinkedEntryIterator();
    }
    public final boolean contains(Object o) {
        if (!(o instanceof Map.Entry))
            return false;
        Map.Entry<?,?> e = (Map.Entry<?,?>) o;
        Object key = e.getKey();
        Node<K,V> candidate = getNode(hash(key), key);
        return candidate != null && candidate.equals(e);
    }
    public final boolean remove(Object o) {
        if (o instanceof Map.Entry) {
            Map.Entry<?,?> e = (Map.Entry<?,?>) o;
            Object key = e.getKey();
            Object value = e.getValue();
            return removeNode(hash(key), key, value, true, true) != null;
        }
        return false;
    }
    public final Spliterator<Map.Entry<K,V>> spliterator() {
        return Spliterators.spliterator(this, Spliterator.SIZED |
                                        Spliterator.ORDERED |
                                        Spliterator.DISTINCT);
    }
    public final void forEach(Consumer<? super Map.Entry<K,V>> action) {
        if (action == null)
            throw new NullPointerException();
        int mc = modCount;
        for (LinkedHashMap.Entry<K,V> e = head; e != null; e = e.after)
            action.accept(e);
        if (modCount != mc)
            throw new ConcurrentModificationException();
    }
}
可以看到,两个类返回了两个迭代器对象,我们来看看这两个类:
final class LinkedKeyIterator extends LinkedHashIterator implements Iterator<K> {
	public final K next() { return nextNode().getKey(); }
}

final class LinkedEntryIterator extends LinkedHashIterator implements Iterator<Map.Entry<K,V>> {
	public final Map.Entry<K,V> next() { return nextNode(); }
}
都继承于 LinkedHashIterator 类,并且都调用了 nextNode 方法,那么来看看吧(LinkedHashIterator 中定义的方法):
final LinkedHashMap.Entry<K,V> nextNode() {
    LinkedHashMap.Entry<K,V> e = next;
    if (modCount != expectedModCount)
        throw new ConcurrentModificationException();
    if (e == null)
        throw new NoSuchElementException();
    current = e;
    next = e.after;
    return e;
}
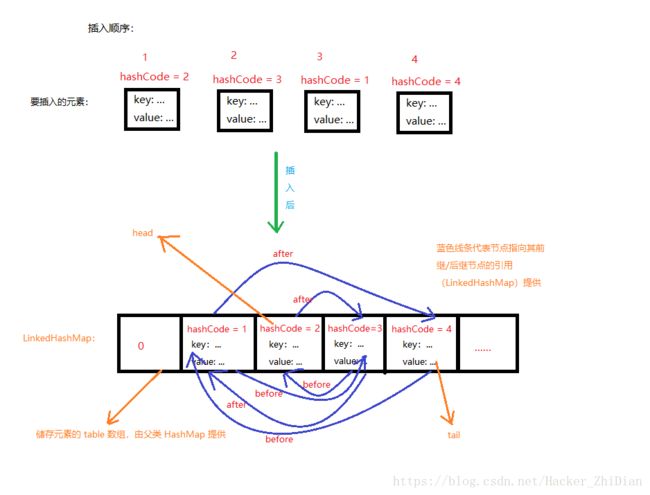
这个方法就很容易理解,就是根据已经有的双向链表的来顺序遍历元素。至此 LinkedHashMap 储存元素的方式保持元素的遍历顺序和插入顺序相同的元素原理分析完毕。最后配张图来加深理解一下:
缓存控制
最后,来看一下上面说的 accessOrder 属性,LinkedHashMap 的构造支持我们对这个属性进行赋值:
public LinkedHashMap(int initialCapacity,
                     float loadFactor,
                     boolean accessOrder) {
    super(initialCapacity, loadFactor);
    this.accessOrder = accessOrder;
}
那么这个值到底有什么作用呢?我们通过实验来看一下:
public class Main {

    public static void main(String[] args) {
        int capacity = 4;
        LinkedHashMap<String, Integer> linkedHashMap =
            new LinkedHashMap<>(capacity, 0.75f, true);
        for (int i = 0; i < capacity; i++) {
            linkedHashMap.put(i + "", i);
        }
        System.out.println("第一次遍历:");
        Set<Map.Entry<String, Integer>> set = linkedHashMap.entrySet();
        for (Map.Entry e : set) {
            System.out.println(e.getKey() + ", " + e.getValue());
        }

        // 这里读取了一次元素值
        linkedHashMap.get("0");
        linkedHashMap.get("1");

        System.out.println("第二次遍历:");
        for (Map.Entry e : set) {
            System.out.println(e.getKey() + ", " + e.getValue());
        }
    }
}
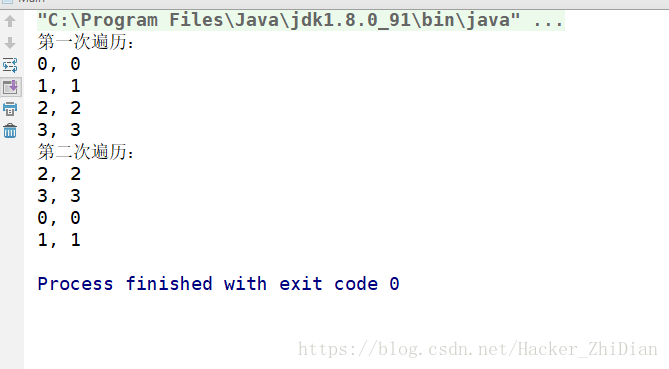
结果:
可以看到,第二次遍历时,元素顺序不是我们插入的顺序了,“0” 和 “1” 对应的元素被放到后面去了,由此我们也知道了,accessOrder 为 true 时会将已经访问的元素放到链表末尾。在 LinkedHashMap 对应的实现方法如下(从 HashMap 中继承而来):
// 该方法只是改变了双向链表中节点的顺序,将节点移至链表尾部
void afterNodeAccess(Node<K,V> e) { // move node to last
    LinkedHashMap.Entry<K,V> last;
    if (accessOrder && (last = tail) != e) {
        LinkedHashMap.Entry<K,V> p =
            (LinkedHashMap.Entry<K,V>)e, b = p.before, a = p.after;
        p.after = null;
        if (b == null)
            head = a;
        else
            b.after = a;
        if (a != null)
            a.before = b;
        else
            last = b;
        if (last == null)
            head = p;
        else {
            p.before = last;
            last.after = p;
        }
        tail = p;
        ++modCount;
    }
}
最后,上面的 LinkedHashMap 中重写的 HashMap 的 5 个方法中剩下最后一个 afterNodeInsertion 方法了,我们来看看:
void afterNodeInsertion(boolean evict) { // possibly remove eldest
    LinkedHashMap.Entry<K,V> first;
    // 移除链表最老的节点(因为采用尾插法建立双向链表,因此头结点是最老的节点)
    if (evict && (first = head) != null && removeEldestEntry(first)) {
        K key = first.key;
        removeNode(hash(key), key, null, false, true);
    }
}
这个方法在插入元素之后(putVal 之中会调用,即在元素插入完成之后会调用),并且传递的参数 evict 值为 true,这里面将 removeEldestEntry 方法的返回值作为一个条件判断,看看这个方法返回什么:
/**
 * Returns true if this map should remove its eldest entry.
 * This method is invoked by put and putAll after
 * inserting a new entry into the map.  It provides the implementor
 * with the opportunity to remove the eldest entry each time a new one
 * is added.  This is useful if the map represents a cache: it allows
 * the map to reduce memory consumption by deleting stale entries.
 *
 * Sample use: this override will allow the map to grow up to 100
 * entries and then delete the eldest entry each time a new entry is
 * added, maintaining a steady state of 100 entries.
 *
 *     private static final int MAX_ENTRIES = 100;
 *
 *     protected boolean removeEldestEntry(Map.Entry eldest) {
 *        return size() > MAX_ENTRIES;
 *     }
 *
 *
 * This method typically does not modify the map in any way,
 * instead allowing the map to modify itself as directed by its
 * return value.  It is permitted for this method to modify
 * the map directly, but if it does so, it must return
 * false (indicating that the map should not attempt any
 * further modification).  The effects of returning true
 * after modifying the map from within this method are unspecified.
 *
 * This implementation merely returns false (so that this
 * map acts like a normal map - the eldest element is never removed).
 */
protected boolean removeEldestEntry(Map.Entry<K,V> eldest) {
    return false;
}
这个方法直接返回了 false,并且它是 protected 修饰的,因此可以被子类重写,假设我们自定义一个子类并且将这个方法重写返回 true 的话,在上面的代码中就会调用(当链表头结点不为 null 时) removeNode 将新添加的节点移除,这样的话 LinkedHashMap 就是一个没有任何元素的空链表,来看看实践代码:
public class Main {

    static class MyLinkedHashMap<K, V> extends LinkedHashMap<K, V> {

        MyLinkedHashMap(int capacity) {
            super(capacity);
        }

        @Override
        protected boolean removeEldestEntry(Map.Entry eldest) {
            return true;
        }
    }

    public static void main(String[] args) {
        int capacity = 4;
        LinkedHashMap<String, Integer> linkedHashMap =
                new MyLinkedHashMap<>(capacity);
        for (int i = 0; i < capacity; i++) {
            linkedHashMap.put(i + "", i);
        }
        Set<Map.Entry<String, Integer>> set = linkedHashMap.entrySet();
        for (Map.Entry e : set) {
            System.out.println(e.getKey() + ", " + e.getValue());
        }
    }
}
结果:
确实证实了我们的想法,至于这个有什么作用,根据 removeEldestEntry 的介绍来看,主要是用于当 LinkedHashMap 作为缓存映射时,可以节省内存而设计的。其实我们熟悉的 LRU 缓存算法就可以通过 LinkedHashMap 中提供的 accessOrder 和 removeEldestEntry 方法来实现,关于 LRU 算法的相关介绍小伙伴们可以参考 这篇文章,我们知道 LRU 算法的缓存的思想是每次有新元素加入时,淘汰最近最少被使用的元素。其核心思想是 如果数据最近被访问过,那么将来被访问的几率也更高。也就是说每当元素被访问时,LRU 就将该元素移至缓存队列顶部,而每次如果需要淘汰元素时,LRU 将缓存队列底部的元素淘汰。而在 LinkedHashMap 中,我们可以通过 accessOrder 属性来控制将每次访问的元素移至链表尾部,通过 removeEldestEntry 方法来控制是否移除链表头部节点,只是将链表尾部看成了 LRU 中缓存队列的顶部,将链表头部看成了 LRU 中缓存队列的底部。关于通过 LinkedHashMap 实现 LRU 的具体代码可以参考:缓存算法的实现 。 LinkedHashMap 的相关介绍就到这里了,下面来看看 WeakHashMap 的实现机制:
WeakHashMap
我们知道, WeakHashMap 是基于弱引用实现的,在开始看 WeakHashMap 之前,希望小伙伴们对 Java 中的弱引用和引用队列有一定的了解,如果对弱引用及引用队列相关的知识点还不太熟悉,可以参考 详解 Java 的四种引用。为了方便理解接下来的内容,这里简单的介绍一下弱引用的作用:在 Java 中,弱引用是强度次于软引用的一种引用形式,JVM 垃圾回收器(Garbage Collector)在每一次执行垃圾回收动作时会将所有 有且仅有被引用强度不高于弱引用(即弱引用和虚引用) 指向的对象回收。那么我们很容易知道:一个仅被弱引用指向的对象时是不会导致 OutOfMenoryError 异常的。在 JDK 1.2 之后,提供了 WeakReference 类来实现弱引用,相关源码如下:
public class WeakReference<T> extends Reference<T> {
    public WeakReference(T referent) {
        super(referent);
    }

    /**
     * Creates a new weak reference that refers to the given object and is
     * registered with the given queue.
     *
     * @param referent object the new weak reference will refer to
     * @param q the queue with which the reference is to be registered,
     *          or null if registration is not required
     */
    public WeakReference(T referent, ReferenceQueue<? super T> q) {
        super(referent, q);
    }

}
可以看到: WeakReference 类提供了两个构造方法,其中第二个构造方法提供了一个 ReferenceQueue 类型的参数,顾名思义,这个参数代表的是引用队列,即指定当前弱引用对象的引用队列,这个队列有什么用呢?简单来说就是当 JVM 回收某个弱引用指向的对象时,先会将该弱引用加入其构造时指定的引用队列(如果有的话)中去(这个过程由 JVM 的垃圾回收线程完成,无需开发者控制),这样的话我们就可以通过这个引用队列取到对应的引用对象,就可以知道哪个对象被回收了,进而做出对应的处理。知道了这个概念之后,我们来看看 WeakHashMap 是如何利用弱引用来管理元素的:
先来看看在 WeakHashMap 中如何表示一个键值对元素:
/**
 * The entries in this hash table extend WeakReference, using its main ref
 * field as the key.
 */
private static class Entry<K,V> extends WeakReference<Object> implements Map.Entry<K,V> {
    V value;
    final int hash;
    // 指向和当前 Entry 具有相同 hash 值的下一个 Entry 对象,
    // WeakHashMap 采用链地址法处理 hash 值冲突的情况
    Entry<K,V> next;

    Entry(Object key, V value,
          ReferenceQueue<Object> queue,
          int hash, Entry<K,V> next) {
        // 注意这里的 super 调用,为 key 对象建立一个弱引用对象指向 key,
        // 这样当 key 对象被回收之后,JVM 会将此处指向 key 对象的弱引用加入 queue 引用队列中
        super(key, queue);
        this.value = value;
        this.hash  = hash;
        this.next  = next;
    }
    // ...
}
WeakHashMap 内部提供了一个继承于 WeakReference 的类 Entry 来表示一个键值对元素。而其构造方法中也提供了一个 ReferenceQueue 类型的参数,即为指定当前 Entry 中 key 的引用队列。而这个方法仅在 WeakHashMap 的 put 方法中调用:
public V put(K key, V value) {
    Object k = maskNull(key);
    int h = hash(k);
    Entry<K,V>[] tab = getTable();
    int i = indexFor(h, tab.length);

    for (Entry<K,V> e = tab[i]; e != null; e = e.next) {
        // 如果当前的 key 已经存在 table 中,那么直接更新对应的 value
        if (h == e.hash && eq(k, e.get())) {
            V oldValue = e.value;1
            if (value != oldValue)
                e.value = value;
            return oldValue;
        }
    }

    modCount++;
    Entry<K,V> e = tab[i];
    // 新建一个 Entry 对象表示键值对元素,同时处理可能存在的 hash 值冲突情况(头插法建立冲突链表)
    tab[i] = new Entry<>(k, value, queue, h, e);
    // 判断是否需要扩容(当前容量是否达到扩容阀值)
    if (++size >= threshold)
        // 翻倍扩容
        resize(tab.length * 2);
    return null;
}
关于 WeakHashMap 如何插入元素这里不再细讲,之前的文章中已经非常详细的讲解了相关的 Map 具体类如何进行元素插入。这里创建 Entry 对象时传入的引用队列对象是一个 WeakHashMap 的类成员变量:
/**
 * Reference queue for cleared WeakEntries
 */
private final ReferenceQueue<Object> queue = new ReferenceQueue<>();
也就是说:WeakHashMap 中所有的 Entry 对象中指向 key 对象的弱引用共用一个引用队列,既然这样我们可以知道:WeakHashMap 中任何一个 Entry 对象中的 key 对象将要被回收时,这里创建的弱引用对象都会被加入 queue 引用队列中。我们之后就可以从 queue 引用队列中获取到对应的弱引用。那么这有什么作用呢?来看一幅图:
图中给了一个思考题:当某个 Entry 对象的 key 被回收了,该怎么处理?如果一个 Entry 对象的 key 被回收了,证明该 Entry 对象已经不再可用,我们此时显然需要将这个 Entry 对象从 Entry 数组(table) 中清除。这样才能保证整个 WeakHashMap 的正确性。那么我们怎样知道某个 Entry 的 key 要被回收了呢?这时候就体现出上面说的引用队列 queue 的用处了,我们可以通过它来获取指向当前将要被回收的 Entry 对象的 key 对象的弱引用。那么在 WeakHashMap 中是怎么处理的呢?我们来看对应的源码:
/**
 * Expunges stale entries from the table.
 * 从 table 中清除过期的 Entry 对象
 */
private void expungeStaleEntries() {
    /*
      通过 ReferenceQueue 的 poll 方法取得当前队列中第一个引用对象并将该引用对象从队列中移除,
      如果 queue 中没有引用对象,则返回 null,该方法不会阻塞线程。
      这里采用循环则是当 queue 中还存在引用对象时就一直处理 queue 中的引用对象。
     */
    for (Object x; (x = queue.poll()) != null; ) {
        synchronized (queue) {
            @SuppressWarnings("unchecked")
            Entry<K,V> e = (Entry<K,V>) x;
            // 得到对应 key 的 hash 值
            int i = indexFor(e.hash, table.length);
		   // 通过 key 的 hash 值得到对应的 Entry 对象,即为要清理的 Entry 对象
            Entry<K,V> prev = table[i];
            Entry<K,V> p = prev;
            // 处理可能存在 hash 值冲突的情况,对应于上图中的情况。
            while (p != null) {
                Entry<K,V> next = p.next;
                if (p == e) {
                    if (prev == e)
                        table[i] = next;
                    else
                        prev.next = next;
                    // Must not null out e.next;
                    // stale entries may be in use by a HashIterator
                    e.value = null; // Help GC
                    size--;
                    break;
                }
                prev = p;
                p = next;
            }
        }
    }
}
这个方法的作用就是清除 WeakHashMap 中所有将要被回收的 key 对象所对应的 Entry 对象的,即清除无用对象。这个方法会在三个地方调用:
// 获取储存元素的 table 数组
private Entry<K,V>[] getTable() {
    expungeStaleEntries();
    return table;
}

// 得到当前 WeakHashMap 中元素的个数
public int size() {
    if (size == 0)
        return 0;
    expungeStaleEntries();
    return size;
}

// 扩容
void resize(int newCapacity) {
    Entry<K,V>[] oldTable = getTable();
    int oldCapacity = oldTable.length;
    if (oldCapacity == MAXIMUM_CAPACITY) {
        threshold = Integer.MAX_VALUE;
        return;
    }

    Entry<K,V>[] newTable = newTable(newCapacity);
    transfer(oldTable, newTable);
    table = newTable;

    /*
     * If ignoring null elements and processing ref queue caused massive
     * shrinkage, then restore old table.  This should be rare, but avoids
     * unbounded expansion of garbage-filled tables.
     */
    if (size >= threshold / 2) {
        threshold = (int)(newCapacity * loadFactor);
    } else {
        expungeStaleEntries();
        transfer(newTable, oldTable);
        table = oldTable;
    }
}
Ok,到了这里,相关的流程都跑通了,关于 WeakHashMap 如何取元素和如何遍历元素等操作就不再介绍了,这些操作在之前的篇幅中介绍 HashMap 等相关类时已经详细介绍了,小伙伴们可以参考之前的文章。这里直接给出相关结论: WeakHashMap 默认的初始容量是 16,最大容量为 1 << 30 ;默认扩容因子为 0.75;可以指定初始容量,但是处理过后的初始容量一定是 2 的次幂,好处是可以通过 & 运算来代替 % 运算提高效率;每次扩容时容量翻倍。节点(Entry)之间利用单项链表之间来处理 hash 值冲突。
Hashtable
这个类其实已经被标为遗留类(Legacy),也就是说这个类已经不建议使用了。这里还是简单介绍一下这个类。其实我一直对这个类的类名有些见解:按照驼峰式命名的方法,其应该是 HashTable ,但是它现在就是被命名为了 Hashtable 。这个类类似于 HashMap,不过它相对于 HashMap 而言其中的相关操作元素的方法名前多用了一个 synchronized 关键字修饰,也就是说这个类是多线程安全的,来看看一些方法:
// 使用了 synchronized 关键字修饰,使得方法是线程安全的
public synchronized V put(K key, V value) {
    // Make sure the value is not null
    if (value == null) {
        throw new NullPointerException();
    }

    // Makes sure the key is not already in the hashtable.
    Entry<?,?> tab[] = table;
    int hash = key.hashCode();
    int index = (hash & 0x7FFFFFFF) % tab.length;
    @SuppressWarnings("unchecked")
    Entry<K,V> entry = (Entry<K,V>)tab[index];
    // 处理当前的 hash 值可能存在 Entry 对象冲突的情况,这里其实就是遍历单链表
    for(; entry != null ; entry = entry.next) {
        if ((entry.hash == hash) && entry.key.equals(key)) {
            V old = entry.value;
            entry.value = value;
            return old;
        }
    }
	// 在这个方法中添加新的 Entry 对象并考虑扩容
    addEntry(hash, key, value, index);
    return null;
}
再看看 addEntry 方法:
// 因为 addEntry 方法的调用方法中已经做了线程同步处理(例如 put 方法),
// 因此这里无需再用 synchronized 关键字修饰
private void addEntry(int hash, K key, V value, int index) {
    modCount++;

    Entry<?,?> tab[] = table;
    if (count >= threshold) {
        // Rehash the table if the threshold is exceeded
        // 进行扩容,这个方法中每次扩容的容量为之前容量的 2 倍 + 1
        rehash();

        tab = table;
        hash = key.hashCode();
        index = (hash & 0x7FFFFFFF) % tab.length;
    }

    // Creates the new entry.
    @SuppressWarnings("unchecked")
    Entry<K,V> e = (Entry<K,V>) tab[index];
    tab[index] = new Entry<>(hash, key, value, e);
    count++;
}
同样的,其内部也提供了 Entry 类来描述键值对元素:
/**
  * Hashtable bucket collision list entry
  */
private static class Entry<K,V> implements Map.Entry<K,V> {
    final int hash;
    final K key;
    V value;
    Entry<K,V> next; // hash 值冲突的下一个元素(采用单链表来处理冲突)

    protected Entry(int hash, K key, V value, Entry<K,V> next) {
        this.hash = hash;
        this.key =  key;
        this.value = value;
        this.next = next;
    }
    // ...
}
好了,这个类的介绍就到这里了,这里总结一下这个类的相关信息:默认初始容量为 11,扩容因子为 0.75,每次扩容后的容量变为之前容量的 2 倍 + 1。上面说这个类已经不被推荐使用了,那么有什么类可以替代这个类吗?答案是有的。这里介绍两个方法来得到可以保证线程安全的 Map :
1、通过 Collections 类中的 synchronizedMap 方法来得到一个保证线程安全的 Map,方法声明如下:
public static
这是一个静态的方法,返回一个线程安全的 Map,这个方法只是对参数中的 Map 对象进行了一下包装,返回了一个新的 Map 对象,将参数中的 Map 对象的相关操作方法都通过使用 synchronized 关键字修饰的方法包装了一下,但是具体的操作流程还是和原来的 Map 对象一样,来看一个方法的源码:
public V put(K key, V value) {
    synchronized (mutex) {return m.put(key, value);}
}
可以看到,m 才是参数指定的 Map 对象,put 方法是返回的 Map 对象的方法。
2、使用 ConcurrentHashMap 类,这个类是 JDK1.5 新增的一个类,可以非常高效的进行相关的元素操作,同时还保证多线程安全。内部实现非常巧妙,简单来说就是内部有多个互斥锁,每个互斥锁负责一段区域,举个例子:
假设现在内部有 100 个元素,即有一个长度为 100 的元素数组,那么 ConcurrentHashMap 提供了 10 个锁,每个锁负责 10 个元素(0~9, 10~19, …, 90~99),每当有线程操作某个元素时,通过这个元素的键的 hash 值可以得到其操作的是哪个区域,之后就锁住对应区域的锁对象即可,而其他区域的元素依然可以被其他线程访问。这就好比一个厕所,里面有多个位置,每个位置每次只能有一个人上厕所,但是不能因为这一个人上厕所就把整个厕所给锁掉,所以就是每个位置设置一把锁,对应只负责这个位置即可。
IdentityHashMap
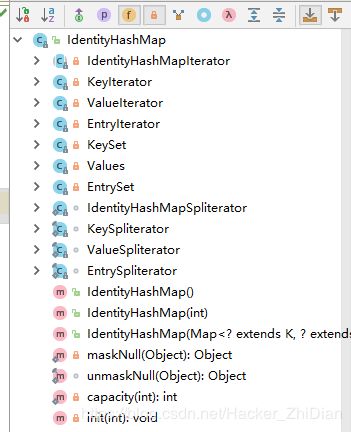
这个 Map 和我们之前介绍的一些 Map 有较大的区别,当然,总的思想不会变(为了更快的读取键值对元素)。和之前介绍的 Map 的不同点在于其存取键值对的方式:我们之前看到的 Map 具体类都会自定义一个名为 Entry 的内部类来表示储存的键值对元素,而在 IdentityHashMap 中我们找不到对应的类

是把类名换了吗?其实并不是,因为 IdentityHashMap 将键对象和值对象储存在同一个数组中,我们来看看这个数组:
// 保存键值对对象的数组,数组大小一定是 2 的次幂
transient Object[] table; // non-private to simplify nested class access
可以看到:table 数组是 Object 类型的,意味着这个数组可以储存任何非基本数据类型的对象。那么 IdentityHashMap 是如何根据所给的键得到对应的值得呢?来看看其 get 方法:
public V get(Object key) {
    // 如果 key 不为 null,则返回 key,否则返回 NULL_KEY,
    // NULL_KEY 是一个 Object 对象,即代表 key 为 null 时的键
    Object k = maskNull(key);
    Object[] tab = table;
    int len = tab.length;
    // 求出 key 的 hash 值,传入 len 防止得到的 hash 值越界
    int i = hash(k, len);
    while (true) {
        // 获取 key 的 hash 下标在 table 中所对应的对象
        Object item = tab[i];
        // 如果该对象和当前的 key 是同一个对象,认为值是数组当前下标中下一个对象
        if (item == k)
            // 这里会有数组下标越界的风险?
            return (V) tab[i + 1];
        // 如果数组中当前下标的值为 null,则说明该键在当前 Map 中没有对应的值
        if (item == null)
            return null;
        // 如果当前的 item != k,将 i 往后移
        i = nextKeyIndex(i, len);
    }
}
上述代码中注释已经写得很清楚了,留下了一个疑问:return (V) tab[i + 1]; 会有数组下标越界的可能吗?要解决这个问题,我们得看一下 hash 方法和 nextKeyIndex 方法的源码,先看看 hash 方法的源码:
/**
  * Returns index for Object x.
  */
private static int hash(Object x, int length) {
    // 这里直接得到的是 x 的 Object 父类对象的 hashCode() 方法的返回值
    int h = System.identityHashCode(x);
    // Multiply by -127, and left-shift to use least bit as part of hash
    return ((h << 1) - (h << 8)) & (length - 1);
}
注意到这里 System.identityHashCode 方法,来看看这个方法的说明:
/**
 * Returns the same hash code for the given object as
 * would be returned by the default method hashCode(),
 * whether or not the given object's class overrides
 * hashCode().
 * The hash code for the null reference is zero.
 *
 * @param x object for which the hashCode is to be calculated
 * @return  the hashCode
 * @since   JDK1.1
 */
public static native int identityHashCode(Object x);
通过注释我们了解到这个方法的返回值就相当于直接调用 x.hashCode() 的返回值,也就是相当于调用 Object.hashCode 方法。而对于 Object.hashCode 方法来说,对于不同的对象,其返回值就不一样。回到 IdentityHashMap.hash 方法中:得到了 key 的 hash 之后,返回了 ((h << 1) - (h << 8)) & (length - 1); 的值,我们知道 << 运算符即为左移运算符,左移 x 位相当于 * 2^x,所以原式可以写成 ((h * 2^1) - (h * 2^8)) & (length - 1); 而我们知道:任何一个数乘以 2 ,得到的结果都是偶数,那么我们可以认为 (h * 2^1) - (h * 2^8) 是一个偶数,但是结果可能是一个负数,所以接下来进行 & (length - 1); 运算。我们知道 length 即为 IdentityHashMap 的 table数组的长度,这个值肯定是大于 0 的,而计算机用补码来表示数字,正数的二进制最高为为 0,负数的二进制最高位为 1 (最高位为符号位:正数为 0,负数为 1),此时再进行按位与(&)运算(只要是位运算都是现将操作数转换成二进制,再进行相应的运算),按位与的规则是对两个操作数的二进制位按位比较,如果两个位的值都是 1,那么结果就是 1,否则为 0,那么可知一个负数和一个正数进行 & 运算,得到的值一定是非负数(第一位符号位为 0)。这是第一个。第二个是可以通过 & 来模拟 % 运算,在这里通过 hash 方法得到的值是要作为数组下标的,那么数组下标肯定不能越界,我们可以通过 % 来确保值不大于某个数,为什么这里可以通过 & 来模拟 % 操作呢?我们注意到上面说过:table 的长度是 2 的次幂值,熟悉二进制的小伙伴知道:2 的次幂值中化为二进制只有一个 1 ,举个例子(32 位 int 值):
2^0 = 1; -> 000...(31 个 0)1
2^1 = 2; -> 000...(30 个 0)10
2^2 = 4; -> 000...(29 个 0)100
...
那么将某个 2 的次幂值 - 1,得到的值是什么呢?
2^0 - 1= 0; -> 000...(31 个 0)0
2^1 - 1= 1; -> 000...(30 个 0)01
2^2 - 1= 3; -> 000...(29 个 0)011
此时再进行按位 & 运算,得到结果的最大值也就是该 2 的次幂值 - 1。而反过来想:% 运算不就是为了让运算的到的值不大于目标数吗?所以这里的用法很巧妙。那么为什么要用 & 来代替 % 呢?因为位运算的效率比 % 高很多。
好了,现在我们应该知道:hash 方法返回的值是一个正数,也是一个不大于 table.length 的偶数。又因为 table.length 本身就是一个偶数,那么 hash 方法得到的值和 table.length 至少相差 2 ,也就是说 hash(key, len) <= table.length - 2; 是成立的。那么回到 IdentityHashMap 的 get 方法:得到的数组下标是小于 table.length 的偶数,return (V) tab[i + 1]; 也就不会有越界的风险。下面是 nextKeyIndex 方法:
/**
 * Circularly traverses table of size len.
 */
private static int nextKeyIndex(int i, int len) {
    return (i + 2 < len ? i + 2 : 0);
}
理解了上面的,这个也就非常理解了:其实就是为了找到 i 的所代表数组下标的下一个键的下标,如果到了数组末尾就从头来过。下面来看看 IdentityHashMap 的 put 方法:
public V put(K key, V value) {
    final Object k = maskNull(key);

    retryAfterResize: for (;;) {
        final Object[] tab = table;
        final int len = tab.length;
        // 得到 key 的 hash 值
        int i = hash(k, len);
		// 找到 i 下标的对应的 table 数组元素,如果不为 null 则处理 hash 冲突
        for (Object item; (item = tab[i]) != null;
             i = nextKeyIndex(i, len)) {
            if (item == k) {
                @SuppressWarnings("unchecked")
                // 先保存被替换的旧值
                V oldValue = (V) tab[i + 1];
                // 旧值换成新值
                tab[i + 1] = value;
                // 返回被替换的旧值
                return oldValue;
            }
        }

        // 如果到了这里说明没有冲突,需要在 table 数组中新加入两个对象(key、value),
        // 这时需要考虑扩容
        final int s = size + 1;
        // Use optimized form of 3 * s.
        // Next capacity is len, 2 * current capacity.
        if (s + (s << 1) > len && resize(len))
            continue retryAfterResize;

        modCount++;
        // 键值对象赋值
        tab[i] = k;
        tab[i + 1] = value;
        size = s;
        return null;
    }
}
下面看看 IdentityHashMap 的扩容机制:
private boolean resize(int newCapacity) {
    // assert (newCapacity & -newCapacity) == newCapacity; // power of 2
    // 每次扩容数组容量翻倍
    int newLength = newCapacity * 2;

    Object[] oldTable = table;
    int oldLength = oldTable.length;
    // 如果当前数组容量达到最大,扩容失败
    if (oldLength == 2 * MAXIMUM_CAPACITY) { // can't expand any further
        if (size == MAXIMUM_CAPACITY - 1)
            throw new IllegalStateException("Capacity exhausted.");
        return false;
    }
    if (oldLength >= newLength)
        return false;

    Object[] newTable = new Object[newLength];

    for (int j = 0; j < oldLength; j += 2) {
        Object key = oldTable[j];
        if (key != null) {
            Object value = oldTable[j+1];
            // 将原数组中键值对引用赋为 null,方便 JVM 进行垃圾回收
            oldTable[j] = null;
            oldTable[j+1] = null;
            // 得到当前键在新数组中的下标
            int i = hash(key, newLength);
            while (newTable[i] != null)
                i = nextKeyIndex(i, newLength);
            // 找到空位将键值对象插入新的数组中
            newTable[i] = key;
            newTable[i + 1] = value;
        }
    }
    table = newTable;
    return true;
}
OK,整个 IdentityHashMap 的设计思想到这里就很清晰了:
IdentityHashMap 将键和值都储存在 table 数组中,读元素的时候通过先得到键所在数组的下标(通过 hash 方法),而对应的值得下标为键的下标 + 1。键所在的数组下标一定是偶数,值所在的数组下标一定是奇数。同时,存入元素也按照相同的规则。如果当前元素个数 * 3 > table.length。那么进行扩容,扩容是数组容量翻倍。table 数组的最大容量是 1 << 30,默认初始容量为 32。
关于其他的方法(移除元素,构造方法),有兴趣的小伙伴可以自己分析。这里不再分析了。
好了,到这里我们已经基本把 Java 中 Map 的具体类介绍完了,还有个别 Map 具体类会在后面的文章中和其他的知识点一起介绍。
如果博客中有什么不正确的地方,还请多多指点,如果觉得我写的对您有帮助,请不要吝啬您的赞。
谢谢观看。。。


