Installation of Cloudera Enterprise 6.1.1
Installation of Cloudera Enterprise 6.1.1
- Before You Install
- Configure Network Names
- Disabling the Firewall
- Setting SELinux mode
- Enable an NTP Service
- Installing Cloudera Manager, CDH, and Managed Services
- Step 1: Configure a Repository for Cloudera Manager
- Configuring a Local Package Repository
- Creating a Permanent Internal Repository
- Setting Up a Web server
- Downloading and Publishing the Package Repository
- Configuring Hosts to Use the Internal Repository
- Use the Remote Repository for Cloudera Manager
- Step 2: Install Java Development Kit
- Step 3: Install Cloudera Manager Server
- Install Cloudera Manager Packages
- Enable Auto-TLS
- Step 4: Install and Configure Databases
- Installing the MySQL Server
- Configuring and Starting the MySQL Server
- Installing the MySQL JDBC Driver
- Creating Databases for Cloudera Software
- Step 5: Set up the Cloudera Manager Database
- Syntax for scm_prepare_database.sh
- Step 6: Install CDH and Other Software
- Welcome
- Accept License
- Select Edition
- Welcome (Add Cluster - Installation)
- Setup Auto-TLS
- Specify Hosts
- Select Repository
- Accept JDK License
- Enter Login Credentials
- Install Agents
- Install Parcels
- Inspect Hosts
- Step 7: Set Up a Cluster Using the Wizard
- Select Services
- Assign Roles
- Setup Database
- Review Changes
- Command Details
- Summary
- Congratulations!
Before You Install
The following topics describe additional considerations you should be aware of before beginning an installation:
Configure Network Names
Configure each host in the cluster as follows to ensure that all members can communicate with each other:
-
Set the hostname to a unique name (not
localhost).$ sudo hostnamectl set-hostname foo-1.example.com -
Edit /etc/hosts with the IP address and fully qualified domain name (FQDN) of each host in the cluster and you must make the IP of each host in cluster STATIC in
/etc/sysconfig/network-scripts/ifcfg-eth0.172.18.2.1** node0 172.18.2.1** node1 172.18.2.1** node2 172.18.2.1** node3 172.18.2.1** node4But format like 'node0.tocoding.com' will be the best -
Edit
/etc/sysconfig/networkwith the FQDN of this host only:HOSTNAME=node0 -
Verify that each host consistently identifies to the network:
a. Rununame -aand check that the hostname matches the output of the hostname command.
b. Run/sbin/ifconfigand note the value of inet addr in theeth0entry, for example:eth0: flags=4163c. Run
host -v -t A $(hostname)and verify that the output matches the hostname command.
The IP address should be the same as reported byifconfigforeth0:
Disabling the Firewall
- For iptables, save the existing rule set:
$ sudo iptables-save > ~/firewall.rules - Disable the firewall:
$ sudo systemctl disable firewalld
$ sudo systemctl stop firewalld
Setting SELinux mode
Security-Enhanced Linux (SELinux) allows you to set access control through policies. If you are having trouble deploying CDH with your policies, set SELinux in permissive mode on each host before you deploy CDH on your cluster.
To set the SELinux mode, perform the following steps on each host.
- Check the SELinux state:
$ getenforce - If the output is either
PermissiveorDisabled, you can skip this task and continue on to Disabling the Firewall. If the output is enforcing, continue to the next step. - Open the
/etc/selinux/configfile (in some systems, the/etc/sysconfig/selinuxfile). - Change the line
SELINUX=enforcingtoSELINUX=permissive.$ sudo systemctl disable firewalld $ sudo systemctl stop firewalld - Save and close the file.
- Restart your system or run the following command to disable SELinux immediately:
$ setenforce 0
After you have installed and deployed CDH, you can reenable SELinux by changing SELINUX=permissive back to SELINUX=enforcing in /etc/selinux/config (or /etc/sysconfig/selinux), and then running the following command to immediately switch to enforcing mode:
$ setenforce 1
Enable an NTP Service
CDH requires that you configure a Network Time Protocol (NTP) service on each machine in your cluster. Most operating systems include the ntpd service for time synchronization.
RHEL 7 compatible operating systems use chronyd by default instead of ntpd. If chronyd is running (on any OS), Cloudera Manager uses it to determine whether the host clock is synchronized. Otherwise, Cloudera Manager uses ntpd.
Note: If you are using ntpd to synchronize your host clocks, but chronyd is also running, Cloudera Manager relies on chronyd to verify time synchronization, even if it is not synchronizing properly. This can result in Cloudera Manager reporting clock offset errors, even though the time is correct.
To use ntpd for time synchronization:
-
Install the
ntppackage:$ yum -y install ntp -
Edit the
/etc/ntp.conffile to add NTP servers, as in the following example.server 0.pool.ntp.org server 1.pool.ntp.org server 2.pool.ntp.org -
Start the ntpd service:
$ sudo systemctl start ntpd -
Configure the ntpd service to run at boot:
$ sudo systemctl enable ntpd -
Synchronize the system clock to the NTP server:
ntpdate -u 2.pool.ntp.org -
Synchronize the hardware clock to the system clock:
$ hwclock --systohc
Installing Cloudera Manager, CDH, and Managed Services
This procedure is recommended for installing Cloudera Manager and CDH for production environments.
Before you begin the installation, make sure you have reviewed the requirements and other considerations described in Before You Install.
The general steps in the installation procedure are as follows:
- Step 1: Configure a Repository
- Step 2: Install JDK
- Step 3: Install Cloudera Manager Server
- Step 4: Install Databases
- Step 5: Set up the Cloudera Manager Database
- Step 6: Install CDH and Other Software
- Step 7: Set Up a Cluster
Step 1: Configure a Repository for Cloudera Manager
Cloudera Manager is installed using package management tools such as yum for RHEL compatible systems. The tool depends on access to repositories to install software. Cloudera maintains Internet-accessible repositories for CDH and Cloudera Manager installation files. You can also create your own internal repository for hosts that do not have Internet access.
Configuring a Local Package Repository
You can create a package repository for Cloudera Manager either by hosting an internal web repository or by manually copying the repository files to the Cloudera Manager Server host for distribution to Cloudera Manager Agent hosts.
Creating a Permanent Internal Repository
The following sections describe how to create a permanent internal repository using Apache HTTP Server:
Setting Up a Web server
To host an internal repository, you must install or use an existing Web server on an internal host that is reachable by the Cloudera Manager host, and then download the repository files to the Web server host. The examples in this section use Apache HTTP Server as the Web server.
- Install Apache HTTP Server:
$ sudo yum install httpd - Start Apache HTTP Server:
$ sudo systemctl start httpd
Downloading and Publishing the Package Repository
-
Download the package repository for the product you want to install:
Cloudera Manager 6
To download the files for the latest Cloudera Manager 6.1 release, run the following commands on the Web server host.
$ sudo mkdir -p /var/www/html/cloudera-repos
$ sudo wget --recursive --no-parent --no-host-directories https://archive.cloudera.com/cm6/6.1.1/redhat7/ -P /var/www/html/cloudera-repos
$ sudo wget https://archive.cloudera.com/cm6/6.1.1/allkeys.asc -P /var/www/html/cloudera-repos/cm6/6.1.1/
$ sudo chmod -R ugo+rX /var/www/html/cloudera-repos/cm6CDH 6
To download the files for the latest CDH 6.1 release, run the following commands on the Web server host.
$ sudo mkdir -p /var/www/html/cloudera-repos
$ sudo wget --recursive --no-parent --no-host-directories https://archive.cloudera.com/cdh6/6.1.1/redhat7/ -P /var/www/html/cloudera-repos```
$ sudo wget --recursive --no-parent --no-host-directories https://archive.cloudera.com/gplextras6/6.1.1/redhat7/ -P /var/www/html/cloudera-repos$ sudo chmod -R ugo+rX /var/www/html/cloudera-repos/cdh6 $ sudo chmod -R ugo+rX /var/www/html/cloudera-repos/gplextras6 -
Visit the Repository URL http://
/cloudera-repos/ in your browser and verify the files you downloaded are present. If you do not see anything, your Web server may have been configured to not show indexes.
Configuring Hosts to Use the Internal Repository
After establishing the repository, modify the client configuration to use it:
| OS | Procedure |
|---|---|
| RHEL7(CentOS7) | Create /etc/yum.repos.d/cloudera-repo.repo files on cluster hosts with the following content, where |
[cloudera-repo]
name=cloudera-repo
baseurl=http:///cm/5
enabled=1
gpgcheck=0
Use the Remote Repository for Cloudera Manager
- Download the
cloudera-manager.repofile for your OS version to the/etc/yum.repos.d/directory on the Cloudera Manager Server host.$ sudo wget https://archive.cloudera.com/cm6/6.1.1/redhat7/yum/ -P /etc/yum.repos.d/ - Import the repository signing GPG key:
$ sudo rpm --import https://archive.cloudera.com/cm6/6.1.0/redhat7/yum/RPM-GPG-KEY-cloudera
Step 2: Install Java Development Kit
The Oracle JDK installer is available both as an RPM-based installer for RPM-based systems, and as a .tar.gz file. These instructions are for the .tar.gz file.
- Download the
.tar.gzfile for one of the 64-bit supported versions of the Oracle JDK from Java SE 8 Downloads. - Extract the JDK to
/usr/java/jdk-version. For example:$ tar xvfz /path/to/jdk-8u-linux-x64.tar.gz -C /usr/java/ - Repeat this procedure on all cluster hosts and configuring the JAVA_HOME in
/etc/profile.
Step 3: Install Cloudera Manager Server
In this step you install the Cloudera Manager packages on the Cloudera Manager Server host, and optionally enable auto-TLS.
Install Cloudera Manager Packages
- On the Cloudera Manager Server host, type the following commands to install the Cloudera Manager packages.
OS Command RHEL7(CentOS7) $ sudo yum install cloudera-manager-daemons cloudera-manager-agent cloudera-manager-server - If you are using an Oracle database for Cloudera Manager Server, edit the
/etc/default/cloudera-scm-serverfile on the Cloudera Manager server host. Locate the line that begins withexport CMF_JAVA_OPTSand change the-Xmx2Goption to-Xmx4G.
Enable Auto-TLS
Auto-TLS is supported for new installations only. You must enable Auto-TLS before adding any hosts to Cloudera Manager. To enable auto-TLS with an embedded Cloudera Manager CA, run the following command:
$ sudo JAVA_HOME=/usr/java/jdk1.8.0_141-cloudera /opt/cloudera/cm-agent/bin/certmanager setup --configure-services
Note: The certmanager utility is included with Cloudera Manager Agent, but not Cloudera Manager Server. If you see an error about the certmanager command not being found, make sure you have installed the cloudera-manager-agent package as documented above.
Replace jdk1.8.0_141-cloudera with your JDK version and check the /var/log/cloudera-scm-agent/certmanager.log log file to confirm that the /var/lib/cloudera-scm-server/certmanager/* directories were CREATED.
Step 4: Install and Configure Databases
Cloudera Manager uses various databases and datastores to store information about the Cloudera Manager configuration, as well as information such as the health of the system, or task progress.
Installing the MySQL Server
Install the MySQL database.
| OS | Command |
|---|---|
| RHEL7(CentOS7) | $ wget http://repo.mysql.com/mysql-community-release-el7-5.noarch.rpm $ sudo rpm -ivh mysql-community-release-el7-5.noarch.rpm $ sudo yum update $ sudo yum install mysql-server $ sudo systemctl start mysqld |
Configuring and Starting the MySQL Server
-
Stop the MySQL server if it is running.
OS Command RHEL7(CentOS7) $ sudo systemctl stop mysqld -
Move old InnoDB log files
/var/lib/mysql/ib_logfile0and/var/lib/mysql/ib_logfile1out of/var/lib/mysql/to a backup location. -
Determine the location of the option file,
/etc/my.cnfby default. -
Here is an option file with Cloudera recommended settings:
[mysqld] datadir=/var/lib/mysql socket=/var/lib/mysql/mysql.sock transaction-isolation = READ-COMMITTED # Disabling symbolic-links is recommended to prevent assorted security risks; # to do so, uncomment this line: symbolic-links = 0 key_buffer_size = 32M max_allowed_packet = 32M thread_stack = 256K thread_cache_size = 64 query_cache_limit = 8M query_cache_size = 64M query_cache_type = 1 max_connections = 550 #expire_logs_days = 10 #max_binlog_size = 100M #log_bin should be on a disk with enough free space. #Replace '/var/lib/mysql/mysql_binary_log' with an appropriate path for your #system and chown the specified folder to the mysql user. log_bin=/var/lib/mysql/mysql_binary_log #In later versions of MySQL, if you enable the binary log and do not set #a server_id, MySQL will not start. The server_id must be unique within #the replicating group. server_id=1 binlog_format = mixed read_buffer_size = 2M read_rnd_buffer_size = 16M sort_buffer_size = 8M join_buffer_size = 8M # InnoDB settings innodb_file_per_table = 1 innodb_flush_log_at_trx_commit = 2 innodb_log_buffer_size = 64M innodb_buffer_pool_size = 4G innodb_thread_concurrency = 8 innodb_flush_method = O_DIRECT innodb_log_file_size = 512M [mysqld_safe] log-error=/var/log/mysqld.log pid-file=/var/run/mysqld/mysqld.pid sql_mode=STRICT_ALL_TABLES -
If AppArmor is running on the host where MySQL is installed, you might need to configure AppArmor to allow MySQL to write to the binary.
-
Ensure the MySQL server starts at boot:
OS Command RHEL7(CentOS7) $ sudo systemctl enable mysqld -
Start the MySQL server:
OS Command RHEL7(CentOS7) $ sudo systemctl start mysqld -
Run
/usr/bin/mysql_secure_installationto set the MySQL root password and other security-related settings. In a new installation, the root password is blank. Press the Enter key when you’re prompted for the root password. For the rest of the prompts, enter the responses listed below in bold:$ sudo /usr/bin/mysql_secure_installation[...] Enter current password for root (enter for none): OK, successfully used password, moving on... [...] Set root password? [Y/n] Y New password: Re-enter new password: Remove anonymous users? [Y/n] Y [...] Disallow root login remotely? [Y/n] N [...] Remove test database and access to it [Y/n] Y [...] Reload privilege tables now? [Y/n] Y All done!
Installing the MySQL JDBC Driver
Install the JDBC driver on the Cloudera Manager Server host, as well as any other hosts running services that require database access.
- Download the MySQL JDBC driver from http://www.mysql.com/downloads/connector/j/5.1.html (in
.tar.gzformat). As of the time of writing, you can download version 5.1.46 usingwgetas follows:$ wget https://dev.mysql.com/get/Downloads/Connector-J/mysql-connector-java-5.1.46.tar.gz - Extract the JDBC driver JAR file from the downloaded file. For example:
$ tar zxvf mysql-connector-java-5.1.46.tar.gz - Copy the JDBC driver, renamed, to
/usr/share/java/. If the target directory does not yet exist, create it. For example:$ sudo mkdir -p /usr/share/java/ $ cd mysql-connector-java-5.1.46/usr/share/java/ $ sudo cp mysql-connector-java-5.1.46-bin.jar /usr/share/java/mysql-connector-java.jar
Creating Databases for Cloudera Software
Create databases and service accounts for components that require databases:
- Cloudera Manager Server
- Cloudera Management Service roles:
- Activity Monitor (if using the MapReduce service in a CDH 5 cluster)
- Reports Manager
- Hue
- Each Hive metastore
- Sentry Server
- Cloudera Navigator Audit Server
- Cloudera Navigator Metadata Server
- Oozie
Record the values you enter for database names, usernames, and passwords. The Cloudera Manager installation wizard requires this information to correctly connect to these databases.
- Log in as the
rootuser, or another user with privileges to create database and grant privileges:$ mysql -u root -p Enter password: - Create databases for each service deployed in the cluster using the following commands. You can use any value you want for the <database>, <user>, and <password> parameters. The Databases for Cloudera Software table, below lists the default names provided in the Cloudera Manager configuration settings, but you are not required to use them.
Configure all databases to use the utf8 character set.
Databases for Cloudera Software
Commands:Service Database User Cloudera Manager Server scmscmActivity Monitor amonamonReports Manager rmanrmanHue huehueHive Metastore Server metastorehiveSentry Server sentrysentryCloudera Navigator Audit Server navnavCloudera Navigator Metadata Server navmsnavmsOozie oozieooziemysql> CREATE DATABASE scm DEFAULT CHARACTER SET utf8 DEFAULT COLLATE utf8_general_ci; mysql> GRANT ALL ON scm.* TO 'scm'@'%' IDENTIFIED BY 'mysql'; mysql> CREATE DATABASE amon DEFAULT CHARACTER SET utf8 DEFAULT COLLATE utf8_general_ci; mysql> GRANT ALL ON amon.* TO 'amon'@'%' IDENTIFIED BY 'mysql'; mysql> CREATE DATABASE rman DEFAULT CHARACTER SET utf8 DEFAULT COLLATE utf8_general_ci; mysql> GRANT ALL ON rman.* TO 'rman'@'%' IDENTIFIED BY 'mysql'; mysql> CREATE DATABASE hue DEFAULT CHARACTER SET utf8 DEFAULT COLLATE utf8_general_ci; mysql> GRANT ALL ON hue.* TO 'hue'@'%' IDENTIFIED BY 'mysql'; mysql> CREATE DATABASE metastore DEFAULT CHARACTER SET utf8 DEFAULT COLLATE utf8_general_ci; mysql> GRANT ALL ON metastore.* TO 'hive'@'%' IDENTIFIED BY 'mysql'; mysql> CREATE DATABASE sentry DEFAULT CHARACTER SET utf8 DEFAULT COLLATE utf8_general_ci; mysql> GRANT ALL ON sentry.* TO 'sentry'@'%' IDENTIFIED BY 'mysql'; mysql> CREATE DATABASE nav DEFAULT CHARACTER SET utf8 DEFAULT COLLATE utf8_general_ci; mysql> GRANT ALL ON nav.* TO 'nav'@'%' IDENTIFIED BY 'mysql'; mysql> CREATE DATABASE navms DEFAULT CHARACTER SET utf8 DEFAULT COLLATE utf8_general_ci; mysql> GRANT ALL ON navms.* TO 'navms'@'%' IDENTIFIED BY 'mysql'; mysql> CREATE DATABASE oozie DEFAULT CHARACTER SET utf8 DEFAULT COLLATE utf8_general_ci; mysql> GRANT ALL ON oozie.* TO 'oozie'@'%' IDENTIFIED BY 'mysql'; - Confirm that you have created all of the databases:
You can also confirm the privilege grants for a given user by running:mysql> SHOW DATABASES;mysql> SHOW GRANTS FOR ''@'%';
Step 5: Set up the Cloudera Manager Database
Cloudera Manager Server includes a script that can create and configure a database for itself. The script can:
- Create the Cloudera Manager Server database configuration file.
- Create and configure a database for Cloudera Manager Server to use.
- Create and configure a user account for Cloudera Manager Server.
Although the script can create a database, you must have already created the database as described in Step 4.
Syntax for scm_prepare_database.sh
The syntax for the scm_prepare_database.sh script is as follows:
$ sudo /opt/cloudera/cm/schema/scm_prepare_database.sh mysql scm scm
Enter SCM password:
JAVA_HOME=/usr/java/jdk1.8.0_141-cloudera
Verifying that we can write to /etc/cloudera-scm-server
Creating SCM configuration file in /etc/cloudera-scm-server
Executing:  /usr/java/jdk1.8.0_141-cloudera/bin/java -cp /usr/share/java/mysql-connector-java.jar:/usr/share/java/oracle-connector-java.jar:/usr/share/java/postgresql-connector-java.jar:/opt/cloudera/cm/schema/../lib/* com.cloudera.enterprise.dbutil.DbCommandExecutor /etc/cloudera-scm-server/db.properties com.cloudera.cmf.db.
[main] DbCommandExecutor INFO  Successfully connected to database.
All done, your SCM database is configured correctly!
Step 6: Install CDH and Other Software
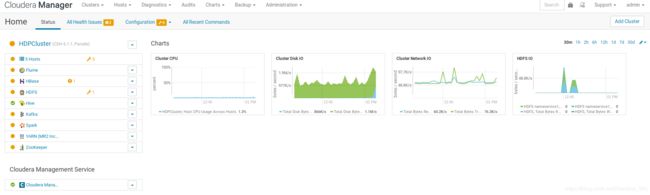
After setting up the Cloudera Manager database, start Cloudera Manager Server, and log in to the Cloudera Manager Admin Console:
- Start Cloudera Manager Server:
$ sudo systemctl start cloudera-scm-server - Wait several minutes for the Cloudera Manager Server to start. To observe the startup process, run the following on the Cloudera Manager Server host:
$ sudo tail -f /var/log/cloudera-scm-server/cloudera-scm-server.log
When you see this log entry, the Cloudera Manager Admin Console is ready:
INFO WebServerImpl:com.cloudera.server.cmf.WebServerImpl: Started Jetty server.
3. In a web browser, go to http://
Note: If you enabled auto-TLS, you are redirected to https://
:7183 , and a security warning is displayed. You might need to indicate that you trust the certificate, or click to proceed to the Cloudera Manager Server host.
-
Log into Cloudera Manager Admin Console. The default credentials are:
Username:admin
Password:admin
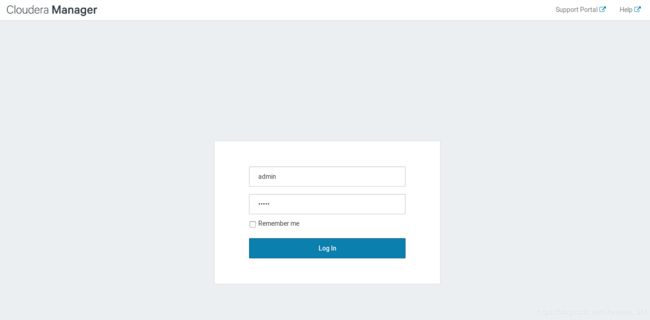
Note: Cloudera Manager does not support changing the admin username for the installed account. You can change the password using Cloudera Manager after you run the installation wizard. Although you cannot change the admin username, you can add a new user, assign administrative privileges to the new user, and then delete the default admin account.
-
After you log in, the End User License Terms and Conditions page displays. Read the terms and conditions and then check the box labeled Yes, I accept the End User License Terms and Conditions to accept them. Click Continue, and the installation wizard launches.
The following sections guide you through each step of the installation wizard:
- Welcome
- Accept License
- Select Edition
- Welcome (Add Cluster - Installation)
- Setup Auto-TLS
- Specify Hosts
- Select Repository
- Accept JDK License
- Enter Login Credentials
- Install Agents
- Install Parcels
- Inspect Hosts
Welcome
The Welcome page provides a brief overview of Cloudera Manager, and links to the release notes for the version you are installing. Click Continue to proceed with the installation.
Accept License
The Accept License page provides the End User License Terms and Conditions. Read the license agreement and click the checkbox labeled Yes, I accept the End User License Terms and Conditions if you accept the terms and conditions of the license agreement.
Select Edition
On the Select Edition page, you can select the edition of Cloudera Manager to install and, optionally, install a license:
- Choose Cloudera Enterprise Cloudera Enterprise Trial edition to install which does not require a license, but expires after 60 days and cannot be renewed.
- Information is displayed indicating what the CDH installation includes.
- Click Continue to proceed with the installation.
Welcome (Add Cluster - Installation)
The Welcome page of the Add Cluster - Installation wizard provides a brief overview of the installation and configuration procedure, as well as some links to relevant documentation. Click Continue to proceed with the installation.
Setup Auto-TLS
Important: Auto-TLS is supported for new installations only. If you do not setup auto-TLS before continuing, you cannot do so later.
The Setup Auto-TLS page provides instructions for initializing the certificate manager for auto-TLS if you have not done so already. If you already initialized the certificate manager in Step 3, the wizard displays a message indicating that auto-TLS has been initialized. Click Continue to proceed with the installation.
Specify Hosts
Choose which hosts will run CDH and other managed services
-
To enable Cloudera Manager to automatically discover hosts on which to install CDH and managed services, enter the cluster hostnames or IP addresses. You can also specify hostname and IP address ranges. For example:
Range Definition Matching Hosts 10.1.1.[1-4] 10.1.1.1, 10.1.1.2, 10.1.1.3, 10.1.1.4 host[1-3].example.com host1.example.com, host2.example.com, host3.example.com -
Click Search. If there are a large number of hosts on your cluster, wait a few moments to allow them to be discovered and shown in the wizard. If the search is taking too long, you can stop the scan by clicking Abort Scan. You can modify the search pattern and repeat the search as many times as you need until you see all of the expected hosts.
-
Verify that the number of hosts shown matches the number of hosts where you want to install services.
-
Click Continue.
Select Repository
Important: You cannot install software using both parcels and packages in the same cluster.
The Select Repository page allows you to specify repositories for Cloudera Manager Agent and CDH and other software.
In the Cloudera Manager Agent section:
- Select either Public Cloudera Repository or Custom Repository configuring in Step 1 for the Cloudera Manager Agent software.
In the CDH and other software section:
- Select the repository type to use for the installation. In the Install Method section select one of the following:
- Use Parcels (Recommended)
- Select the version of CDH to install.
- Click Continue.
Accept JDK License
You have already installed your own Oracle JDK version in Step 2, leave the box unchecked.
Enter Login Credentials
- Select root for the
rootaccount, or select Another user and enter the username for an account that has password-lesssudoprivileges. - Choose password authentication, enter and confirm the password.
- Specify the maximum number of host installations to run at once. The default and recommended value is 10. You can adjust this based on your network capacity.
- Click Continue.
Install Agents
The Install Agents page displays the progress of the installation. You can click on the Details link for any host to view the installation log. If the installation is stalled, you can click the Abort Installation button to cancel the installation and then view the installation logs to troubleshoot the problem.
If the installation fails on any hosts, you can click the Retry Failed Hosts to retry all failed hosts, or you can click the Retry link on a specific host.
After installing the Cloudera Manager Agent on all hosts, click Continue.
Install Parcels
If you selected parcels for the installation method, the Install Parcels page reports the installation progress of the parcels you selected earlier. After the parcels are downloaded, progress bars appear representing each cluster host. You can click on an individual progress bar for details about that host.
After the installation is complete, click Continue.
Inspect Hosts
The Inspect Hosts page runs the Host Inspector to search for common configuration problems. View the results and address any identified problems. Click the Run Again button to update the results after making any changes.
After addressing identified problems, click Finish.
This completes the Cluster Installation wizard and launches the Cluster Setup wizard.
Step 7: Set Up a Cluster Using the Wizard
After completing the Add Cluster - Installation wizard, the Add Cluster - Setup wizard automatically starts. The following sections guide you through each page of the wizard:
- Select Services
- Assign Roles
- Setup Database
- Review Changes
- Command Details
- Summary
Select Services
Note: If you enabled auto-TLS in Step 3, and you want Cloudera Manager to automatically configure TLS for all services that support TLS, you must enable the option before continuing:
- Click on the Cloudera Manager logo in the top left corner to exit the wizard and go to the Cloudera Manager home page.
- Go to Administration > Settings > Category > Security.
- Find the Automatic configuration of TLS for services option, and select Automatic TLS configuration for all services.
- Enter a Reason for change, and then click Save Changes to commit the changes.
- Click on the Cloudera Manager logo again to go to the home page.
- In the Cluster 1 section on the left side, click the Add Services link to launch the Cluster Installation wizard again.
After selecting the services you want to add, click Continue.
Assign Roles
The Assign Roles page suggests role assignments for the hosts in your cluster. You can click on the hostname for a role to select a different host. You can also click the View By Host button to see all the roles assigned to a host.
After assigning all of the roles for your services, click Continue.
Setup Database
On this page, you can enter the database names, usernames, and passwords you created in Step 4.
Select the database type and enter the database name, username, and password for each service. Click Test Connection to validate the settings. If successful click Continue.
Review Changes
The Review Changes page lists default and suggested settings for several configuration parameters, including data directories.
Review and make any necessary changes, and then click Continue.
Command Details
This page lists the details of the First Run command. You can expand the running commands to view the details of any step.
After the First Run command completes, click Continue.
Summary
This reports the success or failure of the setup wizard. Click Finish to complete the wizard. The installation is complete.
Congratulations!