在CentOS 7下配置Hadoop环境(一)
在CentOS 7下配置Hadoop环境(一)
Tags: Hadoop
所需软件
安装centos 7
配置JDK
配置无密钥登录
配置Hadoop
配置Eclipse
Loading…
常见问题
所需软件
centos 7 https://www.centos.org/download/
hadoop 2.7.3 http://hadoop.apache.org/releases.html
eclipse-mars-2 http://www.eclipse.org/mars/
jdk 1.8_121 http://www.oracle.com/technetwork/java/javase/downloads/index.html
hbase 1.2.4 http://www.apache.org/dyn/closer.cgi/hbase/
zookeper 3.4.6 http://zookeeper.apache.org/releases.html#download
VMware Workstation
https://vmware-workstation.en.softonic.com/
安装centos 7
- Master虚拟机配置
- 设置用户
root用户密码为123456
个人用户名liufei,密码123456(为了简单点操作,实际应用不推荐)
配置JDK
- 解压jdk安装包
当前工作目录为/home/liufei
$tar -zxvf jdk8u121-linux-x64.tar.gz
2.编辑/etc/profile文件(root权限)
切换到root用户
su
然后输入root密码
#vim /etc/profile
在文件最后添加下列代码
export JAVA_HOME=/home/liufei/hadoop/jdk1.8.0_121
 export PATH=$JAVA_HOME/bin:$PATH
 export CLASSPATH=.:$JAVA_HOME/lib/dt.jar:$JAVA_HOME/lib/tools.jar
按esc键回到普通模式,再按shift+:进入命令模式,输入wq!保存并退出
使配置文件生效
source /etc/profile
3.确认配置成功
在命令行下输入
java -version
显示以下信息
java version "1.8.0_121"
 Java(TM) SE Runtime Environment (build 1.8.0_121-b13)
 Java HotSpot(TM) 64-Bit Server VM (build 25.121-b13, mixed mode)
配置无密钥登录
克隆集群并修改hostname
点击VMware Workstation->虚拟机->管理->克隆,克隆一台奴隶机(电脑条件允许的话可以多克隆几台)
修改两台虚拟机的hostname
在一台虚拟机中用root权限systemctl --static set-hostname master
在另一台中用root权限systemctl --static set-hostname slave修改hosts文件确保虚拟机之间可以互联
在master中用root权限
vim /etc/hosts,将原来的localhost删掉,添加
192.168.75.137 master
 192.168.75.136 slave
就是两台虚拟机各自的IP地址+hostname
不知道IP地址的话,可以用使用ifconfig命令查看
发送hosts文件到slave机
scp /etc/hosts liufei@slave:/etc/
检查是否能ping通ping slavessh无密钥登陆
关闭防火墙
systemctl disable firewalld.service
检查防火墙状态systemctl status firewalld.service
进入home目录/home/liufei下
生成.ssh目录ssh-keygen -t rsa,用rsa算法产生公钥和私钥
进入.ssh隐藏目录cd .ssh,可以看到id_rsa id_rsa.pub两个文件,一个是私钥,一个是公钥
我们把公钥放进authorized_keys文件,cat id_rsa.pub >> authorized_keys
改变authorized_keys文件权限,chmod 600 authorized_keys
改变.ssh目录权限,chmod 700 .ssh
发送authorized_keys到slave机,scp authorized_keys liufei@slave:/home/liufei/.ssh/
检查无密钥登录是否成功,ssh slave,发现可以进入slave
配置Hadoop
- 解压hadoop压缩包
在
/home/liufei目录下创建一个文件夹mkdir hadoop
进入hadoop文件夹,cd hadoop,解压hadoop压缩包到hadoop文件夹下
tar -zxvf hadoop-2.7.3.tar.gz -C /home/liufei/hadoop配置相关文件
进入hadoop/hadoop-2.7.3/etc/hadoop文件夹,
cd hadoop/hadoop-2.7.3/etc/hadoop
1.配置hadoop-env.sh
vim hadoop-env.sh,在最后一行加上export JAVA_HOME=/home/liufei/hadoop/jdk1.8.0_121
2.配置core-site.xml
在configuration标签中添加
 fs.default.name
 hdfs://master:9000
 true


 hadoop.tmp.dir
 /home/liufei/hadoop/tmp


 ds.default.name
 hdfs://master:54310
 true
3.配置hdfs-site.xml
添加
 dfs.namenode.name.dir
 file:/home/liufei/hadoop/dfs/name
 true


 dfs.datanode.data.dir
 file:/home/liufei/hadoop/dfs/data
 true


 dfs.replication
 1
4.配置mapred-site.xml
先更改mapred-site.xml.template名称为mapred-site.xml
mv mapred-site.xml.template mapred-site.xml
在其中添加
 mapreduce.framework.name
 yarn


 mapreduce.jobhistory.address
 master:10020


 mapreduce.jobhistory.webapp.address
 master:19888
5.配置yarn-site.xml
添加
 yarn.nodemanager.aux-services
 mapreduce_shuffle


 yarn.nodemanager.aux-services.mapreduce.shuffle.class
 org.apache.hadoop.mapred.ShuffleHandler


 yarn.resourcemanager.hostname
 master


 yarn.resourcemanager.address
 master:8032


 yarn.resourcemanager.scheduler.address
 master:8030


 yarn.resourcemanager.resource-tracker.address
 master:8031


 yarn.resourcemanager.admin.address
 master:8033


 yarn.resourcemanager.webapp.address
 master:8088
6.配置master文件,添加master
7.配置slaves文件,添加
master
 slave
将配置好的hadoop发送到slave机中
scp -r hadoop-2.7.3 slave:/home/liufei/hadoop
切换工作目录到hadoop-2.7.3下
cd
 cd hadoop/hadoop-2.7.3
格式化namenode和datanode
bin/hdfs namenode -format
 bin/hdfs datanode -format
启动集群
sbin/start-dfs.sh
 sbin/start-yarn.sh
在master中输入jps命令可以看到6个进程
NameNode
 SecondNameNode
 ResourceManager
 JPS
 DataNode
 NodeManager
在slave中输入jps可以发现3个
DataNode
 JPS
 NodeManager
配置Eclipse
解压
eclipse压缩包tar -zxvf eclipse-jee-mars-2-linux-gtk-x86_64.tar.gz
把hadoop-eclipse-plugin-2.7.3.jar插件放到eclipse下面plugins目录下
插件链接http://pan.baidu.com/s/1kUD7Msv
使插件生效,/home/liufei/eclipse/eclipse -clean
它会自动打开eclipse
- 编辑Map Reduce运行环境
打开
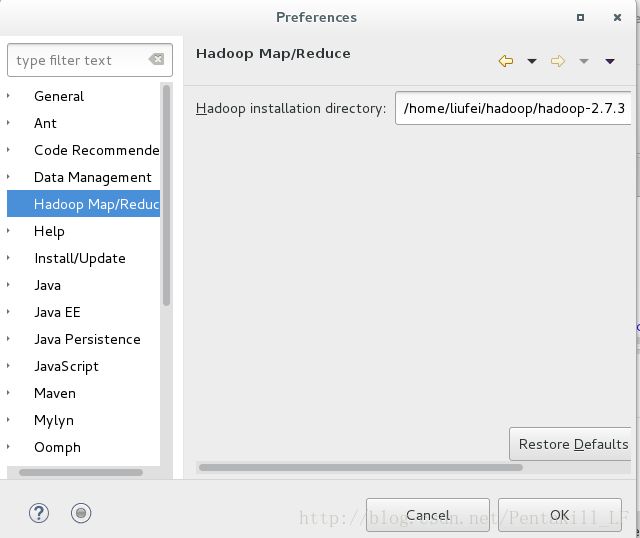
eclipse->Window->Preference->Hadoop Map/Reduce菜单
编辑`Hadoop installation
directory为你当前hadoop目录,即/home/liufei/hadoop/hadoop-2.7.3,确定OK`
>
打开
Window菜单下Perspective->Open Perspective->Other选项
选择Map/Reduce选项
选中左侧
DFS Location选项,在下方空白处点击右键创建新的New Hadoop Location,编辑配置
点击左侧
DFS Location展开可以看到MapReduce Location,在(1)目录下创建user目录,然后在user目录下创建liufei目录,在liufei目录下创建input目录
- 运行MapReduce项目测试一下
选择eclipse的File菜单选择创建new project,项目类型为Map/Reduce Project,项目名为Word Count创建测试类
WordCount,选择包名为org.apache.hadoop.examples,完成,开始写代码
![enter description here][7]
package org.apache.hadoop.examples;
import java.io.IOException;
import java.net.URI;
import java.util.Random;
import java.util.StringTokenizer;
import org.apache.commons.logging.Log;
import org.apache.commons.logging.LogFactory;
import org.apache.hadoop.conf.Configuration;
import org.apache.hadoop.fs.FileSystem;
import org.apache.hadoop.fs.Path;
import org.apache.hadoop.io.IntWritable;
import org.apache.hadoop.io.Text;
import org.apache.hadoop.io.WritableComparable;
import org.apache.hadoop.mapreduce.Job;
import org.apache.hadoop.mapreduce.Mapper;
import org.apache.hadoop.mapreduce.Reducer;
import org.apache.hadoop.mapreduce.lib.input.FileInputFormat;
import org.apache.hadoop.mapreduce.lib.input.SequenceFileInputFormat;
import org.apache.hadoop.mapreduce.lib.map.InverseMapper;
import org.apache.hadoop.mapreduce.lib.output.FileOutputFormat;
import org.apache.hadoop.mapreduce.lib.output.SequenceFileOutputFormat;
import org.apache.hadoop.util.GenericOptionsParser;
public class WordCount {
// 定义log变量
public static final Log LOG = LogFactory.getLog(FileInputFormat.class);
public static class WCMapper extends Mapper {
private final static IntWritable one = new IntWritable(1);
private Text word = new Text();
public void map(Object key, Text value, Context context) throws IOException, InterruptedException {
StringTokenizer itr = new StringTokenizer(value.toString());
while (itr.hasMoreTokens()) {
word.set(itr.nextToken());
context.write(word, one);
}
}
}
public static class WCReducer extends Reducer {
private IntWritable result = new IntWritable();
public void reduce(Text key, Iterable values, Context context)
throws IOException, InterruptedException {
int sum = 0;
for (IntWritable val : values) {
sum += val.get();
}
// 这里的sum就是每个word的输出词频
result.set(sum);
context.write(key, result);
}
}
private static class WCComparator extends IntWritable.Comparator {
public int compare(WritableComparable a, WritableComparable b) {
return -super.compare(a, b);
}
public int compare(byte[] b1, int s1, int l1, byte[] b2, int s2, int l2) {
return -super.compare(b1, s1, l1, b2, s2, l2);
}
}
public static void main(String[] args) throws Exception {
Configuration conf = new Configuration();
String[] otherArgs = new GenericOptionsParser(conf, args).getRemainingArgs();
if (otherArgs.length != 2) {
System.err.println("Usage: wordcount " );
System.exit(2);
}
FileSystem fileSystem = FileSystem.get(new URI(args[1]), conf, "root");
if (fileSystem.exists(new Path(args[1]))) {
fileSystem.delete(new Path(args[1]), true);
}
Path tempDir = new Path("wordcount-temp-" + Integer.toString(new Random().nextInt(Integer.MAX_VALUE))); // 定义一个临时目录
Job job = Job.getInstance(conf);
job.setJarByClass(WordCount.class);
job.setMapperClass(WCMapper.class);
job.setCombinerClass(WCReducer.class);
job.setReducerClass(WCReducer.class);
job.setOutputKeyClass(Text.class);
job.setOutputValueClass(IntWritable.class);
FileInputFormat.addInputPath(job, new Path(otherArgs[0]));
FileOutputFormat.setOutputPath(job, tempDir);// 先将词频统计任务的输出结果写到临时目
// 录中, 下一个排序任务以临时目录为输入目录。
job.setOutputFormatClass(SequenceFileOutputFormat.class);
if (job.waitForCompletion(true)) {
Job sortJob = Job.getInstance(conf);
sortJob.setJarByClass(WordCount.class);
FileInputFormat.addInputPath(sortJob, tempDir);
sortJob.setInputFormatClass(SequenceFileInputFormat.class);
/* InverseMapper由hadoop库提供,作用是实现map()之后的数据对的key和value交换 */
sortJob.setMapperClass(InverseMapper.class);
/* 将 Reducer 的个数限定为1, 最终输出的结果文件就是一个。 */
sortJob.setNumReduceTasks(1);
FileOutputFormat.setOutputPath(sortJob, new Path(otherArgs[1]));
sortJob.setOutputKeyClass(IntWritable.class);
sortJob.setOutputValueClass(Text.class);
/*
* Hadoop 默认对 IntWritable 按升序排序,而我们需要的是按降序排列。 因此我们实现了一个
* IntWritableDecreasingComparator 类, 并指定使用这个自定义的 Comparator
* 类对输出结果中的 key (词频)进行排序
*/
sortJob.setSortComparatorClass(WCComparator.class);
System.exit(sortJob.waitForCompletion(true) ? 0 : 1);
}
FileSystem.get(conf).deleteOnExit(tempDir);
}
}
选中
WordCount类,右键点击Run As,选择Run Configurations,在Arguments选项处添加input output
把
/home/liufei/hadoop/hadoop-2.7.3/etc/hadoop目录下的core-site.xml,hdfs-site.xml和log4j.properties3个文件复制到WordCouunt项目下的src目录下在
DFS Location下面我们自己创建的input目录下,右键选择Upload files to DFS,随便选一个文本文件,最好有字符串的=[Barack Obama.txt][9]。
右键开始运行WordCount类,完成后可以在DFS Location的liufei目录下发现Output目录,点击里面的文件可以看到运行结果
常见问题
- DataNode没有显示
先暂停hadoop服务,
sbin/stop-dfs.sh和sbin/stop-yarn.sh
将master和slave机上tmp和dfs目录删除
重新格式化namenode和datanode
再启动集群
centos无法上网
确保网络没问题的情况下
vmware的ubuntu使用NAT共享主机的ip上网,只需设置DHCP便可自动获取ip。
NAT方式上不了网时,应该是与VMware相关的服务没有打开
打开‘运行’,敲cmd后输入:
net start “VMware Authorization Service”
net start “VMware DHCP Service”
net start “VMware NAT Service”
便开启相应服务!不想敲命令也可以直接去控制面板->管理工具->服务
确保VMware DHCP Service 和VMware NAT Service 服务已经启动!
设置开机自启动网路
进入centos系统,编辑/etc/sysconfig/network-scripts/ifcfg-ens***[随机数字],
把ONBOOT=no改为yes,然后service network restart。
master的DFS Location拒绝连接
确保hadoop正常运行
检查MapReduce Location配置是否正确,修改MapReduce的主机名为IP地址
netstat -anp|grep 端口ID
查看详细端口信息
kill -9 端口ID
强制关闭端口


