深度学习AI美颜系列---AI 发型管家(美颜相机发型管家算法解析)
美颜相机---AI 发型管家效果的算法解析
####前言
本文为去年写的Gitchat文章,由于Gitchat有时间版权限制,一年时间,所以今天才能发布到CSDN博客上来。
本文为大家介绍美颜相机中 AI 发型管家效果的算法解析,当然,本人并没有美颜相机的算法代码,只是从自己的角度根据美颜相机的效果呈现,来分析猜测算法流程,最后得到近似的效果。
首先,我们看一下美颜相机的发型管家介绍:

这个界面明确划分了男生和女生,我们发现效果呈现流程是这样的:
###具体流程
1.上传一张标准正脸测试图,效果流程如下:
2.上传一张侧脸的测试图,发现界面提示 “ 使用正脸照片效果更加呦 ~ ”;
3.上传一张男生测试图,会得到一个男生发型效果,女生测试图会得到女生发型效果;
4.发型效果中发型的颜色可以更改选择;
5.默认推荐发型如果用户不喜欢,可以自行更改;
有了上面的 5 个特点总结,我们就可以分析算法流程了,这里我分析的结果如下:
####分析算法流程
1.用户选择一张照片或者拍照之后,首先进行人脸旋转角度检测,如果角度非正脸角度,提示用户最好重新上传照片;
2.承接 1 之后,用户人像照片会进行性别识别等分析,也就是界面 1 中所示的过程,这个过程会做如下处理:
① 性别识别;
② 根据性别到男女对应的发型模版库中进行脸型和发型匹配,得到最接近或者最优的发型模版匹配;
③ 根据最佳模版的一些参数,对用户照片进行美颜、美妆处理;
3.根据 2 中得到的最佳模版,将用户美颜美妆处理之后的照片进行换脸,得到界面 2 中对应的推荐发型;
4.中得到的效果图进行头发分割,得到对应的头发区域;
5.根据 4 中的头发区域,对 3 中得到的效果图进行头发换色,得到最终的效果图;
6.用户可以手动选择不同的发型,然后按照 2 - 5 的步骤得到对应的效果;
好了,到此,我们已经仔细分析了美颜相机发型管家的算法实现原理,当然是猜测的结果,下面我们来验证一下。
####实现以及过程调整
这里我将分模块来实现上述的过程,并将过程做了简单的调整:
#####**1.人脸检测 + 关键点识别 + 人脸角度检测**
这一步通常使用第三方人脸 SDK,比如商汤,旷世或者腾讯开源的调用 API 等,当然你也可以自己训练制作人脸 SDK;
① 判断有无人脸,有人脸则进行关键点检测和角度检测;
② 根据角度判断,正脸范围则继续;
#####**2.性别识别**
这里本人基于最简单的 CNN 网络来构架性别识别,具体连接:[性别识别算法博客链接](https://blog.csdn.net/trent1985/article/details/80253642)
网络结构如下:
该网络中输入图片为大小为 92 X 112 的人脸单通道灰度图像,类别标签(男标签 [1,0],女标签 [0,1]),所有参数均在网络结构图中标注。
代码分为 `GenderUtils.py/GenderTrain.py/GenderTest.py` 三部分
网络结构部分代码如下:
    # AGE
import matplotlib.image as img
import tensorflow as tf
import numpy as np
import matplotlib.pyplot as plt
from tensorflow.python.framework import ops
import math
import os
import csv

def create_placeholders(n_H0, n_W0, n_C0, n_y):
    """
    Creates the placeholders for the tensorflow session.

    Arguments:
    n_H0 -- scalar, height of an input image
    n_W0 -- scalar, width of an input image
    n_C0 -- scalar, number of channels of the input
    n_y -- scalar, number of classes

    Returns:
    X -- placeholder for the data input, of shape [None, n_H0, n_W0, n_C0] and dtype "float"
    Y -- placeholder for the input labels, of shape [None, n_y] and dtype "float"
    """

    X = tf.placeholder(name='X', shape=(None, n_H0, n_W0, n_C0), dtype=tf.float32)
    Y = tf.placeholder(name='Y', shape=(None, n_y), dtype=tf.float32)
    return X, Y

def random_mini_batches(X, Y, mini_batch_size = 64, seed = 0):
    """
    Creates a list of random minibatches from (X, Y)

    Arguments:
    X -- input data, of shape (input size, number of examples) (m, Hi, Wi, Ci)
    Y -- true "label" vector (containing 0 if cat, 1 if non-cat), of shape (1, number of examples) (m, n_y)
    mini_batch_size - size of the mini-batches, integer
    seed -- this is only for the purpose of grading, so that you're "random minibatches are the same as ours.

    Returns:
    mini_batches -- list of synchronous (mini_batch_X, mini_batch_Y)
    """

    m = X.shape[0]                  # number of training examples
    mini_batches = []
    np.random.seed(seed)

    # Step 1: Shuffle (X, Y)
    permutation = list(np.random.permutation(m))
    shuffled_X = X[permutation,:,:,:]
    shuffled_Y = Y[permutation,:]

    # Step 2: Partition (shuffled_X, shuffled_Y). Minus the end case.
    num_complete_minibatches = int(math.floor(m / mini_batch_size)) # number of mini batches of size mini_batch_size in your partitionning
    for k in range(0, int(num_complete_minibatches)):
        mini_batch_X = shuffled_X[k * mini_batch_size : k * mini_batch_size + mini_batch_size,:,:,:]
        mini_batch_Y = shuffled_Y[k * mini_batch_size : k * mini_batch_size + mini_batch_size,:]
        mini_batch = (mini_batch_X, mini_batch_Y)
        mini_batches.append(mini_batch)

    # Handling the end case (last mini-batch < mini_batch_size)
    if m % mini_batch_size != 0:
        mini_batch_X = shuffled_X[num_complete_minibatches * mini_batch_size : m,:,:,:]
        mini_batch_Y = shuffled_Y[num_complete_minibatches * mini_batch_size : m,:]
        mini_batch = (mini_batch_X, mini_batch_Y)
        mini_batches.append(mini_batch)

    return mini_batches

def row_csv2dict(csv_file):
    dict_club={}
    with open(csv_file)as f:
        reader=csv.reader(f,delimiter=',')
        for row in reader:
            dict_club[row[0]]=row[1]
    return dict_club

def input_data():

    path = "data/train/"
    train_num = sum([len(x) for _, _, x in os.walk(os.path.dirname(path))])
    image_train = np.zeros((train_num,112,92))
    label_train = np.ones((train_num,2))
    train_label_dict = row_csv2dict("data/train.csv")
    count = 0
    for key in train_label_dict:
        if int(train_label_dict[key]) == 0:
            label_train[count, 0] = 1
            label_train[count, 1] = 0
        else:
            label_train[count, 1] = 1
            label_train[count, 0] = 0
        filename = path + str(key)
        image_train[count] = img.imread(filename)
        count = count + 1
    path = "data/test/"
    test_num = sum([len(x) for _, _, x in os.walk(os.path.dirname(path))])
    image_test = np.zeros((test_num, 112,92))
    label_test = np.ones((test_num,2))
    test_label_dict = row_csv2dict("data/test.csv")
    count = 0
    for key in test_label_dict:
        if int(test_label_dict[key]) == 0:
            label_test[count, 0] = 1
            label_test[count, 1] = 0
        else:
            label_test[count, 1] = 1
            label_test[count, 0] = 0
        filename = path + str(key)
        image_test[count] = img.imread(filename)
        count = count + 1
    return image_train, label_train,image_test, label_test

def weight_variable(shape,name):
    return tf.Variable(tf.truncated_normal(shape, stddev = 0.1),name=name)

def bias_variable(shape,name):
    return tf.Variable(tf.constant(0.1, shape = shape),name=name)

def conv2d(x,w,padding="SAME"):
    if padding=="SAME" :
        return tf.nn.conv2d(x, w, strides = [1,1,1,1], padding = "SAME")
    else:
        return tf.nn.conv2d(x, w, strides = [1,1,1,1], padding = "VALID")

def max_pool(x, kSize, Strides):
    return tf.nn.max_pool(x, ksize = [1,kSize,kSize,1],strides = [1,Strides,Strides,1], padding = "SAME")

def compute_cost(Z3, Y):
    """
    Computes the cost

    Arguments:
    Z3 -- output of forward propagation (output of the last LINEAR unit), of shape (6, number of examples)
    Y -- "true" labels vector placeholder, same shape as Z3

    Returns:
    cost - Tensor of the cost function
    """
    cost = tf.reduce_mean(tf.nn.softmax_cross_entropy_with_logits(logits=Z3, labels=Y))
    return cost

def initialize_parameters():
    tf.set_random_seed(1)
    W1 = tf.cast(weight_variable([5,5,1,32],"W1"), dtype = tf.float32)
    b1 = tf.cast(bias_variable([32],"b1"), dtype = tf.float32)
    W2 = tf.cast(weight_variable([5,5,32,64],"W2"), dtype = tf.float32)
    b2 = tf.cast(bias_variable([64],"b2"), dtype = tf.float32)
    W3 = tf.cast(weight_variable([5,5,64,128],"W3"), dtype = tf.float32)
    b3 = tf.cast(bias_variable([128],"b3"), dtype = tf.float32)

    W4 = tf.cast(weight_variable([14*12*128,500],"W4"), dtype = tf.float32)
    b4 = tf.cast(bias_variable([500],"b4"), dtype = tf.float32)
    W5 = tf.cast(weight_variable([500,500],"W5"), dtype = tf.float32)
    b5 = tf.cast(bias_variable([500],"b5"), dtype = tf.float32)
    W6 = tf.cast(weight_variable([500,2],"W6"), dtype = tf.float32)
    b6 = tf.cast(bias_variable([2],"b6"), dtype = tf.float32)
    parameters = {"W1":W1,
                 "b1":b1,
                 "W2":W2,
                 "b2":b2,
                 "W3":W3,
                 "b3":b3,
                 "W4":W4,
                 "b4":b4,
                 "W5":W5,
                 "b5":b5,
                 "W6":W6,
                 "b6":b6}
    return parameters

def cnn_net(x, parameters, keep_prob = 1.0):
    #frist convolution layer
    w_conv1 = parameters["W1"]
    b_conv1 = parameters["b1"]
    h_conv1 = tf.nn.relu(conv2d(x,w_conv1) + b_conv1)  #output size 112x92x32
    h_pool1 = max_pool(h_conv1,2,2)    #output size 56x46x32

    #second convolution layer
    w_conv2 = parameters["W2"]
    b_conv2 = parameters["b2"]
    h_conv2 = tf.nn.relu(conv2d(h_pool1, w_conv2) + b_conv2) #output size 56x46x64
    h_pool2 = max_pool(h_conv2,2,2) #output size 28x23x64

    #third convolution layer
    w_conv3 = parameters["W3"]
    b_conv3 = parameters["b3"]
    h_conv3 = tf.nn.relu(conv2d(h_pool2,w_conv3) + b_conv3) #output size 28x23x128
    h_pool3 = max_pool(h_conv3,2,2) #output size 14x12x128

    #full convolution layer
    w_fc1 = parameters["W4"]
    b_fc1 = parameters["b4"]
    h_fc11 = tf.reshape(h_pool3,[-1,14*12*128])
    h_fc1 = tf.nn.relu(tf.matmul(h_fc11,w_fc1) + b_fc1)

    w_fc2 = parameters["W5"]
    b_fc2 = parameters["b5"]
    h_fc2 = tf.nn.relu(tf.matmul(h_fc1,w_fc2)+b_fc2)
    h_fc2_drop = tf.nn.dropout(h_fc2,keep_prob)

    w_fc3 = parameters["W6"]
    b_fc3 = parameters["b6"]
    y_conv = tf.matmul(h_fc2_drop, w_fc3) + b_fc3
    #y_conv = tf.nn.softmax(tf.matmul(h_fc2_drop, w_fc3) + b_fc3)
    #rmse = tf.sqrt(tf.reduce_mean(tf.square(y_ - y_conv)))
    #cross_entropy = tf.reduce_mean(tf.nn.softmax_cross_entropy_with_logits(labels = y, logits = y_conv))
    #train_step = tf.train.GradientDescentOptimizer(0.001).minimize(cross_entropy)
    #correct_prediction  = tf.equal(tf.argmax(y_conv, 1), tf.argmax(y,1))
    #accuracy = tf.reduce_mean(tf.cast(correct_prediction, tf.float32))
    return y_conv

def save_model(saver,sess,save_path):
    path = saver.save(sess, save_path)
    print 'model save in :{0}'.format(path)
完整代码工程下载连接:
百度网盘地址(密码5wst):[百度网盘下载地址]
Github地址:[Github下载地址]
#####**3.脸型与发型匹配**
在该模块中,本人使用了最简单的欧式距离,来进行用户照片与模版脸型的匹配计算:
假设用户脸型点位(人脸关键点)为A,模版关键点为B,遍历模版库中所有模版,计算距离 Dis:
>Dis =sqrt( (Ax - Bx) * (Ax - Bx) + (Ay - By) * (Ay - By))
选取 Dis 最小的模版作为最优模版;
上述过程是脸型的匹配,根据美颜相机的提示,只显示了脸型分析,这里本人猜测还有对于发型的匹配,比如,短发型的用户照片,会匹配到短发型的模版效果,不过本人暂时没有找到合适的算法,这里暂时忽略;
#####**4. 根据 3 中得到的最优模版,设定该模版对应的美颜和美妆参数,对用户照片进行美颜美妆处理;**
这个过程中,美颜包括磨皮美白、大眼、瘦脸等等,看大家具体需求而定,我这里只进行了磨皮美白美颜算法,这里相关连接如下:
>[磨皮算法博客 A]
[磨皮算法博客 B]
磨皮美白算法相关的资料很多,大家也可以自行百度,本人这里主要讲 AI 发型管家的算法流程问题。
#####**为什么这里不是统一固定的美颜美妆参数呢?**
原因是这样的:不同的发型效果图也是不一样的,考虑到不同发型,不同颜色场景,实际上从审美角度看,是需要搭配不同的服饰,不同的妆容的,所以这里是不同模版对应不同的参数。
美颜之后是化妆,这里本人使用的是妆容迁移技术,直接将妆容模版的妆容效果迁移到用户照片中去,相关的算法、效果连接如下:
>[妆容迁移算法连接 A]
[妆容迁移算法连接 B]
这一步对应的效果图举例:
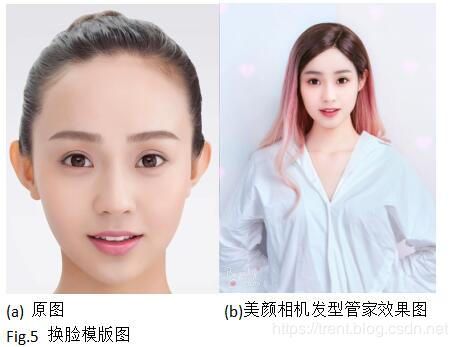
这里本人直接使用美颜相机发型管家处理的效果图当作本人的模版图(模版的设计非常考究,需要设计高手+有版权的模特,本人这里测试图仅供测试,切勿做商务用途,以免侵权,若有侵权敬请告知,本人立刻删除),如下所示:
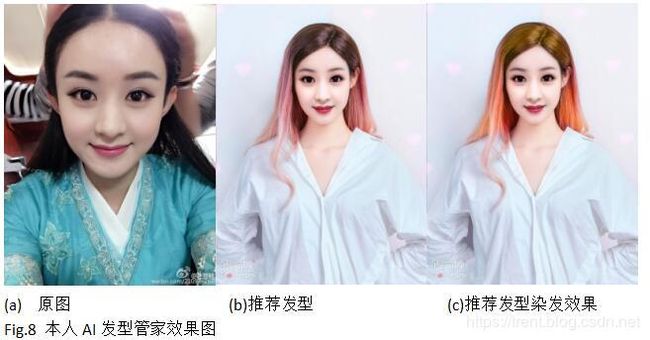
根据上面的换脸模版图,我们进行妆容迁移 + 换脸,如下图所示:
#####**6.头发换色**
这个模块主要实现最后效果图的头发颜色更改,用户可以有多种颜色选择,来满足自己的审美需求;
换发色的算法基本上是基于颜色空间的颜色替换,具体流程如下:
本人做过详细的算法讲解,连接如下:[染发算法博客链接]
这一步的算法效果举例如下:
上面 1 - 6 个步骤,就是本人实现的关于美颜相机发型管家效果的算法流程,由于这个流程中相关的算法太复杂,模块组合太多,所以基本上本人以算法流程解析为主,相关的算法具体实现都给了对应的算法与 demo 的连接,大家可以仔细研究,这里不要吐槽算法实现的繁琐,实际上任何一个好的效果,它的背后大多数情况下都是多个算法的组合;
最后给出本人实现的完整的效果流程图:
对比美颜相机发型管家的效果如下:
最后本人给出一个 DEMO 看效果:[美颜相机发型管家 PC DEMO ]
>注意:算法是核心,掌握了算法流程,才是真正的掌握,不要过分追求代码,没意义。(不少读者吐槽我不分享代码,一方面本人理论上只讲思路,另一方面,研究可能涉及商业机密,不方便给出详细代码,再者,一味追求代码复制粘贴的图像算法工程师绝对不是一个合格的图像算法工程师!)


