转载 引自:RabbitMQ(二)CentOS6.7 下的 HelloWorld
前一篇写了在Windows下的安装使用,这次记录下CentOS6.7下的安装使用.
其实在CentOS下和Windows下过程是一样的,都是 先安装Erlang环境,再安装RabbitMQ Server.
只不过CentOS下经常遇到各种问题,所以感觉上麻烦点.
版本是 CentOS6.7+RabbitMQ3.6.5,官方文档地址 http://www.rabbitmq.com/install-rpm.html
主要分以下部分
1) 安装Erlang环境
2)安装RabbitMQ Server
3)启动server,并启用管理台插件
4)新增用户并设置权限
5)外网登录管理台
6)代码连接CentOS下的MQ
7)遇到的问题及解决办法
1)安装Erlang环境
官网提供了3种安装方法,我这里用第一种.
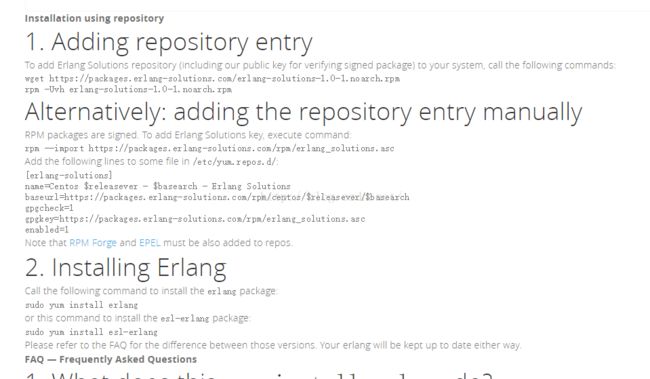
按官网指引,来到 https://www.erlang-solutions.com/resources/download.html 页面, 这里可以选择Linux的版本进行对应的下载.
我最开始 选择了centos,然后下载19.1.5这个版本, 然后进行安装发现少一堆包.
最后还是安装网页下发的 说明进行在线安装

首先
- wget https://packages.erlang-solutions.com/erlang-solutions-1.0-1.noarch.rpm
- rpm -Uvh erlang-solutions-1.0-1.noarch.rpm
这2句一般不会遇到问题,然后
遇到问题1
- http://packages.erlang-solutions.com/rpm/centos/6/x86_64/repodata/primary.xml.gz: [Errno -1] Metadata file does not match checksum
- Trying other mirror.
- erlang-solutions/primary | 869 kB 00:00
- http://packages.erlang-solutions.com/rpm/centos/6/x86_64/repodata/primary.xml.gz: [Errno -1] Metadata file does not match checksum
- Trying other mirror.
- Error: failure: repodata/primary.xml.gz from erlang-solutions: [Errno 256] No more mirrors to try.
解决方法见7)中的问题1.解决后继续
因为网速慢,遇到问题2
解决方法见7)中的问题2.解决后继续
Erlang安装完成.
2)安装RabbitMQ Server
需要先下载 rpm文件 , (上面给的官网安装地址 最上面就有下载的地方)
然后执行下面命令
- rpm --import https://www.rabbitmq.com/rabbitmq-release-signing-key.asc
- yum install rabbitmq-server-3.6.5-1.noarch.rpm
注:上面yum命令 要在 下载的rpm文件的目录下进行
遇到问题3
- Error: Package: rabbitmq-server-3.6.5-1.noarch (/rabbitmq-server-3.6.5-1.noarch)
- Requires: socat
解决方法见7)中的问题3.解决后继续
完成安装
3)启动server,并启用管理台插件
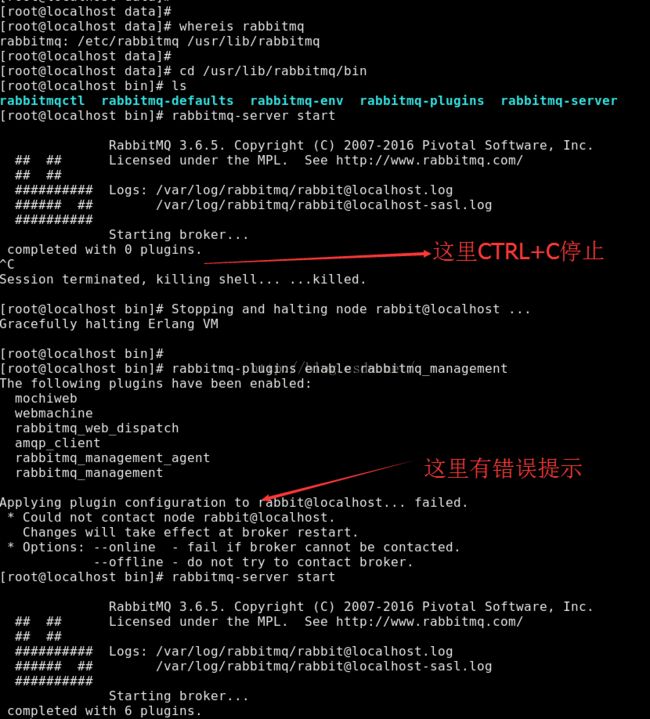
- 执行 whereis rabbitmq
- 结果 rabbitmq: /etc/rabbitmq /usr/lib/rabbitmq
- 执行 cd /usr/lib/rabbitmq/bin
- 执行 rabbitmq-server start
结果如下
- RabbitMQ 3.6.5. Copyright (C) 2007-2016 Pivotal Software, Inc.
- ## ## Licensed under the MPL. See http://www.rabbitmq.com/
- ## ##
- ########## Logs: /var/log/rabbitmq/[email protected]
- ###### ## /var/log/rabbitmq/[email protected]
- ##########
- Starting broker...
- ompleted with 0 plugins.
可以看到默认没有插件,然后我们去启动管理台的插件
- [root@localhost bin]# rabbitmq-plugins enable rabbitmq_management
- The following plugins have been enabled:
- mochiweb
- webmachine
- rabbitmq_web_dispatch
- amqp_client
- rabbitmq_management_agent
- rabbitmq_management
-
- Applying plugin configuration to rabbit@localhost... failed.
- * Could not contact node rabbit@localhost.
- Changes will take effect at broker restart.
- * Options: --online - fail if broker cannot be contacted.
- --offline - do not try to contact broker.
这里出现了 contact node rabbit@localhost 的提示,但是当时没注意,就继续往下了
执行启动命令. 启动完成
整体如下图

启动完成.
4)新增用户并设置权限
因为假想中这是服务器,我们平时访问肯定都是在外网,所以默认的guest只能在本机使用肯定不行了.(官方推荐删掉guest或者修改密码)
所以我们需要新增一个可以外网访问的用户.
可以在页面新增(更简单一点),也可以用命令新增. 我们这里用命令
- rabbitmqctl add_user admin 123456
遇到问题4,和启动插件时候有点类似 Error: unable to connect to node rabbit@localhost: nodedown

解决方法见7)中的问题4.解决后继续
- rabbitmqctl set_user_tags admin administrator
- rabbitmqctl set_permissions -p "/" admin ".*" ".*" ".*"
上面2句分别是设置角色(非官方说法),设置外网登录权限
OK.新增用户授权完成.
5)外网登录管理台
在本地浏览器输入CentOS的管理台地址 http://192.168.1.100:15672/
这里要注意下centos的防火墙状态,我测试就直接把防火墙关了
- 关闭防火墙
- /etc/init.d/iptables stop
使用刚才创建的admin登录后,如下图

如果登录失败,返回状态是401的话,就是权限设置的有问题.
6)代码连接CentOS下的MQ
代码和上一篇Windows下的基本一样,只是需要指定下IP,用户名,密码
- import com.rabbitmq.client.Channel;
- import com.rabbitmq.client.Connection;
- import com.rabbitmq.client.ConnectionFactory;
-
-
- public class Send {
- private final static String QUEUE_NAME = "hello";
-
-
- public static void main(String[] argv) throws Exception {
- ConnectionFactory factory = new ConnectionFactory();
- factory.setHost("192.168.1.100");
- factory.setUsername("admin");
- factory.setPassword("123456");
- Connection connection = factory.newConnection();
- Channel channel = connection.createChannel();
-
-
- channel.queueDeclare(QUEUE_NAME, false, false, false, null);
- String message = "Hello World!";
- channel.basicPublish("", QUEUE_NAME, null, message.getBytes("UTF-8"));
- System.out.println(" [x] Sent '" + message + "'");
-
-
- channel.close();
- connection.close();
- }
- }
接收的类也一样
- import com.rabbitmq.client.*;
-
-
- import java.io.IOException;
-
-
- public class Recv {
-
- private final static String QUEUE_NAME = "hello";
-
- public static void main(String[] argv) throws Exception {
- ConnectionFactory factory = new ConnectionFactory();
- factory.setHost("192.168.1.100");
- factory.setUsername("admin");
- factory.setPassword("123456");
- Connection connection = factory.newConnection();
- Channel channel = connection.createChannel();
-
- channel.queueDeclare(QUEUE_NAME, false, false, false, null);
- System.out.println(" [*] Waiting for messages. To exit press CTRL+C");
-
- Consumer consumer = new DefaultConsumer(channel) {
- @Override
- public void handleDelivery(String consumerTag, Envelope envelope, AMQP.BasicProperties properties, byte[] body)
- throws IOException {
- System.out.println("consumerTag"+consumerTag);
- System.out.println("properties"+properties.getMessageId());
- String message = new String(body, "UTF-8");
- System.out.println(" [x] Received '" + message + "'");
- }
- };
- channel.basicConsume(QUEUE_NAME, true, consumer);
- }
- }
端口号因为是默认的,指定不指定无所谓了.
运行代码,成功执行.
7)遇到的问题及解决办法
问题1
- http://packages.erlang-solutions.com/rpm/centos/6/x86_64/repodata/primary.xml.gz: [Errno -1] Metadata file does not match checksum
- Trying other mirror.
解决1
先安装网上的 yum clean all 发现没解决.
继续深入
- wget --no-cache http://packages.erlang-solutions.com/rpm/centos/6/x86_64/repodata/primary.xml.gz
- sha1sum primary.xml.gz
-
- 得到下面的
- 1572f7949d751054a14e0b24ea3f2592633d06c4 primary.xml.gz
然后找到本地的
- cd /var/cache/yum/x86_64/6/erlang-solutions
- vim repomd.xml
发现里面的数值和我们计算的不一致,则修改成上面计算的.(下面是我修改后的)
- <data type="primary">
- <location href="repodata/primary.xml.gz"/>
- <checksum type="sha">1572f7949d751054a14e0b24ea3f2592633d06c4checksum>
- <timestamp>1478542719timestamp>
- <open-checksum type="sha">61989f5a64efd4daecd0d719457a47a2290b7126open-checksum>
- data>
保存,退出.继续执行 sudo yum install erlang, 我这还有个这种提示,但是继续往下运行了. 问题解决
参考 http://tilt.lib.tsinghua.edu.cn/node/385
搞定!
问题2
解决2
设置超时时间 加上 timeout=1200
网速慢可以设置更长点.
搞定!
问题3
- Error: Package: rabbitmq-server-3.6.5-1.noarch (/rabbitmq-server-3.6.5-1.noarch)
- Requires: socat
解决3
看提示就是需要socat的包,
去下载socat
- Loaded plugins: fastestmirror, refresh-packagekit, security
- Setting up Install Process
- Loading mirror speeds from cached hostfile
- * base: mirrors.btte.net
- * extras: mirrors.btte.net
- * updates: mirror.bit.edu.cn
- No package socat available.
- Error: Nothing to do
继续解决,更新源
- wget --no-cache http://www.convirture.com/repos/definitions/rhel/6.x/convirt.repo -O /etc/yum.repos.d/convirt.repo
- yum install socat
- yum install rabbitmq-server-3.6.5-1.noarch.rpm
搞定!
问题4
- Error: unable to connect to node rabbit@localhost: nodedown
解决4
这个问题官网也提到过,说是cookie不一致之类的问题.
网上搜了好多,其实在我们 开启管理台插件的时候,就已经看到提示了. 那就是重启解决.
最后执行
- service rabbitmq-server restart
然后再执行命令, 果然OK.
搞定!
总结下.在centos下安装,不同的机器可能遇到不同的问题.我安装了3次就分别遇到不同的问题.都记录在里面了.
一般通过网上搜索都可以解决!


