全链路追踪ZipKin
支持语言:java, js, php, python, c#, go, c/c++
一、组件
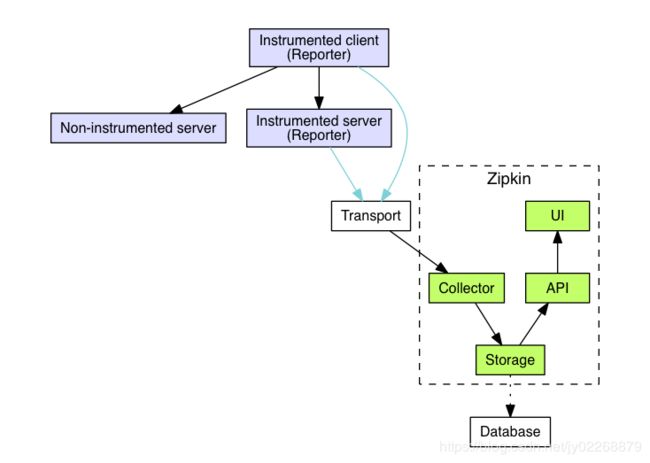
1.conllector:收集服务上报数据。支持http、grpc、kafka上报。
2.storage:数据可落地到Cassandra、ElasticSearch 、MySQL
3.search:storage中存储的数据提供简单的JSON API查询,主要提供给web UI使用
4.web UI:提供简单的web界面
二、数据模型
traceId:标记一次请求的跟踪,相关的Spans都有相同的traceId。
parentId:可选的id,当前Span的父Span id,通过parentId来保证Span之间的依赖关系,如果没有parentId,表示当前Span为根Span。
id:span id。
kind:zipkin最新V2版本的API中,不再要求在annotations中上传cs,cr,sr,ss。而是通过kind标记是server-side span还是client-side span,两端记录自己的timestap来取代cs和sr,记录duration来取代cr和ss
name:span的名称,这里是接口名称。
timestamp:Span创建时的时间戳,使用的单位是微秒。
duration:持续时间使用的单位是微秒。
localEndPoint:表示span由谁上报。
annotations:注释用于及时记录事件,有一组核心注释用于定义请求的开始和结束。
cs:Client Send,客户端发起请求
sr:Server Receive,服务器接受请求,开始处理
ss:Server Send,服务器完成处理,给客户端应答
cr:Client Receive,客户端接受应答从服务器
tags/binaryAnnotations:是一种k-v模型的业务自定义信息,它用来额外的描述这条span的信息。可把请求参数放到里面。
[
{
"traceId": "cbe588a5ac115c37",
"parentId": "b15efdeb183dd736",
"id": "52b6c79c487cb2b5",
"kind": "SERVER",
"name": "/other",
"timestamp": 1543762060521000,
"duration": 35000,
"localEndpoint": {
"serviceName": "service3",
"ipv4": "192.168.2.100"
},
"tags": {
"http.status_code": "200",
"http.url": "/other"
}
},
{
"traceId": "cbe588a5ac115c37",
"parentId": "cbe588a5ac115c37",
"id": "b15efdeb183dd736",
"kind": "CLIENT",
"name": "/lee",
"timestamp": 1543762060001000,
"duration": 593000,
"localEndpoint": {
"serviceName": "service1",
"ipv4": "192.168.2.100"
},
"tags": {
"http.url": "/lee"
}
},
{
"traceId": "cbe588a5ac115c37",
"id": "cbe588a5ac115c37",
"kind": "SERVER",
"name": "/sid",
"timestamp": 1543762059848000,
"duration": 767000,
"localEndpoint": {
"serviceName": "service1",
"ipv4": "192.168.2.100"
},
"tags": {
"http.status_code": "200",
"http.url": "/sid"
}
},
{
"traceId": "cbe588a5ac115c37",
"parentId": "b15efdeb183dd736",
"id": "52b6c79c487cb2b5",
"kind": "CLIENT",
"name": "/other",
"timestamp": 1543762060324000,
"duration": 240000,
"localEndpoint": {
"serviceName": "service2",
"ipv4": "192.168.2.100"
},
"tags": {
"http.url": "/other"
}
},
{
"traceId": "cbe588a5ac115c37",
"parentId": "cbe588a5ac115c37",
"id": "b15efdeb183dd736",
"kind": "SERVER",
"name": "/lee",
"timestamp": 1543762060141000,
"duration": 445000,
"localEndpoint": {
"serviceName": "service2",
"ipv4": "192.168.2.100"
},
"tags": {
"http.status_code": "200",
"http.url": "/lee"
}
}
]
三、安装启动
wget -O zipkin.jar 'https://search.maven.org/remote_content?g=io.zipkin.java&a=zipkin-server&v=LATEST&c=exec'
java -jar zipkin.jar
启动成功后
root@node1:/app/zipkin# java -jar zipkin.jar
********
** **
* *
** **
** **
** **
** **
********
****
****
**** ****
****** **** ***
****************************************************************************
******* **** ***
**** ****
**
**
***** ** ***** ** ** ** ** **
** ** ** * *** ** **** **
** ** ***** **** ** ** ***
****** ** ** ** ** ** ** **
:: Powered by Spring Boot :: (v2.1.0.RELEASE)
2018-12-02 22:14:22.944 INFO 15018 --- [ main] z.s.ZipkinServer : Starting ZipkinServer on node1 with PID 15018 (/app/zipkin/zipkin.jar started by root in /app/zipkin)
2018-12-02 22:14:22.970 INFO 15018 --- [ main] z.s.ZipkinServer : The following profiles are active: shared
2018-12-02 22:14:32.485 INFO 15018 --- [ main] i.u.servlet : Initializing Spring embedded WebApplicationContext
2018-12-02 22:14:32.488 INFO 15018 --- [ main] o.s.w.c.ContextLoader : Root WebApplicationContext: initialization completed in 9201 ms
四、提供对外端口:9411,可以打开浏览器访问http://node1:9411
五、示例
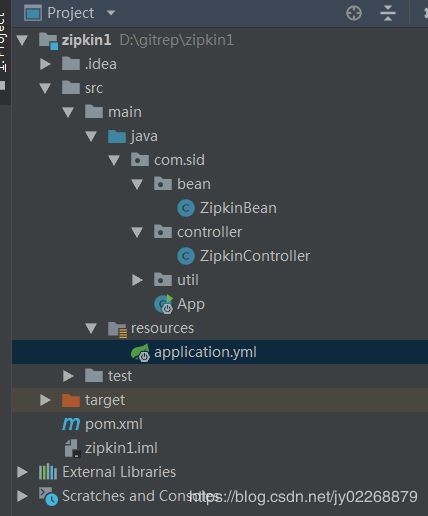
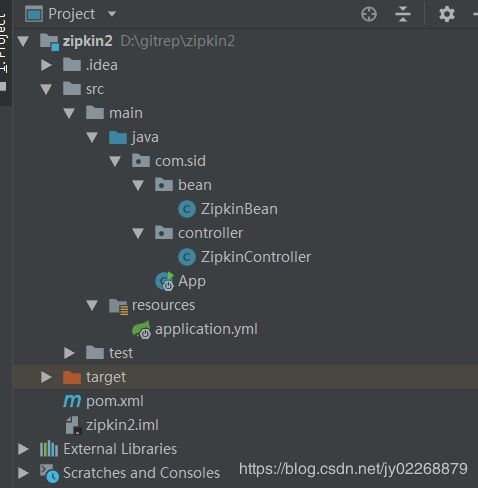
创建三个项目zipkin1、zipkin2、zipkin3。zipkin1中发送HTTP请求调用zipkin2中的方法,zipkin2中发送HTTP请求调用zipkin3中的方法。
zipkin1的代码:
pom.xml
xsi:schemaLocation="http://maven.apache.org/POM/4.0.0 http://maven.apache.org/xsd/maven-4.0.0.xsd">
spring-boot-1.5.8.release parent
ZipkinBean.java
package com.sid.bean;
import com.github.kristofa.brave.*;
import com.github.kristofa.brave.okhttp.BraveOkHttpRequestResponseInterceptor;
import okhttp3.OkHttpClient;
import org.apache.http.impl.client.CloseableHttpClient;
import org.apache.http.impl.client.HttpClients;
import org.springframework.context.annotation.Bean;
import org.springframework.context.annotation.Configuration;
import com.github.kristofa.brave.Brave.Builder;
import com.github.kristofa.brave.http.HttpSpanCollector;
import com.github.kristofa.brave.http.HttpSpanCollector.Config;
import com.github.kristofa.brave.httpclient.BraveHttpRequestInterceptor;
import com.github.kristofa.brave.httpclient.BraveHttpResponseInterceptor;
import com.github.kristofa.brave.servlet.BraveServletFilter;
import java.io.IOException;
import java.net.HttpURLConnection;
import java.net.URL;
/**
* @program: zipkin1
* @description: 核心类ZipkinBean提供需要使用的Bean
* @author: Sid
* @date: 2018-11-16 17:30
* @since: 1.0
**/
@Configuration
public class ZipkinBean {
/**
* 配置收集器
*
* @return
*/
@Bean
public SpanCollector spanCollector() {
Config config = HttpSpanCollector.Config.builder()
.compressionEnabled(false) //默认false,span在transport之前是否会被gzipped
.connectTimeout(5000)
.flushInterval(1) //flushInterval表示span的传递间隔 实际为定时任务执行的间隔时间
.readTimeout(6000)
.build();
return HttpSpanCollector.create("http://node1:9411", config, new EmptySpanCollectorMetricsHandler());
}
/**
* Brave各工具类的封装
* 作为各调用链路,只需要负责将指定格式的数据发送给zipkin
*
* @param spanCollector
* @return
*/
@Bean
public Brave brave(SpanCollector spanCollector) {
Builder builder = new Builder("service1");// 指定serviceName
builder.spanCollector(spanCollector);
//builder.traceSampler(Sampler.create(1.0f));// 采集率
builder.traceSampler(Sampler.ALWAYS_SAMPLE);// 采集率
return builder.build();
}
/**
* 过滤器,需要serverRequestInterceptor,serverResponseInterceptor 分别完成sr和ss操作
*
* @param brave
* @return
*/
@Bean
public BraveServletFilter braveServletFilter(Brave brave) {
BraveServletFilter filter = new BraveServletFilter(
brave.serverRequestInterceptor(),
brave.serverResponseInterceptor(),
new MySpanNameProvider());
return filter;
}
/**
* httpClient客户端,需要clientRequestInterceptor,clientResponseInterceptor分别完成cs和cr操作
*
* controller中使用HTTP请求的时候必须用这个httpClient
*
* 如果用自己随便写的httpClient,没有添加BraveHttpRequestInterceptor、BraveHttpResponseInterceptor拦截器
* zipkin收到的数据不会成树形
* 比如 service1 service2 service3 都是单独的traceId
*
* @param brave
* @return
*/
@Bean
public CloseableHttpClient httpClient(Brave brave) {
CloseableHttpClient httpclient = HttpClients.custom()
.addInterceptorFirst(new BraveHttpRequestInterceptor(brave.clientRequestInterceptor(), new MySpanNameProvider()))
.addInterceptorFirst(new BraveHttpResponseInterceptor(brave.clientResponseInterceptor())).build();
return httpclient;
}
/** android 端常用这个*/
@Bean
public OkHttpClient okHttpClient(Brave brave){
OkHttpClient client = new OkHttpClient.Builder()
.addInterceptor(new BraveOkHttpRequestResponseInterceptor(
brave.clientRequestInterceptor(),
brave.clientResponseInterceptor(),
new MySpanNameProvider()))
.build();
return client;
}
}
其中new MySpanNameProvider()是定义的上报spanName,这个类是自定义的,Brave提供给默认的类是DefaultSpanNameProvider,它用的HTTP请求的方式作为spanName,这里我们需要用请求路径作为spanName。
所以实现SpanNameProvider接口,自定义个设置spanName的类
MySpanNameProvider.java
package com.sid.bean;
import com.github.kristofa.brave.http.HttpRequest;
import com.github.kristofa.brave.http.SpanNameProvider;
/**
* @program: zipkin1
* @description: 自定义SpanNameProvider
* @author: Sid
* @date: 2018-11-22 17:29
* @since: 1.0
**/
public class MySpanNameProvider implements SpanNameProvider {
@Override
public String spanName(HttpRequest request) {
return request.getUri().getPath();
}
}
ZipkinController.java
package com.sid.controller;
import org.apache.http.client.methods.CloseableHttpResponse;
import org.apache.http.client.methods.HttpGet;
import org.apache.http.impl.client.CloseableHttpClient;
import org.apache.http.util.EntityUtils;
import org.springframework.beans.factory.annotation.Autowired;
import org.springframework.web.bind.annotation.GetMapping;
import org.springframework.web.bind.annotation.RestController;
/**
* @program: zipkin1
* @description:
* @author: Sid
* @date: 2018-11-16 17:19
* @since: 1.0
**/
@RestController
public class ZipkinController {
@Autowired
CloseableHttpClient httpClient;
@GetMapping("/sid")
public String service() throws Exception {
//CloseableHttpClient httpClient = HttpClients.createDefault();
Thread.sleep(100);
HttpGet get = new HttpGet("http://localhost:8082/lee");
CloseableHttpResponse response = httpClient.execute(get);
return EntityUtils.toString(response.getEntity(), "utf-8");
}
}
App.java
package com.sid;
import org.springframework.boot.SpringApplication;
import org.springframework.boot.autoconfigure.SpringBootApplication;
/**
* @program: zipkin1
* @description:
* @author: Sid
* @date: 2018-11-16 17:16
* @since: 1.0
**/
@SpringBootApplication
public class App {
public static void main(String[] args) {
SpringApplication.run(App.class, args);
}
}
application.yml
server:
port: 8081
zipkin2的代码:
基本上是一样的,这里只贴出不一样的部分
ZipkinBean.java中
注册的名字不一样
/**
* Brave各工具类的封装
*
* @param spanCollector
* @return
*/
@Bean
public Brave brave(SpanCollector spanCollector) {
Builder builder = new Builder("service2");// 指定serviceName
builder.spanCollector(spanCollector);
//builder.traceSampler(Sampler.create(1.0f));// 采集率
builder.traceSampler(Sampler.ALWAYS_SAMPLE);// 采集率
return builder.build();
}
ZipkinController.java中逻辑不一样
@GetMapping("/lee")
public String service() throws Exception {
//CloseableHttpClient httpClient = HttpClients.createDefault();
Thread.sleep(100);
HttpGet get = new HttpGet("http://localhost:8083/other");
CloseableHttpResponse response = httpClient.execute(get);
return EntityUtils.toString(response.getEntity(), "utf-8");
}
application.yml使用不同端口来测试,因为测试时在同一台机器上
server:
port: 8082
zipkin3的代码:
基本上是一样的,这里只贴出不一样的部分
ZipkinBean.java中
注册的名字不一样
/**
* Brave各工具类的封装
*
* @param spanCollector
* @return
*/
@Bean
public Brave brave(SpanCollector spanCollector) {
Builder builder = new Builder("service3");// 指定serviceName
builder.spanCollector(spanCollector);
//builder.traceSampler(Sampler.create(1.0f));// 采集率
builder.traceSampler(Sampler.ALWAYS_SAMPLE);// 采集率
return builder.build();
}
ZipkinController.java中逻辑不一样
@GetMapping("/other")
public String service() throws Exception {
return "service3 return";
}
application.yml使用不同端口来测试,因为测试时在同一台机器上
server:
port: 8083
启动zipkin1、zipkin2、zipkin3
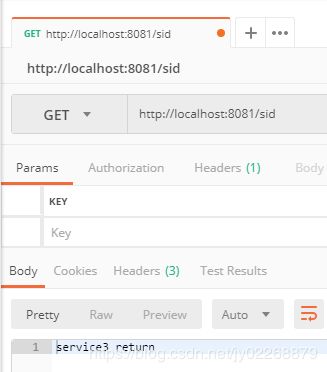
访问zipkin1的service方法
查看zipkin的web ui界面
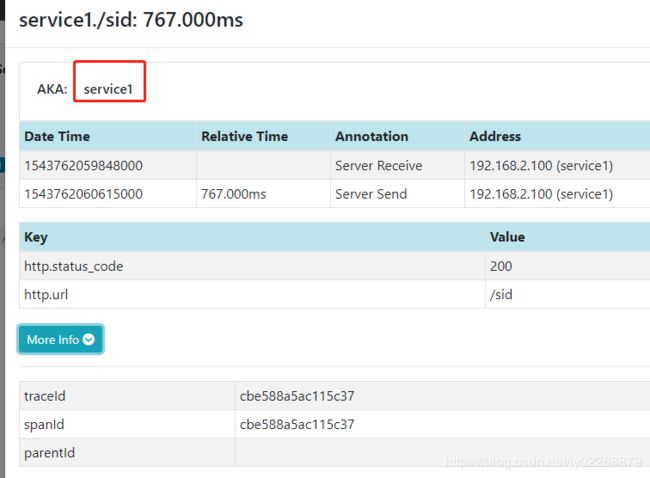
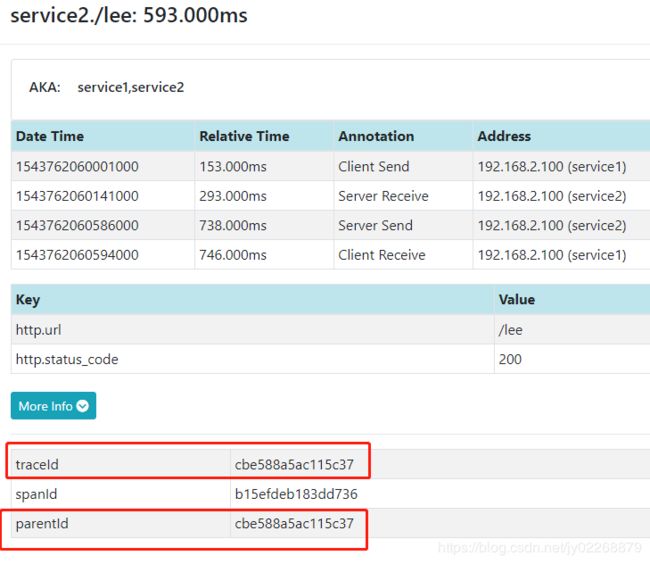
点击可以看到详细信息
service1的
service2的
service2的traceId是根ID,即service1的spanId
service2的parentId表示是哪个服务调用的service2服务,这里显示的是service1的spanId
