Spring Boot之WebSocket实现广播通讯
描述
WebSocket通过一个socket实现全双工异步通讯,对比HTTP基于请求应答的半双工通讯。
其在广播和点对点实时通讯方法更优越。
直接使用WebSocket或者SockJS(WebSocket协议的模拟,兼容性要求高)会使开发车旭很繁琐。
所以会直接使用它的子协议STOMP(Simple (or Streaming) Text Orientated Messaging Protocol)。
STOMP协议使用一个基于帧(frame)的格式定义消息,与HTTP的request和response类似(具有类似@RequestMapping的@MessageMapping)
注:学习自 《JavaEE开发的颠覆者 Spring Boot实战》 一书
效果
每个浏览器窗口输入localhost:8080即可。全站广播。
简单原理:
- 客户端连接服务器开放的socket(连接过程有个可选的订阅操作,订阅了就会收到广播,订阅函数是个异步回调函数)
- 客户端发送要广播的数据给服务器,服务器@MessageMapping接收处理,然后返回给订阅的客户端。(这里的客户端同一份代码都是订阅的)
- 客户端触发订阅的回调函数,处理广播数据。
实现
<dependency>
     <groupId>org.springframework.bootgroupId>
     <artifactId>spring-boot-starter-thymeleafartifactId>
dependency>
<dependency>
     <groupId>org.springframework.bootgroupId>
     <artifactId>spring-boot-starter-websocketartifactId>
dependency>
- 配置WebSocket
package xyz.cglzwz.chatroom.config;

import org.springframework.context.annotation.Configuration;
import org.springframework.messaging.simp.config.MessageBrokerRegistry;
import org.springframework.web.socket.config.annotation.EnableWebSocketMessageBroker;
import org.springframework.web.socket.config.annotation.StompEndpointRegistry;
import org.springframework.web.socket.config.annotation.WebSocketMessageBrokerConfigurer;

/**
 * 配置WebSocket
 * 注意:AbstractWebSocketMessageBrokerConfigurer已经过时
 * # 通过@EnableWebSocketMessageBroker注解开启STOMP子协议来传输基于代理(Message broker)的消息,
 *   这时控制器支持使用@MessageMapper,就像使用@RequestMapper一样映射
 * 现在在用的接口是WebSocketMessageBrokerConfigurer,这个接口定义的方法带了default可以不实现
 *
 * @author chgl16
 * @date 2018-12-13 15:36
 * @version 1.0
 */

@Configuration
@EnableWebSocketMessageBroker
public class WebSocketConfig implements WebSocketMessageBrokerConfigurer {

    /**
     * 注册STOMP协议的节点endpoint
     * 并映射到指定的URL
     *
     * @param registry
     */
    @Override
    public void registerStompEndpoints(StompEndpointRegistry registry) {
        // 注册一个STOMP的endpoint,并指定使用SockJS协议,名为"endpointWisely"
        registry.addEndpoint("/endpointWisely").withSockJS();
    }

    /**
     * 配置消息代理
     * 不实现也可以,对应的是客户端订阅,在控制器的@SendTo中声明即可
     *
     * @param registry
     */
    /*
    @Override
    public void configureMessageBroker(MessageBrokerRegistry registry) {
        // 广播式应配置一个/topic消息代理,
        registry.enableSimpleBroker("/topic");
    }
    */
}
- 广播内容的POJO,区分写为两个(客户要发的内容,广播显示内容)
package xyz.cglzwz.chatroom.domain;

import org.springframework.stereotype.Component;

/**
 * 浏览器向服务端发送的消息用此类接受
 *
 * @author chgl16
 * @date 2018-12-13 16:01
 * @version 1.0
 */

@Component
public class WiselyMessage {
    private String message;

    public String getMessage(){
        return message;
    }
}
package xyz.cglzwz.chatroom.domain;

import org.springframework.stereotype.Component;

/**
 * 服务端向浏览器发送的此类消息
 *
 * @author chgl16
 * @date 2018-12-13 16:04
 * @version 1.0
 */

@Component
public class WiselyResponse {
    private String responseMessage;

    public String getResponseMessage() {
        return responseMessage;
    }

    public void setResponseMessage(String responseMessage) {
        this.responseMessage = responseMessage;
    }
}
- 控制器
package xyz.cglzwz.chatroom.controller;

import org.apache.commons.logging.Log;
import org.apache.commons.logging.LogFactory;
import org.springframework.beans.factory.annotation.Autowired;
import org.springframework.messaging.handler.annotation.MessageMapping;
import org.springframework.messaging.handler.annotation.SendTo;
import org.springframework.stereotype.Controller;
import org.springframework.web.bind.annotation.RequestMapping;
import xyz.cglzwz.chatroom.domain.WiselyMessage;
import xyz.cglzwz.chatroom.domain.WiselyResponse;

/**
 * 演示控制器
 *
 * @author chgl16
 * @date 2018-12-13 16:07
 * @version 1.0
 */

@Controller
public class WsController {
    private static final Log log =LogFactory.getLog(WsController.class);

    @Autowired
    private WiselyResponse wiselyResponse;

    /**
     * 1.当浏览器向服务器发送请求时,通过@MessageMapping映射
     * 2.当服务器有消息时,会对订阅了@SendTo中的路径的浏览器发送消息
     *
     * @param wiselyMessage
     * @return
     * @throws Exception
     */
    @MessageMapping(value = "/broadcast")
    @SendTo(value = "/topic/getResponse")
    public WiselyResponse say(WiselyMessage wiselyMessage) throws Exception {
        // 等待三秒才响应
        // Thread.sleep(3000);
        // 给全网响应广播内容
        wiselyResponse.setResponseMessage("广播:" + wiselyMessage.getMessage());
        log.info("广播内容: " + wiselyMessage.getMessage());
        return wiselyResponse;
    }

    /**
     * 视图解析映射
     * 要现在application.properties里配置好Thymeleaf视图
     *
     * @return
     */
    @RequestMapping("/")
    public String toWs() {
        return "ws";
    }
}
关键的注解 @MessageMapping(value = “/broadcast”), @SendTo(value = “/topic/getResponse”)
- @MessageMapping是客户端向服务器发送消息的映射器
- @SendTo是订阅这个广播服务处理器,前端订阅了才会收到广播,也具异步回调返回广播信息给客户端的功能。
- value和客户端服务端一致即可
- => Thymeleaf配置
- 前端HTML
<html lang="en" xmlns:th="https://www.thymeleaf.org">
<head>
    <meta charset="UTF-8">
    <title>Spring Boot+WebSocket+广播title>
    <link rel="stylesheet" type="text/css" th:href="@{css/ws.css}"/>
head>
<body >
<div id="root">
    <div>
        <button id="connect" onclick="connect()">加入连接button>

        <button id="disconnect" disabled="disabled" onclick="disconnect()">断开连接button>
    div>
    <hr>
    <div id="conversation-div">
        <label>请输入要广播的信息:label>
        <input type="text" id="message"/>
        <button id="sendMessage" onclick="sendMessage()">发送button>
        <hr>
        <p id="response">p>
    div>
div>

<script th:src="@{lib/sockjs.min.js}">script>
<script th:src="@{lib/stomp.min.js}">script>
<script th:src="@{lib/jquery.js}">script>
<script th:src="@{js/ws.js}">script>
body>
html>
- 前端核心JavaScript
var stompClient = null;

/**
 * 渲染显示和按钮状态
 *
 * @param status
 */
function setConnected(status) {
    $("#connect")[0].disabled = status;
    $("#disconnect")[0].disabled = !status;
    $('#conversation-div')[0].style.visibility = status ? 'visible' : 'hidden';
    $('#response')[0].innerHTML = "";
}

/**
 * 连接
 */
function connect() {
    // 连接SockJS的endpoint名称为"/endpointWisely"
    var socket = new SockJS('/endpointWisely');
    // 使用STOMP子协议的WebSocket客户端
    stompClient = Stomp.over(socket);
    // 连接WebSocket服务端
    stompClient.connect({}, function (frame) {
        setConnected(true);
        console.log('Connected: ' + frame);
        // ##回调函数## 订阅"/topic/getResponse"目标发送的消息,来显示
        stompClient.subscribe('/topic/getResponse', function (response) {
            console.log("response: " + JSON.stringify(response));
            // 发回数据形式为{"command":"MESSAGE","headers":{"content-length":"36","message-id":"3khnmfpx-0","subscription":"sub-0","content-type":"application/json;charset=UTF-8","destination":"/topic/getResponse"},"body":"{\"responseMessage\":\"Welcome, cccc!\"}"}
            showResponse(JSON.parse(response.body).responseMessage);
        });

    });
}

/**
 * 断开连接
 */
function disconnect() {
    if (stompClient != null) {
        stompClient.disconnect();
    }
    setConnected(false);
    console.log("断开连接");
}

/**
 * 发送广播信息
 */
function sendMessage() {
    var message = $('#message').val();
    // 向目标发送消息
    stompClient.send("/broadcast", {}, JSON.stringify({'message': message}));
}

/**
 * 显示响应信息
 *
 * @param message
 */
function showResponse(message) {
    $('#response')[0].innerHTML += message + '
';
    /*
     10秒后清屏,
     参数code不能仅仅是一句 "$('#response')[0].innerHTML = "";"
     并发量高的时候,会有bug,可能不是第一个10秒结束
      */
    // setTimeout(function(){$('#response')[0].innerHTML = "";}, 10000);
}
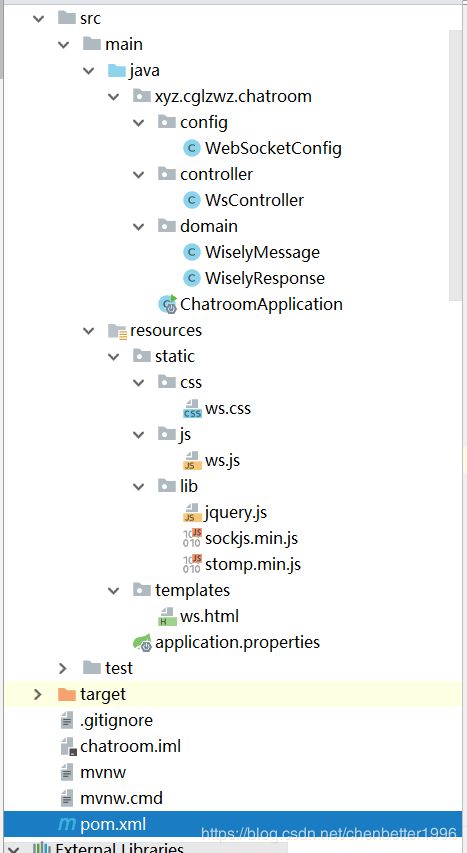
需要导入三个js库
- 运行
- 直接运行主类
- mvn spring-boot: run
- mvn clean compile package,然后java -jar xx.jar --server.port=8080
其实第一种方法直接运行主类在Spring Boot上做得很好,相比普通项目。这个做了一点其他类或者静态文件的修改都会重新编译运行。确保热部署最新,而普通项目一般没有重新编译修改项。
- =>完整代码地址

