Scrapy-redis实现分布式爬虫
-
- 爬虫框架 Scrapy
- Key-Value 内存数据库 Redis
- Scrapy_redis 实现调度
- Scrapy_redis 工作原理
- 在 Scrapy 中使用 scrapy_redis
- settings
- Spider
- Docker 部署 Scrapy
- Dockerfile
- Docker-compose
- 构建镜像
- 启动 Redis 服务器
- 启动爬虫服务
- 查看服务
- 关闭爬虫服务
- 删除爬虫服务
- 爬虫任务注入
- 参考资料
爬虫框架 Scrapy
Scrapy is a free and open source web crawling framework, written in Python. Originally designed for web scraping, it can also be used to extract data using APIs or as a general purpose web crawler.
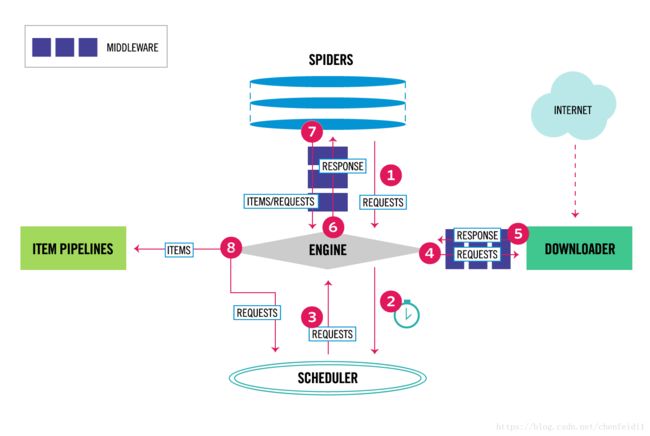
之前两篇文章梳理了 Scrapy 框架的结构,组件和工作流程,并给出简单的使用示例, 具体参考:
- Scrapy 基础入门
Key-Value 内存数据库 Redis
Redis is an open-source in-memory database project implementing a distributed, in-memory key-value store with optional durability.
REmote DIctionary Server(Redis)是一个由 Salvatore Sanfilippo 写的 key-value 存储系统。
Redis 是一个开源的使用 ANSI C 语言编写、遵守 BSD 协议、支持网络、可基于内存亦可持久化的日志型、Key-Value 数据库,并提供多种语言的 API。
它通常被称为数据结构服务器,因为值(value)可以是 字符串(String), 哈希(Map), 列表(list), 集合(sets) 和 有序集合(sorted sets)等类型。
基础的 Redis 操作参考文章:Redis 基础入门
Scrapy_redis 实现调度
Scrapy_redis 工作原理
假设你现在有 100 台机器可以用,怎么实现一个分布式的爬取算法呢?
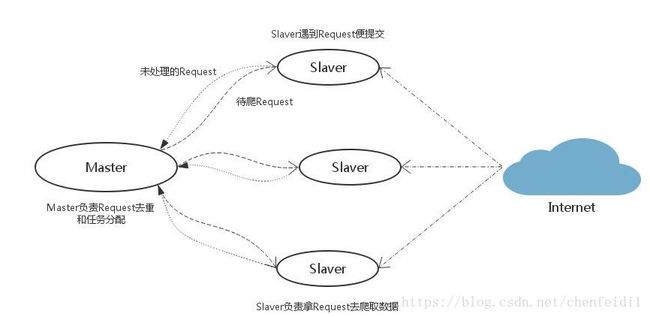
我们把这 100 台中的 99 台运算能力较小的机器叫作 slave,另外一台较大的机器叫作 master。如果我们能把任务队列 queue 放到这台 master 机器上,所有的 slave 都可以通过网络跟 master 联通,每当一个 slave 完成一个请求,就从 master 获取一个新的请求。而每次 slave 新抓到一个网页,就把这个网页上所有的链接送到 master 的 queue 里去。
其中的分布式体现在多台机器上的 spider 同时爬取,并且这种分布式是通过 scrapy_redis 实现的。Redis 中存储了工程的 request,stats 信息,能够对各个机器上的爬虫实现集中管理,这样可以解决爬虫的性能瓶颈,利用 Redis 的高效和易于扩展能够轻松实现高效率下载:当 Redis 存储或者访问速度遇到瓶颈时,可以通过增大 Redis 集群数和爬虫集群数量改善。
本质上说,就是大家(所有机器,所有爬虫)把拿到的东西(url,request)放在一起(redis queue)去调度。
Scrapy_redis 源码学习 详细介绍了使用 Redis 实现分布式的思路和具体实现。新的架构如图:
在 Scrapy 中使用 scrapy_redis
settings
除了 Scrapy 自带的配置,scrapy_redis 增加了一些用于管理 Redis 服务器连接,数据持久化,任务队列(Fifo, Lifo, Priority),任务注入数据结构(列表/集合),调度器,过滤器等的选择。
其中,主要的设置有:
- SCHEDULER: 启用 scrapy_redis 调度器,实现本地与 Redis 服务器任务交互
- DUPEFILTER_CLASS: 启用 scrapy_redis 过滤器,实现 request 的全局过滤
- SCHEDULER_SERIALIZER: 调度 request 时使用的序列化格式,默认 pickle
- SCHEDULER_PERSIST: 保存任务队列,方便暂停和重启
- SCHEDULER_QUEUE_CLASS: 任务队列类型,默认优先级队列
- SCHEDULER_IDLE_BEFORE_CLOSE: 爬虫没有任务而进入空闲等待状态,多少时间后关闭爬虫(设置并不生效,爬虫会一直空闲挂起)
- RedisPipeline: 组件自带的 pipeline,将数据存储到 Redis 列表中。考虑到 Redis 内存压力,一般不使用。
- REDIS_ITEMS_KEY: 爬虫数据上传 Redis 使用的键名(只有启用 RedisPipeline 才生效)
- REDIS_ITEMS_SERIALIZER: 数据上传 Redis 使用的序列化格式,默认 json
- REDIS_HOST, REDIS_PORT, REDIS_URL, REDIS_PARAMS: 指定连接 Redis 的参数,其中 REDIS_URL 可以指定连接的数据库 db 且覆盖 REDIS_HOST, REDIS_PORT(即同时设置时 REDIS_HOST, REDIS_PORT 不生效)。
- REDIS_START_URLS_AS_SET: 设置启动 URL 存储为集合(默认为列表)
- REDIS_START_URLS_KEY: 爬虫从 Redis 获取启动 URL 的键名,不设置使用默认值
# Enables scheduling storing requests queue in redis.
SCHEDULER = "scrapy_redis.scheduler.Scheduler"

# Ensure all spiders share same duplicates filter through redis.
DUPEFILTER_CLASS = "scrapy_redis.dupefilter.RFPDupeFilter"

# Default requests serializer is pickle, but it can be changed to any module
# with loads and dumps functions. Note that pickle is not compatible between
# python versions.
# Caveat: In python 3.x, the serializer must return strings keys and support
# bytes as values. Because of this reason the json or msgpack module will not
# work by default. In python 2.x there is no such issue and you can use
# 'json' or 'msgpack' as serializers.
# SCHEDULER_SERIALIZER = "scrapy_redis.picklecompat"

# Don't cleanup redis queues, allows to pause/resume crawls.
SCHEDULER_PERSIST = True

# Schedule requests using a priority queue. (default)
# SCHEDULER_QUEUE_CLASS = 'scrapy_redis.queue.PriorityQueue'

# Alternative queues.
SCHEDULER_QUEUE_CLASS = 'scrapy_redis.queue.FifoQueue'
# SCHEDULER_QUEUE_CLASS = 'scrapy_redis.queue.LifoQueue'

# Max idle time to prevent the spider from being closed when distributed crawling.
# This only works if queue class is SpiderQueue or SpiderStack,
# and may also block the same time when your spider start at the first time (because the queue is empty).
# SCHEDULER_IDLE_BEFORE_CLOSE = 1

# Store scraped item in redis for post-processing.
# ITEM_PIPELINES = {
#    'scrapy_redis.pipelines.RedisPipeline': 300
# }

# The item pipeline serializes and stores the items in this redis key.
# REDIS_ITEMS_KEY = '%(spider)s:items'

# The items serializer is by default ScrapyJSONEncoder. You can use any
# importable path to a callable object.
# REDIS_ITEMS_SERIALIZER = 'json.dumps'

# Specify the host and port to use when connecting to Redis (optional).
REDIS_HOST = '10.202.80.94'
REDIS_PORT = 6380

# Specify the full Redis URL for connecting (optional).
# If set, this takes precedence over the REDIS_HOST and REDIS_PORT settings.
# REDIS_URL = 'redis://user:pass@hostname:9001'

# Custom redis client parameters (i.e.: socket timeout, etc.)
# REDIS_PARAMS  = {}
# Use custom redis client class.
# REDIS_PARAMS['redis_cls'] = 'myproject.RedisClient'

# If True, it uses redis' ``SPOP`` operation. You have to use the ``SADD``
# command to add URLs to the redis queue. This could be useful if you
# want to avoid duplicates in your start urls list and the order of
# processing does not matter.
REDIS_START_URLS_AS_SET = True

# Default start urls key for RedisSpider and RedisCrawlSpider.
# REDIS_START_URLS_KEY = '%(name)s:start_urls'

# Use other encoding than utf-8 for redis.
# REDIS_ENCODING = 'latin1'
Spider
Spider 的配置比较简单,只需要更改继承的父类为 RedisSpider 即可。
from scrapy_redis.spiders import RedisSpider
from scrapy_redis.connection import defaults

class CommentSpider(RedisSpider):
    name = 'comment'

    def parse(self, response):
        pass

    '''
    def next_requests(self):
        use_set = self.settings.getbool('REDIS_START_URLS_AS_SET', defaults.START_URLS_AS_SET)
        pipe = self.server.pipeline(transaction=False)
        fetch_one = pipe.spop if use_set else pipe.lpop
        for i in range(min((10 * self.redis_batch_size), 512)):
            fetch_one(self.redis_key)
        datas = pipe.execute()

        for data in datas:
            if not data:
                continue
            req = self.make_request_from_data(data)
            if req:
                yield req
            else:
                self.logger.debug("Request not made from data: %r", data)
    '''
由于 scrapy_redis 目前实现的 Redis 调度为每次获取一个 request,所以为了提高效率重写了 next_requests 方法,改为使用管道一次获取更多 request。
Docker 部署 Scrapy
关于 Docker 的安装和基本使用,参考文章:
- Centos7 安装 Docker
- 非 Root 运行 Docker
- Docker 基础入门
Dockerfile
Dockerfile 是 Docker 官方推荐的镜像构建方法,其提供了一系列指令用于从基础镜像构建新镜像,具体使用请参考:Dockerfile 构建镜像
爬虫需要的 Python 环境构建如下:
# Version: 0.0.1
FROM python
MAINTAINER Fei Chen '[email protected]'
ADD . /code
WORKDIR /code
RUN pip install -r requirements.txt -i http://mirrors.aliyun.com/pypi/simple/ --trusted-host mirrors.aliyun.com
其中,requirements.txt 包含模块:
- pyyaml
- scrapy_redis
- pytz
Docker-compose
Docker-compose 简单使用介绍了 Compose 的命令行工具和如何写 Compose file 来完成 Docker 容器的编配。
爬虫的 docker-compose.yml:
version: '3'
services:
  spider:
    build: .
    volumes:
      - $PWD:/code
      - /data1/datascience/scrapy-data:/data
    command: scrapy crawl comment
构建镜像
$ docker-compose build
因为源码使用 docker VOLUME 挂载在容器内,所以在不改变程序运行环境下(如没有安装新的 Python 包),对源码的调整只需要关闭服务后重新启动,而无需再次构建。
启动 Redis 服务器
$ docker run -d --name comment_redis -p 6380:6379 redis
启动爬虫服务
$ docker-compose up -d --scale spider=8
查看服务
$ docker-compose ps


      Name                Command          State  Ports
---------------------------------------------------------
jdcomment_spider_1  scrapy crawl comment    Up
jdcomment_spider_2  scrapy crawl comment    Up
jdcomment_spider_3  scrapy crawl comment    Up
jdcomment_spider_4  scrapy crawl comment    Up
jdcomment_spider_5  scrapy crawl comment    Up
jdcomment_spider_6  scrapy crawl comment    Up
jdcomment_spider_7  scrapy crawl comment    Up
jdcomment_spider_8  scrapy crawl comment    Up
关闭爬虫服务
$ docker-compose stop
删除爬虫服务
$ docker-compose rm
爬虫任务注入
如果设置了启动 URL 存储类型为列表(默认),则:
$ LPUSH comment:start_urls http://sclub.jd.com/comment/productPageComments.action?page=23&pageSize=10&isShadowSku=0&score=0&sortType=6&productId=4679170
如果类型为集合,则:
$ SADD comment:start_urls http://sclub.jd.com/comment/productPageComments.action?page=23&pageSize=10&isShadowSku=0&score=0&sortType=6&productId=4679170
参考资料
- github: rmax/scrapy-redis
- scrapy-redis实现scrapy分布式爬取分析


