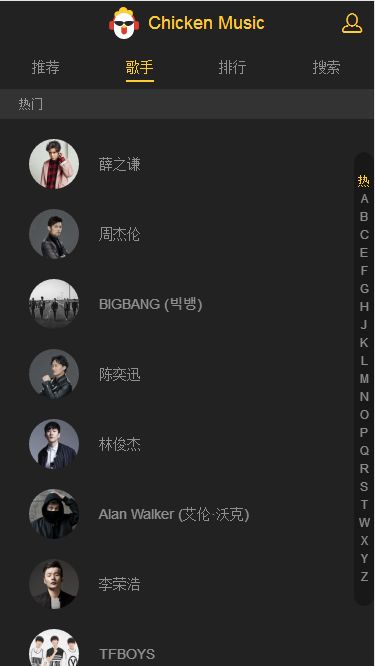
(1) 当跨域请求报错 Access-Control-Allow-Origin 访问控制允许同源,有两种办法解决开发环境下的跨域问题 ( 注意 : 只是开发环境,只是为了方便调试 ),用 cors ( Cross-origin resource sharing ) 跨域资源共享,解决实际生产中的跨域问题。
- 开发环境的跨域:(以下有两种方法)
(1) 下载浏览器插件 allow control allow origin
使用 Allow-Control-Allow-Origin: *,默认会修改所有 response,修改 response header 允许跨域资源访问
(2) proxyTable
vue-cli的config文件中的index.js文件里有一个参数叫proxyTable
( proxy是代理的意思 )
作用:1.将复杂的url简化。2.跨域
项目根目录/config/index.js

 proxyTable: {   // proxy是代理的意思
      '/api': {       // 用 ( /api ) 代替 ( http://localhost:3000/api )
        target: 'http://localhost:3000/',    // 接口域名
        changeOrigin: true,              // 是否跨域
        pathRewrite: {            // 路径重写,一般不变
          '^/api': ''
        }
      }
    }

请求到 /api/users 现在会被代理到请求 http://localhost:3000/api/users。

--------------------------------------------------------------------------------

具体请求时:

_getDistList() {
        this.$http.get('/api/路由地址')
          .then((response) => {
              console.log(response)
          })
      }
- 真实环境的跨域:(cors跨域资源共享)
cors实在服务器端配置,需要服务器和浏览器同时支持才可以。
cors跨域,只是在服务器端配置,前端请求就和平时同源的请求一样,基本不变。
cors可以发送get和post请求,jsonp只能发送get请求
(2) jsonp跨域
(3) 后端代理
(4) watch 观察者
- 当你想要在数据变化响应时,执行异步操作或开销较大的操作,使用watch
- 观察数据变化,在被观察的数据变化时,执行需要执行的异步方法函数,和mobx中的observer相似
watch: {
      data() {
        setTimeout(() => {
          this.refresh()          // 当data变化是,更新better-scroll
        }, this.refreshDelay)
      }
    }
(5) vue-lazyload 懒加载插件
- 安装
cnpm install vue-lazyload --save
- 使用
在main.js中

import VueLazyload from 'vue-lazyload'

Vue.use(VueLazyload, { })     // 所有的第三方插件都要Vue.use()
- 实例
main.js


import VueLazyload from 'vue-lazyload'

Vue.use(VueLazyload, {
  loading: require('common/image/logo2.png')    //加载过程中替换的图片
})

--------------------------------------------------------------

recommend.vue
![图片]()
(6) fastclick 和 better-scroll的点击冲突
- 回忆fastclick的用法
在main.js中

import fastclick from 'fastclick'    // 解决移动端点击300ms延迟

fastclick.attach(document.body)     // attach是关联的意思
解决方案:
![图片]()
(7) forEach() 和 .map() 和 push
forEach()
- array.forEach(function(currentValue, index, array), thisValue)
currentValue : 必需。当前元素
index : 可选。当前元素的索引值。
arr : 可选。当前元素所属的数组对象。
.map()
- map:map即是 “映射”的意思 用法与 forEach 相似
- 返回值 : 一个新数组,每个元素都是回调函数的结果。
let array = arr.map(function callback(currentValue, index, array) {
// Return element for new_array
}[, thisArg])
push()
- push() 方法可向数组的末尾添加一个或多个元素,并返回新的长度。
arrayObject.push(newelement1,newelement2,....,newelementX)
newelement1 : 必需。要添加到数组的第一个元素。
newelement2 : 可选。要添加到数组的第二个元素。
newelementX : 可选。可添加多个元素。
forEach()
array.forEach(function(currentValue, index, arr), thisValue)
var arr = [1,2,3,4];
arr.forEach(function(value,index,array){
array[index] == value; //结果为true
sum+=value;
});
console.log(sum); //结果为 10
---------------------------------------------------------------------------
list.forEach((item, index) => {
if (index < HOT_SINGER_LEN) { // 如果index<10
map.hot.items.push(new Singer(
{
id: item.Fsinger_mid,
name: item.Fsinger_name
}
))
}
}
-----------------------------------------------------------------------------
完整案列:
{{m.name}}
这是排行页面
// 输出结果为:20 学生 职员
(8)
$emit 派发事件,分发事件;
$on监听事件;
$off取消监听;
- Event.$emit(‘msg‘,this.msg) 发送数据
第一个参数是派发的事件的名称,接收时还用这个名字接收;
第二个参数是这个数据现在的位置; - 通过vm.$emit( event, […args] )函数 : 可以让父组件知道子组件调用了什么函数
listview.vue ( 子组件 )
-
{{group.title}}
-
![]() {{item.name}}
{{item.name}}
methods: {
selectItem(item) {
this.$emit('select', item) // 派发事件,参数是item,让外界知道是点击了哪个元素
}
}
// 像下面的写法,直接在listview中写逻辑,也能达到同样的效果
// 因为listview是基础组件,不做逻辑部分。所以最好派发出事件,像上面那样
methods: {
selectItem(item) {
this.$router.push({
path: `/singer/${item.id}`
})
},
----------------------------------------------------------------------------------
singer.vue ( 父组件 )
(9)
嵌套路由
子路由 children[ { path: ':id', component: xxxxx } ]
路由跳转:this.$router.push({ path: xxxxx})
路由跳转的另一种写法: this.$router.push('xxxxxx')
router/index.js


export default new Router({
  routes: [
    {path: '/', name: 'home', redirect: '/recommend'},
    {path: '/recommend', name: 'recommend', component: Recommend},
    {
      path: '/singer',
      name: 'singer',
      component: Singer,
      children: [{
        path: ':id',
        component: SingerDetail
      }]
    },
    {path: '/rank', name: 'rank', component: Rank},
    {path: '/search', name: 'search', component: Search}
  ]
})
------------------------------------------------------------------------------

singer.vue
(10) axios请求的抽象,promise封装
test.js


import axios from 'axios'
export function getImageUrl() {
  return axios.get('http://image.baidu.com/channel/listjson?pn=15&rn=30&ie=utf8')
    .then((response) => {
      return Promise.resolve(response)
    })
 }
---------------------------------------------------------------------------

singer-detail.vue   中调用


import {getImageUrl} from 'api/test.js'
  export default {
      created() {
          this.getD()
      },
      methods: {
          getD() {
            getImageUrl().then((data) => {
                console.log(data.data.data)
            })
          }
      }
}
(10) 传统的传值,从singer页跳转到singer-detail中
步骤:
- (1) 在listview基础组件中,在v-for循环的dom上绑定事件,这个事件中有派发事件函数this.$emit('select', item)
listview.vue


  methods: {
      selectItem(item) {
        this.$emit('select', item)   //点击的tiem数据作为参数
      }
}
- (2) 在 (父组件singer组件) 中接收 (listview子组件) 派发过来的事件,并执行新的事件selectSinger,跳转路由地址,页面跳转到detail组件。即router-view显示的页面,并且把singer存入data的fromListData中,fromListData作为数据传入detail组件。
singer.vue
- (3) detail组件接收singer组件传过来的fromListData。并渲染
singer-detail.vue
-
{{dataFromListToDetail.name}}
(10) VUEX 状态管理
(1) 每个vue的核心就是 Store仓库
"store" 基本上就是一个容器,它包含着你的应用中大部分的状态(state)
(2) Vuex 和单纯的全局对象的区别
(1) Vuex 的状态存储是响应式的 :
当 Vue 组件从 store 中读取状态的时候,若 store 中的状态发生变化,那么相应的组件也会相应地得到高效更新。
(2) 不能直接改变 store 中的状态
-改变 store 中的状态的唯一途径就是显式地提交(commit) mutations。
-这样使得我们可以方便地跟踪每一个状态的变化,从而让我们能够实现一些工具帮助我们更好地了解我们的应用。
(3) 项目结构
Vuex 并不限制你的代码结构。但是,它规定了一些需要遵守的规则:
1.应用层级的状态应该集中到单个 store 对象中。
2.提交(commit) mutation 是更改状态的唯一方法,并且这个过程是同步的。
3.异步逻辑都应该封装到 action 里面。
只要你遵守以上规则,如何组织代码随你便。如果你的 store 文件太大,只需将 action、mutation 和 getters 分割到单独的文件。
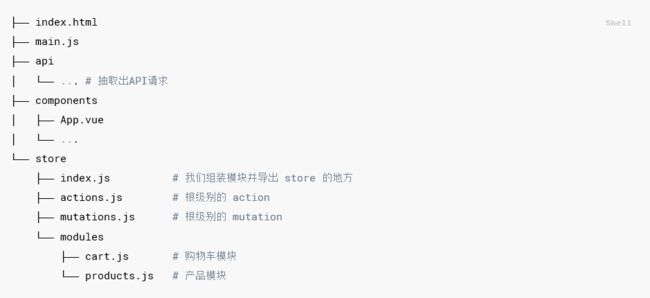
对于大型应用,我们会希望把 Vuex 相关代码分割到模块中。下面是项目结构示例:
(4) 核心概念
(4.1) state
单一状态树 :每个应用仅包含一个store实例
- Vuex 使用 单一状态树 —— 是的,用一个对象就包含了全部的应用层级状态。至此它便作为一个『唯一数据源(SSOT)』而存在。
- 这也意味着,每个应用将仅仅包含一个 store 实例。
- 单一状态树让我们能够直接地定位任一特定的状态片段,在调试的过程中也能轻易地取得整个当前应用状态的快照。
在 Vue 组件中获得 Vuex 状态 : 在组件的计算属性compoted中返回某个状态
// 创建一个 Counter 组件
const Counter = {
  template: `{{ count }}`,    // 模板
  computed: {
    count () {
      return store.state.count
    }
  }
}
每当 store.state.count 变化的时候, 都会重新求取计算属性,并且触发更新相关联的 DOM。
然而,这种模式导致组件依赖全局状态单例。在模块化的构建系统中,在每个需要使用 state 的组件中需要频繁地导入,并且在测试组件时需要模拟状态。
uex 通过 store 选项,提供了一种机制将状态从根组件『注入』到每一个子组件中(需调用 Vue.use(Vuex)):
const app = new Vue({
el: '#app',
// 把 store 对象提供给 “store” 选项,这可以把 store 的实例注入所有的子组件
store,
components: { Counter },
template: `
通过在根实例中注册 store 选项,该 store 实例会注入到根组件下的所有子组件中,且子组件能通过 this.$store 访问到。
更新下Counter 的实现:
const Counter = {
  template: `{{ count }}`,
  computed: {
    count () {
      return this.$store.state.count
    }
  }
}
mapState 辅助函数
当一个组件需要获取多个状态时候,将这些状态都声明为计算属性会有些重复和冗余。为了解决这个问题,我们可以使用 mapState 辅助函数帮助我们生成计算属性,让你少按几次键:
// 在单独构建的版本中辅助函数为 Vuex.mapState
import { mapState } from 'vuex'

export default {
  // ...
  computed: mapState({
    // 箭头函数可使代码更简练
    count: state => state.count,

    // 传字符串参数 'count' 等同于 `state => state.count`
    countAlias: 'count',

    // 为了能够使用 `this` 获取局部状态,必须使用常规函数
    countPlusLocalState (state) {
      return state.count + this.localCount
    }
  })
}
(4.2) Getters ( store 中的计算属性 )
- Getters 接受 state 作为其第一个参数:
const store = new Vuex.Store({
  state: {
    todos: [
      { id: 1, text: '...', done: true },
      { id: 2, text: '...', done: false }
    ]
  },
  getters: {
    doneTodos: state => {
      return state.todos.filter(todo => todo.done)
    }
  }
})
- Getters 也可以接受其他 getters 作为第二个参数:
getters: {
  // ...
  doneTodosCount: (state, getters) => {
    return getters.doneTodos.length
  }
}
store.getters.doneTodosCount // -> 1
`
mapGetters 辅助函数
mapGetters 辅助函数仅仅是将 store 中的 getters 映射到局部计算属性:
import { mapGetters } from 'vuex'

export default {
  // ...
  computed: {
  // 使用对象展开运算符将 getters 混入 computed 对象中
    ...mapGetters([
      'doneTodosCount',
      'anotherGetter',
      // ...
    ])
  }
}
如果你想将一个 getter 属性另取一个名字,使用对象形式:
mapGetters({
  // 映射 this.doneCount 为 store.getters.doneTodosCount
  doneCount: 'doneTodosCount'
})
`
(4.3) Mutations ( Vuex 中的 mutations 非常类似于事件 )
- 更改 Vuex 的 store 中的状态的唯一方法是提交 mutation
- Vuex 中的 mutations 非常类似于事件:每个 mutation 都有一个字符串的 事件类型 (type) 和 一个 回调函数 (handler)。这个回调函数就是我们实际进行状态更改的地方,并且它会接受 state 作为第一个参数:
const store = new Vuex.Store({
  state: {
    count: 1
  },
  mutations: {
    increment (state) {
      // 变更状态
      state.count++
    }
  }
})
你不能直接调用一个 mutation handler。这个选项更像是事件注册:“当触发一个类型为 increment 的 mutation 时,调用此函数。”要唤醒一个 mutation handler,你需要以相应的 type 调用 store.commit 方法:
store.commit('increment')
提交载荷(Payload) 相当于另一个参数
- 你可以向 store.commit 传入额外的参数,即 mutation 的 载荷(payload):
// ...
mutations: {
  increment (state, n) {
    state.count += n
  }
}
store.commit('increment', 10)   // 另一个参数
在大多数情况下,载荷应该是一个对象,这样可以包含多个字段并且记录的 mutation 会更易读:
// ...
mutations: {
  increment (state, payload) {
    state.count += payload.amount
  }
}
store.commit('increment', {
  amount: 10
- 提交 mutation 的另一种方式是直接使用包含 type 属性的对象:
store.commit({
  type: 'increment',
  amount: 10
})
`
使用常量替代 Mutation 事件类型
- 使用常量替代 mutation 事件类型在各种 Flux 实现中是很常见的模式。这样可以使 linter 之类的工具发挥作用,同时把这些常量放在单独的文件中可以让你的代码合作者对整个 app 包含的 mutation 一目了然:
// mutation-types.js
export const SOME_MUTATION = 'SOME_MUTATION'
// store.js
import Vuex from 'vuex'
import { SOME_MUTATION } from './mutation-types'

const store = new Vuex.Store({
  state: { ... },
  mutations: {
    // 我们可以使用 ES2015 风格的计算属性命名功能来使用一个常量作为函数名
    [SOME_MUTATION] (state) {
      // mutate state
    }
  }
})
`
在组件中提交 Mutations
- 你可以在组件中使用 this.$store.commit('xxx') 提交 mutation,或者使用 mapMutations 辅助函数将组件中的 methods 映射为 store.commit 调用(需要在根节点注入 store)。
import { mapMutations } from 'vuex'

export default {
  // ...
  methods: {
    ...mapMutations([
      'increment' // 映射 this.increment() 为 this.$store.commit('increment')
    ]),
    ...mapMutations({
      add: 'increment' // 映射 this.add() 为 this.$store.commit('increment')
    })
  }
}
(4.4) Actions
- Action 类似于 mutation,不同在于:
Action 提交的是 mutation,而不是直接变更状态。
Action 可以包含任意异步操作。
const store = new Vuex.Store({
  state: {
    count: 0
  },
  mutations: {
    increment (state) {
      state.count++
    }
  },
  actions: {
    increment (context) {
      context.commit('increment')
    }
  }
})
Action 函数接受一个与 store 实例具有相同方法和属性的 context 对象,因此你可以调用 context.commit 提交一个 mutation,或者通过 context.state 和 context.getters 来获取 state 和 getters。当我们在之后介绍到 Modules 时,你就知道 context 对象为什么不是 store 实例本身了。
实践中,我们会经常用到 ES2015 的 参数解构 来简化代码(特别是我们需要调用 commit 很多次的时候):
actions: {
  increment ({ commit }) {
    commit('increment')
  }
}
分发 Action
- Action 通过 store.dispatch 方法触发:
store.dispatch('increment')

// dispatch:是派遣,调度的意思
乍一眼看上去感觉多此一举,我们直接分发 mutation 岂不更方便?实际上并非如此,还记得 mutation 必须同步执行这个限制么?Action 就不受约束!我们可以在 action 内部执行异步操作:
actions: {
  incrementAsync ({ commit }) {
    setTimeout(() => {
      commit('increment')
    }, 1000)
  }
}
- Actions 支持同样的载荷方式和对象方式进行分发:
// 以载荷形式分发
store.dispatch('incrementAsync', {
  amount: 10
})

// 以对象形式分发
store.dispatch({
  type: 'incrementAsync',
  amount: 10
})
(4.4) Modules
- 由于使用单一状态树,应用的所有状态会集中到一个比较大的对象。当应用变得非常复杂时,store 对象就有可能变得相当臃肿。
为了解决以上问题,Vuex 允许我们将 store 分割成模块(module)。每个模块拥有自己的 state、mutation、action、getter、甚至是嵌套子模块——从上至下进行同样方式的分割:
const moduleA = {
  state: { ... },
  mutations: { ... },
  actions: { ... },
  getters: { ... }
}

const moduleB = {
  state: { ... },
  mutations: { ... },
  actions: { ... }
}

const store = new Vuex.Store({
  modules: {
    a: moduleA,
    b: moduleB
  }
})

store.state.a // -> moduleA 的状态
store.state.b // -> moduleB 的状态

