SSH环境搭建(巨详细!!!)
前言:搭建SSH会使用很多包,一般需要到处复制,放在lib下,这样会很麻烦。因此,我使用Maven搭建ssh环境,如果你没听过maven,不用惊慌,主要是为了使用它的pom.xml,它可以自动导入你需要的jar包,使开发更方便。let's go!(注:此工程是引入别人的代码)
一、建立web project工程(不同版本,以下顺序有差别,但内容不变)
1.file--new--web project
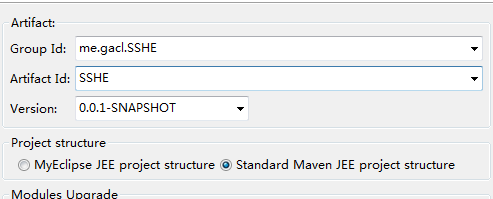
2.name:SSHE,选择mavensupport,next
输入项目的group id:一般为域名+项目名,
Artifact id:项目名,
选择标准maven工程,finish
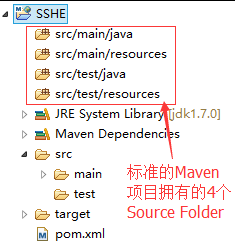
3.新建的工程视图
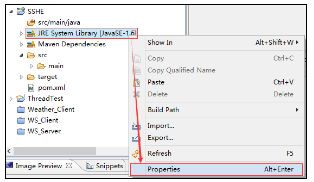
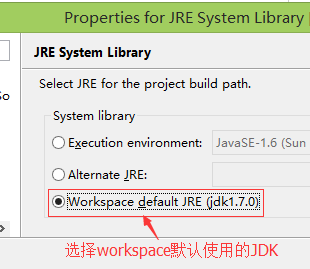
修改配置:这里的JDK要选择默认的,这样别人在使用的时候,如果JDk不一致的话也不会出错
二、搭建Spring3开发环境
1.引入spring3的jar包:在pom.xml中编写Spring3需要的包,maven会自动下载这些包以及相关的依赖jar包
2.编写spring.xml:在src/main/resources目录下创建一个spring.xml文件
xmlns:context="http://www.springframework.org/schema/context"
xsi:schemaLocation="http://www.springframework.org/schema/beans
http://www.springframework.org/schema/beans/spring-beans-3.0.xsd
http://www.springframework.org/schema/context
http://www.springframework.org/schema/context/spring-context-3.0.xsd
">
3.在src/main/resources目录下创建一个config.properties文件,config.properties文件主要是用来编写一些系统的配置信息,例如数据库连接信息,config.properties文件中的内容暂时先不编写,等整合到Hibernate时再编写具体的数据库连接信息。(虽然为空,但一定要有,否则出错)
4.测试
首先,在src/main/java中创建me.gacl.service包,在包中编写一个 UserServiceI 接口
package me.gacl.service;
/**
* 测试
* @author gacl
*
*/
public interface UserServiceI {
/**
* 测试方法
*/
void test();
}
然后,在src/main/java中创建me.gacl.service.impl包,在包中编写UserServiceImpl实现类
package me.gacl.service.impl;
import org.springframework.stereotype.Service;
import me.gacl.service.UserServiceI;
//使用Spring提供的@Service注解将UserServiceImpl标注为一个Service
@Service("userService")
public class UserServiceImpl implements UserServiceI {
@Override
public void test() {
System.out.println("Hello World!");
}
}
进行单元测试时需要使用到Junit,所以需要在pom.xml文件中添加Junit的jar包描述
最后,在src/main/test中创建me.gacl.test包,在包中编写 TestSpring类
package me.gacl.test;
import me.gacl.service.UserServiceI;
import org.junit.Test;
import org.springframework.context.ApplicationContext;
import org.springframework.context.support.ClassPathXmlApplicationContext;
public class TestSpring {
@Test
public void test(){
//通过spring.xml配置文件创建Spring的应用程序上下文环境
ApplicationContext ac = new ClassPathXmlApplicationContext("classpath:spring.xml");
//从Spring的IOC容器中获取bean对象
UserServiceI userService = (UserServiceI) ac.getBean("userService");
//执行测试方法
userService.test();
}
}
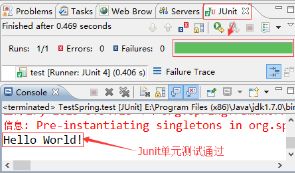
5.run as--junit 运行
6.在web.xml中配置Spring监听器
7.先执行【Maven install】命令发布项目,然后启动tomcat服务器,tomcat服务器启动的过程中没有出现报错,输入地址:http://localhost:8080/SSHE
测试通过,Spring3开发环境搭建成功!
三、搭建Struts2
1.引包:在pom.xml文件中编写Struts2所需要的jar包
2.在src/main/resources目录下创建一个struts.xml文件
3.在web.xml中配置Struts2的过滤器
4.测试:在src/main/java中创建me.gacl.action包,在包中编写一个 TestAction类
package me.gacl.action;
import me.gacl.service.UserServiceI;
import org.apache.struts2.convention.annotation.Action;
import org.apache.struts2.convention.annotation.Namespace;
import org.apache.struts2.convention.annotation.ParentPackage;
import org.springframework.beans.factory.annotation.Autowired;
@ParentPackage("basePackage")
@Action(value="strust2Test")//使用convention-plugin插件提供的@Action注解将一个普通java类标注为一个可以处理用户请求的Action,Action的名字为struts2Test
@Namespace("/")//使用convention-plugin插件提供的@Namespace注解为这个Action指定一个命名空间
public class TestAction {
/**
* 注入userService
*/
@Autowired
private UserServiceI userService;
/**
* http://localhost:8080/SSHE/strust2Test!test.action
* MethodName: test
* Description:
* @author xudp
*/
public void test(){
System.out.println("进入TestAction");
userService.test();
}
}
5.先执行【Maven install】操作,然后启动tomcat服务器运行,输入访问地址:http://localhost:8080/SSHE/strust2Test!test.action,结果会在控制台输出,每刷新一次地址就会在控制台打印以下信息
测试通过,Struts2的开发环境搭建并整合Spring成功!
四、搭建Hibernate4
1.引包:在pom.xml文件中编写Hibernate4所需要的jar包
注意:一定要排除掉Struts2中的javassist,否则就冲突了(在Struts包中有删除的方法,去掉注释即可)。
2.在config.properties文件中编写连接数据库需要使用到的相关信息:注意此处数据库名称sshe,用户名和密码都是root,根据需要自己改
#hibernate.dialect=org.hibernate.dialect.OracleDialect
#driverClassName=oracle.jdbc.driver.OracleDriver
#validationQuery=SELECT 1 FROM DUAL
#jdbc_url=jdbc:oracle:thin:@127.0.0.1:1521:orcl
#jdbc_username=gacl
#jdbc_password=xdp
hibernate.dialect=org.hibernate.dialect.MySQLDialect
driverClassName=com.mysql.jdbc.Driver
validationQuery=SELECT 1
jdbc_url=jdbc:mysql://localhost:3306/sshe?useUnicode=true&characterEncoding=UTF-8&zeroDateTimeBehavior=convertToNull
jdbc_username=root
jdbc_password=root
#hibernate.dialect=org.hibernate.dialect.SQLServerDialect
#driverClassName=net.sourceforge.jtds.jdbc.Driver
#validationQuery=SELECT 1
#jdbc_url=jdbc:jtds:sqlserver://127.0.0.1:1433/sshe
#jdbc_username=sa
#jdbc_password=123456
#jndiName=java:comp/env/dataSourceName
hibernate.hbm2ddl.auto=update
hibernate.show_sql=true
hibernate.format_sql=true
3.在src/main/resources目录下新建一个spring-hibernate.xml文件
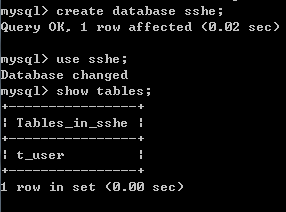
4.创建sshe数据库:
打开cmd,输入mysql的用户名:mysql -uroot -p和密码:root
CREATE DATABASE sshe;
5.测试
在src/main/java中创建me.gac.model包,在包中编写一个 User类
package me.gacl.model;
import java.util.Date;
import javax.persistence.Column;
import javax.persistence.Entity;
import javax.persistence.Id;
import javax.persistence.Table;
import javax.persistence.Temporal;
import javax.persistence.TemporalType;
@Entity
@Table(name = "T_USER", schema = "SSHE")
public class User implements java.io.Serializable {
// Fields
private String id;
private String name;
private String pwd;
private Date createdatetime;
private Date modifydatetime;
// Constructors
/** default constructor */
public User() {
}
/** minimal constructor */
public User(String id, String name, String pwd) {
this.id = id;
this.name = name;
this.pwd = pwd;
}
/** full constructor */
public User(String id, String name, String pwd, Date createdatetime, Date modifydatetime) {
this.id = id;
this.name = name;
this.pwd = pwd;
this.createdatetime = createdatetime;
this.modifydatetime = modifydatetime;
}
// Property accessors
@Id
@Column(name = "ID", unique = true, nullable = false, length = 36)
public String getId() {
return this.id;
}
public void setId(String id) {
this.id = id;
}
@Column(name = "NAME",nullable = false, length = 100)
public String getName() {
return this.name;
}
public void setName(String name) {
this.name = name;
}
@Column(name = "PWD", nullable = false, length = 32)
public String getPwd() {
return this.pwd;
}
public void setPwd(String pwd) {
this.pwd = pwd;
}
@Temporal(TemporalType.TIMESTAMP)
@Column(name = "CREATEDATETIME", length = 7)
public Date getCreatedatetime() {
return this.createdatetime;
}
public void setCreatedatetime(Date createdatetime) {
this.createdatetime = createdatetime;
}
@Temporal(TemporalType.TIMESTAMP)
@Column(name = "MODIFYDATETIME", length = 7)
public Date getModifydatetime() {
return this.modifydatetime;
}
public void setModifydatetime(Date modifydatetime) {
this.modifydatetime = modifydatetime;
}
}
在src/main/java中创建me.gacl.dao包,在包中编写一个 UserDaoI接口
package me.gacl.dao;
import java.io.Serializable;
import me.gacl.model.User;
public interface UserDaoI {
/**
* 保存用户
* @param user
* @return
*/
Serializable save(User user);
}
在src/main/java中创建me.gacl.dao.impl包,在包中编写 UserDaoImpl实现类
package me.gacl.dao.impl;
import java.io.Serializable;
import org.hibernate.SessionFactory;
import org.springframework.beans.factory.annotation.Autowired;
import org.springframework.stereotype.Repository;
import me.gacl.dao.UserDaoI;
import me.gacl.model.User;
@Repository("userDao")
public class UserDaoImpl implements UserDaoI {
/**
* 使用@Autowired注解将sessionFactory注入到UserDaoImpl中
*/
@Autowired
private SessionFactory sessionFactory;
@Override
public Serializable save(User user) {
return sessionFactory.getCurrentSession().save(user);
}
}
在之前创建好的UserServiceI接口中添加一个save方法的定义
package me.gacl.service;
import java.io.Serializable;
import me.gacl.model.User;
/**
* 测试
* @author gacl
*
*/
public interface UserServiceI {
/**
* 测试方法
*/
void test();
/**
* 保存用户
* @param user
* @return
*/
Serializable save(User user);
}
在UserServiceImpl类中实现save方法
package me.gacl.service.impl;
import java.io.Serializable;
import org.springframework.beans.factory.annotation.Autowired;
import org.springframework.stereotype.Service;
import me.gacl.dao.UserDaoI;
import me.gacl.model.User;
import me.gacl.service.UserServiceI;
//使用Spring提供的@Service注解将UserServiceImpl标注为一个Service
@Service("userService")
public class UserServiceImpl implements UserServiceI {
/**
* 注入userDao
*/
@Autowired
private UserDaoI userDao;
@Override
public void test() {
System.out.println("Hello World!");
}
@Override
public Serializable save(User user) {
return userDao.save(user);
}
}
在src/main/test下的me.gacl.test包中编写 TestHibernate类
package me.gacl.test;
import java.util.Date;
import java.util.UUID;
import me.gacl.model.User;
import me.gacl.service.UserServiceI;
import org.junit.Before;
import org.junit.Test;
import org.springframework.context.ApplicationContext;
import org.springframework.context.support.ClassPathXmlApplicationContext;
public class TestHibernate {
private UserServiceI userService;
/**
* 这个before方法在所有的测试方法之前执行,并且只执行一次
* 所有做Junit单元测试时一些初始化工作可以在这个方法里面进行
* 比如在before方法里面初始化ApplicationContext和userService
*/
@Before
public void before(){
ApplicationContext ac = new ClassPathXmlApplicationContext(new String[]{"spring.xml","spring-hibernate.xml"});
userService = (UserServiceI) ac.getBean("userService");
}
@Test
public void testSaveMethod(){
//ApplicationContext ac = new ClassPathXmlApplicationContext(new String[]{"spring.xml","spring-hibernate.xml"});
//UserServiceI userService = (UserServiceI) ac.getBean("userService");
User user = new User();
user.setId(UUID.randomUUID().toString().replaceAll("-", ""));
user.setName("孤傲苍狼");
user.setPwd("123");
user.setCreatedatetime(new Date());
userService.save(user);
}
}
6.run as--junit
测试能够通过,并查看数据库
到此,Hibernate4开发环境的搭建并且与Spring整合的工作算是全部完成并且测试通过了。
五、三大框架综合测试
1.完善web.xml文件中的配置
xsi:schemaLocation="http://java.sun.com/xml/ns/javaee
http://java.sun.com/xml/ns/javaee/web-app_3_0.xsd">
2、编写测试代码
在TestAction类中添加一个saveUser方法
package me.gacl.action;
import java.util.Date;
import java.util.UUID;
import me.gacl.model.User;
import me.gacl.service.UserServiceI;
import org.apache.struts2.convention.annotation.Action;
import org.apache.struts2.convention.annotation.Namespace;
import org.apache.struts2.convention.annotation.ParentPackage;
import org.springframework.beans.factory.annotation.Autowired;
@ParentPackage("basePackage")
@Action(value="strust2Test")//使用convention-plugin插件提供的@Action注解将一个普通java类标注为一个可以处理用户请求的Action
@Namespace("/")//使用convention-plugin插件提供的@Namespace注解为这个Action指定一个命名空间
public class TestAction {
/**
* 注入userService
*/
@Autowired
private UserServiceI userService;
/**
* http://localhost:8080/SSHE/strust2Test!test.action
* MethodName: test
* Description:
* @author xudp
*/
public void test(){
System.out.println("进入TestAction");
userService.test();
}
/**
* http://localhost:8080/SSHE/strust2Test!saveUser.action
*/
public void saveUser(){
User user = new User();
user.setId(UUID.randomUUID().toString().replaceAll("-", ""));
user.setName("xdp孤傲苍狼");
user.setPwd("123456");
user.setCreatedatetime(new Date());
userService.save(user);
}
}
修改TestSpring这个测试类中的test方法的代码
package me.gacl.test;
import me.gacl.service.UserServiceI;
import org.junit.Test;
import org.springframework.context.ApplicationContext;
import org.springframework.context.support.ClassPathXmlApplicationContext;
public class TestSpring {
@Test
public void test(){
//通过spring.xml配置文件创建Spring的应用程序上下文环境
//ApplicationContext ac = new ClassPathXmlApplicationContext("classpath:spring.xml");
/**
*因为已经整合了Hibernate,UserServiceImpl类中使用到了userDao,
*userDao是由spring创建并且注入给UserServiceImpl类的,而userDao中又使用到了sessionFactory对象
*而创建sessionFactory对象时需要使用到spring-hibernate.xml这个配置文件中的配置项信息,
*所以创建Spring的应用程序上下文环境时,需要同时使用spring.xml和spring-hibernate.xml这两个配置文件
*否则在执行Maven install命令时,因为maven会先执行test方法中的代码,而代码执行到
*UserServiceI userService = (UserServiceI) ac.getBean("userService");
*这一行时就会因为userDao中使用到sessionFactory对象无法正常创建的而出错,这样执行Maven install命令编译项目时就会失败!
*
*/
ApplicationContext ac = new ClassPathXmlApplicationContext(new String[]{"spring.xml","spring-hibernate.xml"});
//从Spring的IOC容器中获取bean对象
UserServiceI userService = (UserServiceI) ac.getBean("userService");
//执行测试方法
userService.test();
}
}
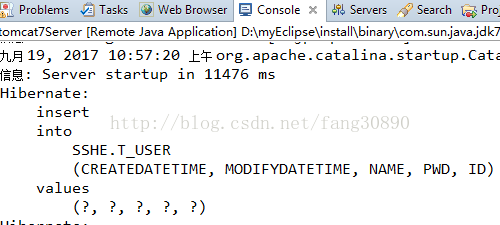
3.执行【Maven install】命令,再启动tomcat,输入地址:http://localhost:8080/SSHE/strust2Test!saveUser.action进行访问,访问没有出错会在控制台打印以下信息
到此全部结束,此时可能会出现的错误是在建包期间,Javassist-XX-GA.jar这个包,要求删过一次,但是在新建完工程之初,自带的还有一个,我这里的解决方法是,在建完工程时,把pom.xml
OK!有需要代码的,去http://download.csdn.net/download/fang30890/9985403下载


