RN react-navigation使用
一、命令安装
npm install react-navigation --save该库包含三类组件:
(1)StackNavigator:用来跳转页面和传递参数
(2)TabNavigator:类似底部导航栏,用来在同一屏切换不同页面
(3)DrawerNavigator:侧滑菜单导航栏,用于轻松设置带抽屉的屏幕
二、react-navigation
1、StackNavigator属性介绍
navigationOptions:配置StackNavigator的一些属性。

    title:标题,如果设置了这个导航栏和标签栏的title就会变成一样的,不推荐使用
    header:可以设置一些导航的属性,如果隐藏顶部导航栏只要将这个属性设置为null
    headerTitle:设置导航栏标题,推荐
    headerBackTitle:设置跳转页面左侧返回箭头后面的文字,默认是上一个页面的标题。可以自定义,也可以设置为null
    headerTruncatedBackTitle:设置当上个页面标题不符合返回箭头后的文字时,默认改成"返回"
    headerRight:设置导航条右侧。可以是按钮或者其他视图控件
    headerLeft:设置导航条左侧。可以是按钮或者其他视图控件
    headerStyle:设置导航条的样式。背景色,宽高等
    headerTitleStyle:设置导航栏文字样式
    headerBackTitleStyle:设置导航栏‘返回’文字样式
    headerTintColor:设置导航栏颜色
    headerPressColorAndroid:安卓独有的设置颜色纹理,需要安卓版本大于5.0
    gesturesEnabled:是否支持滑动返回手势,iOS默认支持,安卓默认关闭


screen:对应界面名称,需要填入import之后的页面

mode:定义跳转风格

   card:使用iOS和安卓默认的风格

   modal:iOS独有的使屏幕从底部画出。类似iOS的present效果

headerMode:返回上级页面时动画效果

   float:iOS默认的效果

   screen:滑动过程中,整个页面都会返回

   none:无动画

cardStyle:自定义设置跳转效果

   transitionConfig: 自定义设置滑动返回的配置

   onTransitionStart:当转换动画即将开始时被调用的功能

   onTransitionEnd:当转换动画完成,将被调用的功能

path:路由中设置的路径的覆盖映射配置

initialRouteName:设置默认的页面组件,必须是上面已注册的页面组件

initialRouteParams:初始路由参数// 注册导航
const Navs = StackNavigator({
Home: { screen: Tabs },
HomeTwo: {
screen: HomeTwo, // 必须, 其他都是非必须
path:'app/homeTwo', 使用url导航时用到, 如 web app 和 Deep Linking
navigationOptions: {} // 此处设置了, 会覆盖组件内的`static navigationOptions`设置. 具体参数详见下文
},
HomeThree: { screen: HomeThree },
HomeFour: { screen: HomeFour }
}, {
initialRouteName: 'Home', // 默认显示界面
navigationOptions: { // 屏幕导航的默认选项, 也可以在组件内用 static navigationOptions 设置(会覆盖此处的设置)
headerTitle: "首页",//导航栏标题
headerBackTitle: null,//设置跳转页面左侧返回箭头后面的文字,默认是上一个页面的标题。可以自定义,也可以设置为null
headerTintColor: "#333",//设置导航栏颜色
cardStack: {
gesturesEnabled: true//是否允许右滑返回,在iOS上默认为true,在Android上默认为false
}
},
mode: 'card', // 页面切换模式, 左右是card(相当于iOS中的push效果), 上下是modal(相当于iOS中的modal效果)
headerMode: 'screen', // 导航栏的显示模式, screen: 有渐变透明效果, float: 无透明效果, none: 隐藏导航栏
onTransitionStart: ()=>{ console.log('导航栏切换开始'); }, // 页面切换开始时的回调函数
onTransitionEnd: ()=>{ console.log('导航栏切换结束'); } // 页面切换结束时的回调函数
});如果在StackNavigatorConfig里面配置了navigationOptions的一下参数,这些参数会作用与RouteConfigs里面的所有路由的子页面,如果路由子页面里面设置了static navigationOptions那么会覆盖此处配置的全局参数
已经配置好导航器以及对应的路由页面了,但是要完成页面之间的跳转,还需要 navigation。
navigation
在导航器中的每一个页面,都有 navigation 属性,该属性有以下几个属性/方法:
navigate - 跳转到其他页面
state - 当前页面导航器的状态
setParams - 更改路由的参数
goBack - 返回
dispatch - 发送一个action
navigete
调用这个方法可以跳转到导航器中的其他页面,此方法有三个参数:
— routeName 导航器中配置的路由名称

— params 传递参数到下一个页面

— action action

比如: this.props.navigation.navigate('Find', {param: 'i am the param'});
state
state 里面包含有传递过来的参数 params 、 key 、路由名称 routeName ,打印log可以看得到:
{
  params: { param: 'i am the param' },
  key: 'id-1500546317301-1',
  routeName: 'Mine'
}
setParams
更改当前页面路由的参数,比如可以用来更新头部的按钮或者标题。
componentDidMount() {
    this.props.navigation.setParams({param:'i am the new param'})
}
goBack
回退,可以不传,也可以传参数,还可以传 null 。
this.props.navigation.goBack();       // 回退到上一个页面
this.props.navigation.goBack(null);   // 回退到任意一个页面
this.props.navigation.goBack('Home'); // 回退到Home页面
2、TabNavigator属性介绍
screen:和导航的功能是一样的,对应界面名称,可以在其他页面通过这个screen传值和跳转。


navigationOptions:配置TabNavigator的一些属性

title:标题,会同时设置导航条和标签栏的title

tabBarVisible:是否隐藏标签栏。默认不隐藏(true)

tabBarIcon:设置标签栏的图标。需要给每个都设置

tabBarLabel:设置标签栏的title。推荐

导航栏配置

tabBarPosition:设置tabbar的位置,iOS默认在底部,安卓默认在顶部。(属性值:'top','bottom')

swipeEnabled:是否允许在标签之间进行滑动

animationEnabled:是否在更改标签时显示动画

lazy:是否根据需要懒惰呈现标签,而不是提前,意思是在app打开的时候将底部标签栏全部加载,默认false,推荐为true

trueinitialRouteName: 设置默认的页面组件

backBehavior:按 back 键是否跳转到第一个Tab(首页), none 为不跳转

tabBarOptions:配置标签栏的一些属性iOS属性

activeTintColor:label和icon的前景色 活跃状态下

activeBackgroundColor:label和icon的背景色 活跃状态下

inactiveTintColor:label和icon的前景色 不活跃状态下

inactiveBackgroundColor:label和icon的背景色 不活跃状态下

showLabel:是否显示label,默认开启 style:tabbar的样式

labelStyle:label的样式安卓属性

activeTintColor:label和icon的前景色 活跃状态下

inactiveTintColor:label和icon的前景色 不活跃状态下

showIcon:是否显示图标,默认关闭

showLabel:是否显示label,默认开启 style:tabbar的样式

labelStyle:label的样式 upperCaseLabel:是否使标签大写,默认为true

pressColor:material涟漪效果的颜色(安卓版本需要大于5.0)

pressOpacity:按压标签的透明度变化(安卓版本需要小于5.0)

scrollEnabled:是否启用可滚动选项卡 tabStyle:tab的样式

indicatorStyle:标签指示器的样式对象(选项卡底部的行)。安卓底部会多出一条线,可以将height设置为0来暂时解决这个问题

labelStyle:label的样式

iconStyle:图标样式
3、DrawerNavigator属性介绍
 DrawerNavigatorConfig

     drawerWidth - 抽屉的宽度
     drawerPosition - 选项是左或右。 默认为左侧位置
     contentComponent - 用于呈现抽屉内容的组件,例如导航项。 接收抽屉的导航。 默认为DrawerItems
     contentOptions - 配置抽屉内容

     initialRouteName - 初始路由的routeName
     order - 定义抽屉项目顺序的routeNames数组。
     路径 - 提供routeName到路径配置的映射,它覆盖routeConfigs中设置的路径。
     backBehavior - 后退按钮是否会切换到初始路由? 如果是,设置为initialRoute,否则为none。 默认为initialRoute行为

    DrawerItems的contentOptions属性

     activeTintColor - 活动标签的标签和图标颜色
     activeBackgroundColor - 活动标签的背景颜色
     inactiveTintColor - 非活动标签的标签和图标颜色
     inactiveBackgroundColor - 非活动标签的背景颜色
     内容部分的样式样式对象
     labelStyle - 当您的标签是字符串时,要覆盖内容部分中的文本样式的样式对象
4、使用StackNavigator + TabNavigator实现Tab界面切换、界面间导航
1>首先导入必要组件(包含导航路由)
import { StackNavigator, TabNavigator, TabBarBottom } from "react-navigation";
import Home from "./category/Home";
import Feedback from "./category/feedback/feedback";
import Task from "./category/task/taskHome";
2>定义TabNavigator
const MyTab = TabNavigator(
{
Home: {
screen: Home,
navigationOptions: ({ navigation }) => ({
headerTitle: "首页",
tabBarLabel: "首页",
headerBackTitle: null,
tabBarIcon: ({ tintColor }) => (
navigation.state.params ? navigation.state.params.submit() : null
}>
提交
),
tabBarIcon: ({ tintColor }) => (
3>定义StackNavigator
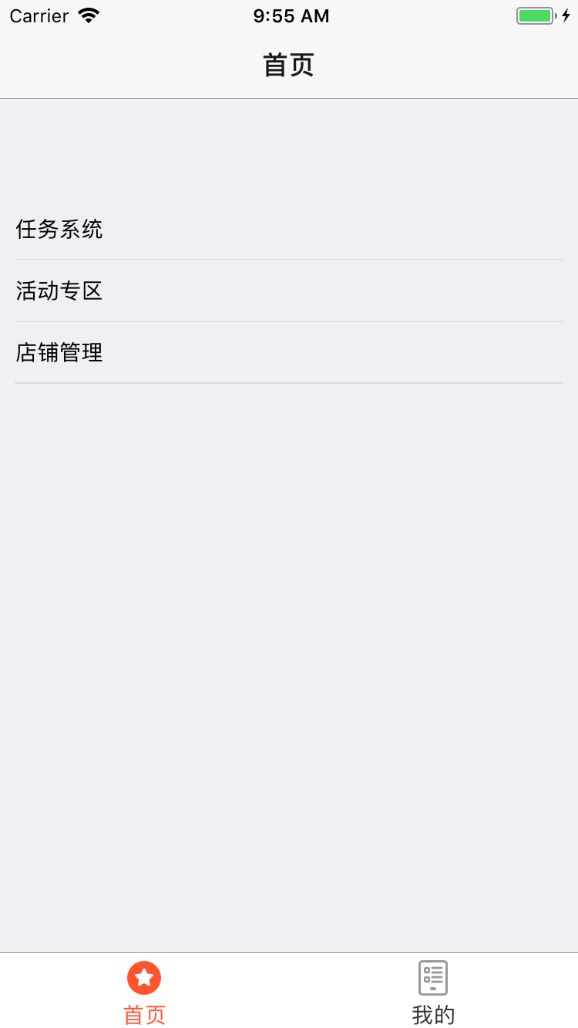
效果图:
const AppIndex = StackNavigator({
    Main: {
        screen: MyTab
    },
Task: {
        screen: Task,
        navigationOptions: {
            headerBackTitle: null
        }
    }
});
任务系统导航跳转到任务首页:
难点:导航右侧配置按钮:
headerRight:设置导航条右侧。可以是按钮或者其他视图控件onPress = {()=>this.share()}
static navigationOptions = ({ navigation }) => ({
        title: `${navigation.state.params.title}`,
        headerBackTitle: `${navigation.state.params.title}`,
        headerRight: (

                this.share()
                    }>
                    分享


        )
});//右侧配置两个按钮
static navigationOptions = ({ navigation }) => ({
title: `${navigation.state.params.title}`,
headerBackTitle: `${navigation.state.params.title}`,
headerRight: (
navigation.state.params ? navigation.state.params.share() : null
}>
分享
navigation.state.params ? navigation.state.params.jumpToRule() : null
}>
兑换规则
)
});例如分享:
首先在本类中声明一个share(){
}的方法
页面挂载完成在componentDidMount里面设置navigation的setParams把方法注入到navigation中去
componentDidMount() {
        // 通过在componentDidMount里面设置setParams
        this.props.navigation.setParams({
            share: this.share
        });
    }
然后点击时直接在navigation中寻找刚刚注入的放置直接调用
onPress={() =>
                        navigation.state.params ? navigation.state.params.share() : null
                    }
本人开发中最初的处理方式:
把导航里面配置的按钮需要调用的本类函数放到window全局对象下面,然后在全局里面寻找调用


