OpenGL ES之六——绘制矩形和圆形
概述
这是一个系列的Android平台下OpenGl ES介绍,从最基本的使用最终到VR图的展示的实现,属于基础篇。(后面针对VR视频会再有几篇文章,属于进阶篇)
OpenGL ES之一——概念扫盲
OpenGL ES之二——Android中的OpenGL ES概述
OpenGL ES之三——绘制纯色背景
OpenGL ES之四——绘制点,线,三角形
OpenGL ES之五——相机和投影,绘制等腰三角形
OpenGL ES之六——绘制矩形和圆形
OpenGL ES之七——着色器语言GLSL
OpenGL ES之八——GLES20类和Matrix类
OpenGL ES之九——相机和投影
OpenGL ES之十——纹理贴图(展示一张图片)
OpenGL ES之十一——绘制3D图形
OpenGL ES之十二——地球仪和VR图
本篇概述
上文中主要介绍了相机和投影,并利用二者做出了变换矩阵,画出了等腰三角形。本文将介绍如何绘制矩形和圆形。
重点:顶点法和索引法;OpenGL ES中多边形的构成
一 顶点法和索引法以及OpenGL Es中多边形的构成
1.1 顶点法和索引法
之前文中绘制点,线,三角形都是使用的GLES30.glDrawArrays ,它就是顶点法。是根据传入的顶点顺序进行绘制的。另外还有另外一种方法GLES30.glDrawElements,称之为索引法,是根据索引序列,在顶点序列中找到对应的顶点,并根据绘制的方式,组成相应的图元绘制。
顶点法拥有的绘制方式,索引法也都有。相对于顶点法在复杂图形的绘制中无法避免大量顶点重复的情况,索引法可以相对顶点法减少很多重复顶点占用的空间。所以复杂图形的情况下推荐使用索引法。
1.2 OpenGL ES中多边形的构成
三角形就是OpenGLES提供的最复杂的图元单位,想要绘制其他的多边形,例如矩形和圆形就要利用三角形来拼成。
1.2.1 矩形
先来看张图如下,途中的矩形可以分为三角形123和三角形134(当然也可以按照其他的分法分,可以分为不同个数和不同方式)。

四个顶点的参数可以如下:
	//四个顶点的位置参数
    private float rectangleCoords[] = {
            -0.5f, 0.5f, 0.0f,//top left
            -0.5f, -0.5f, 0.0f, // bottom left
            0.5f, -0.5f, 0.0f, // bottom right
            0.5f, 0.5f, 0.0f // top right
    };
1.2.2 圆形
圆形的构建,相对复杂一点,按照微积分的思想我们将一个圆分为n个三角形,n的数值越大那么这个圆看起来越光滑。如下图n由小变大:

以六边形为例,由012、023,034、045、056、061六个三角形,更多变形同样如此。
利用简单的数学知识,即可得到,以多边形中心建立直角坐标系,得到n变形的顶点坐标为:
private float[]  createPositions(){
    ArrayList data=new ArrayList<>();
    data.add(0.0f);             //设置圆心坐标
    data.add(0.0f);
    data.add(0.0f);
    float angDegSpan=360f/n;
    for(float i=0;i<360+angDegSpan;i+=angDegSpan){
        data.add((float) (radius*Math.sin(i*Math.PI/180f)));
        data.add((float)(radius*Math.cos(i*Math.PI/180f)));
        data.add(0.0f);
    }
    float[] f=new float[data.size()];
    for (int i=0;i
二 绘制一个矩形
使用的布局文件和上篇文章中的完全相同;Activity中将实例化的渲染器改为RectangleRender; 顶点着色器和片段着色器文件和上篇完全相同。
2.1 顶点着色器和片段着色器
和上篇文中的相同,所以直接拿来使用
2.2 渲染器Render
2.2.1 相对上一篇文中SimpleShapeRender增加和改变一些参数如下:
	//顶点索引缓存
    private final ShortBuffer indicesBuffer;

	/**
     * 顶点索引
     */
    private short[] indices = {
            0, 1, 2, 0, 2, 3
    };

    //四个顶点的颜色参数
    private float color[] = {
            0.0f, 0.0f, 1.0f, 1.0f,//top left
            0.0f, 1.0f, 0.0f, 1.0f,// bottom left
            0.0f, 0.0f, 1.0f, 1.0f,// bottom right
            1.0f, 0.0f, 0.0f, 1.0f// top right
    };

	//四个顶点的位置参数
    private float rectangleCoords[] = {
            -0.5f, 0.5f, 0.0f,//top left
            -0.5f, -0.5f, 0.0f, // bottom left
            0.5f, -0.5f, 0.0f, // bottom right
            0.5f, 0.5f, 0.0f // top right
    };
2.2.2 增加处理程序如下
构造方法中增加
		//顶点索引相关
        indicesBuffer = ByteBuffer.allocateDirect(indices.length * 4)
                .order(ByteOrder.nativeOrder())
                .asShortBuffer();
        indicesBuffer.put(indices);
        indicesBuffer.position(0);
绘制矩形使用
//绘制三角形
        GLES30.glDrawElements(GL10.GL_TRIANGLES, indices.length, GL10.GL_UNSIGNED_SHORT, indicesBuffer);
2.3 完整渲染器类如下
public class RectangleRender implements GLSurfaceView.Renderer {
    //一个Float占用4Byte
    private static final int BYTES_PER_FLOAT = 4;
    //顶点个数
    private static final int POSITION_COMPONENT_COUNT = 4;
    //顶点位置缓存
    private final FloatBuffer vertexBuffer;
    //顶点颜色缓存
    private final FloatBuffer colorBuffer;
    //顶点索引缓存
    private final ShortBuffer indicesBuffer;
    //渲染程序
    private int mProgram;

    //相机矩阵
    private final float[] mViewMatrix = new float[16];
    //投影矩阵
    private final float[] mProjectMatrix = new float[16];
    //最终变换矩阵
    private final float[] mMVPMatrix = new float[16];

    //返回属性变量的位置
    //变换矩阵
    private int uMatrixLocation;
    //位置
    private int aPositionLocation;
    //颜色
    private int aColorLocation;

    //四个顶点的位置参数
    private float rectangleCoords[] = {
            -0.5f, 0.5f, 0.0f,//top left
            -0.5f, -0.5f, 0.0f, // bottom left
            0.5f, -0.5f, 0.0f, // bottom right
            0.5f, 0.5f, 0.0f // top right
    };

    /**
     * 顶点索引
     */
    private short[] indices = {
            0, 1, 2, 0, 2, 3
    };

    //四个顶点的颜色参数
    private float color[] = {
            0.0f, 0.0f, 1.0f, 1.0f,//top left
            0.0f, 1.0f, 0.0f, 1.0f,// bottom left
            0.0f, 0.0f, 1.0f, 1.0f,// bottom right
            1.0f, 0.0f, 0.0f, 1.0f// top right
    };

    public RectangleRender() {
        //顶点位置相关
        //分配本地内存空间,每个浮点型占4字节空间;将坐标数据转换为FloatBuffer,用以传入给OpenGL ES程序
        vertexBuffer = ByteBuffer.allocateDirect(rectangleCoords.length * BYTES_PER_FLOAT)
                .order(ByteOrder.nativeOrder())
                .asFloatBuffer();
        vertexBuffer.put(rectangleCoords);
        vertexBuffer.position(0);

        //顶点颜色相关
        colorBuffer = ByteBuffer.allocateDirect(color.length * BYTES_PER_FLOAT)
                .order(ByteOrder.nativeOrder())
                .asFloatBuffer();
        colorBuffer.put(color);
        colorBuffer.position(0);

        //顶点索引相关
        indicesBuffer = ByteBuffer.allocateDirect(indices.length * 4)
                .order(ByteOrder.nativeOrder())
                .asShortBuffer();
        indicesBuffer.put(indices);
        indicesBuffer.position(0);
    }

    @Override
    public void onSurfaceCreated(GL10 gl, EGLConfig config) {
        //将背景设置为白色
        GLES20.glClearColor(1.0f,1.0f,1.0f,1.0f);

        //编译顶点着色程序
        String vertexShaderStr = ResReadUtils.readResource(R.raw.vertex_simple_shade);
        int vertexShaderId = ShaderUtils.compileVertexShader(vertexShaderStr);
        //编译片段着色程序
        String fragmentShaderStr = ResReadUtils.readResource(R.raw.fragment_simple_shade);
        int fragmentShaderId = ShaderUtils.compileFragmentShader(fragmentShaderStr);
        //连接程序
        mProgram = ShaderUtils.linkProgram(vertexShaderId, fragmentShaderId);
        //在OpenGLES环境中使用程序
        GLES30.glUseProgram(mProgram);


        uMatrixLocation = GLES30.glGetUniformLocation(mProgram, "u_Matrix");
        aPositionLocation = GLES30.glGetAttribLocation(mProgram, "vPosition");
        aColorLocation = GLES30.glGetAttribLocation(mProgram, "aColor");
    }

    @Override
    public void onSurfaceChanged(GL10 gl, int width, int height) {
        //设置绘制窗口
        GLES30.glViewport(0, 0, width, height);


        //相机和透视投影方式
        //计算宽高比
        float ratio=(float)width/height;
        //设置透视投影
        Matrix.frustumM(mProjectMatrix, 0, -ratio, ratio, -1, 1, 3, 7);
        //设置相机位置
        Matrix.setLookAtM(mViewMatrix, 0, 0, 0, 7.0f, 0f, 0f, 0f, 0f, 1.0f, 0.0f);
        //计算变换矩阵
        Matrix.multiplyMM(mMVPMatrix,0,mProjectMatrix,0,mViewMatrix,0);


        /*//正交投影方式
        final float aspectRatio = width > height ?
                (float) width / (float) height :
                (float) height / (float) width;
        if (width > height) {
            //横屏
            Matrix.orthoM(mMVPMatrix, 0, -aspectRatio, aspectRatio, -1f, 1f, -1f, 1f);
        } else {
            //竖屏
            Matrix.orthoM(mMVPMatrix, 0, -1f, 1f, -aspectRatio, aspectRatio, -1f, 1f);
        }*/
    }

    @Override
    public void onDrawFrame(GL10 gl) {
        //把颜色缓冲区设置为我们预设的颜色
        GLES30.glClear(GLES30.GL_COLOR_BUFFER_BIT);

        //将变换矩阵传入顶点渲染器
        GLES20.glUniformMatrix4fv(uMatrixLocation,1,false,mMVPMatrix,0);
        //准备坐标数据
        GLES30.glVertexAttribPointer(aPositionLocation, 3, GLES30.GL_FLOAT, false, 0, vertexBuffer);
        //启用顶点位置句柄
        GLES30.glEnableVertexAttribArray(aPositionLocation);

        //准备颜色数据
        GLES30.glVertexAttribPointer(aColorLocation, 4, GLES30.GL_FLOAT, false, 0, colorBuffer);
        //启用顶点颜色句柄
        GLES30.glEnableVertexAttribArray(aColorLocation);

        //绘制三角形
        GLES30.glDrawElements(GL10.GL_TRIANGLES, indices.length, GL10.GL_UNSIGNED_SHORT, indicesBuffer);

        //禁止顶点数组的句柄
        GLES30.glDisableVertexAttribArray(aPositionLocation);
        GLES30.glDisableVertexAttribArray(aColorLocation);
    }
}
2.4 绘制结果如下图
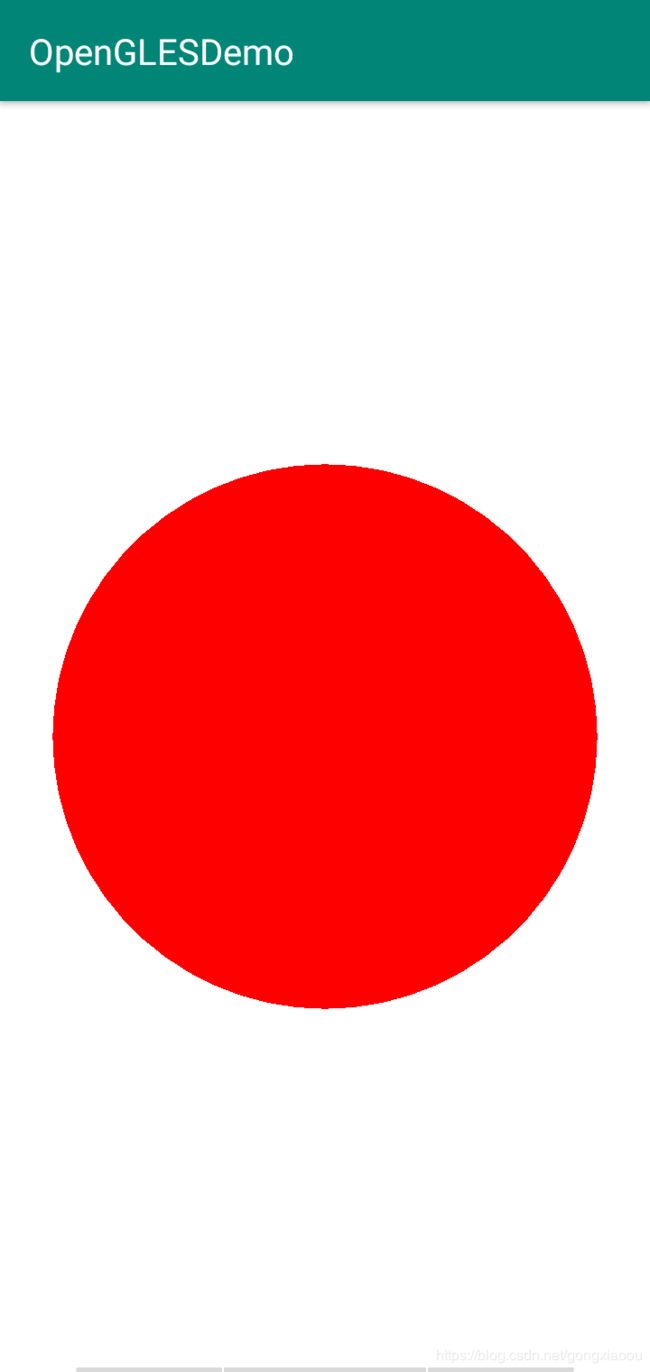
三.绘制一个圆形
使用的布局文件和上篇文章中的完全相同;Activity中将实例化的渲染器改为RectangleRender; 顶点着色器和片段着色器文件和上篇完全相同。
3.1获取顶点位置和颜色
	private void createPositions(int radius, int n){
        ArrayList data=new ArrayList<>();
        data.add(0.0f);             //设置圆心坐标
        data.add(0.0f);
        data.add(0.0f);
        float angDegSpan=360f/n;
        for(float i=0;i<360+angDegSpan;i+=angDegSpan){
            data.add((float) (radius*Math.sin(i*Math.PI/180f)));
            data.add((float)(radius*Math.cos(i*Math.PI/180f)));
            data.add(0.0f);
        }
        float[] f=new float[data.size()];
        for (int i=0;i tempC = new ArrayList<>();
        ArrayList totalC = new ArrayList<>();
        tempC.add(1.0f);
        tempC.add(0.0f);
        tempC.add(0.0f);
        tempC.add(1.0f);
        for (int i=0;i
3.2绘制
	//绘制圆形
        GLES30.glDrawArrays(GLES30.GL_TRIANGLE_FAN, 0, circularCoords.length/3);
3.3 完整渲染器类
public class CircularRender implements GLSurfaceView.Renderer {
    //一个Float占用4Byte
    private static final int BYTES_PER_FLOAT = 4;
    //顶点位置缓存
    private final FloatBuffer vertexBuffer;
    //顶点颜色缓存
    private final FloatBuffer colorBuffer;
    //渲染程序
    private int mProgram;

    //相机矩阵
    private final float[] mViewMatrix = new float[16];
    //投影矩阵
    private final float[] mProjectMatrix = new float[16];
    //最终变换矩阵
    private final float[] mMVPMatrix = new float[16];

    //返回属性变量的位置
    //变换矩阵
    private int uMatrixLocation;
    //位置
    private int aPositionLocation;
    //颜色
    private int aColorLocation;

    //圆形顶点位置
    private float circularCoords[];
    //顶点的颜色
    private float color[];


    public CircularRender() {
        createPositions(1,60);

        //顶点位置相关
        //分配本地内存空间,每个浮点型占4字节空间;将坐标数据转换为FloatBuffer,用以传入给OpenGL ES程序
        vertexBuffer = ByteBuffer.allocateDirect(circularCoords.length * BYTES_PER_FLOAT)
                .order(ByteOrder.nativeOrder())
                .asFloatBuffer();
        vertexBuffer.put(circularCoords);
        vertexBuffer.position(0);

        //顶点颜色相关
        colorBuffer = ByteBuffer.allocateDirect(color.length * BYTES_PER_FLOAT)
                .order(ByteOrder.nativeOrder())
                .asFloatBuffer();
        colorBuffer.put(color);
        colorBuffer.position(0);
    }

    private void createPositions(int radius, int n){
        ArrayList data=new ArrayList<>();
        data.add(0.0f);             //设置圆心坐标
        data.add(0.0f);
        data.add(0.0f);
        float angDegSpan=360f/n;
        for(float i=0;i<360+angDegSpan;i+=angDegSpan){
            data.add((float) (radius*Math.sin(i*Math.PI/180f)));
            data.add((float)(radius*Math.cos(i*Math.PI/180f)));
            data.add(0.0f);
        }
        float[] f=new float[data.size()];
        for (int i=0;i tempC = new ArrayList<>();
        ArrayList totalC = new ArrayList<>();
        tempC.add(1.0f);
        tempC.add(0.0f);
        tempC.add(0.0f);
        tempC.add(1.0f);
        for (int i=0;i height ?
                (float) width / (float) height :
                (float) height / (float) width;
        if (width > height) {
            //横屏
            Matrix.orthoM(mMVPMatrix, 0, -aspectRatio, aspectRatio, -1f, 1f, -1f, 1f);
        } else {
            //竖屏
            Matrix.orthoM(mMVPMatrix, 0, -1f, 1f, -aspectRatio, aspectRatio, -1f, 1f);
        }*/
    }

    @Override
    public void onDrawFrame(GL10 gl) {
        //把颜色缓冲区设置为我们预设的颜色
        GLES30.glClear(GLES30.GL_COLOR_BUFFER_BIT);

        //将变换矩阵传入顶点渲染器
        GLES20.glUniformMatrix4fv(uMatrixLocation,1,false,mMVPMatrix,0);
        //准备坐标数据
        GLES30.glVertexAttribPointer(aPositionLocation, 3, GLES30.GL_FLOAT, false, 0, vertexBuffer);
        //启用顶点位置句柄
        GLES30.glEnableVertexAttribArray(aPositionLocation);

        //准备颜色数据
        GLES30.glVertexAttribPointer(aColorLocation, 4, GLES30.GL_FLOAT, false, 0, colorBuffer);
        //启用顶点颜色句柄
        GLES30.glEnableVertexAttribArray(aColorLocation);

        //绘制圆形
        GLES30.glDrawArrays(GLES30.GL_TRIANGLE_FAN, 0, circularCoords.length/3);

        //禁止顶点数组的句柄
        GLES30.glDisableVertexAttribArray(aPositionLocation);
        GLES30.glDisableVertexAttribArray(aColorLocation);
    }
}
3.4 绘制结果
3.5 注意
如果将createPositions(1,60);改为createPositions(1,6);结果如下:

正印证了我们上面1.2.2中的结论。


