深度学习Caffe实战笔记(3)用AlexNet跑自己的数据
上一篇博客介绍了如何在caffe框架平台下,用LeNet网络训练车牌识别数据,今天介绍用AlexNet跑自己的数据,同样基于windows平台下,会比基于Ubuntu平台下麻烦一些,特别是后面的Siamese网络,说起Siamese网络真是一把辛酸一把泪啊,先让我哭一会,,,,,哭了5分钟,算了,Siamese网络的苦水等以后再倒吧,言归正传,开始train。
在caffe平台下,实现用Alexnet跑自己的数据步骤和上一篇的步骤差不多,可以说几乎一样。。。。。
1、准备数据
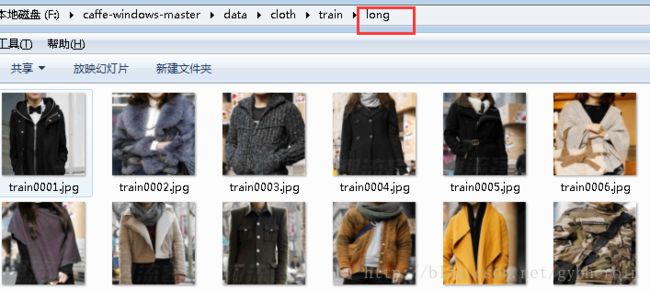
在caffe根目录下data文件夹新建一个文件夹,名字自己起一个就行了,我起的名字是cloth,在cloth文件夹下新建两个文件夹,分别存放train和val数据,在train文件夹下存放要分类的数据,要分几类就建立几个文件夹,分别把对应的图像放进去。(当然,也可以把所有的图像都放在一个文件夹下,只是在标签文件中标明就行)。
![]()


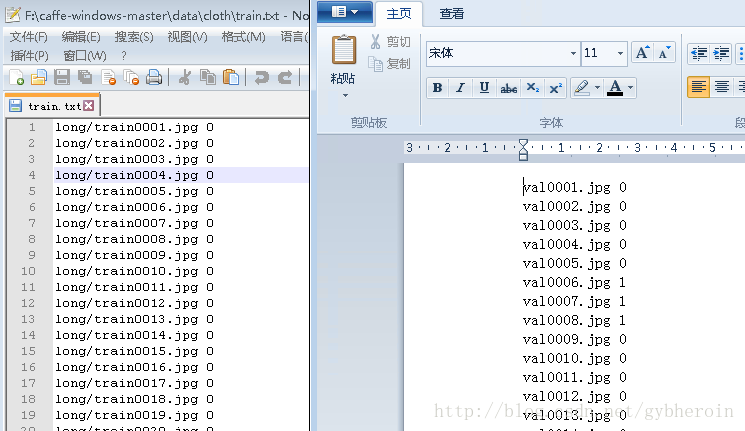
然后建立train数据集对应的标签txt文件。同样,在val文件夹下存放验证数据,并建立验证图像对应的txt标签文件。

2、转换数据
编译成功的caffe根目录下bin文件夹下有一个convert_imageset.exe文件,用来转换数据,在cloth文件夹下新建一个脚本文件,内容:

mtrainldb和mvalldb分别是转化好的数据集文件,既caffe需要的文件。这样在cloth文件夹下会生成两个文件夹:
![]()
这里面存储的就是生成的数据文件。
3、计算均值
在cloth文件夹下新建一个计算均值的脚本文件,内容如下:

用到的computer_image_mean也是bin目录下生成的一个可执行文件,用来计算均值,mtrainldb是存放训练数据的文件夹,mimg_mean_binaryproto就是要生成的均值文件。双击运行后会生成mimg_mean_binaryproto文件,这个文件就是计算出来的均值文件。
4、开始训练
同样,在cloth文件夹下,新建一个train脚本文件,文件内容如下:

这个就不过多解释了吧,solver就是Alexnet的超参文件,打开后如下:
net: "train_val.prototxt"   #需要用哪个网络训练
test_iter: 1000
test_interval: 1000
base_lr: 0.01              #初始化学习率
lr_policy: "step"          #学习策略,每stepsize之后,将学习率乘以gamma
gamma: 0.1   #学习率变化因子
stepsize: 100000  #每stpesize之后降低学习率
display: 20
max_iter: 450000  #最大迭代次数
momentum: 0.9    #动量,上次参数更新的权重
weight_decay: 0.0005   #权重衰减量
snapshot: 10000    #每10000次保存一次模型结果
snapshot_prefix: "cloth"  #模型保存路径
solver_mode: GPU   #CPU或者GPU训练,这里使用CPU,所以需要把GPU改成CPU
打开train_val.prototxt,内容如下:
name: "AlexNet"
layer {
  name: "data"
  type: "Data"
  top: "data"
  top: "label"
  include {
    phase: TRAIN
  }
  transform_param {
    mirror: true
    crop_size: 227
    mean_file: "mimg_mean.binaryproto" #均值文件
  }
  data_param {
    source: "mtrainldb"  #训练数据
    batch_size: 256
    backend: LMDB
  }
}
layer {
  name: "data"
  type: "Data"
  top: "data"
  top: "label"
  include {
    phase: TEST
  }
  transform_param {
    mirror: false
    crop_size: 227
    mean_file: "mimg_mean.binaryproto"  #均值文件
  }
  data_param {
    source: "mvaldb"   #验证数据
    batch_size: 50
    backend: LMDB
  }
}
layer {
  name: "conv1"
  type: "Convolution"
  bottom: "data"
  top: "conv1"
  param {
    lr_mult: 1
    decay_mult: 1
  }
  param {
    lr_mult: 2
    decay_mult: 0
  }
  convolution_param {
    num_output: 96
    kernel_size: 11
    stride: 4
    weight_filler {
      type: "gaussian"
      std: 0.01
    }
    bias_filler {
      type: "constant"
      value: 0
    }
  }
}
layer {
  name: "relu1"
  type: "ReLU"
  bottom: "conv1"
  top: "conv1"
}
layer {
  name: "norm1"
  type: "LRN"
  bottom: "conv1"
  top: "norm1"
  lrn_param {
    local_size: 5
    alpha: 0.0001
    beta: 0.75
  }
}
layer {
  name: "pool1"
  type: "Pooling"
  bottom: "norm1"
  top: "pool1"
  pooling_param {
    pool: MAX
    kernel_size: 3
    stride: 2
  }
}
layer {
  name: "conv2"
  type: "Convolution"
  bottom: "pool1"
  top: "conv2"
  param {
    lr_mult: 1
    decay_mult: 1
  }
  param {
    lr_mult: 2
    decay_mult: 0
  }
  convolution_param {
    num_output: 256
    pad: 2
    kernel_size: 5
    group: 2
    weight_filler {
      type: "gaussian"
      std: 0.01
    }
    bias_filler {
      type: "constant"
      value: 0.1
    }
  }
}
layer {
  name: "relu2"
  type: "ReLU"
  bottom: "conv2"
  top: "conv2"
}
layer {
  name: "norm2"
  type: "LRN"
  bottom: "conv2"
  top: "norm2"
  lrn_param {
    local_size: 5
    alpha: 0.0001
    beta: 0.75
  }
}
layer {
  name: "pool2"
  type: "Pooling"
  bottom: "norm2"
  top: "pool2"
  pooling_param {
    pool: MAX
    kernel_size: 3
    stride: 2
  }
}
layer {
  name: "conv3"
  type: "Convolution"
  bottom: "pool2"
  top: "conv3"
  param {
    lr_mult: 1
    decay_mult: 1
  }
  param {
    lr_mult: 2
    decay_mult: 0
  }
  convolution_param {
    num_output: 384
    pad: 1
    kernel_size: 3
    weight_filler {
      type: "gaussian"
      std: 0.01
    }
    bias_filler {
      type: "constant"
      value: 0
    }
  }
}
layer {
  name: "relu3"
  type: "ReLU"
  bottom: "conv3"
  top: "conv3"
}
layer {
  name: "conv4"
  type: "Convolution"
  bottom: "conv3"
  top: "conv4"
  param {
    lr_mult: 1
    decay_mult: 1
  }
  param {
    lr_mult: 2
    decay_mult: 0
  }
  convolution_param {
    num_output: 384
    pad: 1
    kernel_size: 3
    group: 2
    weight_filler {
      type: "gaussian"
      std: 0.01
    }
    bias_filler {
      type: "constant"
      value: 0.1
    }
  }
}
layer {
  name: "relu4"
  type: "ReLU"
  bottom: "conv4"
  top: "conv4"
}
layer {
  name: "conv5"
  type: "Convolution"
  bottom: "conv4"
  top: "conv5"
  param {
    lr_mult: 1
    decay_mult: 1
  }
  param {
    lr_mult: 2
    decay_mult: 0
  }
  convolution_param {
    num_output: 256
    pad: 1
    kernel_size: 3
    group: 2
    weight_filler {
      type: "gaussian"
      std: 0.01
    }
    bias_filler {
      type: "constant"
      value: 0.1
    }
  }
}
layer {
  name: "relu5"
  type: "ReLU"
  bottom: "conv5"
  top: "conv5"
}
layer {
  name: "pool5"
  type: "Pooling"
  bottom: "conv5"
  top: "pool5"
  pooling_param {
    pool: MAX
    kernel_size: 3
    stride: 2
  }
}
layer {
  name: "fc6"
  type: "InnerProduct"
  bottom: "pool5"
  top: "fc6"
  param {
    lr_mult: 1
    decay_mult: 1
  }
  param {
    lr_mult: 2
    decay_mult: 0
  }
  inner_product_param {
    num_output: 4096
    weight_filler {
      type: "gaussian"
      std: 0.005
    }
    bias_filler {
      type: "constant"
      value: 0.1
    }
  }
}
layer {
  name: "relu6"
  type: "ReLU"
  bottom: "fc6"
  top: "fc6"
}
layer {
  name: "drop6"
  type: "Dropout"
  bottom: "fc6"
  top: "fc6"
  dropout_param {
    dropout_ratio: 0.5
  }
}
layer {
  name: "fc7"
  type: "InnerProduct"
  bottom: "fc6"
  top: "fc7"
  param {
    lr_mult: 1
    decay_mult: 1
  }
  param {
    lr_mult: 2
    decay_mult: 0
  }
  inner_product_param {
    num_output: 4096
    weight_filler {
      type: "gaussian"
      std: 0.005
    }
    bias_filler {
      type: "constant"
      value: 0.1
    }
  }
}
layer {
  name: "relu7"
  type: "ReLU"
  bottom: "fc7"
  top: "fc7"
}
layer {
  name: "drop7"
  type: "Dropout"
  bottom: "fc7"
  top: "fc7"
  dropout_param {
    dropout_ratio: 0.5
  }
}
layer {
  name: "fc8"
  type: "InnerProduct"
  bottom: "fc7"
  top: "fc8"
  param {
    lr_mult: 1
    decay_mult: 1
  }
  param {
    lr_mult: 2
    decay_mult: 0
  }
  inner_product_param {
    num_output: 2       #注意:这里需要改成你要分成的类的个数
    weight_filler {
      type: "gaussian"
      std: 0.01
    }
    bias_filler {
      type: "constant"
      value: 0
    }
  }
}
layer {
  name: "accuracy"
  type: "Accuracy"
  bottom: "fc8"
  bottom: "label"
  top: "accuracy"
  include {
    phase: TEST
  }
}
layer {
  name: "loss"
  type: "SoftmaxWithLoss"
  bottom: "fc8"
  bottom: "label"
  top: "loss"
}
网络协议中需要注意的地方我都做了说明,其它的一些内容就不多做介绍了,想要了解的学友自行查资料吧。。。。
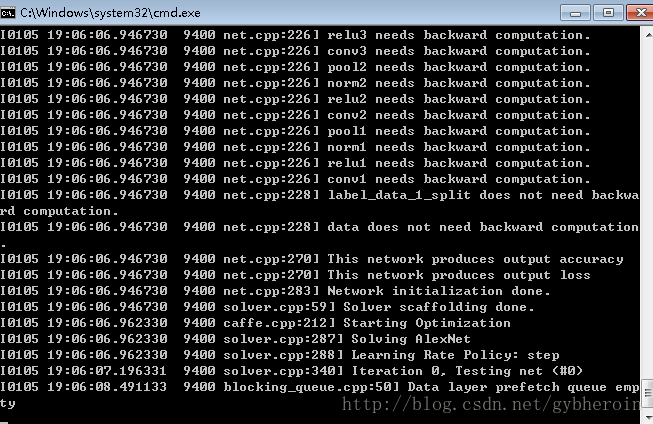
双击train.bat开始训练吧。

5、测试
同样,测试需要一个类别标签文件,category.txt,

在这里介绍一下类别文件的作用,第一个数就是训练时打的标签,后面那个是标签对应的类别名称,我这里为了方便写了0和1,其实应该把后面的0和1改成long sleve和short sleve,以便于测试的时候能直接显示出是长袖或者短袖。
写一个test脚本,
![]()
classification是bin目录下一个可执行文件,用于caffe中的分类。第二个是测试需要的协议,第三个我们训练好的模型,第四个是均值文件,第五个是类别标签,第六个是需要测试的图像。打开测试需要的deploy.prororxt,内容如下:
name: "AlexNet"
input: "data"
input_dim: 10
input_dim: 3         #数据
input_dim: 227
input_dim: 227
layer {
  name: "conv1"
  type: "Convolution"
  bottom: "data"
  top: "conv1"
  param {
    lr_mult: 1
    decay_mult: 1
  }
  param {
    lr_mult: 2
    decay_mult: 0
  }
  convolution_param {
    num_output: 96
    kernel_size: 11
    stride: 4
  }
}
layer {
  name: "relu1"
  type: "ReLU"
  bottom: "conv1"
  top: "conv1"
}
layer {
  name: "norm1"
  type: "LRN"
  bottom: "conv1"
  top: "norm1"
  lrn_param {
    local_size: 5
    alpha: 0.0001
    beta: 0.75
  }
}
layer {
  name: "pool1"
  type: "Pooling"
  bottom: "norm1"
  top: "pool1"
  pooling_param {
    pool: MAX
    kernel_size: 3
    stride: 2
  }
}
layer {
  name: "conv2"
  type: "Convolution"
  bottom: "pool1"
  top: "conv2"
  param {
    lr_mult: 1
    decay_mult: 1
  }
  param {
    lr_mult: 2
    decay_mult: 0
  }
  convolution_param {
    num_output: 256
    pad: 2
    kernel_size: 5
    group: 2
  }
}
layer {
  name: "relu2"
  type: "ReLU"
  bottom: "conv2"
  top: "conv2"
}
layer {
  name: "norm2"
  type: "LRN"
  bottom: "conv2"
  top: "norm2"
  lrn_param {
    local_size: 5
    alpha: 0.0001
    beta: 0.75
  }
}
layer {
  name: "pool2"
  type: "Pooling"
  bottom: "norm2"
  top: "pool2"
  pooling_param {
    pool: MAX
    kernel_size: 3
    stride: 2
  }
}
layer {
  name: "conv3"
  type: "Convolution"
  bottom: "pool2"
  top: "conv3"
  param {
    lr_mult: 1
    decay_mult: 1
  }
  param {
    lr_mult: 2
    decay_mult: 0
  }
  convolution_param {
    num_output: 384
    pad: 1
    kernel_size: 3
  }
}
layer {
  name: "relu3"
  type: "ReLU"
  bottom: "conv3"
  top: "conv3"
}
layer {
  name: "conv4"
  type: "Convolution"
  bottom: "conv3"
  top: "conv4"
  param {
    lr_mult: 1
    decay_mult: 1
  }
  param {
    lr_mult: 2
    decay_mult: 0
  }
  convolution_param {
    num_output: 384
    pad: 1
    kernel_size: 3
    group: 2
  }
}
layer {
  name: "relu4"
  type: "ReLU"
  bottom: "conv4"
  top: "conv4"
}
layer {
  name: "conv5"
  type: "Convolution"
  bottom: "conv4"
  top: "conv5"
  param {
    lr_mult: 1
    decay_mult: 1
  }
  param {
    lr_mult: 2
    decay_mult: 0
  }
  convolution_param {
    num_output: 256
    pad: 1
    kernel_size: 3
    group: 2
  }
}
layer {
  name: "relu5"
  type: "ReLU"
  bottom: "conv5"
  top: "conv5"
}
layer {
  name: "pool5"
  type: "Pooling"
  bottom: "conv5"
  top: "pool5"
  pooling_param {
    pool: MAX
    kernel_size: 3
    stride: 2
  }
}
layer {
  name: "fc6"
  type: "InnerProduct"
  bottom: "pool5"
  top: "fc6"
  param {
    lr_mult: 1
    decay_mult: 1
  }
  param {
    lr_mult: 2
    decay_mult: 0
  }
  inner_product_param {
    num_output: 4096
  }
}
layer {
  name: "relu6"
  type: "ReLU"
  bottom: "fc6"
  top: "fc6"
}
layer {
  name: "drop6"
  type: "Dropout"
  bottom: "fc6"
  top: "fc6"
  dropout_param {
    dropout_ratio: 0.5
  }
}
layer {
  name: "fc7"
  type: "InnerProduct"
  bottom: "fc6"
  top: "fc7"
  param {
    lr_mult: 1
    decay_mult: 1
  }
  param {
    lr_mult: 2
    decay_mult: 0
  }
  inner_product_param {
    num_output: 4096    #改成和训练网络一致
  }
}
layer {
  name: "relu7"
  type: "ReLU"
  bottom: "fc7"
  top: "fc7"
}
layer {
  name: "drop7"
  type: "Dropout"
  bottom: "fc7"
  top: "fc7"
  dropout_param {
    dropout_ratio: 0.5
  }
}
layer {
  name: "fc8"
  type: "InnerProduct"
  bottom: "fc7"
  top: "fc8"
  param {
    lr_mult: 1
    decay_mult: 1
  }
  param {
    lr_mult: 2
    decay_mult: 0
  }
  inner_product_param {
    num_output: 2       #输出的类别个数
  }
}
layer {
  name: "prob"
  type: "Softmax"
  bottom: "fc8"
  top: "prob"
}
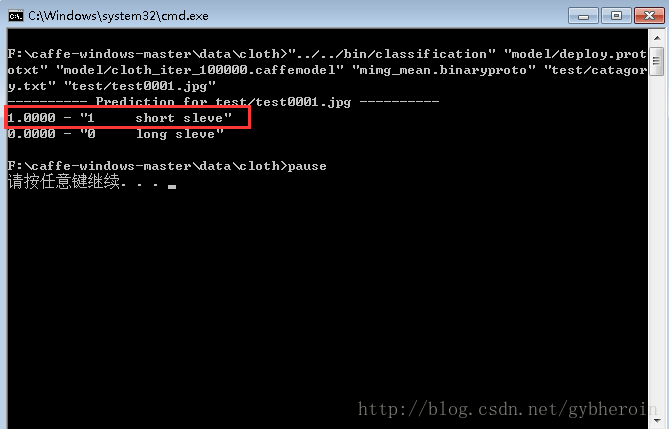
双击运行,测试结果:

表示为短袖的概率为100%.测试图片为:

这两个博客一个是完成lenet网络训练,一个是完成Alexnet网络训练,那么举二反无穷,不管用什么网路,用自己的数据来跑基本上就是这个步骤了对不对,即使有不同,也是大同小异,只需要做小量修改即可,到时候需要具体情况具体分析。。。。。。。
写在后面的话:
话说写博客也不是一件轻松的事情啊,好累,好费时间,在我学习的过程中有好多都是从别的同学的博客里学习到的,所以我很愿意把我学习到的东西分享给别人,因为我也是从一头雾水,问谁谁不理的时候一步步走来的。说到分享,昨天看了一个上本科时学院的书记转发的一个朋友圈文章,叫“为什么层次越高的人,计较的越少”,就谈到了愿不愿分享的问题,有的人觉得自己辛苦得来的东西,害怕别人知道了,不愿意告诉别人怎么做的,其实这样的人格局实在太小,殊不知你告诉别人的只不过是一个结果,在你探索过程中得到的分析能力,思维方式,你的知识结构别人是拿不去的!你在乎的,往往能反映出你的水准,为什么层次越高的人,反而计较的越少呢?不是说他有多么宽容,而是有些事根本入不了他的眼。愿不愿意分享,就能看出一个人的眼界和格局,而眼界和格局往往才是决定一个人盛衰成败的关键!共勉。。。。。。