TensorFlow识别复杂验证码以及搭建生产环境(7)—— 使用TensorFlow-Serving部署生产环境
0x00 基本环境
博主在一台xubuntu-16.04.3的虚拟机上部署的生产环境。至于为什么用xubuntu,纯粹是由于我个人喜欢这个系统的界面。
0x01 Bazel
Bazel是一个构建工具,即一个可以运行编译和测试来组装软件的工具,跟Make、Ant、Gradle、Buck、Pants和Maven一样。
安装方式见:
https://docs.bazel.build/versions/master/install.html
0x02 gRPC
gRPC是由Google主导开发的RPC框架,使用HTTP/2协议并用ProtoBuf作为序列化工具。其客户端提供Objective-C、Java接口,服务器侧则有Java、Golang、C++等接口,从而为移动端(iOS/Androi)到服务器端通讯提供了一种解决方案。 当然在当下的环境下,这种解决方案更热门的方式是RESTFull API接口。该方式需要自己去选择编码方式、服务器架构、自己搭建框架(JSON-RPC)。gRPC官方对REST的声音是:
和REST一样遵循HTTP协议(明确的说是HTTP/2),但是gRPC提供了全双工流
和传统的REST不同的是gRPC使用了静态路径,从而提高性能
用一些格式化的错误码代替了HTTP的状态码更好的标示错误
安装方式见:
https://github.com/grpc/grpc/tree/master/src/python/grpcio
0x03 tensorflow-serving
机器学习技术支撑着许多 Google 产品的功能,比如:Google 应用中的语音识别,收件箱的智能回复,以及 Google 照片搜索,等等。尽管软件行业几十年中积累起的无数经验促成了很多用于构建并支持产品的最佳实践,但基于机器学习的服务却还是带来了一些新颖而有趣的挑战。如今,专为解决这些挑战的系统终于出现了,这就是 TensorFlow Serving。TensorFlow Serving 是一种用于机器学习模型的高性能开源服务系统,专为生产环境而设计,并针对 TensorFlow 进行了优化处理。
TensorFlow Serving 系统非常适用于大规模运行能够基于真实情况的数据并会发生动态改变的多重模型。它能够实现:
模型生命周期管理。
使用多重算法进行试验。
GPU 资源的有效使用。
项目见https://github.com/tensorflow/serving
下载TensorFlow-Seving代码到本地
$>git clone --recurse-submodules   https://github.com/tensorflow/serving
$>cd serving
配置tensorflow代码
$>cd tensorflow
$./configure
$>cd ..
编译(需要很长很长时间,如果最后看到success那就是好了)
bazel build tensorflow_serving/... 0x04 生成PB文件
serving.py
# this python file for tensorflow serving
import tensorflow as tf
MAX_CAPTCHA = 4
from gen_check_code import number, alphabet
CHAR_SET_LEN = len(number) + len(alphabet)

keep_prob = 1.
# 定义神经网络
def crack_captcha_cnn(x):
    w_alpha = 0.01
    b_alpha = 0.1
    # *** x = tf.reshape(X, shape=[-1, IMAGE_HEIGHT, IMAGE_WIDTH, 1])

    # w_c1_alpha = np.sqrt(2.0/(IMAGE_HEIGHT*IMAGE_WIDTH)) #
    # w_c2_alpha = np.sqrt(2.0/(3*3*32))
    # w_c3_alpha = np.sqrt(2.0/(3*3*64))
    # w_d1_alpha = np.sqrt(2.0/(8*32*64))
    # out_alpha = np.sqrt(2.0/1024)

    # 定义三层的卷积神经网络

    # 定义第一层的卷积神经网络
    # 定义第一层权重
    w_c1 = tf.Variable(w_alpha * tf.random_normal([3, 3, 1, 32]))
    # 定义第一层的偏置
    b_c1 = tf.Variable(b_alpha * tf.random_normal([32]))
    # 定义第一层的激励函数
    conv1 = tf.nn.relu(tf.nn.bias_add(tf.nn.conv2d(x, w_c1, strides=[1, 1, 1, 1], padding='SAME'), b_c1))
    # conv1 为输入  ksize 表示使用2*2池化,即将2*2的色块转化成1*1的色块
    conv1 = tf.nn.max_pool(conv1, ksize=[1, 2, 2, 1], strides=[1, 2, 2, 1], padding='SAME')
    # dropout防止过拟合。
    conv1 = tf.nn.dropout(conv1, keep_prob)

    # 定义第二层的卷积神经网络
    w_c2 = tf.Variable(w_alpha * tf.random_normal([3, 3, 32, 64]))
    b_c2 = tf.Variable(b_alpha * tf.random_normal([64]))
    conv2 = tf.nn.relu(tf.nn.bias_add(tf.nn.conv2d(conv1, w_c2, strides=[1, 1, 1, 1], padding='SAME'), b_c2))
    conv2 = tf.nn.max_pool(conv2, ksize=[1, 2, 2, 1], strides=[1, 2, 2, 1], padding='SAME')
    conv2 = tf.nn.dropout(conv2, keep_prob)

    # 定义第三层的卷积神经网络
    w_c3 = tf.Variable(w_alpha * tf.random_normal([3, 3, 64, 64]))
    b_c3 = tf.Variable(b_alpha * tf.random_normal([64]))
    conv3 = tf.nn.relu(tf.nn.bias_add(tf.nn.conv2d(conv2, w_c3, strides=[1, 1, 1, 1], padding='SAME'), b_c3))
    conv3 = tf.nn.max_pool(conv3, ksize=[1, 2, 2, 1], strides=[1, 2, 2, 1], padding='SAME')
    conv3 = tf.nn.dropout(conv3, keep_prob)

    # Fully connected layer
    # 随机生成权重
    w_d = tf.Variable(w_alpha * tf.random_normal([11776, 2048]))
    # 随机生成偏置
    b_d = tf.Variable(b_alpha * tf.random_normal([2048]))
    dense = tf.reshape(conv3, [-1, w_d.get_shape().as_list()[0]])
    dense = tf.nn.relu(tf.add(tf.matmul(dense, w_d), b_d))
    dense = tf.nn.dropout(dense, keep_prob)

    w_out = tf.Variable(w_alpha * tf.random_normal([2048, MAX_CAPTCHA * CHAR_SET_LEN]))
    b_out = tf.Variable(b_alpha * tf.random_normal([MAX_CAPTCHA * CHAR_SET_LEN]))
    out = tf.add(tf.matmul(dense, w_out), b_out)
    # out = tf.nn.softmax(out)
    return out

# 设置导出时的目录特征名
import time
export_time = time.strftime('%Y-%m-%d-%H-%M-%S', time.localtime(time.time()))

x = tf.placeholder(tf.float32, [None, 180 * 60])
x2 = tf.reshape(x, shape=[-1, 60, 180, 1])
output = crack_captcha_cnn(x2)

# 恢复模型参数
saver = tf.train.Saver()
with tf.Session() as sess:
    saver.restore(sess, tf.train.latest_checkpoint('.'))
    predict = tf.argmax(tf.reshape(output, [-1, MAX_CAPTCHA, CHAR_SET_LEN]), 2)

    # 创建模型输出model
    builder = tf.saved_model.builder.SavedModelBuilder('./' + export_time)

    tensor_info_x = tf.saved_model.utils.build_tensor_info(x)
    tensor_info_out = tf.saved_model.utils.build_tensor_info(tf.reshape(predict, [4]))

    signature_def_map = {
            "serving_default": tf.saved_model.signature_def_utils.build_signature_def(
                inputs={"image": tensor_info_x},
                outputs={
                    "out": tensor_info_out,
                },
                method_name=tf.saved_model.signature_constants.PREDICT_METHOD_NAME
            )}
    builder.add_meta_graph_and_variables(sess,
                                          [tf.saved_model.tag_constants.SERVING],
                                             signature_def_map=signature_def_map)
    builder.save()
这段代码主要是恢复模型参数,然后导出PB文件
0x05 部署模型文件
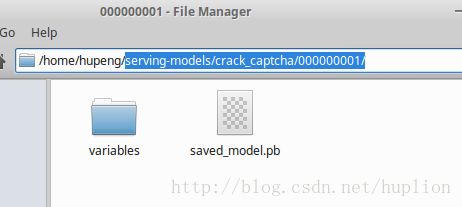
在我的Ubuntu上用户主目录上,我建立了如下的目录结构,拷入两个模型文件到此
切换路径到编译出来的tensorflow-serving的二进制目录下:
cd /home/hupeng/serving/bazel-bin/tensorflow_serving/model_servers
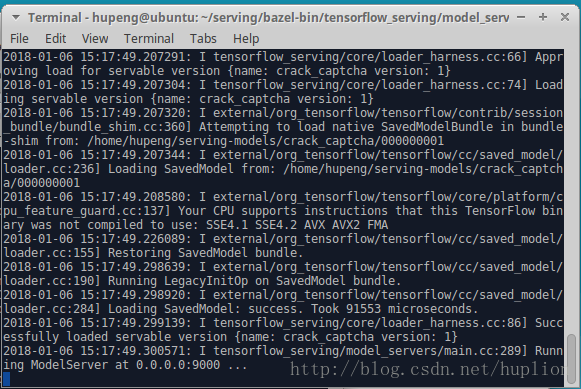
加载模型文件,启动服务
./tensorflow_model_server –port=9000 –model_name=crack_captcha –model_base_path=/home/hupeng/serving-models/crack_captcha


