spring boot 自学笔记(五) Rabbitmq集成,延时消息队列实现
本篇主要记录Spring boot 集成Rabbitmq,分为两部分, 第一部分为创建普通消息队列, 第二部分为延时消息队列实现:
spring boot提供对mq消息队列支持amqp相关包,引入即可:
            org.springframework.boot
            spring-boot-starter-amqp
属性配置文件application.properties:
#rabbitmq
spring.rabbitmq.host=127.0.0.1
spring.rabbitmq.port=5672
spring.rabbitmq.username=root
spring.rabbitmq.password=root
RabbitMq配置类,配置连接工厂以及操作对象:
@Configuration
@ConfigurationProperties(prefix = "spring.rabbitmq")
public class RabbitMQConfiguration {

	private static Logger logger = Logger.getLogger(RabbitMQConfiguration.class);

	private String host;

	private int port;

	private String username;

	private String password;

	// 链接信息
	@Bean
	public ConnectionFactory connectionFactory() {
		CachingConnectionFactory connectionFactory = new CachingConnectionFactory(host, port);
		connectionFactory.setUsername(username);
		connectionFactory.setPassword(password);
		connectionFactory.setVirtualHost("/");
		connectionFactory.setPublisherConfirms(true);
		logger.info("Create ConnectionFactory bean ..");
		return connectionFactory;
	}

	@Bean
	@Scope(ConfigurableBeanFactory.SCOPE_PROTOTYPE)
	public RabbitTemplate rabbitTemplate() {
		RabbitTemplate template = new RabbitTemplate(connectionFactory());
		return template;
	}
	//省略getter setter
}
定义Service接口如下:
暂时不考虑延时队列,定义发送消息接口
/**
 *
 * @author victor
 * @desc 消息队列服务接口
 */
public interface IMessageQueueService {

	/**
	 * 发送消息到队列
	 * @param queue 队列名称
	 * @param message 消息内容
	 */
	public void send(String queueName,String message);


}
Service实现
package com.ks.server.service.impl.queue;

import org.springframework.amqp.AmqpException;
import org.springframework.amqp.core.Message;
import org.springframework.amqp.core.MessagePostProcessor;
import org.springframework.amqp.rabbit.core.RabbitTemplate;
import org.springframework.beans.factory.annotation.Autowired;
import org.springframework.stereotype.Service;

import com.base.common.codec.JSONUtils;
import com.ks.common.constant.MQConstant;
import com.ks.common.service.queue.IMessageQueueService;
import com.ks.modal.queue.DLXMessage;

/**
 *
 * @author victor
 * @desc 消息队列服务接口实现
 */
@Service("messageQueueService")
public class MessageQueueServiceImpl implements IMessageQueueService{

	@Autowired
	private RabbitTemplate rabbitTemplate;

	@Override
	public void send(String queueName, String msg) {
		rabbitTemplate.convertAndSend(MQConstant.DEFAULT_EXCHANGE,queueName, msg);
	}


}
相关常量类:
package com.ks.common.constant;

/**
 *
 * @author victor
 * @desc Rabbit消息队列相关常量
 */
public final class MQConstant {

	private MQConstant(){
	}

	//exchange name
	public static final String DEFAULT_EXCHANGE = "KSHOP";

	//DLX QUEUE
	public static final String DEFAULT_DEAD_LETTER_QUEUE_NAME = "kshop.dead.letter.queue";

	//DLX repeat QUEUE 死信转发队列
	public static final String DEFAULT_REPEAT_TRADE_QUEUE_NAME = "kshop.repeat.trade.queue";


	//Hello 测试消息队列名称
	public static final String HELLO_QUEUE_NAME = "HELLO";


}
到现在为止,队列相关配置,以及使用以及封装完成,接下来是创建队列,
这里我是单独创建一个配置类,用于队列配置, 创建Hello队列示例如下:
package com.ks.ons.config;

import java.util.HashMap;
import java.util.Map;

import org.springframework.amqp.core.Binding;
import org.springframework.amqp.core.BindingBuilder;
import org.springframework.amqp.core.DirectExchange;
import org.springframework.amqp.core.Queue;
import org.springframework.context.annotation.Bean;
import org.springframework.context.annotation.Configuration;

import com.ks.common.constant.MQConstant;

/**
 *
 * @author victor
 * @desc 队列配置
 */
@Configuration
public class QueueConfiguration {

	//信道配置
	@Bean
	public DirectExchange defaultExchange() {
		return new DirectExchange(MQConstant.DEFAULT_EXCHANGE, true, false);
	}


	/*********************    hello 队列  测试    *****************/
	@Bean
	public Queue queue() {
		Queue queue = new Queue(MQConstant.HELLO_QUEUE_NAME,true);
		return queue;
	}

	@Bean
	public Binding binding() {
		return BindingBuilder.bind(queue()).to(defaultExchange()).with(MQConstant.HELLO_QUEUE_NAME);
	}

}
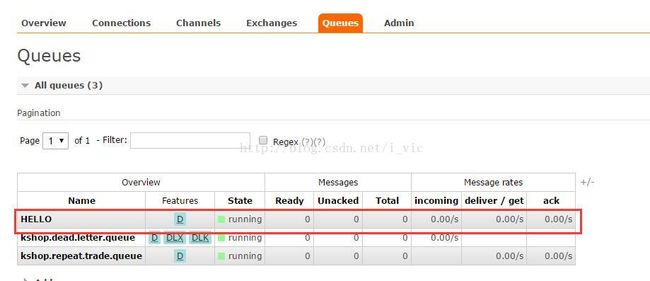
通过配置队列bean,在程序启动时会在rabbitmq中创建相关队列,启动程序,可以在rabbtmq管理界面看到信道和队列信息:
众所周知,既然有了队列,用来处理业务的最终还是需要消费者,消费者创建示例如下:
package com.ks.ons.processor.hello;

import org.springframework.amqp.rabbit.annotation.RabbitHandler;
import org.springframework.amqp.rabbit.annotation.RabbitListener;
import org.springframework.stereotype.Component;

import com.ks.common.constant.MQConstant;

/**
 *
 * @author victor
 * @desc hello 消息队列消费者
 */
@Component
@RabbitListener(queues = MQConstant.HELLO_QUEUE_NAME)
public class HelloProcessor {

	@RabbitHandler
    public void process(String content) {
		System.out.println("接受消息:" + content);
    }
}
注入service
@Autowired
private IMessageQueueService messageQueueService;
发送消息
messageQueueService.send(MQConstant.HELLO_QUEUE_NAME, "测试发送消息");
接下来展示如何实现延时队列,在此之前如果读者像我一样对rabbitmq队列了解程度并不深入的话,--> 推荐文章, 可以对rabbitmq延时队列实现思路有大概了解.
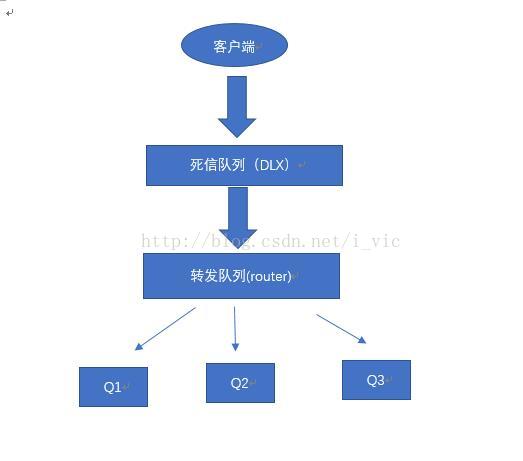
在本文中,主要是通过rabbitmq的DLX特性来实现发送延时队列:
思路如下:
客户端:指具体往MQ发生消息端, 客户端将消息内容进行自定义包装, 将消息中附带目标队列名称。如:客户端向队列Q1发送字符串“hello” , 延时时间为60秒, 包装后修改为{"queueName":"Q1","body": “hello”},此时,将消息发送到DLX死信队列,而非Q1队列,并将消息设置为60秒超时。
DLX:死信队列,用来存储有超时时间信息的消息, 并且可以设置当消息超时时,转发到另一个指定队列(此处设置转发到router), 无消费者,当接收到客户端消息之后,等待消息超时,将消息转发到指定的Router队列
Router: 转发队列,用来接收死信队列超时消息, 如上示例消息,在接收到之后,消费者将消息解析,获取queueName,body,再向所获取的queueName队列发送一条消息,内容为body.
Q1,Q2,Q3.: 用户业务队列,当Q1收到hello,已经是60秒之后,再进行消费
修改上面代码 , 新增两个队列,
死信队列:存放发送的延时消息,
路由转发队列:用于接受死信消息死亡, 并将消息转发到业务目标队列
修改之后代码如下:
/**
 *
 * @author victor
 * @desc 队列配置
 */
@Configuration
public class QueueConfiguration {

	//信道配置
	@Bean
	public DirectExchange defaultExchange() {
		return new DirectExchange(MQConstant.DEFAULT_EXCHANGE, true, false);
	}


	@Bean
	public Queue repeatTradeQueue() {
		Queue queue = new Queue(MQConstant.DEFAULT_REPEAT_TRADE_QUEUE_NAME,true,false,false);
		return queue;
	}

	@Bean
	public Binding  drepeatTradeBinding() {
		return BindingBuilder.bind(repeatTradeQueue()).to(defaultExchange()).with(MQConstant.DEFAULT_REPEAT_TRADE_QUEUE_NAME);
	}

	@Bean
	public Queue deadLetterQueue() {
		Map arguments = new HashMap<>();
		arguments.put("x-dead-letter-exchange", MQConstant.DEFAULT_EXCHANGE);
		arguments.put("x-dead-letter-routing-key", MQConstant.DEFAULT_REPEAT_TRADE_QUEUE_NAME);
		Queue queue = new Queue(MQConstant.DEFAULT_DEAD_LETTER_QUEUE_NAME,true,false,false,arguments);
		System.out.println("arguments :" + queue.getArguments());
		return queue;
	}

	@Bean
	public Binding  deadLetterBinding() {
		return BindingBuilder.bind(deadLetterQueue()).to(defaultExchange()).with(MQConstant.DEFAULT_DEAD_LETTER_QUEUE_NAME);
	}


	/*********************    hello 队列  测试    *****************/
	@Bean
	public Queue queue() {
		Queue queue = new Queue(MQConstant.HELLO_QUEUE_NAME,true);
		return queue;
	}

	@Bean
	public Binding binding() {
		return BindingBuilder.bind(queue()).to(defaultExchange()).with(MQConstant.HELLO_QUEUE_NAME);
	}

}
修改Service服务:
package com.ks.common.service.queue;


/**
 *
 * @author victor
 * @desc 消息队列服务接口
 */
public interface IMessageQueueService {

	/**
	 * 发送消息到队列
	 * @param queue 队列名称
	 * @param message 消息内容
	 */
	public void send(String queueName,String message);

	/**
	 * 延迟发送消息到队列
	 * @param queue 队列名称
	 * @param message 消息内容
	 * @param times 延迟时间 单位毫秒
	 */
	public void send(String queueName,String message,long times);
}
package com.ks.server.service.impl.queue;

import org.springframework.amqp.AmqpException;
import org.springframework.amqp.core.Message;
import org.springframework.amqp.core.MessagePostProcessor;
import org.springframework.amqp.rabbit.core.RabbitTemplate;
import org.springframework.beans.factory.annotation.Autowired;
import org.springframework.stereotype.Service;

import com.base.common.codec.JSONUtils;
import com.ks.common.constant.MQConstant;
import com.ks.common.service.queue.IMessageQueueService;
import com.ks.modal.queue.DLXMessage;

/**
 *
 * @author victor
 * @desc 消息队列服务接口实现
 */
@Service("messageQueueService")
public class MessageQueueServiceImpl implements IMessageQueueService{

	@Autowired
	private RabbitTemplate rabbitTemplate;

	@Override
	public void send(String queueName, String msg) {
		rabbitTemplate.convertAndSend(MQConstant.DEFAULT_EXCHANGE,queueName, msg);
	}

	@Override
	public void send(String queueName, String msg, long times) {
		DLXMessage dlxMessage = new DLXMessage(queueName,msg,times);
		MessagePostProcessor processor = new MessagePostProcessor(){
			@Override
			public Message postProcessMessage(Message message) throws AmqpException {
				message.getMessageProperties().setExpiration(times + "");
				return message;
			}
		};
		dlxMessage.setExchange(MQConstant.DEFAULT_EXCHANGE);
		rabbitTemplate.convertAndSend(MQConstant.DEFAULT_EXCHANGE,MQConstant.DEFAULT_DEAD_LETTER_QUEUE_NAME, JSONUtils.toJson(dlxMessage), processor);
	}


}
JSONUtils 为一个JSON工具类
新增消息实体,用于包装消息:
package com.ks.modal.queue;

import java.io.Serializable;

/**
 *
 * @author victor
 * @desc rabbit 死信消息载体
 */
public class DLXMessage implements Serializable {

	private static final long serialVersionUID = 9956432152000L;

	public DLXMessage() {
		super();
	}

	public DLXMessage(String queueName, String content, long times) {
		super();
		this.queueName = queueName;
		this.content = content;
		this.times = times;
	}

	public DLXMessage(String exchange, String queueName, String content, long times) {
		super();
		this.exchange = exchange;
		this.queueName = queueName;
		this.content = content;
		this.times = times;
	}


	private String exchange;

	private String queueName;

	private String content;

	private long times;

	//省略getter setter

}
路由转发队列消费者实现,负责接收超时消息,进行转发:
package com.ks.ons.processor.system;

import org.springframework.amqp.rabbit.annotation.RabbitHandler;
import org.springframework.amqp.rabbit.annotation.RabbitListener;
import org.springframework.beans.factory.annotation.Autowired;
import org.springframework.stereotype.Component;

import com.base.common.codec.JSONUtils;
import com.ks.common.constant.MQConstant;
import com.ks.common.service.queue.IMessageQueueService;
import com.ks.modal.queue.DLXMessage;

/**
 *
 * @author victor
 * @desc 死信接收处理消费者
 */
@Component
@RabbitListener(queues = MQConstant.DEFAULT_REPEAT_TRADE_QUEUE_NAME)
public class TradeProcessor {

	@Autowired
	private IMessageQueueService messageQueueService;

	@RabbitHandler
    public void process(String content) {
		DLXMessage message = JSONUtils.toBean(content, DLXMessage.class);
		messageQueueService.send(message.getQueueName(), message.getContent());
    }
}
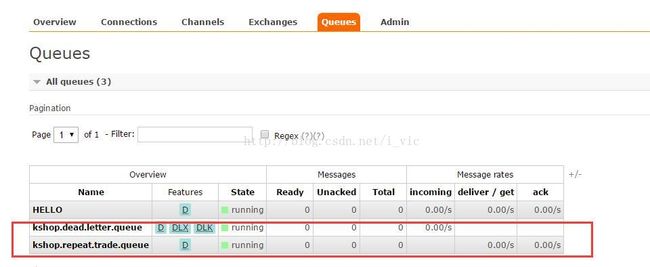
启动项目之后,管理界面如下:
测试代码片段:
messageQueueService.send(MQConstant.HELLO_QUEUE_NAME,"测试延迟发送消息",60000);
浏览器访问:http://127.0.0.1:10086/book/rabbitmq/example/send/60
控制台输出:
示例代码下载
2019/09/12 补充说明:
避免误人子弟,有必要交代一下, 本文实现延迟队列方式有限制:
第一 : 实现消息延迟是个每条死信消息都加上失效时间, 所以当消息量巨大, 效率本身可能会是一个问题
第二, 因为消息队列先进先出原则, 可能会出现收到消息时间和预期时间有所差异,例如: 发送10s 消息,30s消息, 两条消息,如果30s发送在前,10s在后面, 可能会导致10s之后消息并不会推送, 等到30s时候,会同时收到2条消息。
如果具体使用需求不能接受, 可以考虑使用插件版本的延迟队列, 博客文章 第八章。


