仿射变换和弹性变换
仿射变换
相当于对于图像做了一个平移、旋转、放缩、剪切、对称。与刚体变换相同的是,可以保持线点之间的平行和共线关系。即 原来平行的直线变化后还是平行的。但是和刚体变换不同的是线段之间的长度会发生变化。
在python中用opencv实现:
由于变换矩阵的确定太过复杂,所以会采用3点去定法。即给出3个点在原图和变换后图像的位置,返回一个变换矩阵。pts1和pts2是3个点的list
M = cv2.getAffineTransform(pts1, pts2)
随机的仿射变换:
shape = image.shape
shape_size = shape[:2]
# Random affine
center_square = np.float32(shape_size) // 2
square_size = min(shape_size) // 3
pts1 = np.float32([center_square + square_size, [center_square[0]+square_size, center_square[1]-square_size], center_square - square_size])
pts2 = pts1 + random_state.uniform(-alpha_affine, alpha_affine, size=pts1.shape).astype(np.float32)
M = cv2.getAffineTransform(pts1, pts2)
image = cv2.warpAffine(image, M, shape_size[::-1], borderMode=cv2.BORDER_REFLECT_101)
弹性变化
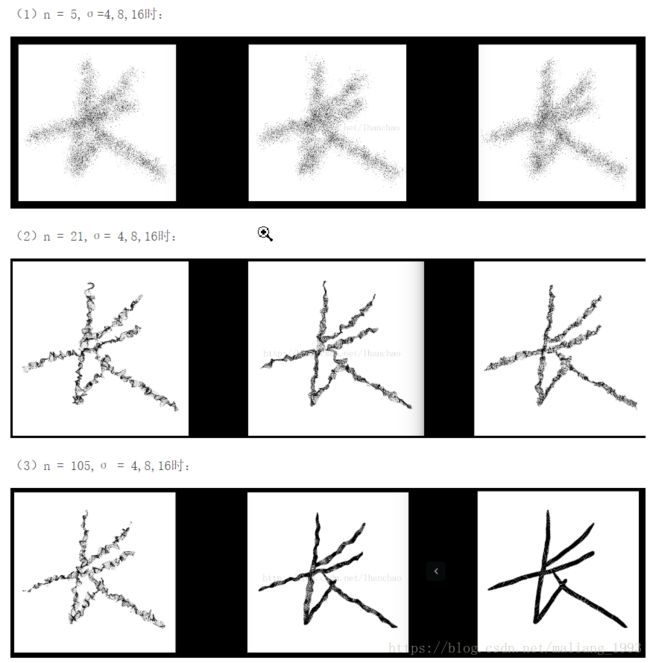
弹性变化算法(Elastic Distortion)最先是由Patrice等人在2003年提出的,最开始应用在mnist手写体数字识别数据集中,发现对原图像进行弹性变换的操作扩充样本以后,对于手写体数字的识别效果有明显的提升。此后成为一种很普遍的扩充字符样本图像的方式。
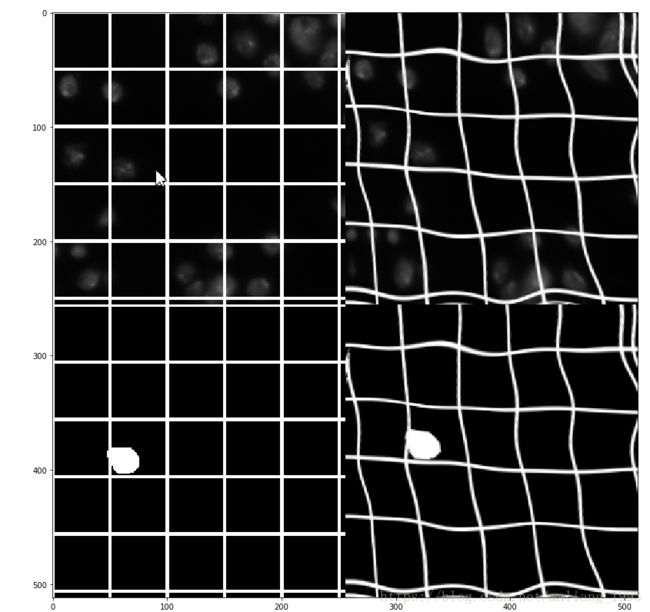
弹性变化是对像素点各个维度产生(-1,1)区间的随机标准偏差,并用高斯滤波(0,sigma)对各维度的偏差矩阵进行滤波,最后用放大系数alpha控制偏差范围。 因而由A(x,y)得到的A’(x+delta_x,y+delta_y)。A‘的值通过在原图像差值得到,A’的值充当原来A位置上的值。一般来说,alpha越小,sigma越大,产生的偏差越小,和原图越接近。
代码实现:
import numpy as np
import pandas as pd
import cv2
from scipy.ndimage.interpolation import map_coordinates
from scipy.ndimage.filters import gaussian_filter
import matplotlib.pyplot as plt
def Elastic_transform(image, alpha, sigma):
shape = image.shape
shape_size = shape[:2]
dx = gaussian_filter((random_state.rand(*shape) * 2 - 1), sigma) * alpha
dy = gaussian_filter((random_state.rand(*shape) * 2 - 1), sigma) * alpha
dz = np.zeros_like(dx)
x, y, z = np.meshgrid(np.arange(shape[1]), np.arange(shape[0]), np.arange(shape[2]))
indices = np.reshape(y+dy, (-1, 1)), np.reshape(x+dx, (-1, 1)), np.reshape(z, (-1, 1))
return map_coordinates(image, indices, order=1, mode='reflect').reshape(shape)
随机仿射弹性变换实现:
def elastic_transform(image, alpha, sigma, alpha_affine, random_state=None):
"""Elastic deformation of images as described in [Simard2003]_ (with modifications).
.. [Simard2003] Simard, Steinkraus and Platt, "Best Practices for
Convolutional Neural Networks applied to Visual Document Analysis", in
Proc. of the International Conference on Document Analysis and
Recognition, 2003.
Based on https://gist.github.com/erniejunior/601cdf56d2b424757de5
"""
if random_state is None:
random_state = np.random.RandomState(None)
shape = image.shape
shape_size = shape[:2]
# Random affine
center_square = np.float32(shape_size) // 2
square_size = min(shape_size) // 3
pts1 = np.float32([center_square + square_size, [center_square[0]+square_size, center_square[1]-square_size], center_square - square_size])
pts2 = pts1 + random_state.uniform(-alpha_affine, alpha_affine, size=pts1.shape).astype(np.float32)
M = cv2.getAffineTransform(pts1, pts2)
image = cv2.warpAffine(image, M, shape_size[::-1], borderMode=cv2.BORDER_REFLECT_101)
dx = gaussian_filter((random_state.rand(*shape) * 2 - 1), sigma) * alpha
dy = gaussian_filter((random_state.rand(*shape) * 2 - 1), sigma) * alpha
dz = np.zeros_like(dx)
x, y, z = np.meshgrid(np.arange(shape[1]), np.arange(shape[0]), np.arange(shape[2]))
indices = np.reshape(y+dy, (-1, 1)), np.reshape(x+dx, (-1, 1)), np.reshape(z, (-1, 1))
return map_coordinates(image, indices, order=1, mode='reflect').reshape(shape)
随机仿射弹性变换效果


