自然语言处理从小白到大白系列(2)word Embedding从one-hot到word2vec
我们知道,对于我们的计算机来说,没有办法像人一样理解自然语言,在人工智能领域,这还有很长一段路要走,就算要直接处理自然语言,都很困难。因此,人们想办法把自然语言用数字的方式表示,便于计算和分析,这就是为什么要做词嵌入:word embedding。本文将从以下的方面讲述word embedding:
- one-hot
- 词的分布式表示
- word2vec
- glove
- fast-text
- word2vec 代码分析
1. one-hot encoding
对于one-hot,也称独热向量编码,是一种十分常用的类别处理手段,当特征是离散的,无序的,就可以通过one hot 进行特征数字化,比如一个特征有高、中、低三个值,通过独热编码,就可以分别编码为001,010,100。
one hot 可以通过如下方式在Python中方便地实现。
from sklearn import processing

enc = preprocessing.OneHotEncoder()
enc.fit([[0,0,3],[1,1,0],[0,2,1],[1,0,2]])  #这里一共有4个数据,3种特征

array = enc.transform([[0,1,3]]).toarray()  #这里使用一个新的数据来测试

print (array)   # [[ 1  0  0  1  0  0  0  0  1]]
有同学可能会纳闷,我们为啥不直接对特征的各个值编码1,2,3,4呢,这样岂不更方便?这是因为我们如果这样编码,就引入了一定的数量大小关系,而原来的特征值之间是并列的,可能是国别,可能是性别,这些特征值之间没有大小的关系;另外,通过one hot编码,能够保证各个特征之间的空间距离也是合理的,如采用欧氏距离,各个特征值之间就是等距的。
然后我们如果通过one hot编码自然语言,会产生什么样的效果呢?假设词表有50000的大小,那么对于每一个词,我们都应该开一个50000维度的向量,然后其中有一个维度的值为1,其余的都是0。我们可能已经发现了其中的缺点,
- 这个词向量是十分稀疏的,浪费了很大的存储空间,
- 我们不能发现各个词之间的相互关系,因为每个词的向量都是正交的,独立的。
因此我们需要一种更好的表示方法:分布式表示
2. 分布式表示
词的分布式表示这个名字(distributed representation)就是相对于one hot 表示而来的,可以理解为,onehot表示把所有的词都集中在了一个维度上,而分布式表示,就是一个词在各个维度上都分布有,分散了某种风险,增加了某些信息量。
分布式表示有什么好处呢,我想下面这个图大家应该都见过,简单来说就是可以表示出两个词之间的空间距离远近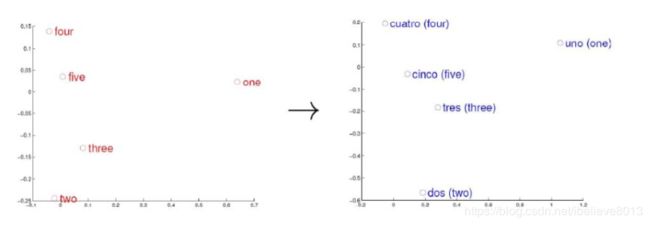
当然,对于分布式表示来说,每个词的向量大大缩短(相比one hot编码),可以通过计算两个词之间的空间距离,这个距离可能能表征词义,语法上的相似性。
事实证明词向量的好坏也决定着下游任务的上限。那么既然这种分布式表示有如此多的好处,那么怎样才能获得好的分布式词向量呢?在相当长的一段时间,或者说目前仍然用得十分广泛的一种方法,就是word2vec。
3. word2vec
word2vec网上的资料多如牛毛,我这里也没有必要把他们的抄一遍过来,但是我在网上看到的最好的资料,应该是《word2vec中的数学原理详解》那份资料:
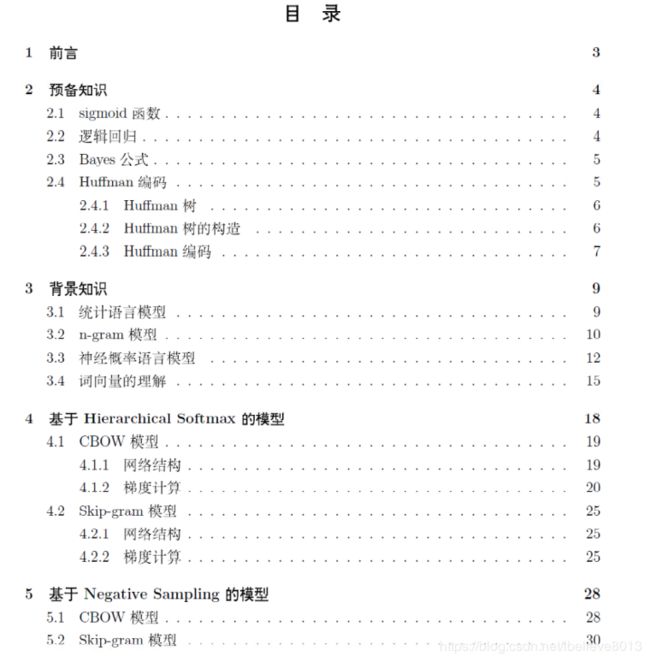
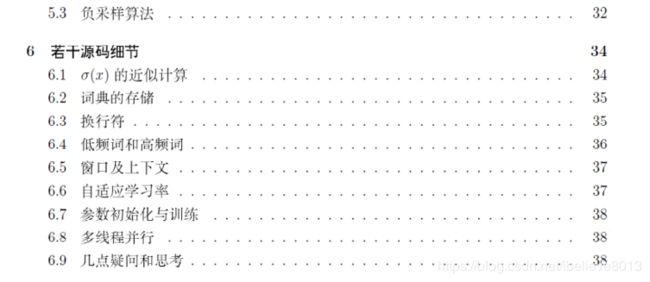
光看目录就知道都是干货了,如果有需要的,我上传到GitHub上,大家可以自取:https://github.com/wujie0001/NLP-learning
,github上会持续更新关于机器学习,NLP等资料,大家可以小小star一下。
这里把word2vec讲一下吧,看了我这个大致的梗概,有个大体的思路,去看上面的资料,可能会更容易。word2vec里面构建词向量的基本假设就是:相似的词,经常会同时出现。(也叫共现),基于这样一个思想,word2vec可以建立模型来实现它。
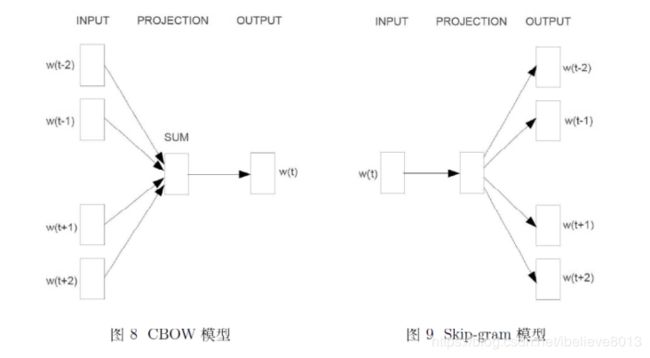
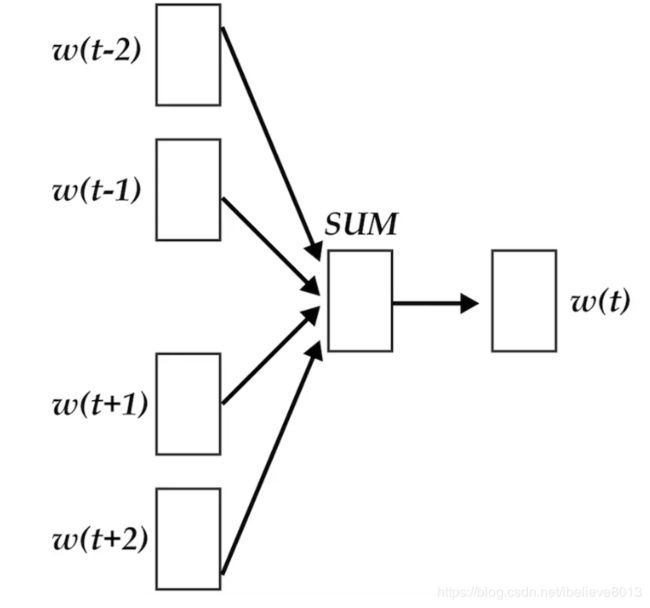
如上图所示,一种是CBOW模型,一种是Skip-gram模型,两个模型的区别是前者通过周边的词对中心词进行预测,更具体的说是将周边的词向量进行加和,得到了中间的词;而skip gram是通过中心词,预测周围的词。一般来说,skip gram的效果似乎还比CBOW的效果好一些。以下讲几个需要注意的细节部分:
- hierarchical softmax
- negative sampling
1. hierarchical softmax
说到这个层次化的softmax,不得不提的就是Huffman树,那为啥要这个Huffman树呢,难道是吃饱了撑的吗?其实不是的,我们假设一下,如果对于一个网络,比如刚才那个CBOW的网络,输出的层的维度应该是多少呢?其实不难想到,因为我们是一个多分类,假设词表是5w维,那么输出层的节点应该是5w个才对,一个网络的输出层这么多节点,其实还是很不麻烦的一个事情,我们仍然是觉得太多的节点,绝大部分是0,想想有没有压缩一下的办法。那么这里的Huffman树就是一种压缩的方式。
Huffman树是按节点的权重来构建一颗二叉树的,具体来说就是按各个词的词频来构建一个二叉树,如果是经常出现的词,如THE , MY, 等,索引的路径就短,是一个生僻词的话,索引的路径就长。举个例子,如下图:

对于一个输出的来说,就是多个二分类的任务了,希望最大化正确路径的概率,即把所有的路径上的节点的概率进行连乘,以这个作为目标函数,这个手法是机器学习里面十分常见的。
这里要注意一下,在Huffman树中,我们对除根节点以外的每个非叶子节点都有一个向量 θ \theta θ,这个向量就是作为参数与词向量和进行内积然后二分类的,也就是每个二分类上面的参数。注意要区分的是各个词向量v(w) 和这里的 θ \theta θ,是不同的向量,最后是两个向量都需要训练的。而训练的方法就是梯度上升的方法,即通过固定一个,更新另一个,然后循环这个过程。
hierarchical softmax需要注意的大概就这些内容,细节的地方可以看上面提供的资料,更为详尽。
2. negative sampling
现在来讲讲负例采样的算法,大家可能都知道它是为了提升效率的一种方法,但是究竟如何提升的效率,可能并没有真正地弄懂。
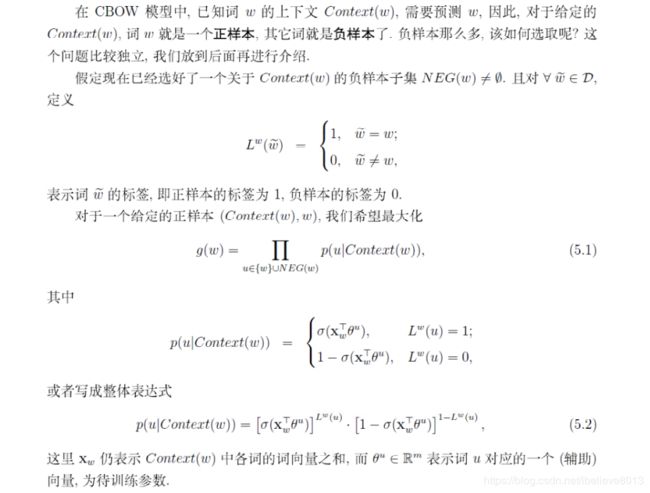
为什么要有负例采样?难道我们的hierarchical softmax还不够快吗,的确是这样的,我们发现hierarchical是一个为了输出层节点不要太多的一种优化,一种妥协,但是我们要想办法另辟蹊径,所以负例采样就出现了,什么是负例采样算法,就是字面意思,随机地采样负样本,不必要每次把所有的负样本都拿来训练。那么每个样本进去都是一个二分类,我们期望是正样本输入的时候,输出正类的概率越大越好;负样本输入的时候,输出正类的概率越小越好,即(1-p)的概率越大越好。如下:
那么下一个问题是,究竟如何采样?
想象一下,词表中有常用词,也有生僻词,直观地,常用词理应更容易被采样到,而生僻词被采样的概率应该更小才好。因此我们应用词频作为权重进行采样,如何实现的呢?
其实就是把所有词(N个)的词频映射到0-1区间内的一段长度,然后再把0-1的区间等距切分为M段,当然这里的M是远远大于N的。
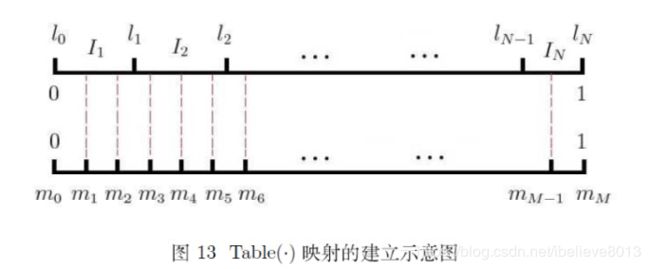
我们要采样的时候,就可以产生一系列的[1,M-1]随机数,然后找找映射到哪个词上,那个词就是被采样到的负样本(刚好采到正样本就直接跳过去)。
好了,word2vec其实说难也不难,归根到底还是要沉下心来,慢慢理清楚他的细节。再次墙裂推荐上面的资料,写得真好。下面讲glove。
4. glove
glove词向量相比于word2vec来说,区别是glove词向量是利用的全局的共现信息,而word2vec被诟病的就是利用的信息过于局部,那glove模型是怎么一回事呢?我们可以快速地来看看。
模型的代价函数是这样的:

这里的 v i T v_i^T viT和 v j v_j vj是要训练的词向量,而 X i , j X_{i,j} Xi,j是共现矩阵中的词频, b i , b j b_i,b_j bi,bj是偏置,可以先忽略。从这个模型我们可以大致看出,模型是希望 v i T v j v_i^Tv_j viTvj能够尽可能接近 X i , j X_{i,j} Xi,j的含义,即希望两个词向量的内积能表征出两个词之间的共现关系!
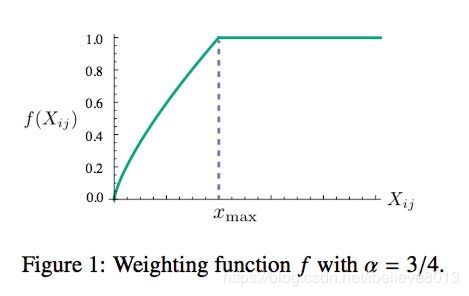
f ( X i , j ) f(X_{i,j}) f(Xi,j)是每个词对的权重函数,我们当然是希望共现的次数多的词对,能够对损失函数有大一点的影响,但是有些词天生就是在一起,权重也得有个度,因此采用一个分段的函数对每个词赋予权重。

x m a x x_{max} xmax是一个超参数,自己定的。
显然glove模型不是一个神经网络模型。
glove词向量的训练也是基于梯度下降的方法。
更为详细的推导,可以看这篇文章:https://blog.csdn.net/coderTC/article/details/73864097,把glove模型的始末讲得比较清晰。这里也不展开讲了。
5. fast-text
FastText模型经常用来和word2vec相比较,要了解Fasttext,也要从三个方面来讲述:
- 模型架构
- 层次的softmax
- N-gram特征
1. 模型架构
模型架构和CBOW的架构很像,我们细致来看看,有什么区别:

如图所示,上面是CBOW的模型,下面是fasttext模型,区别是
- CBOW的输入是onehot的编码,而FastText的输入是embedding的向量
- CBOW输入是上下文窗口的词,进去之后是直接加和;FastText是一个句子的所有词的向量
- CBOW输出是以中心词为label;FastText直接以文本的分类标签作为label
- FastText的hierarchical softmax是必要的,而一般的CBOW可能没有用这个
- fastText在输入时,将单词的字符级别的n-gram向量作为额外的特征
2. hierarchical softmax
说到了hierarchical softmax,也就不多提了,因为在word2vec中已经有说过了
3. N-gram特征
对于文本分类来说,很常用的就是词袋模型。 FastText的另外一个不可或缺的地方,是它利用了N-gram特征,相当于是把词给拆开成了更细粒度的单元,这样的好处是可以一定程度上克服OOV(未登录词)的问题,同时也增加了词表的大小。
一句话总结FastText就是:将整篇文档的词及n-gram特征向量叠加得到文档向量,使用文档向量以文档标签为label做hierarchical softmax多分类。
6. word2vec 代码分析
可以看看大佬用TensorFlow实现的word2vec代码,学习学习。
原链接https://github.com/aymericdamien/TensorFlow-Examples/
from __future__ import division, print_function, absolute_import

import collections
import os
import random
import urllib
import zipfile

import numpy as np
import tensorflow as tf

# Training Parameters
learning_rate = 0.1
batch_size = 128
num_steps = 3000000
display_step = 10000
eval_step = 200000

# Evaluation Parameters
eval_words = ['five', 'of', 'going', 'hardware', 'american', 'britain']

# Word2Vec Parameters
embedding_size = 200 # Dimension of the embedding vector
max_vocabulary_size = 50000 # Total number of different words in the vocabulary
min_occurrence = 10 # Remove all words that does not appears at least n times
skip_window = 3 # How many words to consider left and right
num_skips = 2 # How many times to reuse an input to generate a label
num_sampled = 64 # Number of negative examples to sample
# Download a small chunk of Wikipedia articles collection
url = 'http://mattmahoney.net/dc/text8.zip'
data_path = 'text8.zip'
if not os.path.exists(data_path):
    print("Downloading the dataset... (It may take some time)")
    filename, _ = urllib.urlretrieve(url, data_path)
    print("Done!")
# Unzip the dataset file. Text has already been processed
with zipfile.ZipFile(data_path) as f:
    text_words = f.read(f.namelist()[0]).lower().split()
# Build the dictionary and replace rare words with UNK token
count = [('UNK', -1)]
# Retrieve the most common words
count.extend(collections.Counter(text_words).most_common(max_vocabulary_size - 1))
# Remove samples with less than 'min_occurrence' occurrences
for i in range(len(count) - 1, -1, -1):
    if count[i][1] < min_occurrence:
        count.pop(i)
    else:
        # The collection is ordered, so stop when 'min_occurrence' is reached
        break
# Compute the vocabulary size
vocabulary_size = len(count)
# Assign an id to each word
word2id = dict()
for i, (word, _)in enumerate(count):
    word2id[word] = i

data = list()
unk_count = 0
for word in text_words:
    # Retrieve a word id, or assign it index 0 ('UNK') if not in dictionary
    index = word2id.get(word, 0)
    if index == 0:
        unk_count += 1
    data.append(index)
count[0] = ('UNK', unk_count)
id2word = dict(zip(word2id.values(), word2id.keys()))

print("Words count:", len(text_words))
print("Unique words:", len(set(text_words)))
print("Vocabulary size:", vocabulary_size)
print("Most common words:", count[:10])
data_index = 0
# Generate training batch for the skip-gram model
def next_batch(batch_size, num_skips, skip_window):
    global data_index
    assert batch_size % num_skips == 0
    assert num_skips <= 2 * skip_window
    batch = np.ndarray(shape=(batch_size), dtype=np.int32)
    labels = np.ndarray(shape=(batch_size, 1), dtype=np.int32)
    # get window size (words left and right + current one)
    span = 2 * skip_window + 1
    buffer = collections.deque(maxlen=span)
    if data_index + span > len(data):
        data_index = 0
    buffer.extend(data[data_index:data_index + span])
    data_index += span
    for i in range(batch_size // num_skips):
        context_words = [w for w in range(span) if w != skip_window]
        words_to_use = random.sample(context_words, num_skips)
        for j, context_word in enumerate(words_to_use):
            batch[i * num_skips + j] = buffer[skip_window]
            labels[i * num_skips + j, 0] = buffer[context_word]
        if data_index == len(data):
            buffer.extend(data[0:span])
            data_index = span
        else:
            buffer.append(data[data_index])
            data_index += 1
    # Backtrack a little bit to avoid skipping words in the end of a batch
    data_index = (data_index + len(data) - span) % len(data)
    return batch, labels
# Input data
X = tf.placeholder(tf.int32, shape=[None])
# Input label
Y = tf.placeholder(tf.int32, shape=[None, 1])

# Ensure the following ops & var are assigned on CPU
# (some ops are not compatible on GPU)
with tf.device('/cpu:0'):
    # Create the embedding variable (each row represent a word embedding vector)
    embedding = tf.Variable(tf.random_normal([vocabulary_size, embedding_size]))
    # Lookup the corresponding embedding vectors for each sample in X
    X_embed = tf.nn.embedding_lookup(embedding, X)

    # Construct the variables for the NCE loss
    nce_weights = tf.Variable(tf.random_normal([vocabulary_size, embedding_size]))
    nce_biases = tf.Variable(tf.zeros([vocabulary_size]))

# Compute the average NCE loss for the batch
loss_op = tf.reduce_mean(
    tf.nn.nce_loss(weights=nce_weights,
                   biases=nce_biases,
                   labels=Y,
                   inputs=X_embed,
                   num_sampled=num_sampled,
                   num_classes=vocabulary_size))

# Define the optimizer
optimizer = tf.train.GradientDescentOptimizer(learning_rate)
train_op = optimizer.minimize(loss_op)

# Evaluation
# Compute the cosine similarity between input data embedding and every embedding vectors
X_embed_norm = X_embed / tf.sqrt(tf.reduce_sum(tf.square(X_embed)))
embedding_norm = embedding / tf.sqrt(tf.reduce_sum(tf.square(embedding), 1, keepdims=True))
cosine_sim_op = tf.matmul(X_embed_norm, embedding_norm, transpose_b=True)
# Initialize the variables (i.e. assign their default value)
init = tf.global_variables_initializer()

with tf.Session() as sess:

    # Run the initializer
    sess.run(init)

    # Testing data
    x_test = np.array([word2id[w] for w in eval_words])

    average_loss = 0
    for step in range(1, num_steps + 1):
        # Get a new batch of data
        batch_x, batch_y = next_batch(batch_size, num_skips, skip_window)
        # Run training op
        _, loss = sess.run([train_op, loss_op], feed_dict={X: batch_x, Y: batch_y})
        average_loss += loss

        if step % display_step == 0 or step == 1:
            if step > 1:
                average_loss /= display_step
            print("Step " + str(step) + ", Average Loss= " + \
                  "{:.4f}".format(average_loss))
            average_loss = 0

        # Evaluation
        if step % eval_step == 0 or step == 1:
            print("Evaluation...")
            sim = sess.run(cosine_sim_op, feed_dict={X: x_test})
            for i in range(len(eval_words)):
                top_k = 8  # number of nearest neighbors
                nearest = (-sim[i, :]).argsort()[1:top_k + 1]
                log_str = '"%s" nearest neighbors:' % eval_words[i]
                for k in range(top_k):
                    log_str = '%s %s,' % (log_str, id2word[nearest[k]])
                print(log_str)