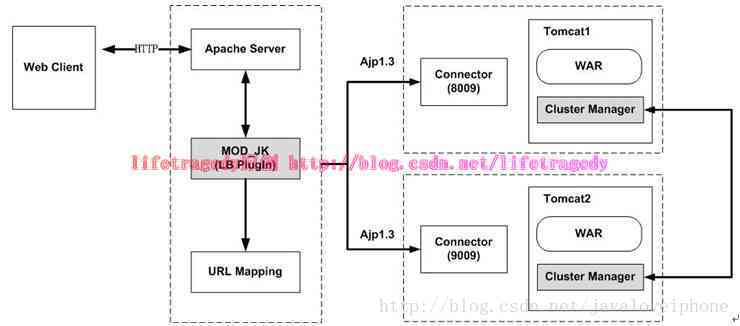
tomcat集群--整合Apache服务器,采用mod_JK连接模式
一、集群技术初步分析
1、tomcat集群多应用服务器,分担压力,并保证服务高可用,使用tomcat自带cluster实现集群环境,Manager负责管理session共享
2、web服务器采用Apache,负责应用服务器间负载均衡
3、apache服务器和tomcat的连接方法其实有三种:mod_JK、http_proxy和ajp_proxy,本文采用mod_JK模式
4、盗一张图,如下:

二、tomcat集群环境安装与配置
1、下载tomcat服务器,本文使用apache-tomcat-7.0.64版本,复制两份,分别为tomcat1和tomcat2,配置server.xml,以tomcat1为例,配置代码如下:
<Server port="8005" shutdown="SHUTDOWN">
  <Listener className="org.apache.catalina.startup.VersionLoggerListener" />
  <Listener className="org.apache.catalina.core.AprLifecycleListener" SSLEngine="on" />
  <Listener className="org.apache.catalina.core.JasperListener" />
  <Listener className="org.apache.catalina.core.JreMemoryLeakPreventionListener" />
  <Listener className="org.apache.catalina.mbeans.GlobalResourcesLifecycleListener" />
  <Listener className="org.apache.catalina.core.ThreadLocalLeakPreventionListener" />


  <GlobalNamingResources>

    <Resource name="UserDatabase" auth="Container"
              type="org.apache.catalina.UserDatabase"
              description="User database that can be updated and saved"
              factory="org.apache.catalina.users.MemoryUserDatabaseFactory"
              pathname="conf/tomcat-users.xml" />
  GlobalNamingResources>


  <Service name="Catalina">


    <Executor name="tomcatThreadPool" namePrefix="catalina-exec-"
        maxThreads="150" minSpareThreads="10"/>


    <Connector port="8080" protocol="org.apache.coyote.http11.Http11NioProtocol"
               connectionTimeout="20000"
               redirectPort="8443"
           executor="tomcatThreadPool"/>


    <Connector port="8009" protocol="AJP/1.3" redirectPort="8443" />


    <Engine name="Catalina" defaultHost="localhost"  jvmRoute="tomcat1">


    <Cluster className="org.apache.catalina.ha.tcp.SimpleTcpCluster"  channelSendOptions="8">


        <Manager className="org.apache.catalina.ha.session.DeltaManager"
            expireSessionsOnShutdown="false"
            notifyListenersOnReplication="true"/>


        <Channel className="org.apache.catalina.tribes.group.GroupChannel">


            <Membership className="org.apache.catalina.tribes.membership.McastService"
                address="228.0.0.4"
                port="45564"
                frequency="500"
                dropTime="3000"/>


            <Receiver className="org.apache.catalina.tribes.transport.nio.NioReceiver"
                address="auto"
                port="4001"
                autoBind="100"
                selectorTimeout="100"
                maxThreads="6"/>


            <Sender className="org.apache.catalina.tribes.transport.ReplicationTransmitter">

                <Transport className="org.apache.catalina.tribes.transport.nio.PooledParallelSender"/>
            Sender>


            <Interceptor className="org.apache.catalina.tribes.group.interceptors.TcpFailureDetector"/>
            <Interceptor className="org.apache.catalina.tribes.group.interceptors.MessageDispatch15Interceptor"/>
            <Interceptor className="org.apache.catalina.tribes.group.interceptors.ThroughputInterceptor"/>

        Channel>


        <Valve className="org.apache.catalina.ha.tcp.ReplicationValve" filter=".*/.gif;.*/.js;.*/.jpg;.*/.png;.*/.htm;.*/.html;.*/.css;.*/.txt;"/>


        <Valve className="org.apache.catalina.ha.session.JvmRouteBinderValve"/>

        <Deployer className="org.apache.catalina.ha.deploy.FarmWarDeployer"
        tempDir="/tmp/war-temp/"
        deployDir="/tmp/war-deploy/"
        watchDir="/tmp/war-listen/"
        watchEnabled="false"/>


        <ClusterListener className="org.apache.catalina.ha.session.ClusterSessionListener"/>
    Cluster>
        <ClusterListener className="org.apache.catalina.ha.session.ClusterSessionListener"/>


      <Realm className="org.apache.catalina.realm.LockOutRealm">

        <Realm className="org.apache.catalina.realm.UserDatabaseRealm"
               resourceName="UserDatabase"/>
      Realm>

      <Host name="localhost"  appBase="webapps"
            unpackWARs="true" autoDeploy="true">


        <Valve className="org.apache.catalina.valves.AccessLogValve" directory="logs"
               prefix="localhost_access_log." suffix=".txt"
               pattern="%h %l %u %t "%r" %s %b" />

      Host>
    Engine>
  Service>
Server>
如果只是实现集群负载均衡,上面的cluster是可以不配置,cluster的作用是实现集群高可用,也就是管理session信息共享
补充配置:
<Server port="9005" shutdown="SHUTDOWN">此外还有如下配置:
<Connector port="8090" protocol="org.apache.coyote.http11.Http11NioProtocol"
               connectionTimeout="20000"
               redirectPort="9443"
           executor="tomcatThreadPool"/>
<Connector port="9009" protocol="AJP/1.3" redirectPort="9443" />
<Engine name="Catalina" defaultHost="localhost" jvmRoute="tomcat2">
<Receiver className="org.apache.catalina.tribes.transport.nio.NioReceiver"
    address="auto"
    port="4001"
    autoBind="100"
    selectorTimeout="100"
    maxThreads="6"/>
注意:上面所涉及到的端口,别忘记修改防火墙iptables开放端口,否则出现无法访问。
2、修改项目的 WEN-INF/web.xml
在之间添加:
<distributable/>3、启动tomcat服务,测试是否可以访问
三、安装配置Apache服务器
1、下载Apache 2.0.25,官网地址:http://httpd.apache.org,下载地址:点击下载Apache 2.0.25
下载之后的文件:apache_2.0.55-win32-x86-no_ssl.msi,双击安装运行。
安装过程中,Network Domain 和 Server Name填写内容,如果用于本机测试,可以直接localhost,否则填写远程主机地址。
或者点击:补充下载地址
2、下载并配置mod_jk.so
因为采用的是mod_jk模式,需要下载mod_jk.so插件,mod_jk-apache-2.0.55.so
将下载的mod_jk-apache-2.0.55.so文件拷贝到Apache安装目录的modules目录下面
3、修改apache配置文件conf/http.conf
开放并修改:
ServerName localhost:80在文件最后加上下面一句代码:
include conf/mod_jk.conf4、配置mod_jk.conf
在http.conf同目录下,创建mod_jk.conf文件,内容如下:
#加载 mod_jk 模块
LoadModule jk_module modules/mod_jk-apache-2.0.55.so
#加载mod_jk.so 配置文件
JkWorkersFile conf/workers.properties
#指定那些请求交给tomcat处理,"controller"为在workers.propertise里指定的负载分配控制器
JkMount /* controller
5、配置workers.properties
在http.conf同目录下,创建workers.properties文件 ,内容如下:
###server 列表
###jvm1 需要注意此名字对应tomcat中server.xml6、启动Apache服务
四、测试集群环境
1、tomcat1、tomcat2中,项目分别创建两个页面:session_set.jsp和session_get.jsp
tomcat1中
session_set.jsp:
<%@ page language="java" pageEncoding="UTF-8"%>
<%
    request.getSession().setAttribute("name", "tomcat1");
    System.out.println("tomcat1 set attribute success!");
%>

<html>
  <head>
    <title>testtitle>
    <meta http-equiv="content-type" content="text/html; charset=UTF-8">
  head>
  <body>
    tomcat1 set attribute success!<br>
  body>
html>
session_get.jsp:
<%@ page language="java" pageEncoding="UTF-8"%>
<%
    Object name = request.getSession().getAttribute("name");
    System.out.println("tomcat1 get attribute:"+name);
%>

<html>
  <head>
    <title>testtitle>
    <meta http-equiv="content-type" content="text/html; charset=UTF-8">
  head>
  <body>
    tomcat1 get attribute:<%=name %><br>
  body>
html>
tomcat2中
session_set.jsp:
<%@ page language="java" pageEncoding="UTF-8"%>
<%
    request.getSession().setAttribute("name", "tomcat2");
    System.out.println("tomcat2 set attribute success!");
%>

<html>
  <head>
    <title>testtitle>
    <meta http-equiv="content-type" content="text/html; charset=UTF-8">
  head>
  <body>
    tomcat2 set attribute success!<br>
  body>
html>
session_get.jsp:
<%@ page language="java" pageEncoding="UTF-8"%>
<%
    Object name = request.getSession().getAttribute("name");
    System.out.println("tomcat2 get attribute:"+name);
%>

<html>
  <head>
    <title>testtitle>
    <meta http-equiv="content-type" content="text/html; charset=UTF-8">
  head>
  <body>
    tomcat2 get attribute:<%=name %><br>
  body>
html>
负载均衡测试:
启动tomcat1、tomcat2、Apache服务之后,用不同的浏览器多次访问 http://localhost/test/session_set.jsp、
http://localhost/test/session_get.jsp
查看结果是否请求被分发到tomcat1和tomcat2上面,如果是,则实现负载均衡。
高可用测试:
负载均衡测试完毕之后,关闭tomcat2,然后刷新会话在tomcat2上面的session_get.jsp页面,查看是否能拿到name的值为tomcat2,如果是,则说明tomcat2的会话信息同步到了tomcat1中,实现了高可用。
关于高可用session不能复制或复制失败的处理:
1、Receiver接收器这个配置:autoBind=”100”,尽量不配(不过默认值好像就是这个)
2、还是接收器配置:address=”auto”,尽量指定ip地址
3、防火墙开启端口:8005、9005、8080、8090、8009、9009、8443、4001、5001、45564等上面tomcat配置所涉及的端口
4、如果执行上述操作,不起作用,关闭防火墙,重启tomcat集群,测试;成功后,开启防火墙,再测
文章参考:
http://blog.csdn.net/yipanbo/article/details/44079083/
http://blog.csdn.net/zhuying_linux/article/details/6590700