ELK日志分析平台
什么是ELK呢?
ELK是三个组件的缩写, 分别是elasticsearch, logstash, kibana. ELK平台可以用于实现日志收集、日志搜索和日志分析
1.elasticsearch(es): 它是个开源分布式搜索引擎,它的特点有:分布式,零配置,自动发现,索引自动分片,索引副本机制,restful风格接口,多数据源,自动搜索负载等。
2.logstash: 简单说是一个日志收集工具, 可以定义从哪里获取数据, 并且可以简单处理数据, 最后可以定义将数据输出到哪里, 一般输出到es.
3.kibana: 其实就是一个数据展示界面, 并且可以分析数据, 例如从es中读取数据进行展示分析. es自己也带有简单的展示dashboard: http://127.0.0.1:9200/_plugin/head/, 当然 前提是你安装了head插件
如何搭建一个ELK日志分析平台呢?
一.单机安装elasticsearch
1.利用安装elasticsearch的rpm包安装
yum install elasticsearch-2.3.3.rpm2.配置elasticsearch的配置文件
cd /etc/elasticsearch/
vim elasticsearch.yml                     # 主配置文件
17 cluster.name: my-es                    # 集群的名称my-es
23 node.name: server1                     # 当前节点的主机名
33 path.data: /var/lib/elasticsearch/     # 数据目录
37 path.logs: /var/log/elasticsearch/     # 日志目录
54 network.host: 172.25.1.1               # 当前主机的IP
58 http.port: 9200                        # 对外端口号


3.安装java环境(因为Elasticsearch是用Java开发的)
rpm -ivh jdk-8u121-linux-x64.rpm4.启动elasticsearch服务
/etc/init.d/elasticsearch start
打开服务后可以在浏览器中输入当前主机的IP和端口号查看(只有简单的数据,没有图形界面也没有分析等,所以我们选择安装相应图形界面的插件,方便分析处理数据)

5.安装插件:
cd /usr/share/elasticsearch/
cd /bin
./plugin list     # 查看已经安装的插件
/usr/share/elasticsearch/bin/plugin install file:/root/elk/elasticsearch-head-master.zip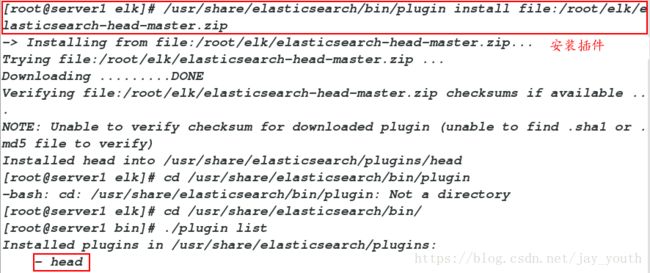
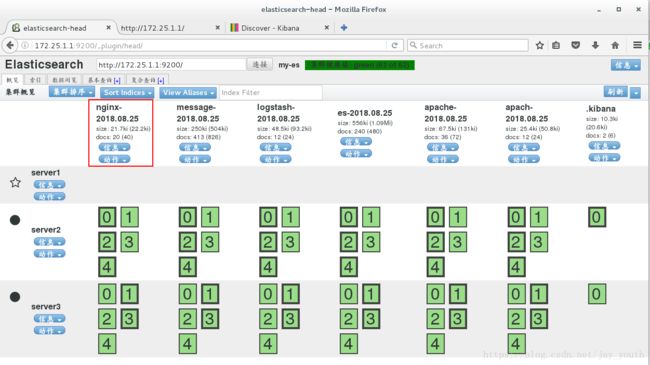
6.安装插件以后,我们在浏览器中查看,得到的就是比较便于观察和分析的web界面

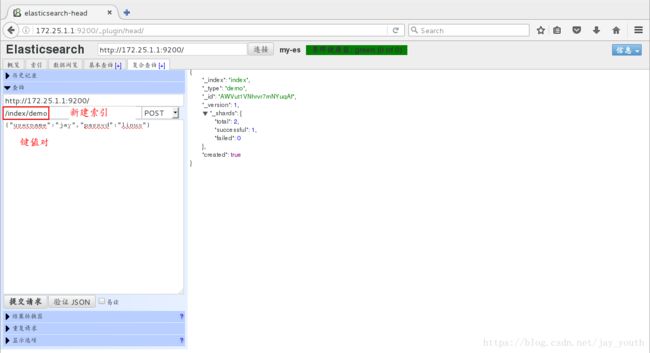
7.在该web界面下建立索引尝试查询
二 . 集群Elasticsearch的安装和配置
Elasticsearch是一个开源的高扩展的分布式全文检索引擎,它可以近乎实时的存储、检索数据;本身扩展性很好,可以扩展到上百台服务器,处理PB级别的数据。
ES可以作为一个独立的单个搜索服务器。不过,为了处理大型数据集,实现容错和高可用性,ES可以运行在许多互相合作的服务器上。这些服务器的集合称为集群。
1.在server2和server3上安装elasticsearch-2.3.3.rpm和jdk-8u121-linux-x64.rpm
rpm -ivh jdk-8u121-linux-x64.rpm
yum install elasticsearch-2.3.3.rpm
2.编辑sevre1上的配置文件elasticsearch.yml
72行 discovery.zen.ping.unicast.hosts: ["server1", "server2","server3"]
# 表示该集群由三台主机构成,主机名分别是server1,server2和server3
将修改好的配置文件发送给server2和server3上,在server2上和server3上修改配置文件中的sevrername和ip
3.启动server2和sevrer3上的服务
/etc/init.d/elasticsearch start
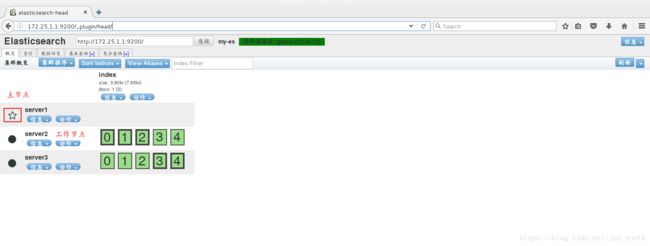
4.为了将集群中三台主机所负责的功能模块分开,我们在配置文件中设定:
server1:
#server1是主节点,同时承担http查询任务
vim elasticsearch.yml
 23 node.name: server1
 24 node.master: true
 25 node.data: false
26 http.enabled: true# server2负责存储数据和http查询任务
vim elasticsearch.yml
23 node.name: server2
25 node.master: false
26 node.data: true
27 http.enabled: trueserver3:
# server3和server2相同
vim elasticsearch.yml
23 node.name: server2
25 node.master: false
26 node.data: true
27 http.enabled: true
5.重启所有节点上的服务,在浏览器中查看web界面
6.查询集群的状态
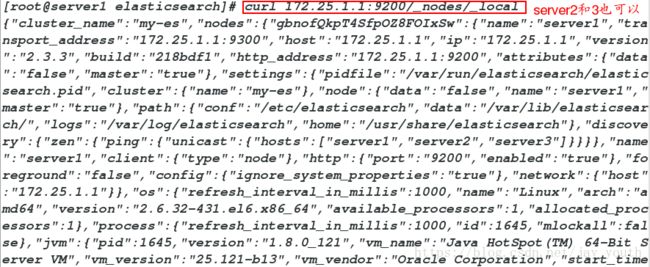
curl -XGET 'http://172.25.1.1:9200/_cluster/health?pretty=true'curl 172.25.1.1:9200/_nodes/_localcurl -XDELETE 'http://172.25.1.1:9200/index'三.logstash的安装与配置
Logstash是开源的服务器端数据处理管道,能够同时从多个来源采集数据,转换数据,然后将数据发送到您喜欢的“存储库”中。(我们的存储当然是Elasticsearch。)
1.安装logstash工具
rpm -ivh logstash-2.3.3-1.noarch.rpm添加不同的模块:
1.标准终端输入stdin和输出stdout模块
/opt/logstash/bin/logstash -e 'input { stdin { } } output { stdout { } }'
# input输入是从终端标准输出
Settings: Default pipeline workers: 1
Pipeline main started
hello   # 标准输入hello
2018-08-25T02:36:54.035Z server1 hello    # 标准输出hello
world
2018-08-25T02:36:57.372Z server1 world
^CSIGINT received. Shutting down the agent. {:level=>:warn}   # ctrl+c中断
stopping pipeline {:id=>"main"}

Pipeline main has been shutdown
2.在标准终端输出的时候选择输出数据格式codec => rubydebug
/opt/logstash/bin/logstash -e 'input { stdin { } } output { stdout { codec => rubydebug } }'
Settings: Default pipeline workers: 1
Pipeline main started
hello          # 标准输入
{
       "message" => "hello",             # 输出
      "@version" => "1",
    "@timestamp" => "2018-08-25T02:38:09.060Z",
          "host" => "server1"
}
world
{
       "message" => "world",
      "@version" => "1",
    "@timestamp" => "2018-08-25T02:38:12.447Z",
          "host" => "server1"
}
^CSIGINT received. Shutting down the agent. {:level=>:warn}
stopping pipeline {:id=>"main"}

Pipeline main has been shutdown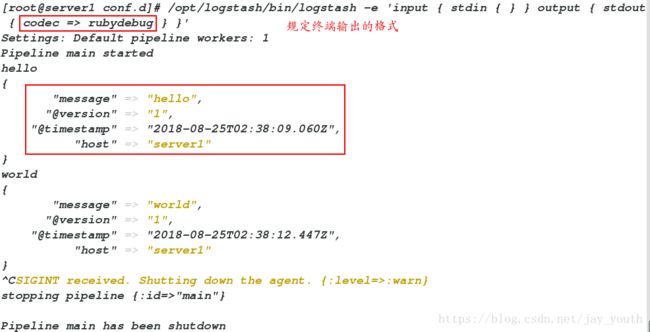
3.标准终端输出,输出到提供elasticsearch的主机(server1)中
/opt/logstash/bin/logstash -e 'input { stdin { } } output { elasticsearch { hosts => ["172.25.1.1"] index => "logstash-%{+YYYY.MM.dd}" } }'
Settings: Default pipeline workers: 1
Pipeline main started
hello
hello world
hello jay        # 无终端输出,是因为将数据输出到了elasticsearch中
^CSIGINT received. Shutting down the agent. {:level=>:warn}
stopping pipeline {:id=>"main"}


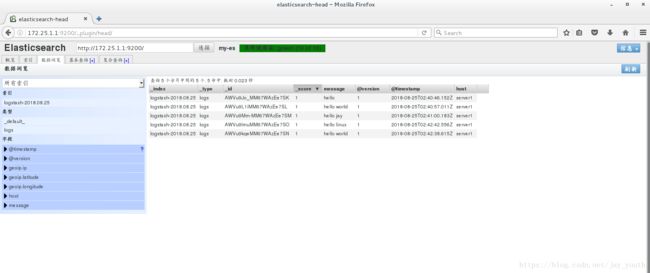
Pipeline main has been shutdown4.上边几种情况的集合,标准终端输入,输出分为两部分,一部分输出到elasticsearch ,另一种是输出到终端…
/opt/logstash/bin/logstash -e 'input { stdin { } } output { elasticsearch { hosts => ["172.25.1.1"] index => "logstash-%{+YYYY.MM.dd}" } stdout { codec => rubydebug } }'
Settings: Default pipeline workers: 1
Pipeline main started
hello world
{
       "message" => "hello world",
      "@version" => "1",
    "@timestamp" => "2018-08-25T02:42:38.615Z",
          "host" => "server1"
}
hello linux
{
       "message" => "hello linux",
      "@version" => "1",
    "@timestamp" => "2018-08-25T02:42:42.556Z",
          "host" => "server1"
}
^CSIGINT received. Shutting down the agent. {:level=>:warn}
stopping pipeline {:id=>"main"}

Pipeline main has been shutdown
5.上边的各种模块都是直接在命令行选择模块,输入或者输出。我们也可以在文件中编写使用的模块,选择输入和输出,
cd /etc/logstash/conf.d/
vim es.conf                # 文件名,可以随意取
input {
        stdin {}           # 输入是标准终端输入standard  input
}

output {
        elasticsearch {                  # 第一个输出是到elasticsearch
                hosts => ["172.25.1.1"]  # elasticsearch所在的主机
                index => "logstash-%{+YYYY.MM.dd}"
        }

        stdout {                         # 第二个输出是标准终端输出
                codec => rubydebug       # 输出的风格是rubydebug
        }
}
在终端的运行情况:
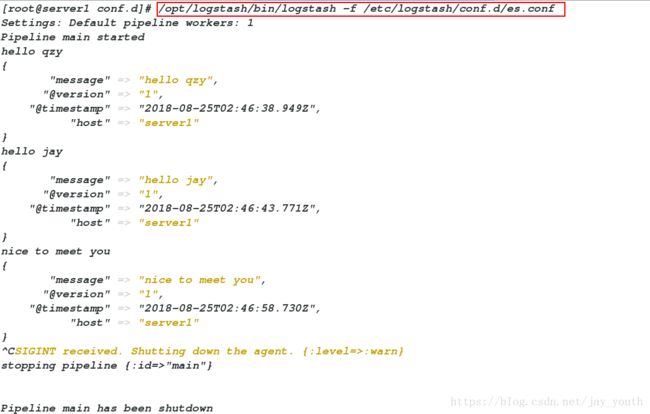
/opt/logstash/bin/logstash -f /etc/logstash/conf.d/es.conf   # 在终端利用logstash运行此文件
Settings: Default pipeline workers: 1
Pipeline main started
hello qzy        # 标准终端输入
{
       "message" => "hello qzy",    # 输出的一部分,在终端标准输出
      "@version" => "1",
    "@timestamp" => "2018-08-25T02:46:38.949Z",
          "host" => "server1"
}
hello jay
{
       "message" => "hello jay",
      "@version" => "1",
    "@timestamp" => "2018-08-25T02:46:43.771Z",
          "host" => "server1"
}
nice to meet you
{
       "message" => "nice to meet you",
      "@version" => "1",
    "@timestamp" => "2018-08-25T02:46:58.730Z",
          "host" => "server1"
}
^CSIGINT received. Shutting down the agent. {:level=>:warn}
stopping pipeline {:id=>"main"}


Pipeline main has been shutdown6.rsyslog模块:
将server1当作一个日志收集服务器
(1).编辑一个使用模块的文件
vim message.conf
input {
        syslog {
                port => 514    # 输入是server2的日志,同步日志端口为514/udp
        }
}


output {
#       elasticsearch {
#               hosts => ["172.25.1.1"]      # 输出到server1的elasticsearch
#               index => "message-%{+YYYY.MM.dd}"
#       }

        stdout {
                codec => rubydebug     # 输出到标准屏幕输出
        }
}
(2).在sevrer2中编辑同步日志的文件
vim /etc/rsyslog.conf
*.*     @@172.25.1.1:514
/etc/init.d/rsyslog restart    # 重新打开rsyslog服务
(3).查看rsyslog的端口和运行该模式的结果
在server1上netstat -antulp | grep 514
![]()
在server1以终端占用的方式执行
/opt/logstash/bin/logstash -f /etc/logstash/conf.d/message.conf

在server1上可以收集到server2上的日志信息
(4).在server上执行logger tigger,在server1上立即可以看到trigger的输出
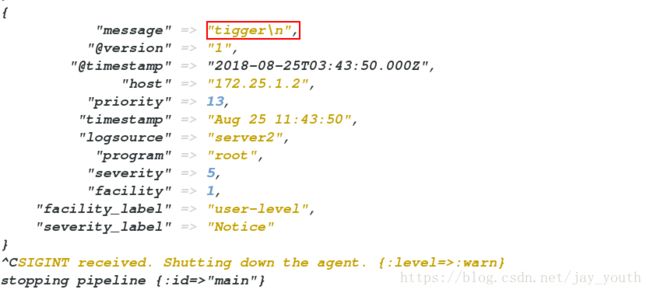
7.利用logstash中的模块将日志记录中的多行输出变为一行:
(1).在elasticsearch的日志记录文件中
cd /var/log/elasticsearch
cat my-es.log
看到以[]为界线的日志有时候并不在一行

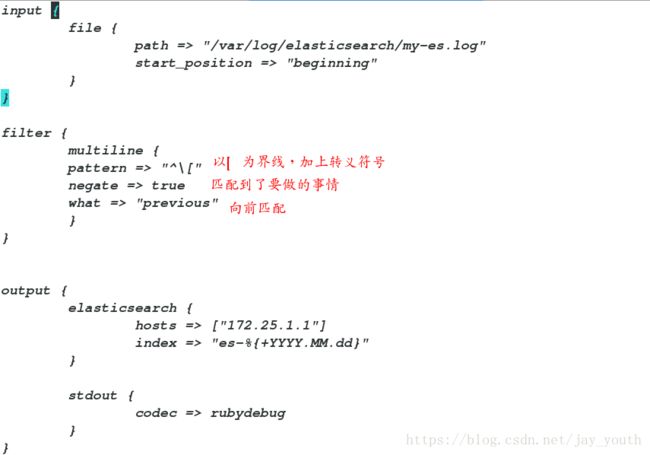
(2).利用filter对输入进行过滤处理再指定输出
vim  /etc/logstash/conf.d/message.conf
input {
        file {
                path => "/var/log/elasticsearch/my-es.log"       # 待处理日志所在位置
                start_position => "beginning"                    # 从日志的开始处处理
        }
}

filter {
        multiline {
        pattern => "^\["
        negate => true
        what => "previous"
        }
}


output {
        elasticsearch {
                hosts => ["172.25.1.1"]
                index => "es-%{+YYYY.MM.dd}"
        }

        stdout {
                codec => rubydebug
        }
}
(3).在终端执行操作
/opt/logstash/bin/logstash -f /etc/logstash/conf.d/message.conf
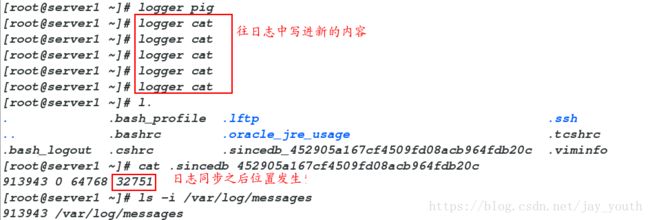
# 因为在终端出有大量的java日志,所以就不再展示- 这里有一个需要注意的点:我们在message.conf中写的是从日志文件的beginning开始,但是,此时我们接着往日志中写东西,我们发现是从上次结束的地方开始,看起来好像与我们的设置出现差异,但是不然,如果又从头开始记录,必然会造成信息的重复。
在linux中,我们有文件专门记录日志的编号:
cat /root/.sincedb_452905a167cf4509fd08acb964fdb20c
913943 0 64768 32581
ls -i /var/log/messages
913943 /var/log/messages

这两个数字是一样的,最后一个日志表示此时日志的位置为32581,当我们在日志中接着写点东西的时候,该数字会发生变化,即表示下次记录的时候从此位置开始
logger cat
cat .sincedb_452905a167cf4509fd08acb964fdb20c (该文件不发生变更,是不会重复读的)
913943 0 64768 32751
9.利用filter使httpd的日志按照规定格式输出:
1.编辑一个处理httpd日志的文件test.conf
vim test.conf
input {
        stdin {}       # 输入是终端标准输入
}
filter {
        grok {
                match => { "message" => "%IP:client} %{WORD:method} %{URIPATHPARAM:request} %{NUMBER:bytes} %{NUMBER:duration}" }
                # 利用filter对输入的数据进行过滤,转换为指定格式指定
        }
}

output {
        stdout {
                codec => rubydebug    # 标准终端输出
        }
}
在终端中
/opt/logstash/bin/logstash -f /etc/logstash/conf.d/test.conf
172.25.1.2  GET /index.html  15888 0.043     # 标准输入
2.引用系统中的变量对httpd服务的输出日志进行处理,按照指定格式输出
vim message.conf
input {
        file {
                path => ["/var/log/httpd/access_log","/var/log/httpd/error_log"]    # 日志文件所在的位置
                start_position => "beginning"   # 开始同步的位置=>文件开始处
        }
}

filter {
        grok {
                match => { "message" => "%{COMBINEDAPACHELOG}" }
                # 引用变量COMBINEDAPACHELOG
        }

}


output {
        elasticsearch {
                hosts => ["172.25.1.1"]
                index => "apache-%{+YYYY.MM.dd}"
        }

        stdout {
                codec => rubydebug
        }
}
3.在httpd的默认发布目录写默认发布文件,在主配置文件中可以看到默认的日志输出格式


引用变量的位置在
/opt/logstash/vendor/bundle/jruby/1.9/gems/logstash-patterns-core-2.0.5/patterns/
vim grok-patterns

在终端执行输出:

四.在server3上安装kibana
Kibana是一个开源的分析与可视化平台,设计出来用于和Elasticsearch一起使用的
1.安装rpm包
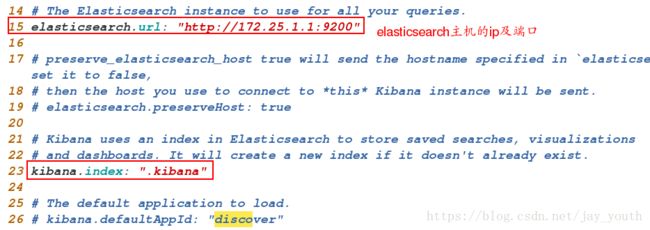
rpm -ivh kibana-4.5.1-1.x86_64.rpm2.编辑其主配置文件,写
cd /opt/kibana/config/
vim kibana.yml/etc/init.d/kibana start
netstat -antlp五.ELK日志分析工具之间的解耦
思路:从nginx的日志文件中得到数据放在logstash中,由logstash将数据存在redis中,再由logstash将数据从redis中拿出来交给kibana,这样下来,数据经过redis,保证了数据的安全性也使得logstash和kibana之间得数据不是直接关联,降低了耦合性。
(一).基本服务的配置
1.在server1上安装nginx
rpm -ivh nginx-1.8.0-1.el6.ngx.x86_64.rpm2.在server2上安装redis
tar zxf redis-3.0.6.tar.gz
cd redis-3.0.6
make                # 来一波简单的源码编译
make install
3.打开redis
cd /root/redis-3.0.6/src/utils/
./install_server.sh
查看redis的端口netstat -antlp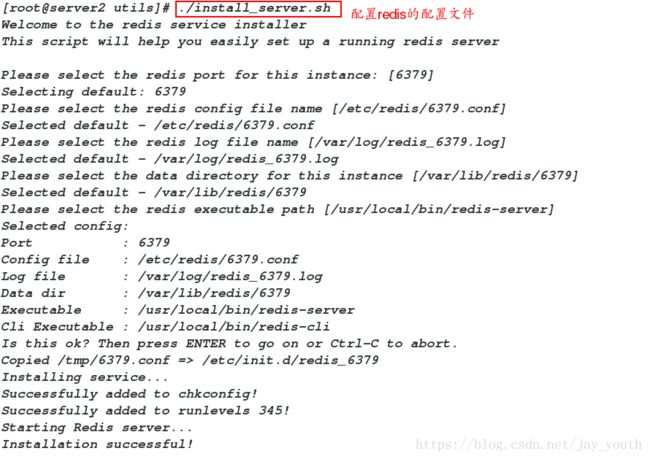
(二).nginx的安装
1.在server1上安装nginx
rpm -ivh nginx-1.8.0-1.el6.ngx.x86_64.rpm2.查看nginx的日志格式,nginx的配置文件
cd /etc/nginx/
vim nginx.confcd /opt/logstash/vendor/bundle/jruby/1.9/gems/logstash-patterns-core-2.0.5/patterns/
vim grok-patterns4.编辑nginx.conf来对nginx的日志做处理
vim nginx.conf
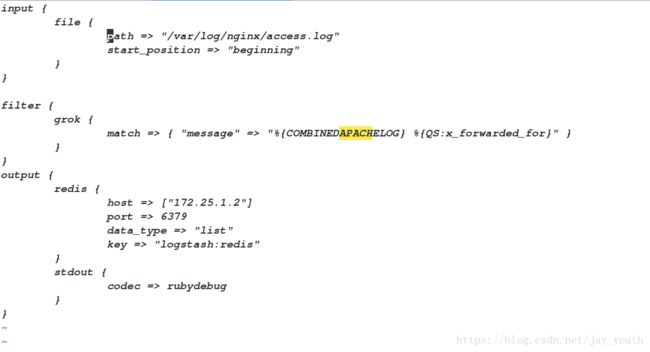
input {
        file {
                path => "/var/log/nginx/access.log"  # nginx的日志
                start_position => "beginning"
        }
}

filter {
        grok {
                match => { "message" => "%{COMBINEDAPACHELOG} %{QS:x_forwarded_for}" }     # 在apache日志的前提下再加上自己的日志输出
        }
}
output {
        redis {
                host => ["172.25.1.2"]
                port => 6379    # 输出到server2的redis端口
                data_type => "list"   # 在redis中以列表形式存储
                key => "logstash:redis"  # 定义列表形式的键值对
        }
        stdout {
                codec => rubydebug
        }
}chmod 644 /var/log/nginx/access.log # 保证对所有用户可写5.在终端执行处理nginx日志的文件
/opt/logstash/bin/logstash -f /etc/logstash/conf.d/nginx.conf6.在物理机进行压测ab -c 1 -n 10 http://172.25.1.1/index.html在server1上看日志输出
(三).在server2上安装noarch
rpm -ivh logstash-2.3.3-1.noarch.rpm
cd /etc/logstash/conf.d/
vim es.conf
input {
    redis {   # 从redis中拿数据
        host => "172.25.1.2"
                port => 6379
                data_type => "list"
                key => "logstash:redis"       # 格式和上边的保持一致
    }
}

output {
    elasticsearch {                      # 输出是将数据输出到elasticsearch中
                hosts => ["172.25.1.1"]
                index => "nginx-%{+YYYY.MM.dd}"
        }
}
/opt/logstash/bin/logstash -f /etc/logstash/conf.d/es.conf
(四).在server3上配置kibana对获得的数据进行分析
选择要创建视图的项目:
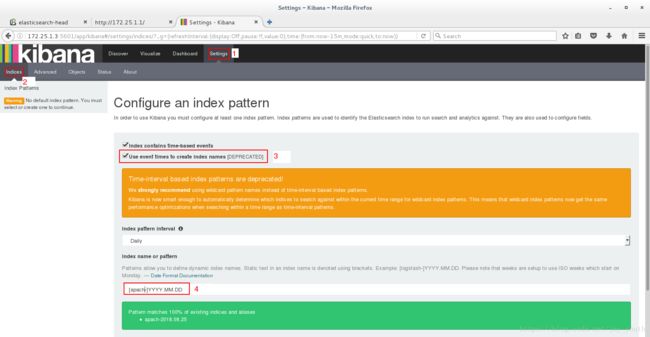
创建反映信息的试图:
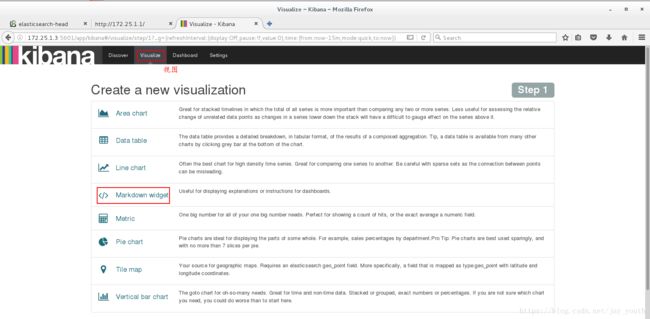
创建联系人或者时间(根据需要选择)
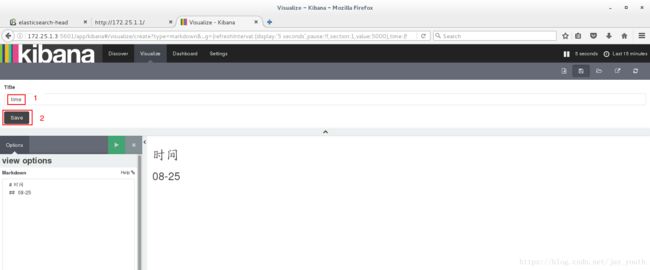
将创建的视图添加到视图框中:


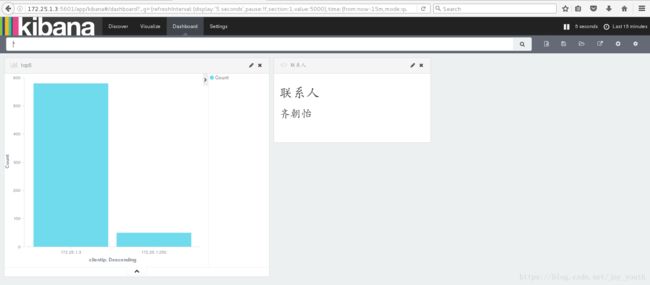
根据自己的需要添加相应的模块来对数据进行分析,最终展现出来:
