成为Android高级工程师——你所要知道的那些“原理”
日常编程中,我们一定用到各种数据结构、第三方框架等。通常我们只需要知道这些轮子有什么用、如何用就可以了,但要达到高级工程师、资深工程师的档次,就一定会涉及到“原理”问题,无论是从造轮子还是解决疑难杂症的考虑,公司一定都会希望他们花了高价聘请的“高级”人才,具有原理知识。下面我就列举一些常见的“原理”,供大家参考。
一、Handler实现原理
或许,这是被问到最多一个原理吧。
Handler是Android用于线程与线程间通信的一套机制。通常被拿来在子线程完成耗时操作后,与主线程通信更新UI的操作。
Handler实现原理依赖Message\MessageQueue\Looper这三者。
1、Message:消息对象。实例化的最好方式是使用Message.obtain或者Handler.obtainMessage从对象池中获取message实例。
2、MessageQueue:消息队列。存放message的集合,并由Looper实例来分发里面的消息对象。
3、Looper:消息循环。通过Looper.prepare()获取一个消息循环,并通过调用Looper.loop方法无限循环获取并分发MessageQueue中的消息。(Tip:如果在主线程中创建handler实例,是不需要调用prepare、loop方法的,因为ActivityThread创建时就已经初始化了Looper)。
实现流程:Handle通过sendMessage或者post方法把Message发送到MessageQueue中,Looper通过MessageQueue的next方法获取消息并分发,如果通过post发送的,则执行callback回调,如果通过send发送的,则执行重写的handMessage方法。
二、HashMap内部原理
hashMap应该是考察java数据结构中最常被问到的一种数据类型。
数据结构中有数组和链表来实现对数据对存储,这两者是两个极端。数组存储区间是连续的,占用内存严重,但查询效率高;而链表存储区间是离散的,占用内存较小,但时间复杂度高,查询复杂。
有没有结合两者特性,既寻址容易、也插入删除简单的数据结构呢?答案是“有”,哈希表(Hash table)。哈希表最常用的一种实现方式是——拉链法,可以把它看作“链表的数组”。
Hashmap存储数据的容器也是一个线性数组,它具有一个静态内部类Node,数据结构如下:
static class Node implements Map.Entry {
        final int hash; //对Key计算的hash值
        final K key; //Key
        V value; //value
        Node next; //链表指向的下一个Node
}
存储时:
int index = (length - 1) & hash(key); // hash值与Node长度取模,得到数组下标
Node[index] = value;
取值时:
int index = (length - 1) & hash(key); // hash值与Node长度取模,得到数组下标
return Node[index];
其中的hash方法在java8中实现如下:
static final int hash(Object key) {
        int h;
        return (key == null) ? 0 : (h = key.hashCode()) ^ (h >>> 16);
}这个“扰动”函数的价值是:将hash值右移16位(刚好32bit的一半),然后让自身的上半区与下半区做“亦或”操作,为的是加大低位的随机性,再与Node长度取模,做为下标,可以有效减少碰撞次数。
 (图:扰动函数)
那么,两个key的hash值取模得到相同的index,会不会把前一个node覆盖呢?
这里就用到了hashmap的链式结构了,Node里面有一个next属性,指向下一个Node。例如,进来一个键值对A,对keyhash取模得到index=0,则Node[0]=A,有进来一个键值对B,得到对index也为0,hashmap这样处理,B.next=A,Node[0]=B,这时又进来一个C,同样index=0,则C.next=B,Node[0]=C。我们发现 数组中总是存放最新的一个Node元素
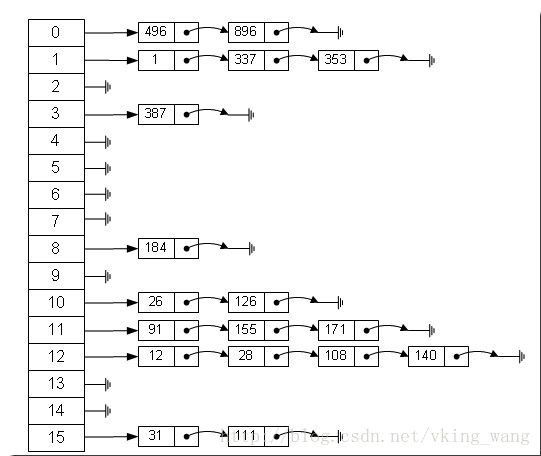 (图:数组的链表)
HashMap是如何根据Key取出value的呢? 我们看一段代码
public V get(Object key) {
        int hash = hash(key.hashCode());
        //先定位到数组元素,再遍历该元素处的链表
        Node[] tab; Node first, e; int n; K k;
        if ((tab = table) != null && (n = tab.length) > 0 && (first = tab[(n - 1) & hash]) != null) {
            if (first.hash == hash && ((k = first.key) == key || (key != null && key.equals(k))))
                return first;
            if ((e = first.next) != null) {
                do {
                    if (e.hash == hash &&((k = e. key) == key || (key != null && key.equals(k))))
                        return e;
                } while ((e = e.next) != null);
            }
        }
        return null;
}
三、ButterKnife实现原理
大部分Android开发应该都知道@JakeWharton 大神的ButterKnife注解库,使用这个库我们可以不用写很多无聊的findViewById()和setOnClickListener()等代码。那么这个库是如何实现的呢?
可能很多人都觉得ButterKnife在bind(this)方法执行的时候通过反射获取Activity中所有的带有@Bind注解的属性并且获得注解中的R.id.xxx值,然后通过反射拿到Activity.findViewById()方法获取View。这是一个注解库的原始实现方式,很大的缺点就是在Activity运行时大量使用反射会影响App的运行性能,造成卡顿以及生成很多临时Java对象更容易触发GC。
ButterKnife显然没有使用这种方式,它用了Java Annotation Processing技术,就是在Java代码编译成Java字节码的时候就已经处理了@Bind、@OnClick(ButterKnife还支持很多其他的注解)这些注解了。
Java Annotation Processing
用于编译时扫描和解析Java注解的工具 ,你可以你定义注解,并且自己定义解析器来处理它们。
Annotation processing是在编译阶段执行的,它的原理就是读入Java源代码,解析注解,然后生成新的Java代码。新生成的Java代码最后被编译成Java字节码。(图:注解解析的过程)

Butterknife工作流程
当你编译你的Android工程时,ButterKnife工程中ButterKnifeProcessor类的process()方法会执行以下操作:
开始它会扫描Java代码中所有的ButterKnife注解@Bind、@OnClick、@OnItemClicked等 ,当它发现一个类中含有注解时,ButterKnifeProcessor会生成一个Java类,名字$ViewBinder,这个类实现了ViewBinder接口,这个ViewBinder类中包含了所有对应的代码,比如@Bind注解对应findViewById(), @OnClick对应了view.setOnClickListener()等等。
最后当Activity启动ButterKnife.bind(this)执行时,ButterKnife会去加载对应的ViewBinder类调用它们的bind()方法。
public class ConfirmInfoActivity$$ViewInjector {
    ...
    public static void bind(Finder finder, final com.huicent.ui.ConfirmInfoActivity target, Object source) {
        View view;
        view = finder.findRequiredView(source, 2131297974, "field 'mTvName'");
        target.mTvName = (android.widget.TextView) view;
        view = finder.findRequiredView(source, 2131297526, "field 'mFlightType'");
        target.mFlightType = (android.widget.TextView) view;
        view = finder.findRequiredView(source, 2131296512, "field 'mChangeBtn' and method 'onClick'");
        target.mChangeBtn = (android.widget.Button) view;
        view.setOnClickListener(
          new android.view.View.OnClickListener() {
            @Override public void onClick(
              android.view.View p0
            ) {
              target.onClick(p0);
            }
          });
        ...
    }
在上面的过程中可以看到,为什么你用@Bind、@OnClick等注解标注的属性或方法必须是public或protected的。因为ButterKnife是通过target.this.editText来注入View的
为什么要这样呢?答案就是性能。如果你把View设置成private,那么框架必须通过反射来注入View,不管现在手机的CPU处理器变得多快,如果有些操作会影响性能,那么是肯定要避免的,这就是ButterKnife与其他注入框架的不同。Butterknife对性能到底有没有影响?
对于使用ButterKnife注解的类,都会生成实现ViewBinder接口名称原类名+$$ViewBinder的相应辅助类。这个过程处于编译期间,也就是我们APT在编译时处理注解生成的。由此可知,对运行时的性能,这个阶段是没有影响的。
编译期生成的辅助类,想要完成绑定View,还需要一个bind的过程。源码如下:
String clsName = cls.getName();
            if(!clsName.startsWith("android.") && !clsName.startsWith("java.")) {
                try {
                    Class injector = Class.forName(clsName + "$$ViewInjector");
                    inject = injector.getMethod("inject", new Class[]{ButterKnife.Finder.class, cls, Object.class});
                    if(debug) {
                        Log.d("ButterKnife", "HIT: Class loaded injection class.");
                    }
                } catch (ClassNotFoundException var4) {
                    if(debug) {
                        Log.d("ButterKnife", "Not found. Trying superclass " + cls.getSuperclass().getName());
                    }

                    inject = findInjectorForClass(cls.getSuperclass());
                }

                INJECTORS.put(cls, inject);
                return inject;
            } else {
                if(debug) {
                    Log.d("ButterKnife", "MISS: Reached framework class. Abandoning search.");
                }

                return NO_OP;
}通过原理分析,结论显而易见。ButterKnife对性能有一定的影响,并且引入了更多的类和方法,增加了安装包的大小。但是,对开发效率的提升也是显而易见的,尤其是配合AS插件的使用。
四、Volley工作原理
Volley 是 Google 推出的轻量级 Android 异步网络请求框架和图片加载框架。在 Google I/O 2013 大会上发布。其适用场景是数据量小,通信频繁的网络操作。
我们知道,把一个Request add进RequestQueue后,Volley就开始工作了,那么Volley是如何工作的?且让我们从头分析。
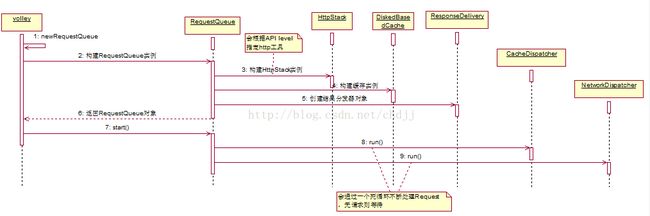
1 - 请求队列(RequestQueue)的创建
创建请求队列的工作是从Volley.newRequestQueue开始的,这个方法内部会调用RequestQueue的构造器,同时指定一些基本配置,如缓存策略为硬盘缓存(DiskBasedCache),http请求方式为HttpURLConnection(level>9)和HttpClient(level<9),默认线程池大小(4)。最后,调用RequestQueue#start启动请求队列。
//volley.java
public static RequestQueue newRequestQueue(Context context, HttpStack stack) {
        File cacheDir = new File(context.getCacheDir(), DEFAULT_CACHE_DIR);
          ... ...
        if (stack == null) {
            if (Build.VERSION.SDK_INT >= 9) {
                stack = new HurlStack();
            } else {
                // Prior to Gingerbread, HttpUrlConnection was unreliable.
                // See: http://android-developers.blogspot.com/2011/09/androids-http-clients.html
                stack = new HttpClientStack(AndroidHttpClient.newInstance(userAgent));
            }
        }
        Network network = new BasicNetwork(stack);
        RequestQueue queue = new RequestQueue(new DiskBasedCache(cacheDir), network);
        queue.start();
        return queue;
    }
我们来看看RequestQueue的构造器
public RequestQueue(Cache cache, Network network, int threadPoolSize,
            ResponseDelivery delivery) {
        mCache = cache;
        mNetwork = network;
        mDispatchers = new NetworkDispatcher[threadPoolSize]; //默认线程池大小为4
        mDelivery = delivery; //结果分发器 new ExecutorDelivery(new Handler(Looper.getMainLooper())) 将结果返回给主线程(根据代码中使用了Handler和UI线程的Looper大家就应该能猜到了),并处理回调事件。
    }
RequestQueue的start方法执行了什么
public void start() {
        stop();  // Make sure any currently running dispatchers are stopped.
        // Create the cache dispatcher and start it.
        mCacheDispatcher = new CacheDispatcher(mCacheQueue, mNetworkQueue, mCache, mDelivery);
        mCacheDispatcher.start();
        // Create network dispatchers (and corresponding threads) up to the pool size.
        for (int i = 0; i < mDispatchers.length; i++) {
            NetworkDispatcher networkDispatcher = new NetworkDispatcher(mNetworkQueue, mNetwork,
                    mCache, mDelivery);
            mDispatchers[i] = networkDispatcher;
            networkDispatcher.start();
        }
    }
逻辑很简单,创建了CacheDispatcher和4个NetworkDispatcher个对象,然后分别启动之。这个CacheDispatcher和NetworkDispatcher都是Thread的子类,其中CacheDispatcher处理走缓存的请求,而4个NetworkDispatcher处理走网络的请求。到此,RequestQueue任务完成了,后面的工作就交由dispatch处理。图:RequestQueue的创建
2 - 请求的添加(RequestQueue.add)
步骤如下:(1)将Request加入mCurrentRequests集合 (2)为请求加上序号 (3)判断是否需要缓存请求,如果不需要,直接加入网络请求队列 (4)如果有相同请求正在处理,则加入到相同请求的等待队列中,否则加入缓存队列。
public Request add(Request request) {
        // Tag the request as belonging to this queue and add it to the set of current requests.
        request.setRequestQueue(this);
        synchronized (mCurrentRequests) {
            mCurrentRequests.add(request);
        }
        // Process requests in the order they are added.
        request.setSequence(getSequenceNumber());
        request.addMarker("add-to-queue");
        // If the request is uncacheable, skip the cache queue and go straight to the network.
        if (!request.shouldCache()) {
            mNetworkQueue.add(request);
            return request;
        }
        // Insert request into stage if there's already a request with the same cache key in flight.
        synchronized (mWaitingRequests) {
            String cacheKey = request.getCacheKey();
            if (mWaitingRequests.containsKey(cacheKey)) {
                // There is already a request in flight. Queue up.
                Queue stagedRequests = mWaitingRequests.get(cacheKey);
                if (stagedRequests == null) {
                    stagedRequests = new LinkedList();
                }
                stagedRequests.add(request);
                mWaitingRequests.put(cacheKey, stagedRequests);
                if (VolleyLog.DEBUG) {
                    VolleyLog.v("Request for cacheKey=%s is in flight, putting on hold.", cacheKey);
                }
            } else {
                // Insert 'null' queue for this cacheKey, indicating there is now a request in
                // flight.
                mWaitingRequests.put(cacheKey, null);
                mCacheQueue.add(request);
            }
            return request;
        }
    }
3 - 请求的处理
处理Request是通过CacheDispatcher和NetworkDispatcher完成的,他们的run方法通过不断的循环从各自的队列中取出请求,进行处理,交给ResponseDelivery。
CacheDispatcher缓存分发器的run方法,处理过程如下图:
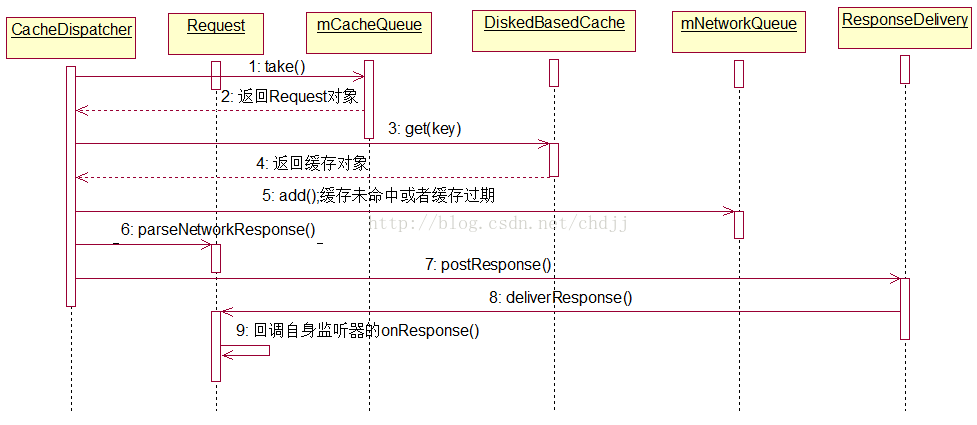
大体逻辑是这样的,首先从队列中取出请求,看其是否已被取消,若是则返回,否则继续向下走。接着从硬盘缓存中通过缓存的键找到值(Cache.Entry),如果找不到或者过期了,那么将此请求加入网络请求队列。如果没有过期,那么通过request.parseNetworkResponse方法将硬盘缓存中的数据封装成Response对象。最后进行新鲜度判断,如果不需要刷新,那么调用ResponseDelivery结果分发器的postResponse分发结果。否则先将结果返回,再将请求交给网络请求队列进行刷新。
NetworkDispatcher实现逻辑如下:

4 - 结果的分发与处理
请求结果的分发处理是由ResponseDelivery实现类ExecutorDelivery完成的,ExecutorDelivery是在RequestQueue的构造器中被创建的,并且绑定了UI线程的Looper。
public RequestQueue(Cache cache, Network network, int threadPoolSize) {
        this(cache, network, threadPoolSize,
                new ExecutorDelivery(new Handler(Looper.getMainLooper())));
    }
ExecutorDelivery内部有个自定义Executor,它仅仅是封装了Handler,所有待分发的结果最终会通过handler.post方法交给UI线程。
public ExecutorDelivery(final Handler handler) {
        // Make an Executor that just wraps the handler.
        mResponsePoster = new Executor() {
            @Override
            public void execute(Runnable command) {
                handler.post(command);
            }
        };
    }
执行结果分发的是ResponseDeliveryRunnable,我们看看其源码:
private class ResponseDeliveryRunnable implements Runnable {
        private final Request mRequest;
        private final Response mResponse;
        private final Runnable mRunnable;
        public ResponseDeliveryRunnable(Request request, Response response, Runnable runnable) {
            mRequest = request;
            mResponse = response;
            mRunnable = runnable;
        }
        @SuppressWarnings("unchecked")
        @Override
        public void run() {
            // If this request has canceled, finish it and don't deliver.
            if (mRequest.isCanceled()) {
                mRequest.finish("canceled-at-delivery");
                return;
            }
            // Deliver a normal response or error, depending.
            if (mResponse.isSuccess()) {
                mRequest.deliverResponse(mResponse.result);
            } else {
                mRequest.deliverError(mResponse.error);
            }
            // If this is an intermediate response, add a marker, otherwise we're done
            // and the request can be finished.
            if (mResponse.intermediate) {
                mRequest.addMarker("intermediate-response");
            } else {
                mRequest.finish("done");
            }
            // If we have been provided a post-delivery runnable, run it.
            if (mRunnable != null) {
                mRunnable.run();
            }
       }
}
这里我们看到了request.deliverResponse被调用了,这个方法通常会回调Listener.onResponse。
到这里,整个volley框架的主线就结束了!!
最后,贴上一幅图概括了整个volley框架的结构组成。

五、OkHttp原理
OkHttp是一个高效的HTTP库,它与Volley的工作流程非常相似,总体设计图如下:

通过Diapatcher不断从RequestQueue中取出请求(Call),根据是否已缓存调用Cache或 Network这两类数据获取接口之一,从内存缓存或是服务器取得请求的数据。该引擎有同步和异步请求,同步请求通过Call.execute()直接返 回当前的Response,而异步请求会把当前的请求Call.enqueue添加(AsyncCall)到请求队列中,并通过回调(Callback) 的方式来获取最后结果。