快速入门深度学习——Tensorflow
前言:近几年AI、神经网络、深度学习这些词语频繁出现,我发现相关的文章已经几乎看不懂了,感觉到了不学就会落伍的地步了。带着这种危机感,趁着工作上能接触到深度学习,我也开始学习起来了。
环境搭建
- Mac和Pc都可以使用
- IDE使用 PyCharm
- Python版本 3.6.8(之前使用3.7版本,发现无法安装TensorFlow)
python 3.7版本安装TensorFlow 会有下面的提示,需要切换到3.6或者其他版本
Could not find a version that satisfies the requirement tensorflow (from versions: )
No matching distribution found for tensorflow
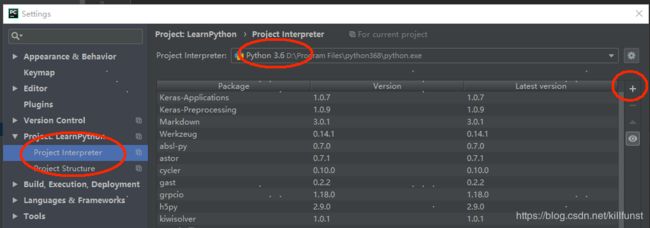
- PyCharm里选择"Project Interpreter",选择Python 3.6,点击“+”添加库
- 搜索"tensoflow",点击安装

- 测试TensorFlow环境是否安装成功
from __future__ import absolute_import, division, print_function
import tensorflow as tf
from tensorflow import keras

# 输出TensorFlow版本号
print(tf.__version__)
能输出TensorFlow的版本号即表示环境没问题了
代码
下面官网介绍的demo:
加载素材库
fashion_mnist = keras.datasets.fashion_mnist
(train_images, train_labels), (test_images, test_labels) = fashion_mnist.load_data()
定义数字对应的物品名称
class_names = ['T-shirt/top', 'Trouser', 'Pullover', 'Dress', 'Coat',
               'Sandal', 'Shirt', 'Sneaker', 'Bag', 'Ankle boot']
适配tensorflow的数据格式
train_images = train_images / 255.0
test_images = test_images / 255.0
def create_model():
    model = tf.keras.models.Sequential([
        keras.layers.Flatten(input_shape=(28, 28)),
        keras.layers.Dense(128, activation=tf.nn.relu),
        keras.layers.Dense(10, activation=tf.nn.softmax)
    ])
    model.compile(optimizer='adam',
                  loss='sparse_categorical_crossentropy',
                  metrics=['accuracy'])
    return model
开始训练模型
model.fit(train_images, train_labels,  epochs = 10,
           validation_data = (test_images,test_labels))
评估模型精确度
loss,acc = model.evaluate(test_images, test_labels)
print("Restored model, accuracy: {:5.2f}%".format(100*acc))
保存模型,下次就可以跳过训练模型这一步
model.save('my_model.h5')
读取之前训练好的模型
model = keras.models.load_model('my_model.h5')
使用模型进行预测
predictions = model.predict(test_images)
# 输出第一个图片的预测结果
# print(np.argmax(predictions[0]))
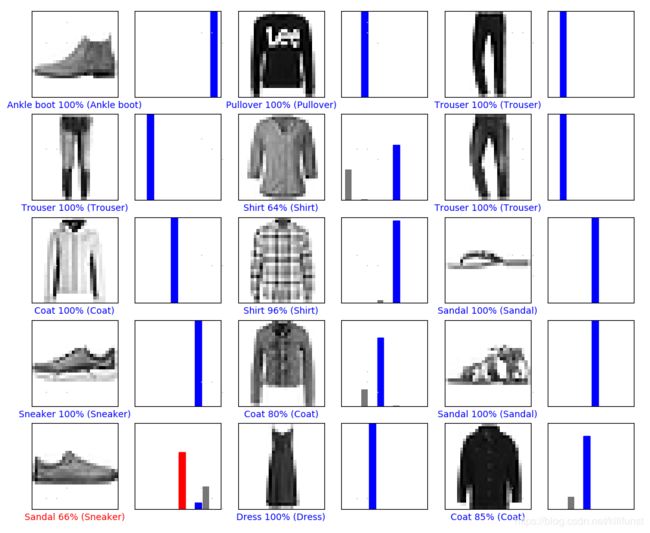
绘制所有结果
import numpy as np
import matplotlib.pyplot as plt
def plot_image(i, predictions_array, true_label, img):
    predictions_array, true_label, img = predictions_array[i], true_label[i], img[i]
    plt.grid(False)
    plt.xticks([])
    plt.yticks([])

    plt.imshow(img, cmap=plt.cm.binary)

    predicted_label = np.argmax(predictions_array)
    if predicted_label == true_label:
        color = 'blue'
    else:
        color = 'red'

    plt.xlabel("{} {:2.0f}% ({})".format(class_names[predicted_label],
                                         100 * np.max(predictions_array),
                                         class_names[true_label]),
               color=color)


def plot_value_array(i, predictions_array, true_label):
    predictions_array, true_label = predictions_array[i], true_label[i]
    plt.grid(False)
    plt.xticks([])
    plt.yticks([])
    thisplot = plt.bar(range(10), predictions_array, color="#777777")
    plt.ylim([0, 1])
    predicted_label = np.argmax(predictions_array)

    thisplot[predicted_label].set_color('red')
    thisplot[true_label].set_color('blue')

num_rows = 5
num_cols = 3
num_images = num_rows*num_cols
plt.figure(figsize=(2*2*num_cols, 2*num_rows))
for i in range(num_images):
  plt.subplot(num_rows, 2*num_cols, 2*i+1)
  plot_image(i, predictions, test_labels, test_images)
  plt.subplot(num_rows, 2*num_cols, 2*i+2)
  plot_value_array(i, predictions, test_labels)

plt.show()